| KIT: | Pacific Coast Hobbies 1/32 Macch C.200 |
| KIT #: | 3201 |
| PRICE: | $46.952 MSRP |
| DECALS: | Six options |
| REVIEWER: | Tom Cleaver |
| NOTES: |
| HISTORY |
During the Second World War, Italian aircraft were subjected to distorted propaganda that played on the fact the Italians were using aircraft that did not look as aerodynamically advanced as did the aircraft being used by the Allies. The Italian air industry was hobbled by older production techniques, and by the need to meet design specifications issued by an overly‑ conservative Regia Aeronautica, and to cater to the extreme conservatism of Italian combat pilots when it came to such questions as the supremacy of the monoplane over the biplane, the need for enclosed cockpits, the need for a heavy armament, and other things considered de rigeur in the aeronautical state of the art. It didn't help that the Italian aircraft industry had nothing like the Merlin or Daimler‑Benz series of in‑line engines, or the high‑powered radials created by Pratt & Whitney.
 That said, just about everything anyone "knows" about Italian aircraft from
reading non‑Italian sources is false, due to the "hang‑over" created by
Second World War propaganda. A prime example of this is the Macchi‑Castoldi
series of fighters, and particularly the progenitor of the series, the
C.200 Saetta (which can be translated as both “Lightning Bolt”
or“Arrow” ‑ the weapons of Jupiter).
That said, just about everything anyone "knows" about Italian aircraft from
reading non‑Italian sources is false, due to the "hang‑over" created by
Second World War propaganda. A prime example of this is the Macchi‑Castoldi
series of fighters, and particularly the progenitor of the series, the
C.200 Saetta (which can be translated as both “Lightning Bolt”
or“Arrow” ‑ the weapons of Jupiter).
The Castoldi fighters had a similar background and pedigree to that of Reginald J. Mitchell's Spitfire, since Mario Castoldi was his sharpest competitor in the creation of high speed seaplanes for the Schneider Cup Trophy competition that lasted from 1920 to 1931. Castoldi's racers had been top competitors, with the M.39 winning the 1926 Schneider competition, and the M.C.72 going on in 1933 to beat the record of the Supermarine S.6B by setting a world air speed record of 423.82 m.p.h. Unfortunately, the problems in engine development that had kept the M.C.72 from beating the S.6B to win the Schneider Cup outright would also dog the development of Castoldi's fighters.
The Schneider influence on the C.200 was not so apparent upon its rollout, since the best engine the Italians had available was the Fiat A.74 R.C.38, a magnificent powerplant derived from Gnome‑Rhone designs, but capable of only 870 h.p. Another stumbling block was the insistence by the Air Force that the best possible field of view for the pilot was paramount before aerodynamic cleanliness. The result was an airplane with a bulky, drag‑producing radial in a poorly‑designed cowling, matched to a humped‑back fuselage that completely eradicated all evidence of the fighter's racer lineage.
 Flight trials following first flight on December 24, 1937, revealed the
C.200 was singularly maneuverable, with exceptionally well‑harmonized
controls and no vices. One remarkable bit of aerodynamic sleight-of-hand
was the asymmetric wing, in which the left wing was longer than the right,
which effectively canceled engine torque and added to the airplane's
maneuverability. Like all other Italian fighters, it was lightly armed in
comparison with its contemporaries, carrying only two .50 caliber machine
guns with 370 rounds per gun.
Flight trials following first flight on December 24, 1937, revealed the
C.200 was singularly maneuverable, with exceptionally well‑harmonized
controls and no vices. One remarkable bit of aerodynamic sleight-of-hand
was the asymmetric wing, in which the left wing was longer than the right,
which effectively canceled engine torque and added to the airplane's
maneuverability. Like all other Italian fighters, it was lightly armed in
comparison with its contemporaries, carrying only two .50 caliber machine
guns with 370 rounds per gun.
The conservative pilots of the Italian fighter arm disliked the sliding canopy. The C.R.42‑equipped 4 Stormo refused to take the first C.200s because the monoplane ‑ as maneuverable as it was ‑ was less so than their biplanes. The pilots of 1 Stormo, who had flown the C.R.32 in the Spanish Civil War, were most anxious to convert to the C.200 since their experiences over Spain had convinced them the day of the biplane was over.
The C.200 did not see combat until June 1940, when the aircraft of the
6 Gruppo Autonomo in Sicily provided escort to S.79 Sparvieros
bombing Malta. When faced by the Hawker Hurricane, it was shown that while
they were both of similar performance, the C.200 had a considerably better
climb rate and could out‑turn and out‑dive the British fighter, as well as
having an equal ability to absorb punishment. In March 1941,Saettas
of the 150 Gruppo entered combat over Greece while the C.200s of the
374 Squadriglia arrived in Libya, followed shortly by the similarly‑
equipped 153 Gruppo. That summer, the
 Corpo di Spedizio Italiano
was formed for operations in the Soviet Union, with a fighter element
equipped with 59 Saettas of the 22 Gruppo.
Corpo di Spedizio Italiano
was formed for operations in the Soviet Union, with a fighter element
equipped with 59 Saettas of the 22 Gruppo.
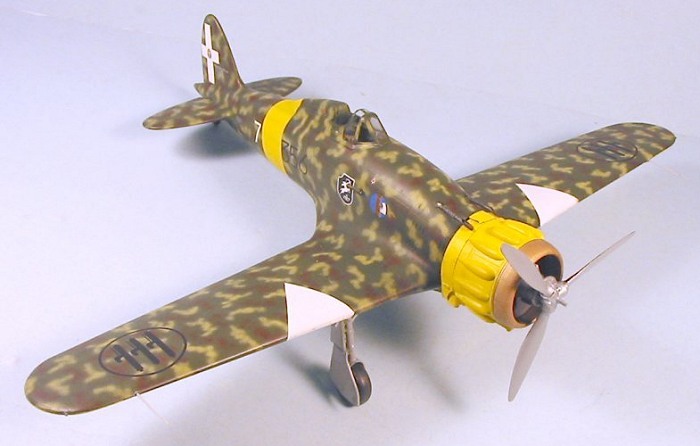
While Allied propaganda made fun of the way the C.200 looked, Allied fighter pilots found it a worthy opponent in the hands of a skilled pilot, and accorded it respect. A standard C.200 weighing 5,121 pounds attained a maximum speed of 312 mph at 14,759 ft., while an altitude of 3,280 ft. was attained in 1 minute, 3 seconds, a very creditable climb performance. Service ceiling was 29,200 feet, and normal range was 354 miles. C.200s were among the Italian fighters that joined the Co‑Belligerent Air Force after the Italian surrender in September 1943, and the airplane served to the end of the war.
| THE KIT |
I am not
aware of any other 1/32 scale C.200 models, though some odd vacuform may
have slipped under the radar back when I did not build in this scale.
(I'll mention again the very nice, but more expensive resin kit by
Craftworks in this scale. Ed) This kit by Pacific Coast Models is the first
injection-molded kit of the Saetta in this scale, and it is
excellent. The 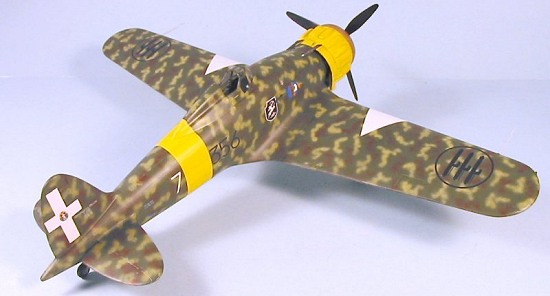 model was reviewed by Maurizio Di Terlizzi - who some call
“Mr. Macchi” - for dimensions and accuracy, and passed his inspection with
flying colors. It depicts the Serie VII version, which was the main
production model.
model was reviewed by Maurizio Di Terlizzi - who some call
“Mr. Macchi” - for dimensions and accuracy, and passed his inspection with
flying colors. It depicts the Serie VII version, which was the main
production model.
The injection-molded plastic parts and the resin detail parts are made by MPM, and they are fully up to that company’s recent standards with petite engraved detail and very realistic fabric detail on the control surfaces. The resin parts are crisply molded and include a really stunning one-piece cowling, a real example of the mold-maker’s art with all the bumps and curves on the original. There are two vacuformed canopies.
Decals are by Skymodels, and provide markings for no less than six different airplanes, with very nice full-color profiles. These are to the usual standard one has come to expect from this company.
The photo-etch set is done by Eduard.
| CONSTRUCTION |
This kit is basically the 1/48 kit scaled up to 1/32, particularly as regards the production design, and is thus as close to a Tamigawa "slammer" as a limited run kit gets. The parts are mostly flash free and easily cleaned up. The only thing to worry about was to cut off the mold‑release pins on the interior surfaces of the wings and fuselage and horizontal stabilizers, but there is no difficulty with that.
I made the mistake of deciding to do the kit in two sub-assemblies - fuselage and wing, which ended up giving me fits to get the two together, since there are all the engine mounts that attach to the firewall, which is part of the main spar attached to the wing. The kit instructions suggest that you build the fuselage first, assembling the firewall with engine mounts into it before gluing the fuselage halves together. This is much simpler than what I had to do and is proof of how well done these instructions are. My advice is to “follow the instructions.” I know, I know, it's radical and generally unheard of, but in this case “try it, you'll like it.”
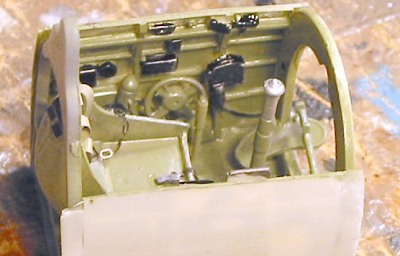
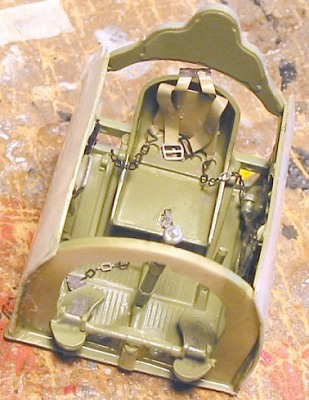 The resin cockpit is beautifully detailed and easy to assemble. I spent
most of my time here painting it, following the detailed painting
instructions. When I sent to assemble the cockpit, I discovered that the
photo-etch instrument panel had not been included with this early-release
review kit (it's there in all the kits now), so I proceeded to use the
plastic panel. This was difficult to fit and when I did get it in it
didn't seem to look as good as I had hoped. The end result was that I
decided to assemble the kit with the canopy closed up - which I think looks
better than it does with the two folding parts hanging down; one can still
see inside the cockpit through the opening. Naturally, two days after I
finished this work and had the cockpit inside the fuselage and the fuselage
all together, I got an envelope in the mail with the missing photo-etch
panel. Examining this, I could see it would solve all the fit problems I
had, so I strongly recommend you build yours with that panel rather than
the injection plastic part. I then painted and detailed the resin cockpit
parts per the kit instructions, and assembled them. The cockpit popped
easily into place inside the fuselage and was fixed in position with CA
glue.
The resin cockpit is beautifully detailed and easy to assemble. I spent
most of my time here painting it, following the detailed painting
instructions. When I sent to assemble the cockpit, I discovered that the
photo-etch instrument panel had not been included with this early-release
review kit (it's there in all the kits now), so I proceeded to use the
plastic panel. This was difficult to fit and when I did get it in it
didn't seem to look as good as I had hoped. The end result was that I
decided to assemble the kit with the canopy closed up - which I think looks
better than it does with the two folding parts hanging down; one can still
see inside the cockpit through the opening. Naturally, two days after I
finished this work and had the cockpit inside the fuselage and the fuselage
all together, I got an envelope in the mail with the missing photo-etch
panel. Examining this, I could see it would solve all the fit problems I
had, so I strongly recommend you build yours with that panel rather than
the injection plastic part. I then painted and detailed the resin cockpit
parts per the kit instructions, and assembled them. The cockpit popped
easily into place inside the fuselage and was fixed in position with CA
glue.
When it came time to glue the fuselage together, I discovered the fuselage halves were mildly warped, to the point I had to wrap the fuselage with rubber bands to hold it in the proper position overnight while the liquid cement set up fully.
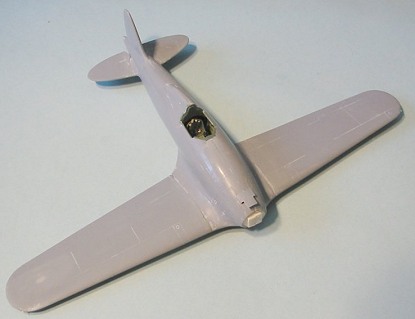 While I had more trouble fitting the wing sub assembly to the fuselage than
I would have had if I had followed the instructions, the two parts went
together nicely, and I only needed some Mr. Surfacer on the various seams
and joints so that they disappeared with light sanding-down.
While I had more trouble fitting the wing sub assembly to the fuselage than
I would have had if I had followed the instructions, the two parts went
together nicely, and I only needed some Mr. Surfacer on the various seams
and joints so that they disappeared with light sanding-down.
I assembled the engine after painting the component parts according to the kit instructions. The engine has separate cylinders, but is well‑designed and goes together without any problem.
I cut the cowling off its molding block, and then cleaned up the too‑thick interior at the rear of the cowling flaps with my Dremel Tool. Be careful here not to get it too thin or it will break under handling. The engine slid easily into the cowling after I had painted the interior of the cowling, and I glued it in position with cyanoacrylate glue. I decided not to attach the cowling and engine to the fuselage until I had painted the model.
| COLORS & MARKINGS |
After “pre-shading” the model with black paint airbrushed along the panel
lines, I painted the fuselage band and the cowling and lower wingtips with
flat white, then with Tamiya Flat Yellow. When
 that was dry I masked off
these areas according to the markings profile. I painted the lower
surfaces with Tamiya “Sky Grey,” and used Tamiya “Olive Green” for the
upper color. I then airbrushed the blotches with Gunze “Middle Stone”
mixed with some “Sail Color” to get the right yellowish/tan shade, and used
Tamiya “Red Brown” for the other blotches. This pattern is different from
the profile instructions in the kit, but is correct according to a photo
and a color profile in the Squadron “Regia Aeronautica” book.
that was dry I masked off
these areas according to the markings profile. I painted the lower
surfaces with Tamiya “Sky Grey,” and used Tamiya “Olive Green” for the
upper color. I then airbrushed the blotches with Gunze “Middle Stone”
mixed with some “Sail Color” to get the right yellowish/tan shade, and used
Tamiya “Red Brown” for the other blotches. This pattern is different from
the profile instructions in the kit, but is correct according to a photo
and a color profile in the Squadron “Regia Aeronautica” book.
Decals:
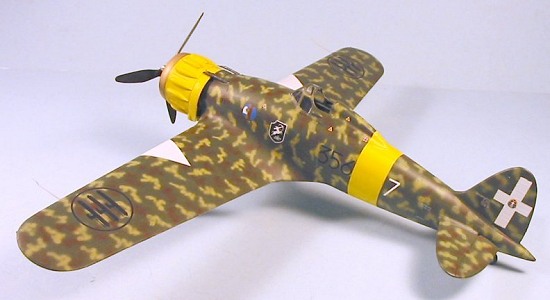
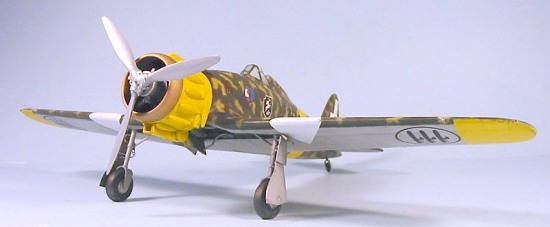
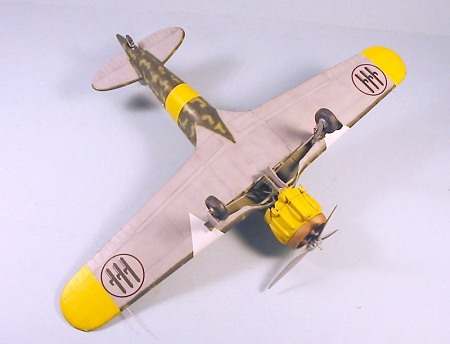
I used the kit decals to do an airplane from the 376th Squadriglia, operating on the Eastern Front with the Corpo Spedizione in the summer of 1942. The decals are excellent and went down with no problem. I used white decal sheet to do the white triangles on the wing which were a regional identification marking for Italian aircraft.
| FINAL CONSTRUCTION |
When the decals were dry, I washed the model to get the setting solution residue off, then gave the model two coats of Xtracrylix Flat Varnish.
 I
had a little trouble assembling the landing gear and the gear doors in the
correct positions, because exact placement of everything is a bit vague in
the instruction sheet. However, Maurizio di Terlizzi is doing a
lavishly-illustrated full-build review, which will be up at the Pacific
Coast Models website, which will answer all questions about these problems.
I
had a little trouble assembling the landing gear and the gear doors in the
correct positions, because exact placement of everything is a bit vague in
the instruction sheet. However, Maurizio di Terlizzi is doing a
lavishly-illustrated full-build review, which will be up at the Pacific
Coast Models website, which will answer all questions about these problems.
With the prop attached and the canopy unmasked, I added a bit of “dinging” to the model and exhaust staining, and considered it finished.
| CONCLUSIONS |
This kit builds up into a really nice model of the C.200 Saetta. In 1/32, it cries out for some super-detailing in the area of the wheel well and the engine mounts. I didn’t have the information to do this, and out of the box the model looks good when completed. However, Maurizio di Terlizzi’s full-build review includes photos of putting in the wiring and other items in the wheel well, and a modeler who follows that will be rewarded with an even better-looking model. The completed model certainly stands positive comparison with the 1/32 Hasegawa Bf-109s and Fw-190s, and it is competitively priced with these kits.
I've always liked the C.200, probably because it is so “clunky-looking.” Highly recommended for those who love Italian airplanes and large-scale models.
June 2005
Thanks to Pacific Coast Models for the review copy. Order yours at www.pacmodels.com
Editor's Note: For those of you who want to get up close and personal with a MC.200, the USAF Museum has one on display.
If you would like your product reviewed fairly and quickly by a site that has around 300,000 visitors a month, please contact me or see other details in the Note to Contributors.