HiPM 1/48 Petalyakov Pe-2
| KIT #: | 48-007 |
| PRICE: | $30.00 on sale |
| DECALS: | Three options |
| REVIEWER: | Jonathan Prestidge |
| NOTES: | Short run |
| HISTORY |
The Petlyakov Pe-2 or “Peshka” (pawn) to its crew, was the most widely used Soviet twin-engine bomber of the Second World War. The Pe-2, with its excellent speed, operated in both level and dive bomber roles. This aircraft, along with the IL-2, formed the backbone of the Soviet tactical Air Forces during World War II. There were many versions of this prolific bomber and it went on to serve in most Soviet Bloc nations after the war.
Vladimir M. Petlyakov designed the VI-100 heavy, high-altitude fighter at the end of the 1930s. Petlyakov had worked at TsAGI (the U.S.S.R.’s national aerodynamic and hydrodynamic research center) since 1921. He was imprisoned in the Stalinist purges of 1937 and designed the VI-100 from the special prison at aircraft factory No. 156. The VI-100 was a “clean-sheet” design and was one of the most advanced aircraft in the world at the time. It featured a stressed-skin metal structure, constant-speed propellers, and superbly clean aerodynamics with the radiators mounted inside the wings. The louvered radiator outlets on top of the wings actually provided forward thrust!
 In response to changes in requirements from the
Soviet Air Force (VVS), Petlyakov redesigned the VI-100 as a fast,
twin-engine bomber. The prototype of this new bomber was called the PB-100
and differed from the VI-100 in many respects. Aside from the bomb bays and
ordinance hard points, fence type dive brakes were fitted, a new two-place
cockpit for the pilot and navigator/bombardier was added, and a station for
a radio operator/rear gunner was installed in the rear fuselage.
In response to changes in requirements from the
Soviet Air Force (VVS), Petlyakov redesigned the VI-100 as a fast,
twin-engine bomber. The prototype of this new bomber was called the PB-100
and differed from the VI-100 in many respects. Aside from the bomb bays and
ordinance hard points, fence type dive brakes were fitted, a new two-place
cockpit for the pilot and navigator/bombardier was added, and a station for
a radio operator/rear gunner was installed in the rear fuselage.
The first versions of the Pe-2 (renamed in honor of its designer) went into full production during 1941. For his service designing the Pe-2, Petlyakov was released from prison in January 1941 and later awarded the Stalin Prize. Sadly, Vladimir M. Petlyakov was killed in January of 1942 when the Pe-2 he was flying in caught fire and crashed.
The early model of the Pe-2 (the subject of this kit) was powered by VK-105RA engines rated at 1,100 hp each. Defensive armament consisted of two pilot aimed, forward-firing 0.3 in (7.62 mm) ShKAS machine-guns in the nose, another ShKAS machine-gun on a flexible mount in the rear part of the cockpit, and a fourth ShKAS machine-gun fired from one of three positions in the rear fuselage. Internal bombload was either four FAB-250 (551 lb/250 kg) bombs carried in the main bay or six FAB-100 (220 lb/100 kg), two of which were carried in small bays in the rear of the engine nacelles. Externally, the Pe-2 could carry a variety of bombs on four hard points beneath the wingroots. Photos also show RS-82 rockets carried on some aircraft under the outer wings, clear of the propeller arc. The Pe-2 was produced in this version until the 105th production batch.
On later production Pe-2s the engines were changed to VK-105PFs of 1260 hp and a MV-3 turret carrying a hard-hitting 0.5 in (12.7mm) UBT machine-gun was installed directly behind the cockpit (Zvezda produces a nice kit of the late-model version).
The Pe-2 saw heavy combat against the Luftwaffe from the beginning of the war in the East and proved its capabilities in both dive and level bombing. The aircraft was fast and reliable, hence it served in continuously modernized versions through the end of the war and beyond. Production of all versions totaled 11,427 aircraft, making the Pe-2 the most numerous Soviet twin-engine bomber.
| THE KIT |
 Historic Plastic Models (HiPM) released this kit in
2001. To date, it remains the only kit of the early Pe-2 in 1/48th scale. When I
saw it at the local hobby store, I was surprised that I had not heard of this
kit before. Before purchasing I did some research and found a positive in-box
review on another web site. However, I could find no photos of a finished kit
online – not a good sign!
Historic Plastic Models (HiPM) released this kit in
2001. To date, it remains the only kit of the early Pe-2 in 1/48th scale. When I
saw it at the local hobby store, I was surprised that I had not heard of this
kit before. Before purchasing I did some research and found a positive in-box
review on another web site. However, I could find no photos of a finished kit
online – not a good sign!
Upon opening the rather small box, I was greeted by 218 plastic parts, a photo-etched fret, 13 clear parts, one film sheet, and a nice decal sheet by Propagteam with markings for two Soviet and one Finnish machine. The plastic parts were molded in hard, shiny, light gray plastic. At first glance, the excellent surface detail on the wings, tail surfaces and engine nacelles really stood out. The smaller parts however had soft detail with lots of flash. The clear parts looked nice. The photo-etch fret was produced by Eduard and of excellent quality though not pre-painted. The instructions seemed clear and construction was broken down in understandable steps. The thought of having an early Pe-2 on the shelf with its sleek, heavy-fighter looks was more than I could resist! It sure looked nice in the box...
| CONSTRUCTION |
Assembly of the HiPM kit began with careful review of the instructions. I removed most of the parts from the sprues and cleaned up sprue attachment points and persistent flash. Many of the smaller parts were modified to enhance detail. I spent hours drilling out air intakes, gun barrels, exhausts, etc. Dry-fitting the larger parts began to reveal one of the kits major drawbacks – NOTHING FIT. Every step of assembly presented a construction surprise/challenge and the assembly sequence in the instructions did not make practical sense in spots. Complicating the issue of poor fit, there were almost no locating pins or marks for any of the parts and if they were there, they were wrong. Often, a subassembly that was correctly built and installed in a previous step was found to interfere with another subassembly much later in the build process. For this review I tried to outline the most prominent problem areas I encountered and my solutions to them.
The main factor that dictated my assembly sequence
was that the hard plastic was almost impervious to liquid plastic cement. All
joints between major parts had to be backed with plastic card to keep the seams
from popping. I used 1/8” wide strips of plastic card placed along the inside of
the fuselage seam, upper wing to fuselage seams, nacelle seams and lower wing
seams. I used liquid cement to melt the softer plastic card into the seams for a
much stronger bond. To facilitate this, I ended up building seven subassemblies
which I was able to
 dry-fit to one another during the build process. The
subassemblies were: upper wings and fuselage, lower wing with partial interior,
tail unit, the two main landing gear and the two engine nacelles. Following this
process yielded a much stronger structure than I could have attained following
the kit instructions.
dry-fit to one another during the build process. The
subassemblies were: upper wings and fuselage, lower wing with partial interior,
tail unit, the two main landing gear and the two engine nacelles. Following this
process yielded a much stronger structure than I could have attained following
the kit instructions.
While building the upper wing and fuselage subassembly, I was careful that the instrument panels were not glued too far apart since they had to be added to a closed fuselage. In step 5, I glued the control column much closer to the seat than the notch it was shown to fit in (otherwise, it interfered with the instrument panel). In steps 9 and 10, machine-gun parts G41 and G42 had to have their barrels significantly trimmed to fit properly. Everything else on the interior progressed slowly with much dry-fitting but no major issues. Once the interior was completed and painted, I closed up the fuselage halves. I added the five clear parts to the rear fuselage at this time since I still had access from both the inside and outside of the fuselage. Once again, lots of dry-fitting and filing were necessary to get a good fit.
The lower wing subassembly was built next and consisted of the three lower wing sections plus interior parts from step 6 and parts E2, E3, E7, F43 and F44 from step 9. The radiator block-off plates from steps 14 and 15 were also added to the lower wing at this time. Once completed, the lower wing subassembly was repeatedly test-fitted to the upper wing and fuselage subassembly prior to glue. When I was finally happy with the fit, both subassemblies were glued starting with the wing center section and working out to the wing tips. Rubber bands and clamps held things in alignment for several days until I was sure everything had set. Then the tail assembly was added after much dry-fitting to make sure things were square.
The instructions would have had me add the main landing gear legs and build the nacelles around them – pure insanity! Once again deviating from the instructions, I enlarged the indents in the lower wing to provide a positive location for the gear and its braces. I then built the landing gear and set them in-place on the lower wing surface to dry. Once dry, I took them off for painting. I discovered during final assembly that there were no axles to speak of to mount the wheels on. I CAREFULLY drilled out the landing gear legs and the wheels themselves with progressively larger drill bits in my pin vice until I could fit a piece of paper clip through both – problem solved!
 Dry-fitting the nacelles to the wing I discovered
that, on my example, the nacelles themselves were too narrow to line up with the
corresponding wing surfaces by 1/16”. I shimmed the nacelles with 1/16” plastic
card between the halves and glued them together. Not only did this improve the
fit to the wing, it also made more room for the tight-fitting landing gear (more
on this later). The oil cooler inlet was blocked off with plastic card during
this step and nacelle bulkheads G26 and G30 were installed after much
dry-fitting. Once the nacelles were dry and the area around the shim cleaned up,
I glued them to the wings. Much time was spent tweaking the fit prior to
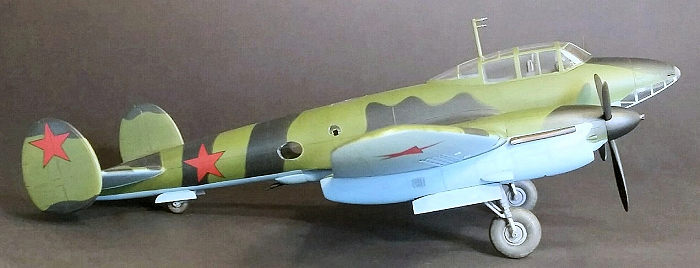
installation. One inaccuracy I found with the nacelles was that the exhausts
were about eight scale inches too low on the nacelle sides. I discovered this as
I was installing the exhausts during final assembly (far too late in the build
for me to worry about). Thus, unlike the real Pe-2 where the exhausts exit just
above the wing leading edge, the HiPM Pe-2 exhausts exit just below the wing
leading edge. Realistically, chances are that no one who sees it will ever
notice.
Dry-fitting the nacelles to the wing I discovered
that, on my example, the nacelles themselves were too narrow to line up with the
corresponding wing surfaces by 1/16”. I shimmed the nacelles with 1/16” plastic
card between the halves and glued them together. Not only did this improve the
fit to the wing, it also made more room for the tight-fitting landing gear (more
on this later). The oil cooler inlet was blocked off with plastic card during
this step and nacelle bulkheads G26 and G30 were installed after much
dry-fitting. Once the nacelles were dry and the area around the shim cleaned up,
I glued them to the wings. Much time was spent tweaking the fit prior to
installation. One inaccuracy I found with the nacelles was that the exhausts
were about eight scale inches too low on the nacelle sides. I discovered this as
I was installing the exhausts during final assembly (far too late in the build
for me to worry about). Thus, unlike the real Pe-2 where the exhausts exit just
above the wing leading edge, the HiPM Pe-2 exhausts exit just below the wing
leading edge. Realistically, chances are that no one who sees it will ever
notice.
Multiple puttying and sanding sessions later, the airframe was smooth and ready for the addition of the remaining clear parts prior to paint. I blocked off the hole in the wing and fabricated a landing light from a slice of clear sprue prior to adding the landing light cover. While dry-fitting the canopy, I discovered that it interfered with the gun sight (parts F18 and H3). I trimmed the gun sight parts by about 50% and continued on. The rest of the clear parts were dry-fitted, added and masked with Scotch tape. The final clear bit added (part H11) does not need masked since it is underside color in all the references I could find. I did cut the barrel off of part F21 at this time to minimize the risk of breaking it off during painting and weathering. It was reattached at final assembly.
| COLORS & MARKINGS |
The interior, landing gear and wheel wells were painted with Poly Scale Israel Gray thinned with Future. The semi-gloss finish allowed washes to flow freely and also made it easier to remove excess wash from the high spots. Detailing continued in the cockpit/fuselage/nacelle interior where I brush painted details per the kit instructions. I added evergreen strip seatbelts to the pilot’s seat, and lap belts to the navigator’s seat and radio operator’s seat. A thin black soapy water wash was applied. Once the wash had dried, I drybrushed the interior with a slightly lighter shade of interior gray.
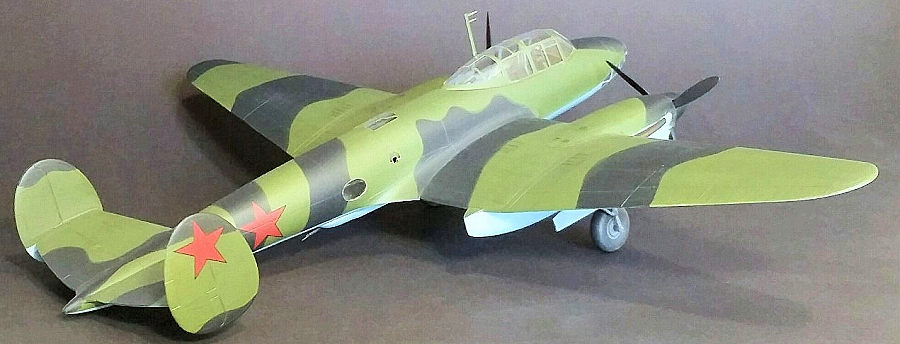
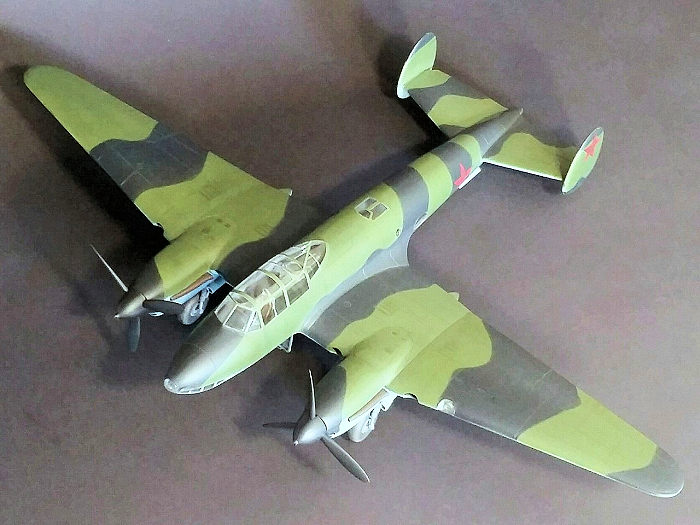
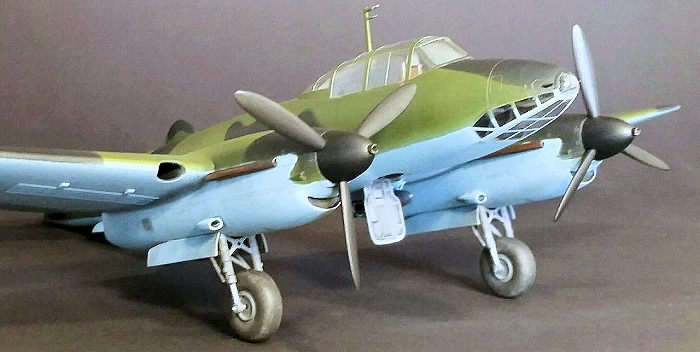
 The airplane depicted here was inspired by an
internet photo of an early Pe-2 in flight. That plane bore no special markings
but I felt it properly represented the mass hordes of Pe-2s and the young Soviet
airmen (truly pawns) fed into the meat grinder of The Great Patriotic War. I
also referenced the wonderful online research of Massimo Tessitori to depict the
typical dark green (FS34102) and black over underside blue (FS35414) camo
scheme. While this was not one of the color schemes depicted in the kit
instructions, I was able to use the kit decals for the plane I modeled. I used
Polly Scale acrylics and pre-shaded the colors for the airframe. I masked
between the colors with thinly rolled snakes of kneaded eraser. I then applied a
thick coat of rubber cement over the color I was protecting. This technique is
much faster for me than cutting paper/tape masks and keeps out paint better than
any method I have previously tried. Once the paint was dry, the rubber cement
peeled right off. I had no ill effects due to the rubber cement reacting with
the underlying acrylic paints or peeling them off.
The airplane depicted here was inspired by an
internet photo of an early Pe-2 in flight. That plane bore no special markings
but I felt it properly represented the mass hordes of Pe-2s and the young Soviet
airmen (truly pawns) fed into the meat grinder of The Great Patriotic War. I
also referenced the wonderful online research of Massimo Tessitori to depict the
typical dark green (FS34102) and black over underside blue (FS35414) camo
scheme. While this was not one of the color schemes depicted in the kit
instructions, I was able to use the kit decals for the plane I modeled. I used
Polly Scale acrylics and pre-shaded the colors for the airframe. I masked
between the colors with thinly rolled snakes of kneaded eraser. I then applied a
thick coat of rubber cement over the color I was protecting. This technique is
much faster for me than cutting paper/tape masks and keeps out paint better than
any method I have previously tried. Once the paint was dry, the rubber cement
peeled right off. I had no ill effects due to the rubber cement reacting with
the underlying acrylic paints or peeling them off.
Next, I used pastels to emphasize the panel lines and dirty the airframe a bit. These planes saw hard use, but they weren’t around long enough to get too weathered. I then sealed everything with a coat of Future in preparation for decals.
The kit markings went down beautifully. I wetted the area receiving the decals with Micro Set. Once in position, the decals responded well to an application of Micro Sol. After weathering the decals, I gave the plane a final satin clear coat.
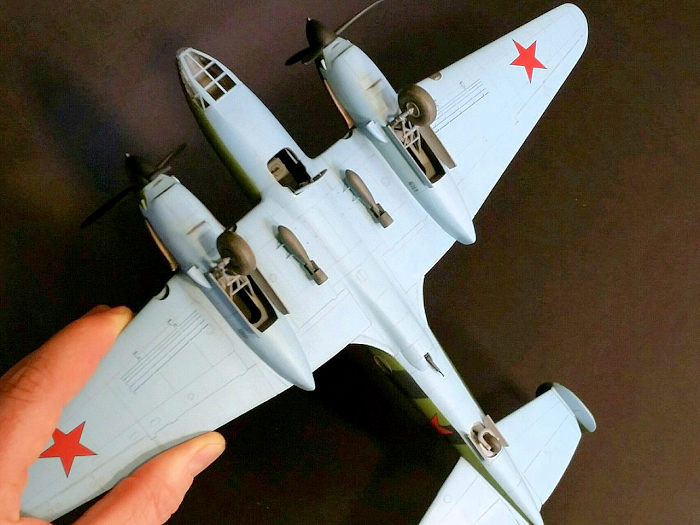
The landing gear and other fiddly bits were added at this time. I was frustrated by the main landing gear at first since the base of the main legs was too wide to fit through the nacelle opening. However, I was able to get them to fit by turning them sideways, putting the main brace into the nacelle first and then turning them to the proper orientation while swinging the rear braces up and over the nacelle lip. The poor-quality molding of the kit bombs inspired me to use bomb racks and bombs from an Eduard Spitfire (possible under Lend-Lease right?). Final touchups, weathering and detailing were then completed.
| CONCLUSIONS |
 I am very happy with the end result and the
finished kit looks great on the shelf. Looking at it, there is no sense of the
immense effort that was required during the build – and that’s a really good
thing. This is currently the only early Pe-2 available in 1/48th scale (though
now that I have slogged through, I’m sure Tamiya will announce one soon). As far
as accuracy, it looks like an early Pe-2 to me. The exhaust is an issue but it
does not detract from the overall look of the model enough for me to fix it now.
That said, I would have corrected it had I found it earlier in the build. This
is by far the most difficult kit I have tackled to date and I’m sure I won’t
build another. Would I recommend it? Let’s put it this way, I’m not sorry I put
in the effort. Recommended for those who have built short-run kits before and
want an early Pe-2 on the shelf!
I am very happy with the end result and the
finished kit looks great on the shelf. Looking at it, there is no sense of the
immense effort that was required during the build – and that’s a really good
thing. This is currently the only early Pe-2 available in 1/48th scale (though
now that I have slogged through, I’m sure Tamiya will announce one soon). As far
as accuracy, it looks like an early Pe-2 to me. The exhaust is an issue but it
does not detract from the overall look of the model enough for me to fix it now.
That said, I would have corrected it had I found it earlier in the build. This
is by far the most difficult kit I have tackled to date and I’m sure I won’t
build another. Would I recommend it? Let’s put it this way, I’m not sorry I put
in the effort. Recommended for those who have built short-run kits before and
want an early Pe-2 on the shelf!
Jonathan
Prestidge 9 April 2019 Copyright ModelingMadness.com If you would like your product reviewed fairly and fairly quickly, please contact the editor or see other details in the
Note to
Contributors. Back to the Main Page
Back to the Review
Index Page
Back to the Previews Index Page