ICM 1/48 Yak-7DI
| KIT #: | 48041 |
| PRICE: | $12.95 |
| DECALS: | Four options |
| REVIEWER: | Jonathan Prestidge |
| NOTES: | Eduard Seatbelts & a propeller from the spares box used |
During 1942-1945 the fighter was produced in great numbers.
Many Soviet aces fought at Yak-9 controls with Nazis. Among them
 were
distinguished pilots twice Hero of the Soviet Union A. Vorozheikin (52
victories), A. Koldunov (46 victories), and French pilot, Hero of the Soviet
Union M. Albert (23 victories).
were
distinguished pilots twice Hero of the Soviet Union A. Vorozheikin (52
victories), A. Koldunov (46 victories), and French pilot, Hero of the Soviet
Union M. Albert (23 victories).
| THE KIT |
 Once I had met the Yak in person, I was determined to build a
model of one. When I saw the ICM Yak-7DI/Yak-9 in a local hobby shop I grabbed
it immediately. Other than the smooth cowl of the Yak-3, the Yak-7DI/Yak-9 looks
similar. As one of the most produced fighters in history, the Yaks have been ill
served by model companies until the more recent releases from ICM, Eduard &
Accurate Miniatures. This kit is made of gray plastic with a slightly pebbly
surface texture in spots and plenty of mold release agent. On the plus side,
there is a basic Klimov engine, some very fine interior framing and other
details, and separate control surfaces. On the minus side, the clear parts are
awful, the canopy being too thick and the framing so heavy it looks as if it
came off of an armor kit. The propeller is also very odd, looking like no other
prop I've ever seen. The shape of the kit is accurate for a Yak-7DI or early
Yak-9.
Once I had met the Yak in person, I was determined to build a
model of one. When I saw the ICM Yak-7DI/Yak-9 in a local hobby shop I grabbed
it immediately. Other than the smooth cowl of the Yak-3, the Yak-7DI/Yak-9 looks
similar. As one of the most produced fighters in history, the Yaks have been ill
served by model companies until the more recent releases from ICM, Eduard &
Accurate Miniatures. This kit is made of gray plastic with a slightly pebbly
surface texture in spots and plenty of mold release agent. On the plus side,
there is a basic Klimov engine, some very fine interior framing and other
details, and separate control surfaces. On the minus side, the clear parts are
awful, the canopy being too thick and the framing so heavy it looks as if it
came off of an armor kit. The propeller is also very odd, looking like no other
prop I've ever seen. The shape of the kit is accurate for a Yak-7DI or early
Yak-9.
| CONSTRUCTION |
I started this build with the engine. I quickly decided to do
a closed-up bird due to the lack of engine detail and difficulty getting
everything to fit. On to the interior. Once everything was painted and
assembled, I gave it a wash using a mix of soapy water &
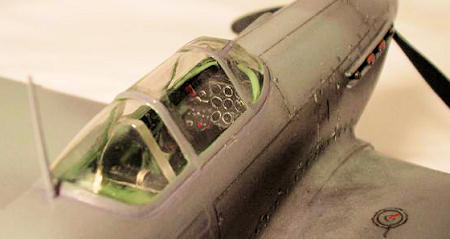 black paint. I then
dry-brushed the interior with Testors silver (oil-based). The instrument panel
was painted flat black, dry brushed, and then I applied Future to the dial
faces. Finally, I attached some pre-painted Eduard belts with white glue and
glued the fuselage together.
black paint. I then
dry-brushed the interior with Testors silver (oil-based). The instrument panel
was painted flat black, dry brushed, and then I applied Future to the dial
faces. Finally, I attached some pre-painted Eduard belts with white glue and
glued the fuselage together.
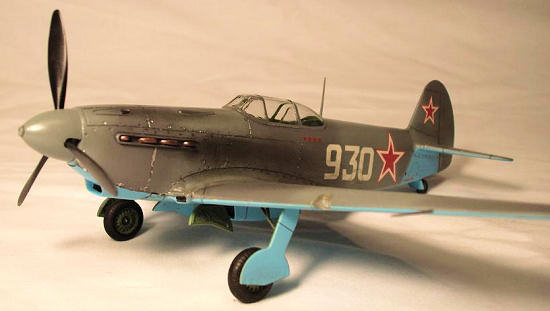
The rest of the airframe built easily but needed putty in a few spots (wing roots & engine cowling). I did not pose the control surfaces on this one. I did use some sprue to spread the fuselage a little to match the upper cowling.
Now for the canopy! If you are comfortable with vacuformed canopies I would recommend using one. I decided to doctor up the stock canopy. I scraped off the framing with a #11 X-acto blade, sanded and polished it smooth with 2000 grit wet-or-dry sand paper and a used dryer sheet., and dipped it in future 3 times. I then attached the canopy to the plane with white glue and masked it with Tamiya tape. Though a vast improvement over the stock framing, the canopy is still too thick and distorts the interior when viewed from certain angles.
The only other area of difficulty I had was painting the wheels/tires. They are one piece and there is no line to show where the wheel stops and the tire starts. I made my best guess. They aren't perfect but look acceptable after a wash and dry-brush session.
| COLORS & MARKINGS |
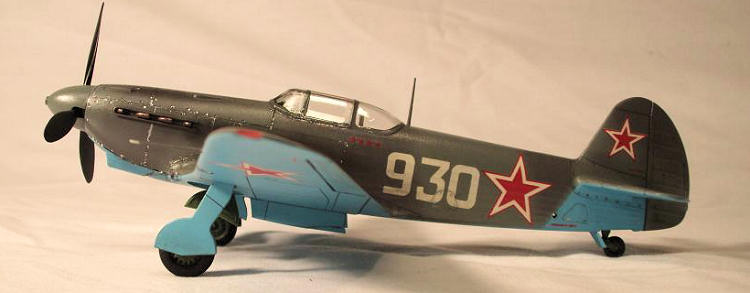
I wanted to do a similar color scheme to the plane I had
seen at the air show. I chose to use the kit decals to depict a Yak-7DI of the
967 IAP (Fighter Regiment), 1st Pribaltijsky Front, March 1943.
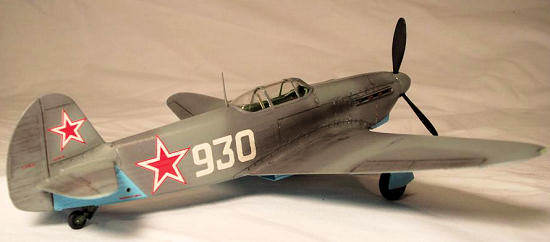
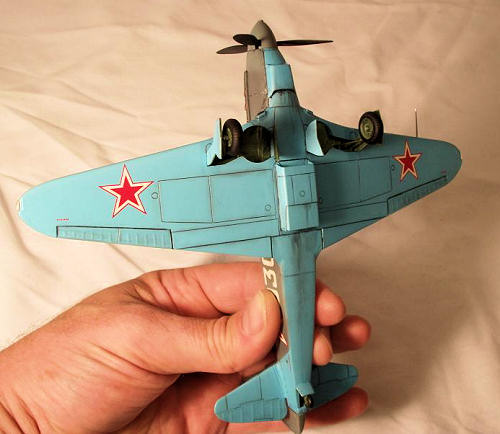 All paints used in this build are Polly Scale and Tamiya
acrylics. I used Russian underside blue for the lower portion of the plane. Once
this was masked I free handed the upper camo scheme. At this point, I applied
pastel weathering to the panel lines and then sealed everything with a coat of
future.
All paints used in this build are Polly Scale and Tamiya
acrylics. I used Russian underside blue for the lower portion of the plane. Once
this was masked I free handed the upper camo scheme. At this point, I applied
pastel weathering to the panel lines and then sealed everything with a coat of
future.
I used the kit decals for this one with no problems. The clear area around the decals was trimmed with a new X-acto blade. Though a bit “sticky” the decals went down fine. I had to apply water to the area where the decal was to go and float the decal into place. Once the decals were in place and almost dry, I brushed on some Champ setting solution and I’m pleased with the results. After weathering the decals, I gave the plane a final semi-gloss coat of future to represent the hard wearing wax coating applied to most Russian planes of WWII.
The landing gear and other final bits were added at this time. I really liked the petite radio mast and pitot tube. I have broken the antenna off several times now but I still like the look. I did not like the look of the kit exhaust either and replaced them with spares from an Accurate Miniatures Yak-1.
Now for the prop. I'm afraid that there is no hope for the kit-supplied part. I replaced mine with a spare from a 1/48th Tamiya Dinah. It may not be 100% correct but to my eyes it looks 100% better and is close in shape to the prop on the Accurate Miniatures Yak-1.
| CONCLUSIONS |
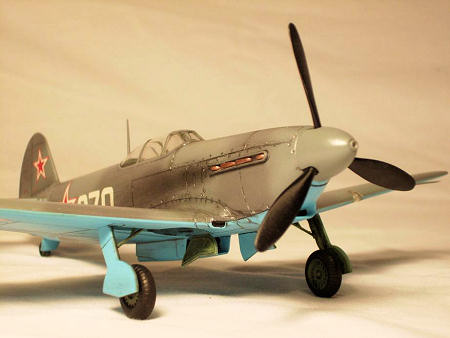 I really like the way this kit turned out. I thank ICM
for giving us an injected kit of this great looking plane. Visually, only the
prop and canopy prevent this from being really nice out of the box. I'm glad I
made the effort to correct them. The lack of locator pins on this kit should not
pose any real issues to a modeler. I would recommend this kit to anyone except
the bare beginner. I'm still waiting for an accurate late model Yak-9.
I really like the way this kit turned out. I thank ICM
for giving us an injected kit of this great looking plane. Visually, only the
prop and canopy prevent this from being really nice out of the box. I'm glad I
made the effort to correct them. The lack of locator pins on this kit should not
pose any real issues to a modeler. I would recommend this kit to anyone except
the bare beginner. I'm still waiting for an accurate late model Yak-9.
November 2008
If you would like your product reviewed fairly and quickly, please contact me or see other details in the Note to Contributors.