Classic Airframes 1/48 MiG-3 (early)
| KIT #: | 405 |
| PRICE: | $Out of Production, but it was about $30 when new |
| DECALS: | Two options |
| REVIEWER: | Jonathan Prestidge |
| NOTES: | Short run injected plastic with resin interior and photo etched details |
| HISTORY |
The Mikoyan-Gurevich MiG-3 was a
progressive development of the MiG-1, it was in fact, the first Soviet
fighter of what was considered the “modern formula” to be delivered in
quantity to the V-VS. It started to reach operational squadrons on March of
1941.
 Its
debut represented a quantum leap in Soviet fighter performance, albeit at
the expense of maneuverability and handling, in consequence it also demanded
a higher degree of pilot competence, which the V-VS was finding difficulty
meeting.
Its
debut represented a quantum leap in Soviet fighter performance, albeit at
the expense of maneuverability and handling, in consequence it also demanded
a higher degree of pilot competence, which the V-VS was finding difficulty
meeting.
The MiG-3 was designed for maximum
performance at altitudes above 20,000 feet, it was therefore unfortunate
that air combat on the Russian front typically took place at much lower
altitudes, coupled with its inferior armament, it quickly found itself at a
distinct disadvantage when it faced Luftwaffe fighters. Nevertheless, many
of the later Russian “aces” achieved impressive results with the MiG-3.
When production ceased in the spring of 1942 a total of 3,322 of the type had been produced, however it was to remain an important aircraft in the fighter inventory for a further two years, being employed primarily for rear area defense.
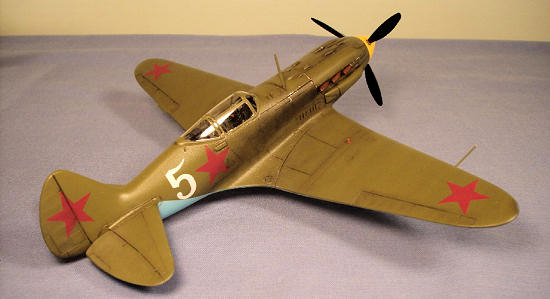
| THE KIT |
The Classic Airframes MiG-3 represents the
“early” version of this airplane. Until Trumpeter released their “early
model” MiG-3 recently, this was the only 1/48th scale injected
kit of this cool little fighter. Having just finished
There are 29 injected parts made of a light
gray plastic that is hard and shiny with very petite surface detail. There
is also a five piece resin interior, film instruments, a vacuformed canopy
(only one, yikes!), and photo etched details. The decals are printed by
Propagteam and include markings for Pokryshkin's “White 5” in summer camo or
a winter camo (white) MiG-3 with red arrows on the sides.
| CONSTRUCTION |
 It
sure looked simple in the box! I decided to
try to build it in one
weekend. The first thing I did was put on a mask and sand the pour stubs off
of the resin parts, trying to keep the dust well contained. Next, I detached
and cleaned up the injected parts, dry-fitting as I went. I glued the oil
coolers and prop shaft to the fuselage sides and glued the fuselage halves
together. This is where the trouble started. You see, the top of the
fuselage just forward of the canopy was slightly too wide. I could have
easily sanded the halves in this spot but I did not notice it until much
later on in construction. By then it was too late. The upper engine cowl is
just narrow enough that it leaves a step at the transition from fuselage to
upper decking just above and aft of the exhaust. I have seen pictures of
pretty rough looking seams on V-VS aircraft so I just chalked that one up to
typical wartime Soviet workmanship.
It
sure looked simple in the box! I decided to
try to build it in one
weekend. The first thing I did was put on a mask and sand the pour stubs off
of the resin parts, trying to keep the dust well contained. Next, I detached
and cleaned up the injected parts, dry-fitting as I went. I glued the oil
coolers and prop shaft to the fuselage sides and glued the fuselage halves
together. This is where the trouble started. You see, the top of the
fuselage just forward of the canopy was slightly too wide. I could have
easily sanded the halves in this spot but I did not notice it until much
later on in construction. By then it was too late. The upper engine cowl is
just narrow enough that it leaves a step at the transition from fuselage to
upper decking just above and aft of the exhaust. I have seen pictures of
pretty rough looking seams on V-VS aircraft so I just chalked that one up to
typical wartime Soviet workmanship.
I sanded the interior side walls until it
fit nicely into the fuselage. I then sprayed the interior a blue-gray and
painted the details per the kit instructions. I assembled and painted the
instrument cluster as well as adding all the PE fiddly bits. I gave the
interior a wash and dry-brush to highlight the details. Once complete, I
used white glue to attach the interior to the fuselage. I have had much
better success with white glue than with super glue.
Next, I assembled the wing, trimming and
sanding the gear wells to fit. I then glued the wing and tail planes to the
fuselage. I used minimal filler and sanded everything down lightly. Here is
where I deviated from the instructions. I saw that several block-off plates
were needed to keep daylight from coming through the fuselage openings
(radiator, wing root ducts & cockpit foot well). I cut some thin cardboard
to fit, painted it black and attached it with white glue. Since I had not
yet attached the upper cowling, this
 was
easy to do. I recently found out (post build) that the MiG-3s had covers
that closed up the wing root openings when the planes were on the ground. I
have seen photos of this on later aircraft but I'm unsure if these covers
were on the early planes.
was
easy to do. I recently found out (post build) that the MiG-3s had covers
that closed up the wing root openings when the planes were on the ground. I
have seen photos of this on later aircraft but I'm unsure if these covers
were on the early planes.
This was my first vacuformed canopy and I
was a little nervous. I cut out the canopy with a sharp #11 X-acto blade,
leaving a little extra around the edges. I then sanded down the edges while
fitting it repeatedly to the fuselage. When I was happy with the fit, I
glued it on with white glue. I masked the canopy using Tamiya tape and a
sharp #11 X-acto blade.
I had to drill the mounting holes for the
landing gear and wheels. Care is needed here to get the correct alignment of
the holes. I started each hole using a pin vise. I then slowly enlarged the
holes by hand until the landing gear fit tightly in place and the wheels fit
snuggly on their axles. I did not glue them in place until after painting.
While I had the pin vice out, I also drilled out the exhausts and the gun
ports on the nose.
By this point, the extra time spent on the
block off plates, canopy and landing gear had blown my one weekend
timetable. Painting, decals and weathering were pushed off until the next
weekend.
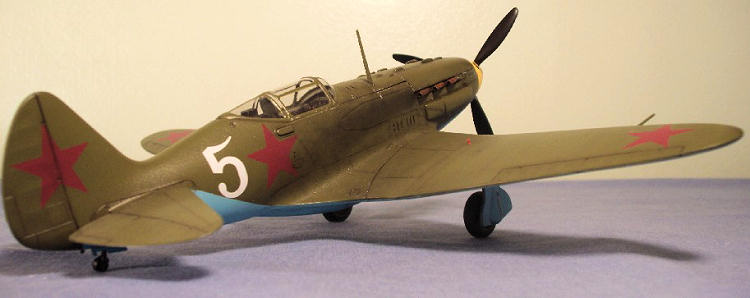
| COLORS & MARKINGS |
I chose to use the kit markings for
Alexander Pokryshkin's “white 5”. Pokryshkin was the second highest scoring
ace of the V-VS in WWII. An experienced pilot before the war, Pokryshkin
started his wartime career flying a MiG-3. He was an aerial combat tactician
who taught other pilots that to survive they must maintain either altitude
or speed. To be caught low and slow in the combat environment was certain
death.
There are no photos of Pokryshkin's MiG
that I'm aware of. After studying many color photos of early MiG-3s captured
in the first days of the German invasion, I felt I had a pretty god idea of
what the plane would have looked like. Aside from a yellow spinner, I
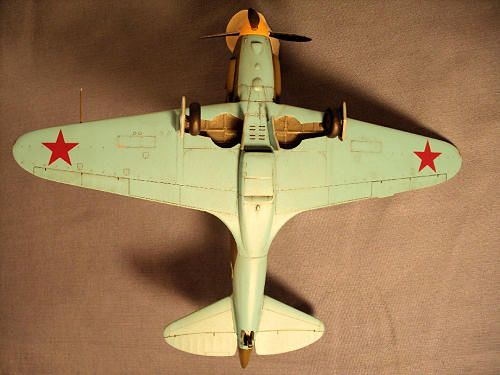 painted
the plane in the standard V-VS green over blue early war camouflage. The
color profile of the plane in the instructions shows it as almost chocolate
brown. This is not correct. The correct color should be a green close to
FS34102. I used FS34127 “French Khaki” from the Poly Scale acrylic line for
the upper color and “Russian Underside Blue” from Poly Scale for the lower
color. I initially painted the prop blades flat black but have since gone
back and painted them aluminum with a blacked-out section on the back side
of each blade.
painted
the plane in the standard V-VS green over blue early war camouflage. The
color profile of the plane in the instructions shows it as almost chocolate
brown. This is not correct. The correct color should be a green close to
FS34102. I used FS34127 “French Khaki” from the Poly Scale acrylic line for
the upper color and “Russian Underside Blue” from Poly Scale for the lower
color. I initially painted the prop blades flat black but have since gone
back and painted them aluminum with a blacked-out section on the back side
of each blade.
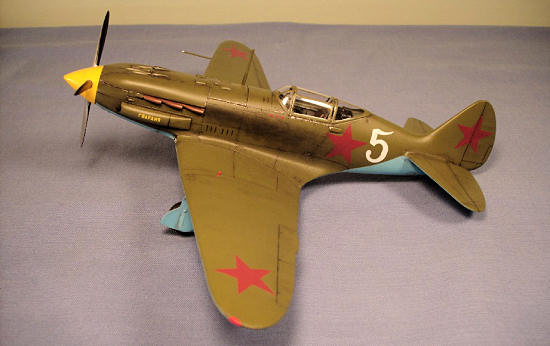
At this point, I applied pastel weathering
to the panel lines and exhaust stains. I then sealed everything with a coat
of future.
I used the kit decals for this one. The
Propagteam decals were very thin and a bit “sticky”. I had to apply ample
water to the area where the decal was to go and float the decal into place.
Several of the stars broke during application but I was able to save them. I
used Tamiya red acrylic paint to touch up the broken decals. Once the decals
were in place and almost dry, I brushed on some Champ setting solution and
I’m pleased with the results. After weathering the decals, I gave the plane
a final semi-gloss coat of future to represent the hard-wearing wax coating
applied to most Russian planes of WWII.
| FINAL CONSTRUCTION |
The landing gear, exhausts and other final
bits were added at this time. I used Testors silver (oil-based) to simulate
chipping around maintenance panels & scuffing on areas walked on by pilots
and ground crew. I used a thin, brown, oil-based wash applied with a fine
brush to bring out the petite panel line detail. I used a Q-tip dipped in
mineral spirits to remove any excess wash. I used some dirty paint thinner
applied with a fine brush to represent oil and fuel stains. I kept the
weathering to a moderately low level since MiG-3s did not usually last that
long at the front. Pokryshkin himself was shot down several times in MiG-3s.
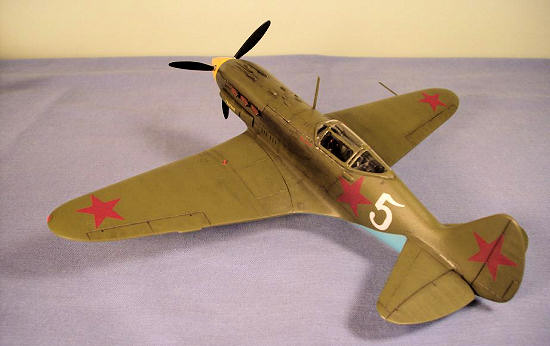
| CONCLUSIONS |
I really enjoyed building this kit. It was
my first “short-run” build and while not show quality it does look great on
my display shelf next to the
May 2010
If you would like your product reviewed fairly and quickly, please contact me or see other details in the Note to Contributors.