Accurate Miniatures 1/48 Il-2m3 Stormovik
| KIT #: | 3407 |
| PRICE: | €40 in 2005 |
| DECALS: | One option |
| REVIEWER: | Spiros Pendedekas |
| NOTES: | A classic but really fine kit |
| HISTORY |
Though the idea for a Soviet armored ground-attack aircraft dates to the early 1930s, when Dmitry Pavlovich Grigorovich designed TSh-1 and TSh-2 armored biplanes, Soviet engines of the time lacked the power needed to provide the heavy aircraft with good performance. It was only until 1938 that such a concept came to fruition, when Sergey Ilyushin and his Central Design Bureau Team designed the twin seater TsKB-55, which was to become the Il-2. Uniquely for a World War II attack aircraft and similarly to the forward fuselage design of the World War I-era Junkers J.I armored, all-metal biplane, the Il-2's armor was designed as a load-bearing part of the monocoque structure, thus saving considerable weight.
Since the emerging design was still overweight and underpowered, not only the original Mikulin AM-35 engine was replaced by the more powerful (and optimized for low altitudes) AM-38, but also the rear gunner’s “office” was deleted, enabling the prototype to pass State Acceptance Trials in March 1941, with deliveries to operational units commencing in May.
 Upon Nazi invasion, only 249 “Stormoviks” were available, with production
immediately slowing down, as the aircraft factories near Moscow and other major
cities in western Russia had to be relocated east of the Ural Mountains for
obvious reasons. Ilyushin and his engineers made good use of that time, in order
to reconsider production methods, with Il-2s again being produced a mere two
months after the move. Production rate, however, was not to Premier Stalin's
liking and, after a threatening telegram, production rapidly gained speed, with
units subsequently becoming available in quantity.
Upon Nazi invasion, only 249 “Stormoviks” were available, with production
immediately slowing down, as the aircraft factories near Moscow and other major
cities in western Russia had to be relocated east of the Ural Mountains for
obvious reasons. Ilyushin and his engineers made good use of that time, in order
to reconsider production methods, with Il-2s again being produced a mere two
months after the move. Production rate, however, was not to Premier Stalin's
liking and, after a threatening telegram, production rapidly gained speed, with
units subsequently becoming available in quantity.
Being a new type in which aircrews had no experience at, might explain the dodgy first period the aircraft had, but, soon, the gained experience, combined with improved tactics, brought the Stormovik to its full potential.
Though a generally tough aircraft that would absorb a lot of punishment, its rear proved unproportionally vulnerable, so the aforementioned deleted rear gunner’s area was very quickly reintroduced, with the existing single seater machines field-modified by cutting a hole in the fuselage behind the cockpit. Upgraded engine variants were also introduced some time in 1942, offering improved takeoff and low-altitude performance.
To counteract the air gunners exceptionally high death rate, late models produced after 1944 had the rear armor plate moved rearwards to allow the gunner to sit behind the fuel tank.Since this modification moved the center of gravity significantly rearwards, swept back outer wings were also introduced, in order to shift the aerodynamic center equally rearwards.
Essentially deployed on the Eastern Front, the aircraft could fly in low light conditions and carry weapons able to defeat the thick armor of the Panther and Tiger I tanks. Ground forces highly valued the presence of the “Ilyusha” on the battlefield, with enemy attacks frequently thwarted thanks to them. It is true, however that Stormovik attacks were not among the most accurate and also, due to its heavy armor, the plane would typically carry only comparatively light bomb-loads, proving less effective than the P-47 or the Typhoon, the net effect often being more psychological than actual physical destruction of targets.
Owing to a shortage of fighters in 1941–1942, Il-2s were occasionally used as fighters. Though grossly outclassed by dedicated types such as the Messerschmitt Bf 109 and Focke-Wulf Fw 190 in dogfights, Stormoviks could take on other Luftwaffe aircraft with some success.
Despite the ultra heavy losses (to degree justified by the quirky operational environment and, particularly, the lack of available Russian fighter protection), the iconic and vastly produced Il-2, the so called “Flying Tank” (a nickname earned thanks to the heavy armor protection), can be regarded as an effective weapon deployed by the Soviet forces, in a way being the forerunner of the equally iconic A-10 and Su-25.
| THE KIT |
 Accurate Miniatures came in 1997 with a then wonder
quarter scale kit of the iconic Stormovik, which was offered in single seater,
dual seater and even ski versions. Upon AM’s demise these nice molds were
reboxed (with occasionally new parts), by Eduard, Italeri, Academy and Revell.
My kit was the original Il-2m3 version, found still wrapped in 2005 at an Athens
hobby shop and offered at a more or less sensible price. For a look at this fine
kit’s contents, please visit the preview here .
Accurate Miniatures came in 1997 with a then wonder
quarter scale kit of the iconic Stormovik, which was offered in single seater,
dual seater and even ski versions. Upon AM’s demise these nice molds were
reboxed (with occasionally new parts), by Eduard, Italeri, Academy and Revell.
My kit was the original Il-2m3 version, found still wrapped in 2005 at an Athens
hobby shop and offered at a more or less sensible price. For a look at this fine
kit’s contents, please visit the preview here .
This kit had been patiently residing in my Shelf of Doom till recently, when a very good friend from The Netherlands bought the single seater version and we decided to build them simultaneously.
| CONSTRUCTION |
Since engineering of AM kits is traditionally
distinctive (and, in cases, complex), before starting, I performed the radical
act of reading carefully the instructions, in order to have a clear view of what
goes where. I then started by attaching the radiator and main wheel bays parts
onto the central lower wing part, followed by the cockpit floor, which had the
foot pedals, the side console, the push/pull rod and fuel tank armor plate
added.
Since the cockpit opening was wide enough, I decided to finish it at later
stages of assembly, so I moved on joining the fuselage halves and attaching them
onto the assembled central lower wing half. Fit was good. The delicate top
rudder balancer would have absolutely no chance to survive Yours Truly brutal
handling, so I bravely cut it off, planning to attach it at final stages (where,
typically, I would find out that I had lost it and had to scratch build one…).
The front cowling consists of the two side halves, and the radiator inlet top
part, onto which the splitter brace, the splitter itself and the duct top are
successively attached. The completed delicate subassembly was then attached to
the fuselage, with fit being acceptable.
 Main wing was next: bearing in mind Tom Cleaver’s warnings after building the
same kit, I refrained from assembling the main wing and then attach it: rather,
after first removing all locating pins, the top wing halves were attached to the
fuselage roots, then allowed to “rest” onto the central wing, with ultra thin
glue joining them immediately after. The lower wing halves were similarly
attached to the central wing lateral joint area first, then allowed to rest onto
the top wing halves. This way a positive fit with not too much struggle was
obtained, which could have been even better, should I have followed Tom
Cleaver’s advice to the letter and attached the top wing halves to each fuselage
half before joining them…
Main wing was next: bearing in mind Tom Cleaver’s warnings after building the
same kit, I refrained from assembling the main wing and then attach it: rather,
after first removing all locating pins, the top wing halves were attached to the
fuselage roots, then allowed to “rest” onto the central wing, with ultra thin
glue joining them immediately after. The lower wing halves were similarly
attached to the central wing lateral joint area first, then allowed to rest onto
the top wing halves. This way a positive fit with not too much struggle was
obtained, which could have been even better, should I have followed Tom
Cleaver’s advice to the letter and attached the top wing halves to each fuselage
half before joining them…
The 2-piece bulged wheel bays were also assembled and attached, followed by the
2-piece horizontal stabilizers. Having decided to add some dynamic posing to the
latter, I force-twisted the elevators downwards at an equal angle: though brutal
(and not generally recommended), the above “technique” resulted in good looking
drooped elevators.
The model was then initially coarse sanded, followed by application of liquefied
styrene as primal filler, then sanded smooth, with “normal” filler consequently
applied. After a final sanding, I attached the starboard air intake filler cap,
the four underwing RS-132 rocket rails and the aileron Flettner rods (but not
the fin mounted one, since the fin yellow band decal ran under it and would have
to be attached beforehand). It was then about time to take the Stormovik to the
paint shop!
| COLORS & MARKINGS |
I first applied a coat of Hu87 Steel Gray, which
actually dried to a nice blue-gray shade, then masked it off and freehanded the
top camo using Hu110, Hu32 and Hu117 for the brown, gray and green respectively.
After “tightening” the demarcation lines with my airbrush at its finest
settings, I removed the masks and gave the bird a coat of Future, in order to
prepare it for decaling.
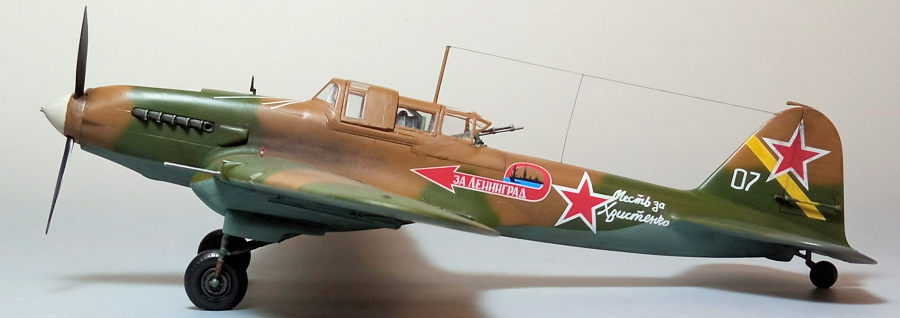
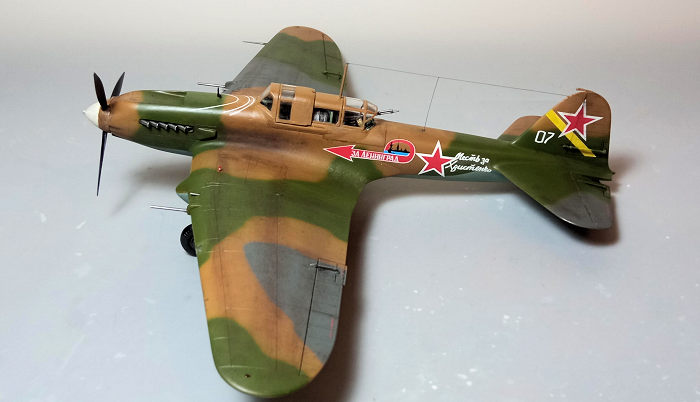 I used the kit decals, in order to represent the only option provided, which is
#07 machine of the 566 ShAP on the Leningrad Front in summer 1944. The
Microscale decals, despite being old, behaved very well and, with the aid of Mr
Mark Softer, followed all surface details successfully. A coat of Future sealed
them.
I used the kit decals, in order to represent the only option provided, which is
#07 machine of the 566 ShAP on the Leningrad Front in summer 1944. The
Microscale decals, despite being old, behaved very well and, with the aid of Mr
Mark Softer, followed all surface details successfully. A coat of Future sealed
them.
As a note, Russian plane colors of the era do show some variation, to a degree
that color accuracy being at a good number of cases a subject of "the specific
shade for the specific bird at the specific time", something that Yours Truly
has definitely no claims on. Rather, I mostly followed the kit instructions that
(to AM’s credit) are stated to be “recommendations to the best of their
knowledge”.
| FINAL CONSTRUCTION |
The various cockpit elements were systematically
painted and attached, namely the pilot’s armor rear plate, seat, stick (set
forward to account for the drooped elevators), gun sight, bomb door and release
controls, flap/gear lever, throttle, fuel tank, gunner’s floor and armor plate,
elevator push rod guard, sling seat, gun mount/ammo box, machine gun track, the
machine gun itself and its feed chute, demonstrating a busy image even out of
the box.
Basic cockpit color was Hu31 greenish gray, with black lever knobs, various
boxes, gun sight base and fuel tank and “leather” stick grip and gunner’s sling
seat. The clear instrument panel had its good looking instrument decal attached
from the back and painted cockpit color with some black portions, indeed looking
really nice! Some red knobs were randomly made with red color and a very fine
brush.
The rear UBT machine gun had its feed chute glued on and attached itn position.
It was painted gunmetal with brass chute. The complete cockpit then received a
black wash for adding depth and used looks, with the “rubbing” areas (seat edges
and the like) receiving some silver dry brushing. Though the kit offers seat
belts as a decal, I found it difficult to apply (and 2D looking), so I
fabricated my usual ones from masking tape.
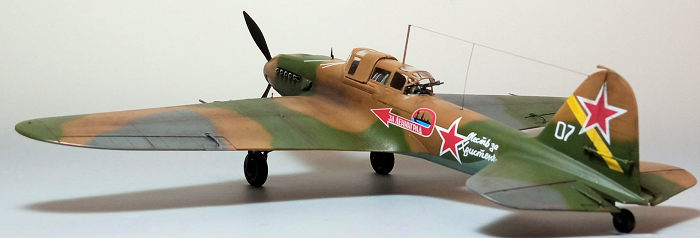
 It was then landing gear time: I attached the rear wheel/strut in position (I
systematically leave the rear wheels off, to attach at later stages, even if
they need some trimming to do so): the strut did indeed need some trimming in
order to be inserted, but, once attached, the trimmed areas were invisible.
It was then landing gear time: I attached the rear wheel/strut in position (I
systematically leave the rear wheels off, to attach at later stages, even if
they need some trimming to do so): the strut did indeed need some trimming in
order to be inserted, but, once attached, the trimmed areas were invisible.
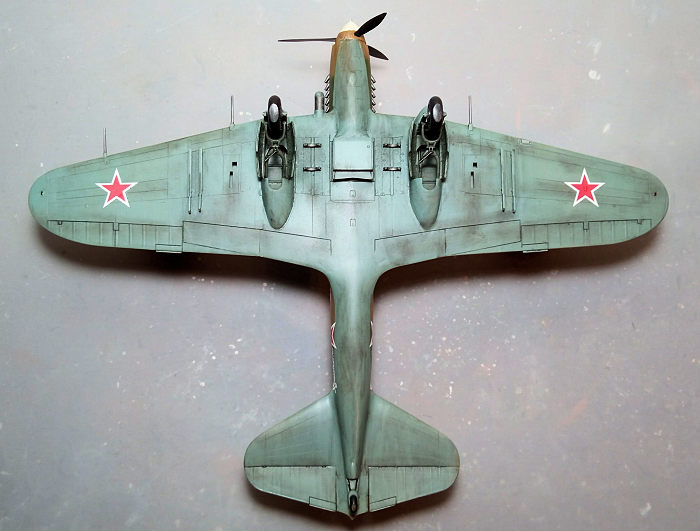
The scale thickness (meaning delicate) landing gear struts with their retraction
braces were then attached, followed by the main wheels. In order to attach the
latter, an axle-looking piece had to be removed from each strut: make sure you
don’t cut them completely flush, but leave the stubs which will hold the wheels.
Basic landing gear color, including bays and door innards, was the same as
cockpit’s greenish gray with leather oleo boots, black tires and darkened gun
metal rims. All “metal” elements were dry brushed with silver. Brake lines were
added from stretched sprue, painted black.
The fin Flettner rod was then attached, painted per the surrounding area camo
with its center portion yellow, in order to match the adjacent fin yellow band.
The four underside bomb sway braces were also attached at this time, painted
gunmetal.
The exhausts were next assembled and had their tubes drilled out, for realistic
looks. They were painted Testors burned metal from my alarmingly dwindling
reserves (making me wonder If I would find an equally performing paint from
another brand…), then carefully attached in position from the inside of the
cowling.
The prop was trapped between the spinner and its back plate.The spinner , was
painted white at the front and wod brown at the rear, then had its starting
coupling tip (starter dog) deepened by micro drilling. Blades were painted
black, each receiving its stencil decal afterwards. Though instructions advised
for yellow tips, contemporary pics show no yellow tips in a good number of cases
and that is what I went for.
The prop shaft is supposed to be trapped between the cowling circular front
plate and its retaining washer, the idea being to attach the mini sub assembly
to the cowling front, then mount the prop, which would rotate. Upon doing so,
however, the emerging slack was (in my case) not to my liking (possibly due to
operator error), so I omitted the cowling plate/shaft subassembly and
butt-fitted the prop to the front, with the looks resembling the nice close
tolerances observed in reality. Thus, in my case, I traded the rotating option
for realistic looks!
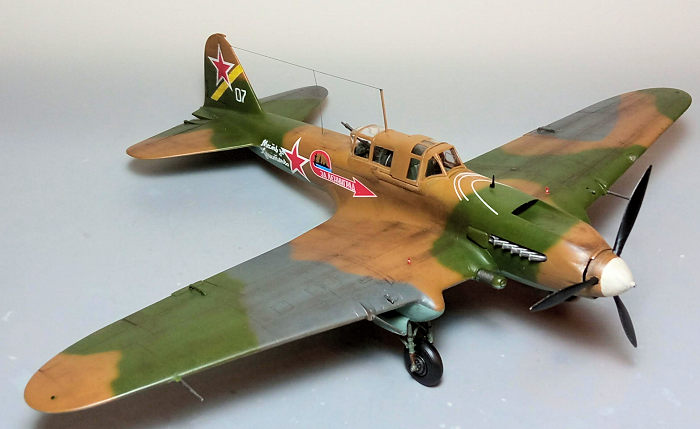
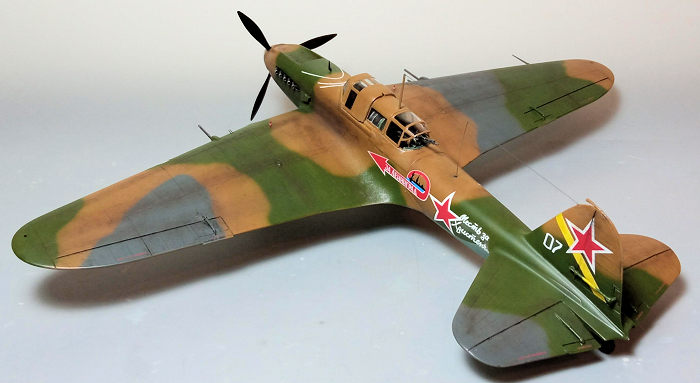
 Since this was a real work horse, unstoppably operating in harsh conditions, I
went on applying an amount of weathering. This included a black wash (heavier at
wheel areas and undersides in general, equally followed by dark brown/black dry
pastels to simulate engine stains and general dirt to wherever would accumulate.
Some silver dry brushing was applied to the blade leading edges and to the wing
roots, where personnel would frequently step on. A satin, almost matt coat gave
the bird its final finish.
Since this was a real work horse, unstoppably operating in harsh conditions, I
went on applying an amount of weathering. This included a black wash (heavier at
wheel areas and undersides in general, equally followed by dark brown/black dry
pastels to simulate engine stains and general dirt to wherever would accumulate.
Some silver dry brushing was applied to the blade leading edges and to the wing
roots, where personnel would frequently step on. A satin, almost matt coat gave
the bird its final finish.
The nice transparencies had their well defined frames hand painted and attached
in position (the mini gaps faired with white glue), followed by the antenna mast
that was attached onto the fixed canopy part and accordingly painted. A wire
antenna was run from the mast top to the fin top, complemented by a smaller one
that ran from its middle to the fuselage top, all made from stretched sprue. The
landing light transparency had its frames also hand painted and attached. The
landing light housing was painted greenish gray, with the light and mirror
itself represented by a blob of "silver" done with my silver pen.
Both the 23mm VYa and the ShKAS gun barrels were carefully drilled to look
hollow, painted gunmetal and attached in position (the latter delicate ones had
their inner non-visible section removed, in order to fit, as they were supposed
to be attached prior to the wings assembly). The pitot was attached at this
stage, too, its tip also painted gunmetal, as well as the top cowling mounted
gun sight post, which was painted black. The tiny but distinctive landing gear
position indicators were finally painted red/white/red and attached in position,
in order to call the Ilyusha done!
| CONCLUSIONS |
Despite its 1997 origins, this is still a really
good kit of the iconic “Flying Tank”. General shape looks spot-on, all parts
(transparencies included) are well molded, detail is very good everywhere
(including the key areas of cockpit and landing gear) and decals, though
offering only one option, are comprehensive and well behaving.
Typically for an AM kit, construction features some less uncomplicated areas,
with special attention having to be paid at the build-up of the wings and
attachment to the fuselage, but If you follow Tom Cleaver’s aforementioned
advice, you will have no issues and, from then on, building the kit will will
possess no extra difficulties than your standard WWI single engine model.
Finally, if you want to go the extra superdetailing/improving mile, you will not
be disappointed, as a respectable amount of aftermarket seems to exist.
The kit has been reboxed in various versions by Eduard (with their usual
wonderful goodies and supreme instructions), Italeri, Academy and Revell and can
be found today at more or less sensible prices. Though “superseded” (as of 2022)
by the Tamiya and the most recent Zvezda offerings, there is really nothing
wrong with this kit. If you are not a beginner and have one or find one at an
interesting price, by all means go on and build it. A gorgeous Ilyusha will
emerge, for sure!
Happy modeling!
5 December 2022
Copyright ModelingMadness.com. All rights reserved. No reproduction in part or in whole without express permission.
If you would like your product reviewed fairly and fairly quickly, please contact the editor or see other details in the Note to Contributors.