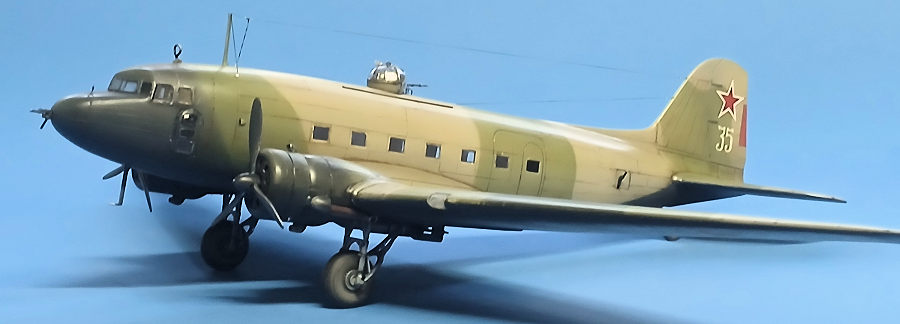
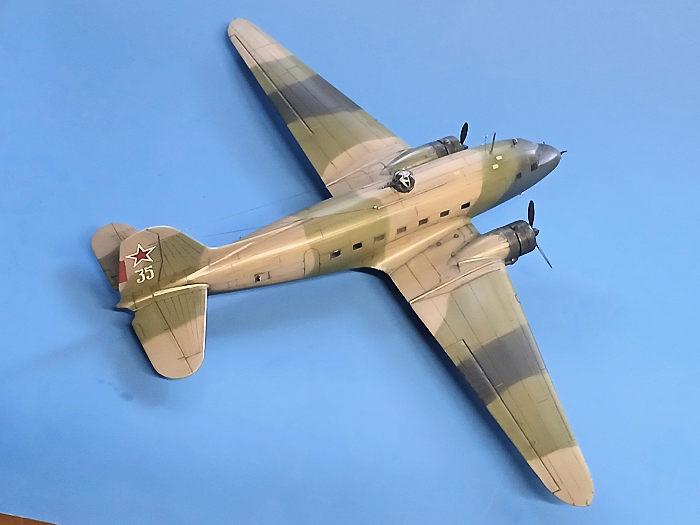
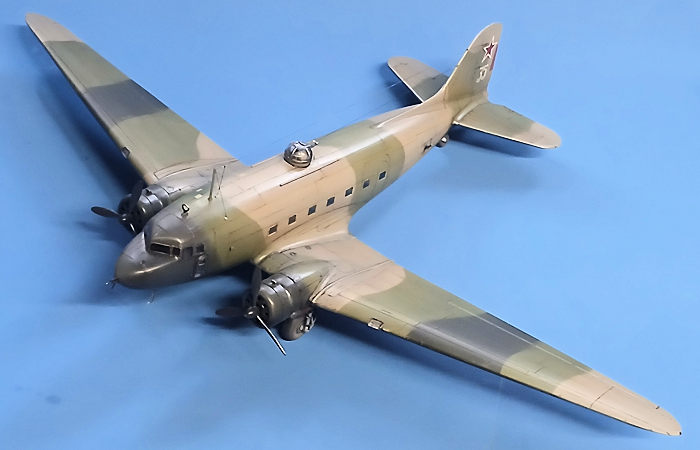
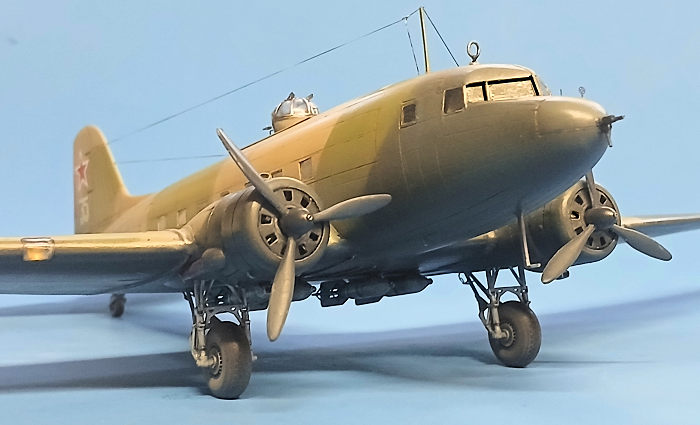
Amodel 1/72 Lusinov Li-2NB
| KIT #: | 72231 |
| PRICE: | $40.00 |
| DECALS: | Two options |
| REVIEWER: | Ryan Grosswiler |
| NOTES: | Low-pressure injection molded, 185 parts (about 40 unused). Armory Models resin MV-3 turret. |
| HISTORY |
We all know the story about the incomparable DC-3/C-47/-53/Dakota. It started with a record-breaking phone conversation between TWA’s CR Smith and Don Douglas about an upgrade to the DC-2 with railway-style berths, resulting in something called the Douglas Sleeper Transport. The upgrade had the unintended effect of pushing the cabin interior to a volume that would maximize the aircraft’s potential max gross takeoff weight, inadvertently out-designing the competing Boeing 247 which had been dominating sales to airlines at that point (Douglas would attempt to artificially repeat this effect twenty years later with the DC-8 versus the 707, but that's another story). This also happened to result in a transport aircraft in full production just as it was needed for widespread military purposes. Lots were available after the war for sale and use throughout the world, and it’s still flying for hire here and there at this writing.
 At the same time, there was a
parallel story going on. The Soviet Union, finding itself badly hung over from
decades of revolution and civil war, needed to catch up with the rest of the
world economically and technologically. At first access to the DC-2 design was
sought, but after a series of discussions and tests, the new DC-3 was selected
instead and a licensing agreement with Douglas Aircraft was concluded. In the
fall of 1936 a young, undistinguished engineer by the name of Boris Lisunov was
permitted travel to Santa Monica and supervise the technical adaptation of the
new airplane to Soviet materials and methods.
At the same time, there was a
parallel story going on. The Soviet Union, finding itself badly hung over from
decades of revolution and civil war, needed to catch up with the rest of the
world economically and technologically. At first access to the DC-2 design was
sought, but after a series of discussions and tests, the new DC-3 was selected
instead and a licensing agreement with Douglas Aircraft was concluded. In the
fall of 1936 a young, undistinguished engineer by the name of Boris Lisunov was
permitted travel to Santa Monica and supervise the technical adaptation of the
new airplane to Soviet materials and methods.
Despite a directive to avoid deviation from the Douglas design, nearly 1300 specific engineering changes ended up being necessary. Not only was a conversion from standard to metric measurements and material required, but some American manufacturing methods weren't adaptable and things such as the landing gear and engine mounting ended up being quite different. In a feat of engineering precision, however, the reconstituted-to-metric transport came within 500 lbs of its American pattern aircraft. Unfortunately, the aircraft was then cursed with a pair of Shvetsov M-25 radials, less horsepower than even the DC-3's original Wright R-1820 engines (that the Shevtsovs themselves were based upon). Performance suffered accordingly, even below that of the Cyclone-powered DC-3.
However, something truly unique had been created: an object sharing the outer mold line of the DC-3, but slightly 'off' in all dimensions, no interchangeable parts. A good airplane had been created from an outstanding one, and as it would turn out, just when its nation needed it. The adaptation work was completed in 1939 and Lisunov returned to the USSR in April. He arrived to a few airframes already being assembled from knock-down kits supplied by Douglas, and the first all-Soviet production examples emerging from the Khimki plant at the end of 1940 were put to work immediately. About 200 had been completed and delivered when in October 1941 in the face of invasion the plant was evacuated and moved to Tashkent, where the reminder of the run was produced. About 5000 (sources vary widely on this) were built, production concluding in 1950.
The Li-2 put to immediate and obvious use for its role of cargo and passenger transportation. Such was the nature of the air war that gun turrets available from wrecked Soviet bombers were almost as soon installed on the aircraft's topside near the center of gravity. Further wartime pressures led to its introduction in the role of bombardment. This was initially also a field expedient, with no capacity for proper aiming and bomb racks fitted in the field, crews throwing additional explosives out the doors. Operations were underway in time for the battle of Stalingrad, where "bombing lanes" were set by searchlights and these ad hoc Li-2 bombers dumping their ordnance on the right bank of the Volga.
 In
1943, a more-properly engineered bombardment version appeared featuring a
dedicated bombardier's position in the place of the auxiliary crew door behind
the pilot, standardized bomb racks, and additional waist gunners' positions just
in forward of the tail. The standard load was 4x FAB-250s, roughly 2200 lbs (a
load of 2x FAB-500 was also photographed, the bombs in the #2 and #4 stations).
This might seem rather light, but keep in mind that the Ilyushin Il-4—the
standard VVS long-range bomber of the time—was carrying the about same load over
about the same distance...and was far less comfortable. Li-2 crew appreciated
their airplane’s internal heating, being able to get up and walk about to a
galley and a lav, and the airplane could serve as a transport as well when
needed.
In
1943, a more-properly engineered bombardment version appeared featuring a
dedicated bombardier's position in the place of the auxiliary crew door behind
the pilot, standardized bomb racks, and additional waist gunners' positions just
in forward of the tail. The standard load was 4x FAB-250s, roughly 2200 lbs (a
load of 2x FAB-500 was also photographed, the bombs in the #2 and #4 stations).
This might seem rather light, but keep in mind that the Ilyushin Il-4—the
standard VVS long-range bomber of the time—was carrying the about same load over
about the same distance...and was far less comfortable. Li-2 crew appreciated
their airplane’s internal heating, being able to get up and walk about to a
galley and a lav, and the airplane could serve as a transport as well when
needed.
A fully specialized bomber version was eventually designed with twin tails and an internal bomb bay, but by then the B-25 was being supplied in quantity via Lend Lease, so this development was not proceeded with. Also, American C-47s were arriving via Lend-Lease, which must have complicated logistics trails considerably. Apparently Stalin himself preferred his American-built airplane, possibly because of the more powerful engines and resulting performance.
The Li-2 would revert purely to its design role after the war, being the transport aircraft habitually gifted to the growing community of Communist nations in Europe and Asia in the decade which followed. Lisunov himself, having achieved this rather remarkable task, disappeared back into obscurity managing projects for Myasishchev and other more minor design bureaus for the remainder of his career.
| THE KIT |
For modelers of wartime Soviet equipment, it used to be that you'd get your Li-2 by taking the Esci DC-3/C-47 kit, scrounging some new engines, and adding a turret and opening up extra windows here and there as appropriate. Now AModel has given us a dedicated set of kits to depict this Soviet version...and the Japanese L2D!
A flimsy box with a rather
folksy painting of the subject up front encloses 18 sprues of gray low-pressure
injected parts, lots of them. As mentioned, the base kit covers also the
Japanese-built L2D airframe and other East Bloc civilian and polar exploration
variants of the basic Li-2 so you'll wind up with a lot of extra parts. Quality
is about the best that low-pressure injection has to offer, which means there
will be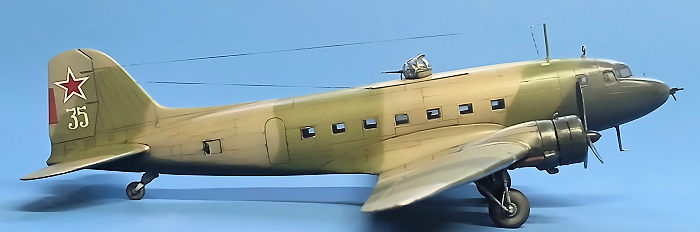 a fair amount of cleanup and fitting required at every joint. That said,
detail is quite fine and excellent, with nicely engraved, consistent panel lines
and similarly nice representation of fabric-covered control surfaces. Even the
guns appear to be useable! Sprues are marked as being the work of a mysterious
"Master 44".
a fair amount of cleanup and fitting required at every joint. That said,
detail is quite fine and excellent, with nicely engraved, consistent panel lines
and similarly nice representation of fabric-covered control surfaces. Even the
guns appear to be useable! Sprues are marked as being the work of a mysterious
"Master 44".
There's minor scratching on all exterior surfaces, especially the fuselage. If you're planning on a natural-metal civilian finish you'll therefore want to treat all main parts to some wet sanding after you get everything dry-fitted, starting with 600 grit. Decals cover two aircraft, one each in the Soviet late war green-over-tan and tan/green/black schemes. I am doubtful that either aircraft was a true -NB as these almost always had black undersides while both depicted are standard VVS light blue beneath. More on this later.
Main parts fit very closely with the Italerei/Esci DC-3, and traces of the Italian kit's panel lines beneath the wings may be made out faintly on the corresponding A-Model parts. A derivative, probably...which isn't a bad thing in this case.
| CONSTRUCTION |
Divide and conquer! I have learned to employ a certain procedure whenever I start construction on a kit where I've heard (or sense) that there are going to be major construction ‘issues’. The short of it is that I dry-fitted almost the entire model before committing to any glue. Also, it's important at this stage to sand down the trailing edges on all flying surfaces as finely as you can; this avoids that clunky 'model' look. In other words, treat this kit as an unusually rigid vac-form which features parts already cut out and rough-sanded for you.
This whole process started by sanding the joint between the two fuselage halves, not only to improve fit between the two, but also gradually tapering aft to get that nice, sharp trailing edge on the rudder. When I had done so, these two halves were taped together. The panel that represents the turreted dorsal surface (Part 106) was dry-fitted at this time; this component would cause me the most trouble so I opted to return to it later.
Next, the fit of the wing lower center section (Part 7) was checked, then its trailing edges sanded thin as well. It also required some sanding front and back where it met the fuselage. A good way to verify alignment here is to verify that the panel lines on adjoining parts match up. The center section was then taped in place.
 Now the upper wing panels
(Parts 8 and
10) got their trailing edges sanded thin and were likewise fit-checked. These
were the only parts
which required special treatment as each upper wing root required a shim along
its entire length: about 1/8" (2mm) at the trailing edge, tapering to a point up
front. The shims were made up from sheet styrene, sanded to fit fairly
precisely, and glued firmly to the fuselage side of the joint, taking care that
none of the cement went anywhere else to cause premature joint fusion.
Now the upper wing panels
(Parts 8 and
10) got their trailing edges sanded thin and were likewise fit-checked. These
were the only parts
which required special treatment as each upper wing root required a shim along
its entire length: about 1/8" (2mm) at the trailing edge, tapering to a point up
front. The shims were made up from sheet styrene, sanded to fit fairly
precisely, and glued firmly to the fuselage side of the joint, taking care that
none of the cement went anywhere else to cause premature joint fusion.
Finally, the lower wing panels (Parts 9 and 11) were tested: these only required the requisite trailing edge sanding, otherwise fitting perfectly, and were duly taped in place. At this point I did some measuring on all 3 axes to make sure the wing was perpendicular to the fuselage centerline, that the dihedral was equal on both sides, and the rudder post was dead vertical. All good, whew! Note that at this point there's been no gluing whatsoever except those two wing root shims.
The awful, pedantic prose in the four paragraphs above could be summarized as, “I assembled the entire airframe without glue to check fit, adjusting with sanding and shims where necessary”. The taped-together airplane-form was now disassembled. Bulkheads (12, 14 15, 16) were glued to the floor (18); when cured, this assembly was test-fitted into the fuselage halves to ensure they would close over it. I also scraped and sanded the rudder leading edge at the hinge line: this is represented on the kit by a simple set of heavy engraved lines whereas on the real DC-3 and Li-2 the rudder had a quite rounded leading edge and very open joint line, almost to the point that the control surface was like a little wing unto itself floating freely in the breeze.
Next lies a feature uncommon to us 1/72 modelers: a line of windows. I didn't like the provided injected strips and their optical distortion, and since they would require tedious fitting anyway I replaced them all with individually-cut pieces of sheet PETG. This wasn't as bad as it sounds. I brought the fuselage halves with me to work one day along with a cutting mat, knife, and cement, and every hour or so I'd take a break to cut and fit a pair of windows. This included the windshield halves. By the end of the day this step was complete. Note that Soviet (and Japanese) production of this aircraft featured additional windows around the cockpit varying in number and configuration; check your sources for what’s appropriate on the aircraft you’re modeling.
I had at this point spent probably about eight hours with all this prep work, but my reward was that, with all fit problems generally resolved, the rest of the build went smoothly and quickly. The interior can only be seen in a shadowy sort of way, so a little platform for the dorsal turret gunner was scratchbuilt and the whole interior painted a medium grey before moving forward with general construction. Don't forget to drill out the mounting holes for the bomb racks and the waist guns!
 Wing roots and the dorsal
turret panel required filling and sanding, but it wasn't as bad as it could have
been without that prep work. I cut away the little ridges (representing external
reinforcing bars) of the latter, adding them with styrene rod later when all had
been sanded smooth and rescribed. The major junctions all dealt with, remaining
components may simply be adjusted and attached with a reduced chance of the
dreaded cascading fit issues. General assembly was completed with the forward
nacelle parts which also required some filling, sanding, and rescribing. Note
that the option provided here for the later carburetor intake design (Parts 43,
71, and 73) is not appropriate for a wartime aircraft. In welcome novelty,
horizontal stabilizers went on without issue, just a line of filler at the root
to clean up the joint.
Wing roots and the dorsal
turret panel required filling and sanding, but it wasn't as bad as it could have
been without that prep work. I cut away the little ridges (representing external
reinforcing bars) of the latter, adding them with styrene rod later when all had
been sanded smooth and rescribed. The major junctions all dealt with, remaining
components may simply be adjusted and attached with a reduced chance of the
dreaded cascading fit issues. General assembly was completed with the forward
nacelle parts which also required some filling, sanding, and rescribing. Note
that the option provided here for the later carburetor intake design (Parts 43,
71, and 73) is not appropriate for a wartime aircraft. In welcome novelty,
horizontal stabilizers went on without issue, just a line of filler at the root
to clean up the joint.
With the basic airframe was now complete and windows masked, those bare and yawning wheel wells were asking for attention. Here the most intense part of the project arrived. Main landing gear parts as AModel provides have been simplified and lack some components within the very open and visible wheel well; this was scratchbuilt with styrene rod and the surrounding interior framework, exhaust system, and wiring represented (referencing detail photos of surviving aircraft found online) with the usual bits-of-styrene-and-brass techniques. It was a tedious process, working entirely through the wheel well openings, and when done with the main gear built up and brake lines, more tedious masking before main gear and tailwheel painted and weathered. Main wheels were mounted, all masked off before general painting. Whew! Another horrible paragraph as painful to read as the work it describes. But it looks cool.
The engines and cowls were finally built up and installed with--surprise!--more fit issues; I rejected the provided plastic prop shaft in favor of a sturdier and more precise system of sleeved brass tubing. As I wanted to depict a Soviet aircraft with all the changes incorporated to emphasize the "alien" aspect against a standard American DC-3 so the cold-weather engine shutters were carefully fitted as well.
Bombs and racks were made up but left off the model at this time. Likewise a resin and photoetch UTK turret from Armory Models, lovely when painted up and dry brushed but a fiddly little bugger to get together.
| COLORS & MARKINGS |
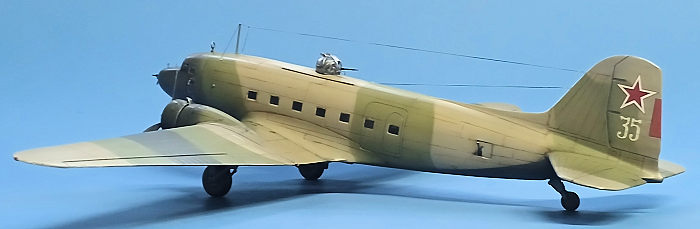 As stated
above, there are two attractive finishing options provided, but neither
corresponds to an Li-2NB as one lacks the distinctive bombardier's side door and
both lack the black undersides. I instead selected a more anonymous but
verifiable -NB in a photograph found online.
As stated
above, there are two attractive finishing options provided, but neither
corresponds to an Li-2NB as one lacks the distinctive bombardier's side door and
both lack the black undersides. I instead selected a more anonymous but
verifiable -NB in a photograph found online.
Decals were mostly sources from the spares box, but I used the ones from the kit underside the wings for the sake of this review. These surprised me: when I applied them before going out for an evening carousing with friends, they (the decals) looked like they were going to remain stubbornly proud of the surface and remain independent even when dry. However, when I returned hours later they'd sucked right down into the surface and scribed panel lines really well. Numbers and rudder stars came from elsewhere.
A wash of dark grays and brown went over the airframe, followed by a semigloss coat and highlighting, pastels, with other assorted weathering. This was locked under a final semigloss coat, the bombs, propellers, antenna aerials, and turret added, and that was it.
| CONCLUSIONS |
Not for the faint of heart, but if you have a history of limited-run kits successfully completed it's a good step-up to a multiengine type of the same medium. By approaching the project expecting fit issues and dealing with them in a proactive way there wasn't any point that I wasn't enjoying the build. I love my metric not-DC-3—with firepower!
Still, with Putin's "Special Military Operation" now dragging through its third year, I'm finding my appetite for Soviet subjects waning rapidly, and now I just want to get them off my desk.
| REFERENCES |
There have been a few monographs covering the LI-2, but most are now unavailable (except at usurious ‘collectors’ prices), and I found that most of what I needed for the Li-2NB specifically could be found online. Look for an article titled “PS-84/Li-2 Camouflage Evolution”.
I’ve also lately been digging into YouTube uploads and there you can find a Soviet wartime technical film with lots and lots of super helpful detail shots going over the exterior of an -NB as well as generalized “action” footage of the type in service. For basic background information our late friend Bill Gunston came to the rescue in one of his last major works.
Gunston, Bill. The Osprey Encyclopedia of Russian Aircraft. Motorbooks Int'l, 1995. ISBN 978-0760300275
25 March 2021
Copyright ModelingMadness.com. All rights reserved. No reproduction in part or in whole without express permission.
If you would like your product reviewed fairly and fairly quickly, please contact the editor or see other details in the Note to Contributors.