| KIT #: | 72023 |
| PRICE: | $ 16.00 |
| DECALS: | One option |
| REVIEWER: | Brian Baker |
| NOTES: | Very nice kit of an unusual subject. The box art said KOP-1. |
| HISTORY |
 The Soviet Navy used very few float seaplanes during
World War II, but this small biplane, the two main variants being designated
KOR-1 and KOR-2, was developed during the middle thirties, first flying in 1934.
It was powered by a 750 hp. M-25 radial engine, a development of the Wright
Cyclone, and was a two seat, open cockpit biplane featuring a single main float
and wingtip floats. Bomb racks could be installed under the lower wings, and the
plane was armed with a single forward firing 7.62 mm machine gun and a similar
gun mounted in the rear cockpit fired by the observer. The plane served as the
major catapult seaplane operating fromSoviet warships in the late thirties. A
later version, the KOR-2, featured a 900 hp. M-62 engine and having slightly
larger overall dimensions. The type served throughout the war.
The Soviet Navy used very few float seaplanes during
World War II, but this small biplane, the two main variants being designated
KOR-1 and KOR-2, was developed during the middle thirties, first flying in 1934.
It was powered by a 750 hp. M-25 radial engine, a development of the Wright
Cyclone, and was a two seat, open cockpit biplane featuring a single main float
and wingtip floats. Bomb racks could be installed under the lower wings, and the
plane was armed with a single forward firing 7.62 mm machine gun and a similar
gun mounted in the rear cockpit fired by the observer. The plane served as the
major catapult seaplane operating fromSoviet warships in the late thirties. A
later version, the KOR-2, featured a 900 hp. M-62 engine and having slightly
larger overall dimensions. The type served throughout the war.
A short account and description of the type appears in the William Green War Planes book, Floatplanes, vol. 6. This is a good reference.
| THE KIT |
This kit first appeared in 1993, and was first issued
by Omega, of Poland, and the molds were later acquired by RPM. The kit is
identified by the manufacturer as KOP-1. The instructions show five plastic
sprues and approximately 35 parts, including a set of wheeled landing gear,
which was not included in the kit I obtained
 years ago. In addition, there are
two clear plastic windshields. The instructions consist of one standard letter
sized sheet, with a sprue diagram and an aircraft history written in Russian,
Four assembly drawings, and a three view drawings showing colors and decal
placement. These are also in Russian, so the Box Art becomes the real color
guide.
years ago. In addition, there are
two clear plastic windshields. The instructions consist of one standard letter
sized sheet, with a sprue diagram and an aircraft history written in Russian,
Four assembly drawings, and a three view drawings showing colors and decal
placement. These are also in Russian, so the Box Art becomes the real color
guide.
The molding is not the fine quality of Hasegawa or more recent Airfix offerings, but the detail isn’t too heavy, and what flash there is can be easily removed. The wings are molded in one piece, so dihedral is no problem, and the wings are realistically thin, as biplane wings usually were. The wing floats are molded with the struts in place, so the problem of aligning them is much reduced. The interior parts include a cockpit floor, a pilot’s seat, a control stick, and an instrument panel. There is no instrument panel decal, so you are on your own here. Some of the parts need some trimming, but all in all, it is a purely workable kit, and an average modeler shouldn’t have any problems.
| CONSTRUCTION |
Assembly begins, or course, with the cockpit interior.
I wasn’t sure of the colors, so I used light grey with leather for the seat.
There was no seat for the rear gunner. Maybe he had to stand up. He probably had
some kind of small bench back there. After the cockpit is detailed to your
satisfaction, the fuselage halves can be joined, and the rear tailplanes can be
attached. One advantage to this kit is that the airplane is entirely one
 color,
so the struts and other parts can be attached using solvent glue without regard
to painting afterwards. The engine needs to be inserted into the cowling before
the fuselage halves go together, and the crankshaft also has to be added,
although the prop goes on afterwards. The wings are molded in one piece,
although the upper wing has a small section that attaches to the cabane struts.
I attached the lower wing first, and then attached the cabane struts and wing
struts before attaching the upper wing.
color,
so the struts and other parts can be attached using solvent glue without regard
to painting afterwards. The engine needs to be inserted into the cowling before
the fuselage halves go together, and the crankshaft also has to be added,
although the prop goes on afterwards. The wings are molded in one piece,
although the upper wing has a small section that attaches to the cabane struts.
I attached the lower wing first, and then attached the cabane struts and wing
struts before attaching the upper wing.
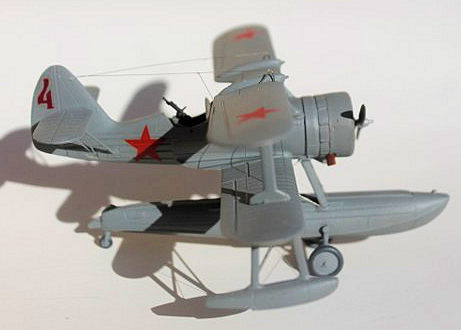
When the wings are complete, then the floats can be installed. The main struts attach to the float individually, and can be lined up using a very good front view drawings on the second assembly page. The wing tip floats’ struts are molded in place, so they are easy to install. After this, I would suggest painting the airframe light grey. The beaching gear and wheels can be attached after painting, as the tires should be black or dark grey.
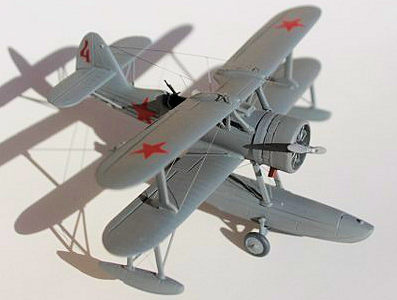
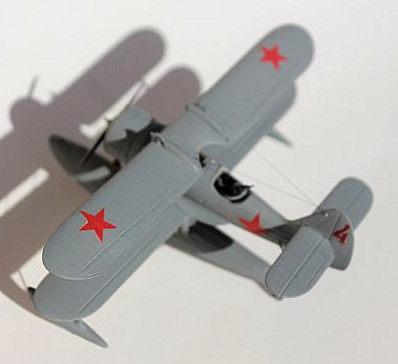
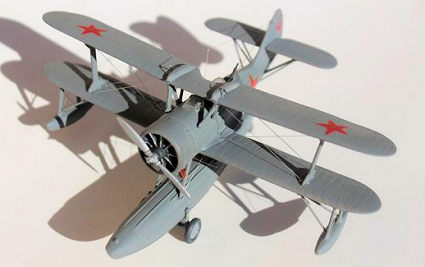
| COLORS & MARKINGS |
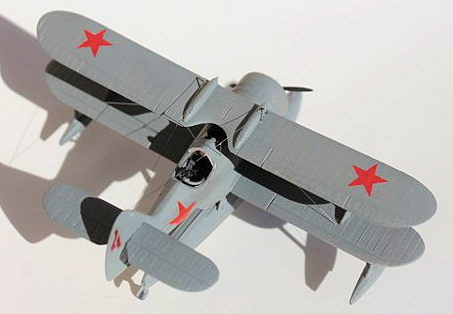 As I said before, the plane is overall medium grey,
and the box art gives what has to be the proper shade. Decals consist of six red
stars and two stylized number 4’s which go on the rudder. There is enough
information in the instructions to show the locations of the rigging wires. Some
of these aircraft had long trailing LF antenna wires which ran from the inner
upper wing upper surfaces to the tip of the vertical stabilizer. The LF antenna
wires aren’t shown on the box art, but they do appear in the drawings in the
instructions.
As I said before, the plane is overall medium grey,
and the box art gives what has to be the proper shade. Decals consist of six red
stars and two stylized number 4’s which go on the rudder. There is enough
information in the instructions to show the locations of the rigging wires. Some
of these aircraft had long trailing LF antenna wires which ran from the inner
upper wing upper surfaces to the tip of the vertical stabilizer. The LF antenna
wires aren’t shown on the box art, but they do appear in the drawings in the
instructions.
| CONCLUSIONS |
This was a fun kit to build, and was easier that more biplanes in this scale. It did fill a gap in my Russian model collection. It is certainly worth getting. Apparently there was a wheeled version of the plane, and the kit instructions show these parts on the sprue diagram, although they parts weren’t included in the kit. It looks better as a floatplane anyway. Don’t miss out on this one. Get one if you can. Recommended.
6 January 2020
Copyright ModelingMadness.com.
If you would like your product reviewed fairly and fairly quickly, please
contact the editor or see other details in the
Note to
Contributors.
Back to the Main Page
Back to the Review Index Page
Back to the Previews Index Page