ICM 1/48 Yak-7A
|
KIT # |
48031 |
|
PRICE: |
$12.98 |
|
DECALS: |
Three aircraft |
|
REVIEW & |
|
|
NOTES: |
|
|
INTRODUCTION |
I am constantly amazed at the quality of the models I am seeing built on the various modeling webzines. These people seem to be super-human, with modeling perfection a common result. With the exception of Scott (who has this big black cloud over him ;>}), I never see any disaster stories that would lead me to believe that these builders are normal human beings (although I am sure they are!). And the truth be told, I am fairly lucky that most of my stuff is disaster free, but every now and then I have a project that defies my best attempts to finish it correctly. Mostly this is a result of my "bad karma", but sometimes the kit does contribute to my bad luck. This is a story of my bad luck!
You may have noticed that I have changed the "History" section to "Introduction". This is the first sign of impending doom, because I have no references to do an adequate history of this aircraft and really don’t know squat about it!
|
THE KIT |
The kit is one of the many YAK-7 variants produced by the Ukrainian based ICM that feature Soviet aircraft flown during the "Great Patriotic War" (aka WWII). ICM is to be commended for filling this long neglected modeling "void" spurred on by Accurate Miniature’s YAK-1 and Eduard’s YAK-3. The kit consists of about 87 injected plastic parts that seems to indicate a fairly detailed model. However, many of the parts are for the other variants of the YAK-7, and also for a fairly detailed engine that will be discarded if you do not leave the top fuselage panel off. Therefore, I would best categorize the detail level as "spartan" and in need of aftermarket or scratch building detail parts. Eduard has just released a detail set (right after I closed up the fuselage----more "bad karma"!) that will go a long way to correcting this. The quality of the plastic is good, not quite approaching the quality of "Tamigawa" with petite recessed engraving. The decals are "so-so", featuring three options for generic Moscow ADZ, Khabarovsk, and Kalininsky Front aircraft flown in early 1942. There will be more on the decals later, so read on! The instruction sheet is an "assembly drawing" type with painting instructions keyed to Humbrol and Testors paints and consists of six pages. Due to the fact that there are few locating pins or holes, assembly can be challenging (read on!).
|
CONSTRUCTION |
Previous experience with other "Eastern Bloc"
kits has shown me that the plastic often contains a heavy mold release agent
that needs to be scrubbed off with warm soapy water. This kit was no exception
in that it was covered in a tacky, greasy substance and it was off to the
kitchen sink for a nice bath. Unfortunately, the bath only made the situation
worse in that the plastic seemed to ooze this substance in the warm water
("bad karma"!). Off to Plan "B" which was a nice rub down
with Pollys Plastic Prep which helped remove it, but several pieces continued to
ooze this substance so I had to clean the parts again (and again, more "bad
karma") just prior to painting! I painted the interior with Humbrol
Camouflage Grey (#28) as recommended in the instructions but I feel this shade
is much too light ("bad karma"). Painting of all the remaining pieces
was also done according to the directions.
The fuselage was glued together without any major gaps or seams requiring
putty (finally, "good karma"). Careful dry fitting and filing of the
forward top panel will also allow a gapless installation. I also drilled out the
gun troughs to accept hypo tubing as gun barrels to be installed later. The
wings and tail feathers were glued on next, and surprisingly the fit was good
with only a little putty required along the chin intake and bottom aft wing
join. Separate ailerons and rudder are provided which is a nice touch and allows
the modeler to pose these surfaces without cutting them off. In addition, I
opened up the wing root intakes with a motor tool and needle files. I then sanded all the seams and joins smooth and applied Mr. Surfacer to all
the seams (I always use Mr. Surfacer to completely hide the joins/seams on every
model). While sanding off the Mr. Surfacer, disaster struck in that the
instrument panel broke off and fell out of the cockpit opening. I saw the panel
hit the carpet and then it promptly disappeared! How a black panel on tan
carpeting could disappear is beyond me ("bad karma")! I briefly
thought of scratch building a new instrument panel (after my mandatory 24 hour
"hope it will turn up" wait), but gave up all hope since I had already
used up my allocation of "bad karma" and getting it inside the
fuselage framing would have only led to more "bad karma". I them
mounted the gun sight (again a challenge since there are no locating holes/pins)
being careful not to interfere with the windscreen. After masking off the canopy
and windscreen with masking tape they were installed with watch cement. The radiator and its exhaust panel were then glued on (again being careful
since there are no mounting pins/tabs) and the various openings were painted
flat black (since there is no detail such as grills/screens present). After
drying, the wheel wells and openings were stuffed with wet tissue and the model
was given a final rub down with Pollys Plastic Prep before hitting the paint
shop.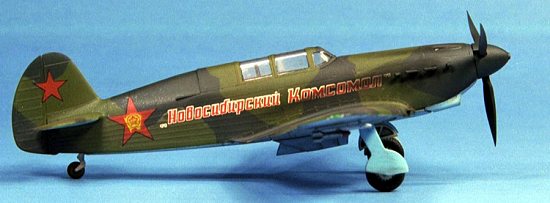 Assembly of the fuselage interior was done using super thin superglue with
the following words of caution, dry fit before gluing since the mounting
locations are somewhat vague and there are fit problems that require minor
filing/sanding. Be especially careful with the location of the side consoles and
the seat so they do not interfere when you close up the fuselage. Also, be aware
that the instrument panel decal is printed black on a clear backing (not white)
so if you paint the panel black (like I did) you won’t see any of the dials on
the decal ("bad karma")! I then stripped off the decal and hand
painted the instrument panel (as it would turn out later, a useless exercise!).
Fit of the instrument panel was "fiddly" and required deepening of the
indentations so they would fit within the cockpit framing and also narrowing of
the sides to fit within the fuselage. The last step was to install some plastic
strip to blank off the interior exhaust openings since I like to install the
exhaust stacks last, after painting.
Assembly of the fuselage interior was done using super thin superglue with
the following words of caution, dry fit before gluing since the mounting
locations are somewhat vague and there are fit problems that require minor
filing/sanding. Be especially careful with the location of the side consoles and
the seat so they do not interfere when you close up the fuselage. Also, be aware
that the instrument panel decal is printed black on a clear backing (not white)
so if you paint the panel black (like I did) you won’t see any of the dials on
the decal ("bad karma")! I then stripped off the decal and hand
painted the instrument panel (as it would turn out later, a useless exercise!).
Fit of the instrument panel was "fiddly" and required deepening of the
indentations so they would fit within the cockpit framing and also narrowing of
the sides to fit within the fuselage. The last step was to install some plastic
strip to blank off the interior exhaust openings since I like to install the
exhaust stacks last, after painting.
|
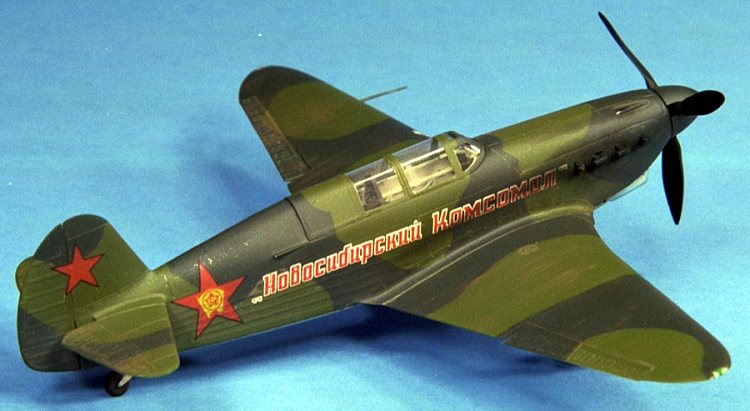
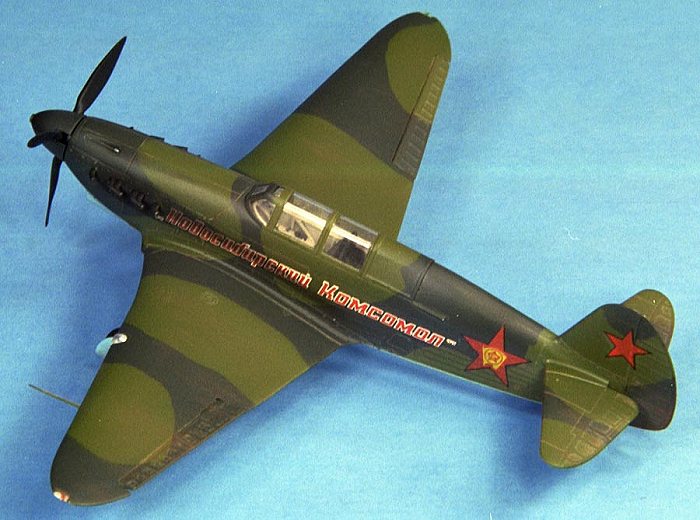
PAINT & DECALS |
 There are many controversies regarding the colors of VVS aircraft with most
every one having their own opinion. The instructions call for a black over green
camouflage with a blue underside, which was very common in early VVS aircraft.
Alternately, some believe that the black should be a very dark black-green (much
like RLM70). I don’t know which is correct but I went with black-green over
dark green since black doesn’t photograph very well. I used Polly Scale USSR
Underside Blue, Aeromaster Acrylic Japan Mitsubishi Interior Green, and Polly
Scale RLM70 Black-Green. All paints were airbrushed using paper masks enlarged
to the correct scale on my scanner and attached with Tombo Mono Multi liquid
glue. This glue is perfect for temporary masking, as it is low tack when dry,
but has enough tack to allow paper masks to be attached around circular objects
(like the fuselage).
There are many controversies regarding the colors of VVS aircraft with most
every one having their own opinion. The instructions call for a black over green
camouflage with a blue underside, which was very common in early VVS aircraft.
Alternately, some believe that the black should be a very dark black-green (much
like RLM70). I don’t know which is correct but I went with black-green over
dark green since black doesn’t photograph very well. I used Polly Scale USSR
Underside Blue, Aeromaster Acrylic Japan Mitsubishi Interior Green, and Polly
Scale RLM70 Black-Green. All paints were airbrushed using paper masks enlarged
to the correct scale on my scanner and attached with Tombo Mono Multi liquid
glue. This glue is perfect for temporary masking, as it is low tack when dry,
but has enough tack to allow paper masks to be attached around circular objects
(like the fuselage).
After drying for a few hours I removed the paper masks and experienced some paint pull up ("bad karma"). I suspect this was probably due to the oozing plastic, as I have never experienced this before. These spots were touched-up and after drying overnight were airbrushed with a coat of Future to prepare the surface for decaling.
The decals supplied with the kit are actually better than they look on the sheet (they look terrible!). They are printed on a matte finish carrier, which could lead to silvering problems, and they are not very opaque. I would recommend replacing them with aftermarket decals but there are none for the YAK-7a. One could use the Aeromaster YAK decals in a pinch. I wanted to see what the kit decals would look like so I used them with a fair degree of success. A few tips if you use the kit decals; apply them over a gloss finish, make sure you get all the air bubbles out (they will silver horribly if you don’t), and seal with a gloss finish.
After drying overnight, I wiped the decals off with a moist cloth with a bit of Pollys Plastic Prep to remove any residue and after drying I shot a very light coat of Future over the decals to seal them. For weathering, I chose to accentuate the engraved panel lines and surface detail with a light burnt umber oil wash on the undersides and an umber wash on the top. Of course at this time I noticed that the horizontal stabilizer does not have a separation line for the control surface on the lower side. This could be easily fixed by scribing in the line but at this stage of the game it was much too late ("bad karma").
I then sealed everything with a light coat of PS Flat Finish to provide a surface for pastel application. I then randomly applied some ground up burnt umber pastels with a soft brush to simulate dirt staining and black to simulate exhaust and gun staining.
|
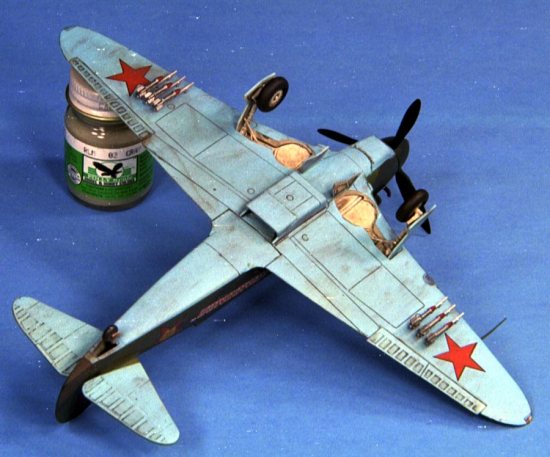
CONSTRUCTION CONTINUES |
I then installed the landing gear assemblies, hypo tubing gun barrels, propeller and spinner, rocket rails and rockets, exhaust stacks, and pitot tube. Gluing the rockets to the rails was challenging, as there are no mounting pins/tabs so I tacked them in place with white glue to insure alignment and then gave them a light application of superglue to permanently fix them in place. The same technique was used on the exhaust stacks. Lastly, all the clear plastic pieces were installed with watch cement. The navigation lights were drilled out and a small droplet of paint was wicked into the opening to simulate the colored light bulb under a clear cover.
|
CONCLUSIONS |
It is hard to make a recommendation on this kit since this was one of my few "bad karma" builds that are as much my bad luck as the kit faults. That being said, the level of detail is very basic and I would definitely use a detail set if I did this kit again. Also, it is unlikely that a YAK-7a will ever be kitted by any of the major manufacturers so this is pretty much the only game in town for an injected molded YAK-7.
|
REFERENCES |
They exist, but I don’t have any!
I do recommend the Modeling of the Soviet VVS web site at:
http://www.kithobbyist.com/VVS/
If you would like your product reviewed fairly and fairly quickly, please contact the editor or see other details in the Note to Contributors.