Accurate Miniatures 1/48 Yak-1b
|
KIT # |
3425 |
|
PRICE: |
$27.50 |
|
DECALS: |
One aircraft |
|
REVIEW : |
Bob Laskodi |
|
NOTES: |
|
|
HISTORY |
 One of the most
beautiful and successful aircraft of the Great Patriotic War was the Yakovlev
series of fighters. This diminutive fighter was conceived in the mind of
Alexander Sergei Yakovlev during WWII and was the most produced Soviet fighter
variant during the war, with over 30,000 aircraft built. Constructed mainly from
non-strategic materials that were vital to other war efforts, the YAK-1b
featured all wood wings and a fabric covered rear fuselage that was simple to
build in quantity and easy to repair. Not nearly as sophisticated as their
western counterparts, the YAK was nonetheless a formidable opponent in the
raging low-to-medium altitude air battles over the Eastern Front.
One of the most
beautiful and successful aircraft of the Great Patriotic War was the Yakovlev
series of fighters. This diminutive fighter was conceived in the mind of
Alexander Sergei Yakovlev during WWII and was the most produced Soviet fighter
variant during the war, with over 30,000 aircraft built. Constructed mainly from
non-strategic materials that were vital to other war efforts, the YAK-1b
featured all wood wings and a fabric covered rear fuselage that was simple to
build in quantity and easy to repair. Not nearly as sophisticated as their
western counterparts, the YAK was nonetheless a formidable opponent in the
raging low-to-medium altitude air battles over the Eastern Front.
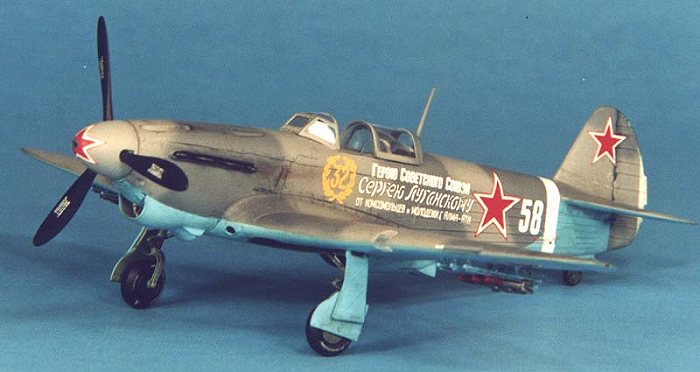
The YAK-1b featured the usual Soviet design philosophy as an incremental improvement over the "Razorback" YAK-1, with an uprated engine, a bubbletop canopy (to improve visibility), and substituting a single 13mm machine gun (vice the two 7.6 mm machine guns) that lowered the weight of the aircraft.
The aircraft modeled was flown by Sergei Lugansky, CO of the 152 Guards Fighter Regiment, an ace with 37 kills.
|
THE KIT |
I always enjoy building an Accurate Miniatures (AM) kit as no other manufacturer combines the accuracy, detail, and quality of an AM kit. The name "Accurate" is no marketing hype! The kit consists of approximately 90 injected molded plastic parts that are the envy of the business in quality. The instruction book is typical AM, detailed and loaded with information that you need to build up a great model. A word of caution to you "expert" model builders out there, better follow those directions because some of the assembly sequences will "bite ya in da butt" if you don’t follow them! The kit features only one decal option, the aircraft flown by Lugansky.
|
CONSTRUCTION |
 This was a straight
out-of-the-box build (OOB) of the kit since it is highly accurate and no
additional parts are really necessary to produce a quality model. After washing
the parts in mild dishwater soap and letting them dry, I then pre-painted all
the parts as indicated in the instructions. For interior parts, I used Polly
Scale British Interior Gray-Green. Starting with the interior, I built up the
kit as per the instructions. I had no major difficulties in assembling the
fuselage components.
This was a straight
out-of-the-box build (OOB) of the kit since it is highly accurate and no
additional parts are really necessary to produce a quality model. After washing
the parts in mild dishwater soap and letting them dry, I then pre-painted all
the parts as indicated in the instructions. For interior parts, I used Polly
Scale British Interior Gray-Green. Starting with the interior, I built up the
kit as per the instructions. I had no major difficulties in assembling the
fuselage components.
After installing the chin oil radiator components, I then glued the fuselage halves together with liquid cement. A tip is to sand and fill the seam on the turtleback section of the fuselage before you install the fuselage top. Guess who didn’t and had to bend files inside to finish the seam! Installing the oil cooler outlet door (B51) was a challenge; it doesn’t fit well and I had to file the side pins down and contort my fingers to get it in with a little glue. Fortunately, the engine coolant radiator door went in much easier.
After installing the stabilizers with liquid cement, I tackled the wings. Follow the instructions closely, as gluing the wing spar in place is critical to get the correct dihedral. I used the following technique. I first glued with liquid cement the center portion of the spar. I used a spring type clamp to hold it in place until the glue set in an hour. I then did the right part of the wing in the same manner, followed by the left part. Next up was the top of the wings glued in place. I then glued the ailerons in, offsetting them slightly. Now to the problem piece. The carburetor air intake (C49) is an AM anomaly. It does not fit without a large gap. You can shim it with plastic card, or take the easy way out (like me!) and just fill it with putty. I then sanded all the seams and applied a little Mr. Surfacer where needed.
The model was painted, decaled, and weathered as described in the following subsections and then final assembly took place.
For final assembly I installed all the landing gear components, and cockpit details. Lastly, I installed the propeller assembly, pitot, and exhaust stacks.
|
PAINT & DECALS |
The model was painted in a typical YAK-1b scheme of dark gray and light gray, with a bright blue underside. I used Polly Scale USSR Underside Blue, Dark Topside Gray, and Light Topside Gray. After letting the paint dry overnight I shot a light coat of Polly Scale Gloss Finish to prepare for the decals.
 The kit decals are
excellent, nice and thin with good registration. After a short drying period, I
applied MicroSol setting solution to get the decals to melt into the surface.
They responded very well to the setting solution with no permanent wrinkling.
After drying overnight, I wiped the decals off with a moist cloth with a bit of
Polly S Plastic Prep to remove any residue and after drying I shot a light coat
of Future over the decals to seal them.
The kit decals are
excellent, nice and thin with good registration. After a short drying period, I
applied MicroSol setting solution to get the decals to melt into the surface.
They responded very well to the setting solution with no permanent wrinkling.
After drying overnight, I wiped the decals off with a moist cloth with a bit of
Polly S Plastic Prep to remove any residue and after drying I shot a light coat
of Future over the decals to seal them.
For weathering, I chose to accentuate the engraved panel lines and surface detail with a light burnt umber oil wash. I then sealed everything with a light coat of PS Flat Finish to provide a surface for pastel application. I then randomly applied some ground up burnt umber pastels with a soft brush to simulate dirt staining on the lower surfaces and also the exhaust/gun streaks. Lastly, I applied a heavy burnt umber oil wash to the wheels and control surface joins.
Lastly, I airbrushed a coat of Polly S Satin Finish to provide a semi-gloss sheen since the aircraft was made primarily of wood that had a heavy varnish applied.
|
CONCLUSIONS |
This is an excellent model of an important WW II aircraft. I am pleased that finally a major kit manufacturer is making 1/48 kits of Russian aircraft. Overall the quality and accuracy are exceptional. The level of detail engraved in the kit is downright incredible. AM still lives up to their awesome reputation with this kit. I spent a little under 20 hours building this kit which is about average for me on an AM build.

|
REFERENCES |
Schiffer Publishing, Stalin’s Eagles, $59.95
Ivy Books, Fighting In Hell, $6.99
Avery Publishing, West Point Military History Series: The Second World War (sold as set)
Modeling The Aircraft Of The Soviet VVS, http://www.oz.net/~xopowo/VVS/vvs.htm
If you would like your product reviewed fairly and fairly quickly contact the editor or see other details in the Note to Contributors.
Back to Reviews Page 2017