|
KIT # |
? |
|
PRICE: |
$ |
|
DECALS: |
See review |
|
REVIEWER: |
Olivier Lacombe |
|
NOTES: |
|
HISTORY |
Alternate History
In May of 1945, the Red Army was
victorious. Berlin was within reach of the shock armies of Marshall
Zhukov and … Although military success was relatively easy to come by,
success with the locals was problematic. Illiterate frontovik
soldiers and tankers took a heavy toll on the populace, summary
executions, looting and rape being on the agenda. The Soviet high
command knew that something had to be done to
 occupy the troops once
the final gunshot had been fired. Various schemes were put forth,
from campaign theatres to musical bands, but one proposal differed from
the lot.
occupy the troops once
the final gunshot had been fired. Various schemes were put forth,
from campaign theatres to musical bands, but one proposal differed from
the lot.
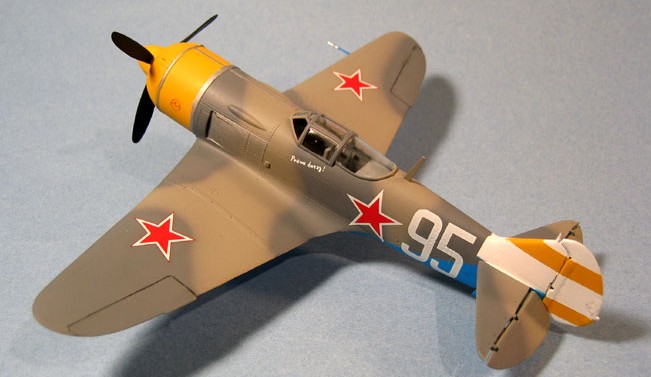
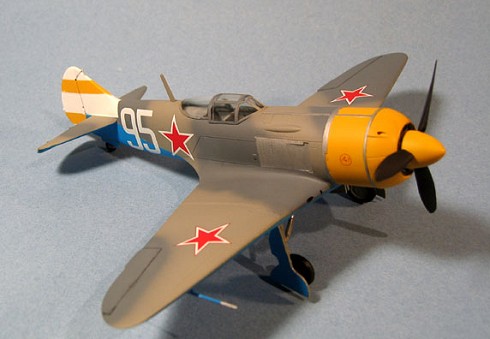
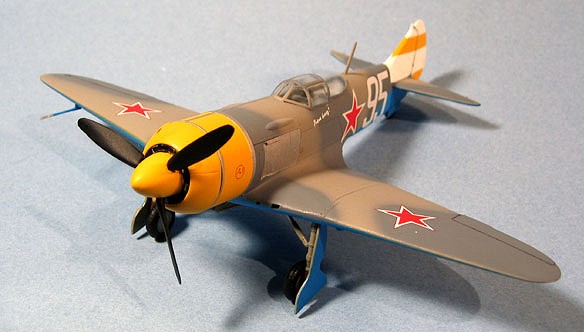
Victor Pietrovich Krishenko was a star among its peer. One of the best pilot in the VVS, he had raked an impressive 45 kills in just over a year and a half, flying Lavochkin fighters. Now flying the mighty La-7, he spent his free time entertaining his pilot comrades with precision aerobatics over the airfield. Usually, such actions were heavily reprimanded by the brass, but his skill made this aerial ballet an extremely good morale booster for the other crews. Upon hearing about the plan to entertain the troops, his squadron leader proposed to the local zampolit that Victor be allowed to perform air shows to entertain the weary soldiers. Approval was quickly granted and Krishenko and his crew were tasked with the embellishment of the Lavochkin. Soon, soldiers were treated to the whistling roar of the Ash-82 engine flipping over Berlin… The Air show La-7 was born!
|
THE KIT |
Typical of older Hobbycraft kit, the La-7 features a mix of heavy and fine details. Fabric on the surface controls is much too heavy, while the scribing on the fuselage and wings is neatly clear. There are no options; the canopy can only be posed in the closed position. Cockpit detail is bare, but scratch builders will be able to make good out of it! You also get parts for the La-5FN, but this later kit is really a La-7 with La-5 parts. Don’t go near it. As for the La-7, it looks like one to me!
I had the good fortune of buying a black box, so I received very good decals in it. Marking options are for Ivan Kozhedub’s presentation aircraft in various tones of blue, a Czech Air Force bird around 1947 and a Soviet fighter from the 163 IAP in 1944.
|
CONSTRUCTION |
 As always, construction started
with the cockpit. With a good paint job, it looks fairly good. I
painted everything Model Master Light Ghost Gray as my supply of Medium
Gray (my usual Russian aircraft interior colour) was dry. Once
assembled, it’s simply a matter of dropping it in the closed fuselage. I
assembled the wings and removed the elevators from the stabs, a tedious
chore since the attachment points are triangular, so you have to drill
all around to be able to separate them. I then checked the fabric detail
on the control surfaces and decided it was much too heavy, so I sanded it
off everywhere but under the elevator.
As always, construction started
with the cockpit. With a good paint job, it looks fairly good. I
painted everything Model Master Light Ghost Gray as my supply of Medium
Gray (my usual Russian aircraft interior colour) was dry. Once
assembled, it’s simply a matter of dropping it in the closed fuselage. I
assembled the wings and removed the elevators from the stabs, a tedious
chore since the attachment points are triangular, so you have to drill
all around to be able to separate them. I then checked the fabric detail
on the control surfaces and decided it was much too heavy, so I sanded it
off everywhere but under the elevator.
I then mated the wings to the fuselage, and the stabs followed. Seams were puttied and sanded all over, but it’s nothing serious, the kit was very good fit. I also built up the spinner, but left the propeller blades off to be added once the painting was done. Also, checking the fit of the front cowl, I decided to leave it off as the fit was excellent. It would allow for an easy way to hold the model while painting it. The rudder was glued on at this stage, and once again, fit is excellent. The last bit left was the oil cooler for which no positive location aids exists. I eyeballed in place, but not before I painted the inside black. The canopy was masked and glued in place.
|
COLORS & MARKINGS |
Originally, this kit was supposed to be an experiment to do a What-If paint scheme on a La-7. I had thought of using Lt. Col. S.F. Dolgushin’s scheme, but with the red replaced by yellow. A quick Photoshop session using a scan from the Osprey Soviet Aces of World War 2 convinced me it was the way to go. Now, before anyone starts saying that no Soviet fighter could have wore so large an area of yellow for fear of confusion with the German planes or lack of patriotic feelings, a quick browse through the aforementioned book shows a few aircrafts with rather large patches of yellow. Case closed.
 First thing I did was to paint
the nose and tail with Tamiya XF-12 IJN Grey to serve as primer for
Tamiya Flat White. Once it was dry, I masked the tail bands and used
Gunze RLM 04 to do the yellow bits. The spinner and front cowls were
dealt in the same manner, except I used no white. Everything was then
masked in preparation for the next step. On the nose, the strips that
hold the cowlings in place really made it easy to mask it up. I read out
Tom Cleaver’s article about his Gavia La-7 to find out what colour I
could use for the belly, and read that he had used Tamiya X-14 to do the
job. Now this colour is called Sky Blue and is very bright, and I was in
shock when I realized how it had turned out. An email to Tom taught me
that he had used RLM 76 to lighten it once it was dry. Oh well. That’s
when I decided to change my plans and to proceed with the Air show La-7.
First thing I did was to paint
the nose and tail with Tamiya XF-12 IJN Grey to serve as primer for
Tamiya Flat White. Once it was dry, I masked the tail bands and used
Gunze RLM 04 to do the yellow bits. The spinner and front cowls were
dealt in the same manner, except I used no white. Everything was then
masked in preparation for the next step. On the nose, the strips that
hold the cowlings in place really made it easy to mask it up. I read out
Tom Cleaver’s article about his Gavia La-7 to find out what colour I
could use for the belly, and read that he had used Tamiya X-14 to do the
job. Now this colour is called Sky Blue and is very bright, and I was in
shock when I realized how it had turned out. An email to Tom taught me
that he had used RLM 76 to lighten it once it was dry. Oh well. That’s
when I decided to change my plans and to proceed with the Air show La-7.
I now needed a paint scheme that would really stand apart from the normal Soviet fighter planes. I browsed through various books featuring Soviet planes and spent a good deal of time looking at models on the web, but nothing caught my eyes. I was extremely pleased to see Randy Lutz’ Gavia La-7 on Hyperscale, as it provided me with the exact scheme I was looking for. Two-tones of grey! Using a scrap sheet of paper, I drew a quick La-7 three-view plan and copied the scheme from the photos at hand. I used Tamiya XF-20 Medium Grey and XF-53 Neutral Grey for the scheme. The colours went on beautifully and it was now time to start adding all the fiddly bits.
|
FINAL CONSTRUCTION |
I painted the wheel wells and all the landing gear parts Model Master RLM 02 as I read that it was pretty close to the colour used on the planes by the Russians. I got the gear legs on the plane, but when I was about to install the main gear doors, I was struck by how wrong they looked. I decided to craft a new set using a scrap styrene sheet. I used the old parts to make a pattern and cut the new ones out with a pair of scissors. I didn’t quite managed to do something terrific, but my home-grown doors look better than the ones in the kit!
 Once all the parts were on, I
glued the stabs in a drooped position, and found out about 2 days later
that when parked, La-7 almost always had the elevators pointed upwards!
Oh well. It’s going to stay that way! I masked around the front
fuselage sides and brushed on some Testor Aluminium (small jar) to
replicate the metal heat shields. I also gave all the cowling strips the
same way. When I unmasked the tail, I found out that yellow paint had
crept under the masks to mar the white surface. I repaired the various
leaks with my trusty brush. Also, for some unknown reason, the RLM 04 I
shot over the white of the tail has a different tint than the one on the
nose, which was sprayed directly over Tamiya IJN Grey.
Once all the parts were on, I
glued the stabs in a drooped position, and found out about 2 days later
that when parked, La-7 almost always had the elevators pointed upwards!
Oh well. It’s going to stay that way! I masked around the front
fuselage sides and brushed on some Testor Aluminium (small jar) to
replicate the metal heat shields. I also gave all the cowling strips the
same way. When I unmasked the tail, I found out that yellow paint had
crept under the masks to mar the white surface. I repaired the various
leaks with my trusty brush. Also, for some unknown reason, the RLM 04 I
shot over the white of the tail has a different tint than the one on the
nose, which was sprayed directly over Tamiya IJN Grey.
Decals
Once the Future had dried, I proceeded to decal the plane. Since I was doing an air show bird, I thought it would be neat to transgress the usual Soviet way of not putting red stars on top of the fighter’s wings. I also imagined how neat red stars would look on the aircraft as it would pull up in a loop. I just tried to put decals to make it look official, but at the same time to have it look smart.
Poly Scale was airbrushed over the model and the canopy mask was removed.
|
CONCLUSIONS |
Well, this must be one of the prettiest paint schemes in my collection! I really enjoyed that kit, as it was dirt cheap and made for a worthy challenge. With a little work, it can be made in something that will rival the Gavia kit in look, and for 4 times less money! I recommend this kit to anyone looking for a fun build.
May 2004
|
REFERENCES |
MORGAN, Hugh, Soviet Aces of World War 2, Osprey aircraft of the aces # 15, Osprey Aerospace, London, 1998.
Copyright ModelingMadness.com. All rights reserved. No reproduction in part or in whole without express permission from the editor.
If you would like your product reviewed fairly and fairly quickly, please contact the editor or see other details in the Note to Contributors.