Hasegawa 1/72 Yak-3
|
KIT #: |
AP 1 |
|
PRICE: |
$17.00 when new in 2002 |
|
DECALS: |
Two options |
|
REVIEWER: |
Jon Hudak |
|
NOTES: |
|
Much has been written about the Yak-3. It was a lightweight, small fighter
built by the Soviets in WW2. It was a further development of the Yak-1M
series with a shortened wingspan and other improvements. The idea was to
improve the already existing Yak-1M series by focusing on improving its
endurance, combat ability and firepower. It was crucial that in order to
improve its abilities, great steps would have to be made in weight reduction
and increasing its performance and speed.
The prototype Yak 3 started life as a standard Yak-1M fuselage fitted with a
new shorter span redesigned wing. The designers at Yakovlev were hoping to
install the new M-107 engine with its
 increased 1,500 plus horsepower
engine. Though highly anticipated the new engine never really materialized
so they had to keep the M-105PF engine already in use with the Yak-1 series.
The P meaning "pushka" or cannon (in this case a 20mm model) which was
mounted between the cylinder banks and fired through the propeller hub.
increased 1,500 plus horsepower
engine. Though highly anticipated the new engine never really materialized
so they had to keep the M-105PF engine already in use with the Yak-1 series.
The P meaning "pushka" or cannon (in this case a 20mm model) which was
mounted between the cylinder banks and fired through the propeller hub.
Improvements were made to the airframe to make it more aerodynamic like a
reconfigured oil cooler intake and a one piece wraparound windscreen to
improve forward/all around visibility. Trials for the prototypes started in
early 1943 and it did not disappoint. Top speeds between 410-422 mph had
exceeded expectations greatly and its flight performance at lower altitudes
was excellent. Unfortunately the prototype crashed from structural failure
during one of the trials (I'm assuming the pilot was probably killed) and
delayed full State Acceptance until October 1943. However the demand from
pilots in the field for a more modern and efficient fighter led to them
being introduced into fighter service before completion of State
Acceptance.
Yak-3s first saw action in June 1943 towards the end of Operation Zitadelle
in the Kursk area. It was a fighter that was loved by its pilots and could
easily hold its own against its Luftwaffe contemporaries like the
Messerschmitt BF109 F/G series and Focke Wulf FW190. One of the lightest
fighters of the war due to its mostly wood construction, it weighed in at
around 5,864 pounds. The Yak-3 had a range of just over 550 miles, a top
speed of around 404 mph and most of them were fitted with a single 20mm
ShVak cannon and two 12.7mm Berezin machine guns. Many an ace would claim
their fare share of kills and came as a nasty surprise to unsuspecting
Luftwaffe pilots.
Hasegawa's kit has been around for sometime. It is a very nice model in
typical Hasegawa fashion. There are three sprues molded in Hasegawa's
standard light gray plastic and one in clear for the canopies. Since the
Yak-3 was of mostly wood construction there aren't a lot of panel lines
on the kit. The ones that are there though are finely engraved. There
are just a few on the fuselage halves and most of them are on the wings.
In typical Hasegawa fashion the panel lines are just right, not too fine
and not too deep. Wheel wells are unfortunately not boxed in. Don't know
how much this might bother some but it
 wouldn't be too hard to fix. The
cockpit is almost ample enough with a one piece main unit that consists
of the floor, lower seat bottom, consoles and foot pedals. There is a
separate seat back, instrument panel and control column. A decal is
provided for the instrument panel which itself is flat with no molded in
raised detail. As usual in a 1:72 scale Hasegawa warbird kit there is no
sidewall detail on the inner sides of the fuselage halves. A nice touch
is the option of two canopies to choose from. One is a solid single
piece unit while the other is a separate three piece affair for anyone
wishing to pose it open.
wouldn't be too hard to fix. The
cockpit is almost ample enough with a one piece main unit that consists
of the floor, lower seat bottom, consoles and foot pedals. There is a
separate seat back, instrument panel and control column. A decal is
provided for the instrument panel which itself is flat with no molded in
raised detail. As usual in a 1:72 scale Hasegawa warbird kit there is no
sidewall detail on the inner sides of the fuselage halves. A nice touch
is the option of two canopies to choose from. One is a solid single
piece unit while the other is a separate three piece affair for anyone
wishing to pose it open.
Decals are provided for two Normandie Niemen aircraft. One for Pilot
officer Robert Marchi and the other for Pilot Officer Roger Sauvage.
Sauvage had the distinction of not only being a gifted fighter pilot but
also because he was African American. He was born in Paris in 1917 and
flew with the Armee de l'Air then eventually with the Normandie Niemen
for the Soviets. But that is another story in itself and one well worth
reading!
Construction started in the cockpit. If you're doing this kit out of the
box, it won't take you long to finish the cockpit that's for sure. To start
with I glued the control column to the floor and the back of the seat in
place. While I was at it I glued the radio platform panel to one of the
fuselage halves before setting everything off to the side to dry for a day
or two. Not sure what the exact color was for the cockpit I just followed
the instructions and used Gunze H48 Field Gray. This color is not unlike
RLM02, just maybe a little darker. I used it for the entire cockpit,
instrument panel, insides of the fuselage halves and the insides of the
landing gear doors and wheel wells. Since the paint was a gloss color I
didn't have to use a separate clear gloss before applying the instrument
panel decal. Once the paint was dry I simply applied the said decal right
over the top of it and voila that was that! I did spray some Testors
Dullcote it to seal the decal in once it was dry though. Any other details
that could be picked out in the cockpit were also done at this time. This
was mostly just some flat black for the control column grip and for the
radio box behind the pilot.
 Once all the cockpit work was done, the fuselage halves were glued together.
When this sub-assembly was dry, the collet/ring was glued in place
inside/behind the front end of the forward edge of the fuselage. This is
where the propeller shaft will slide through. A test fit at this stage of
the fuselage to the wing assembly with the cockpit set in place showed that
it would fit right over with no problems. I also added the separate upper
fuselage insert piece (that forms the top of the cowling/fuselage) around
this time too. So far so good for now...
Once all the cockpit work was done, the fuselage halves were glued together.
When this sub-assembly was dry, the collet/ring was glued in place
inside/behind the front end of the forward edge of the fuselage. This is
where the propeller shaft will slide through. A test fit at this stage of
the fuselage to the wing assembly with the cockpit set in place showed that
it would fit right over with no problems. I also added the separate upper
fuselage insert piece (that forms the top of the cowling/fuselage) around
this time too. So far so good for now...
It was at this point that I hit my first snag with the build. The Yak-3
features two front air inlets at the wing roots (one on either side of the
fuselage at the wing root joint). In the middle of each of these oval shaped
air inlets is a vertical "splitter" bar. I don't know how this is done on
larger scale Yak-3s but on this kit this "splitter" as we'll call it is,
well, split into two pieces. One is on the inside of the top wing and the
other is on the inside of the bottom wing. The wings themselves are
different from the more common 3 piece affair with the single lower span and
the usual two single individual upper pieces like you'd see on a Spitfire,
Mustang, BF-109 etc. Instead this kit features a single span lower piece and
a similar single piece for the upper wings. Maybe it's a common feature on
Yak-3 kits of all types?
Anyway, when you go to line up the two wing halves with each other,
everything fits nice except for the said splitter plates. They don't line up
with each other. After much deliberation, I cut them out from both main wing
sections and replicated them with some thin sheet styrene. It was easier
than I thought and a feather in the cap so to speak! Once this was done I
glued the wing halves together and set them aside to dry. Around this time I
worked on cleaning up the fuselage seams. Due to the unusual configuration
of the wings, the cockpit floor rests in a rectangular hole in the top of
the one piece upper wing. A test fit
 of dropping the fuselage assembly down
onto the wing showed a positive fit. So the cockpit tub was glued in place
and the fuselage was then glued to the wing assembly. The horizontal stabs
soon followed and I now had a mostly complete airframe.
of dropping the fuselage assembly down
onto the wing showed a positive fit. So the cockpit tub was glued in place
and the fuselage was then glued to the wing assembly. The horizontal stabs
soon followed and I now had a mostly complete airframe.
You'd think for something as small as a 1:72 scale Yak that this could be a
quick and easy project. For some that would be the case but not for me! when
I went to add the radiator/bath piece I hit another snag. I don't know if it
was me or the kit but the trailing edges of this unit that make contact with
the fuselage had a big gap on either side and did not sit well at all. With
no quick or easy solutions I added some sheet styrene on either side of the
piece (again to the two sides that make contact with the lower fuselage) and
ended up trimming and sanding the "extensions" I added until I got them to
square up against the fuselage. Before gluing this part to the fuselage I
painted the interior walls of it and the relative area of the fuselage with
some AMT7 Blue from White Ensign Models. The separate "door" at the rear of
the assembly was added and I had previously painted the inside of it with
the same color.
Eventually things started to take shape. Now with all the seams cleaned up
and filled, the wheel wells were masked off and the airframe was almost
ready for paint. The canopy was masked with some bare metal foil and glued
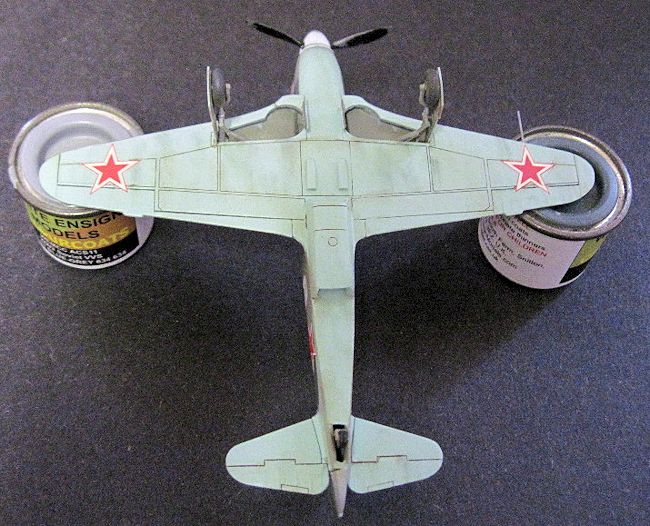
in place. For this model I used White Ensign Model paints. For the bottom of
the airframe and outsides of the landing gear doors I used their AMT7
(light) Blue. This color went on quite nicely I must admit. Once this color
had dried the bottom of the airplane was masked off in preparation for the
AMT-11 Blue Grey. This color also went on nicely and without any problems.
 The last color to go on was the AMT-12 Dark Grey. I thought this color was
originally going to be a dark grey but was surprised to see it was a very
dark sort of greenish color. I don't know why but for some reason this color
didn't go on as well as the other two. Even though it was thinned to the
same consistency as the first two, it just didn't perform as well and was
kind of blotchy and a little on the watery side. It may have just been a
faulty operator valve and I'll try and be more careful next time. In the end
everything worked out fine and you couldn't tell I had any problems so that
was good.
The last color to go on was the AMT-12 Dark Grey. I thought this color was
originally going to be a dark grey but was surprised to see it was a very
dark sort of greenish color. I don't know why but for some reason this color
didn't go on as well as the other two. Even though it was thinned to the
same consistency as the first two, it just didn't perform as well and was
kind of blotchy and a little on the watery side. It may have just been a
faulty operator valve and I'll try and be more careful next time. In the end
everything worked out fine and you couldn't tell I had any problems so that
was good.
With the AMT-12 now dry and all the masking removed, the model was given a
couple of coats of Future in preparation for the decals. With the exception
of the national insignia I decided to eschew the rest of the kit decals and
not do one of the Normandie Niemen planes. It's not that I have anything
against the Nornandie Niemen aircraft it's just that they seem to be pretty
commonplace when it comes to Yak-3s. Okay another reason too was because I
"wimped out" and did not feel like trying to paint those red, white and blue
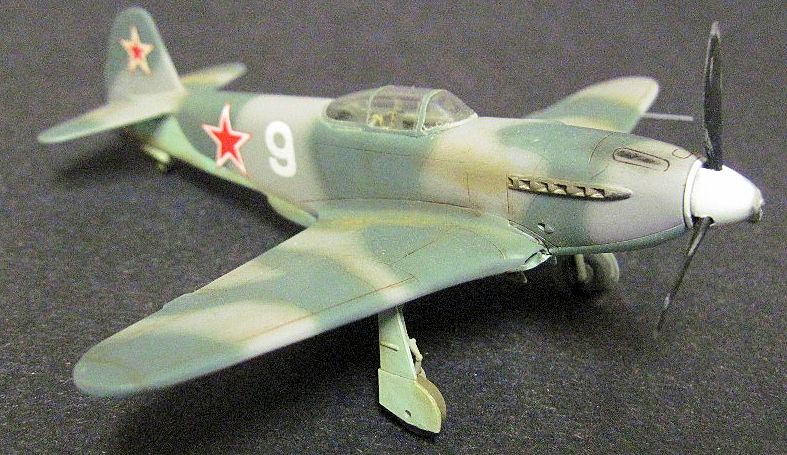
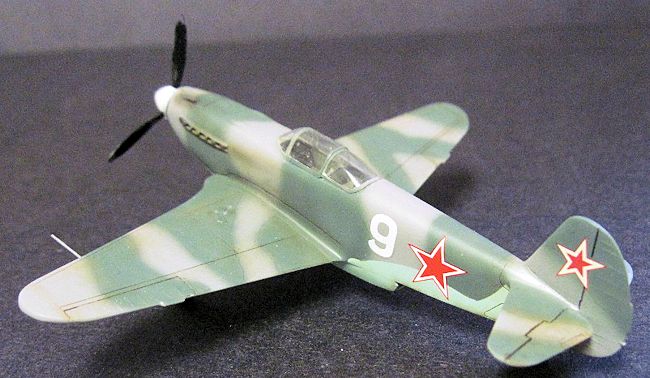
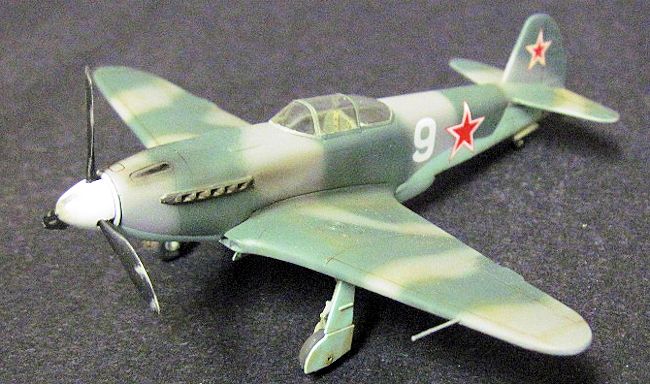
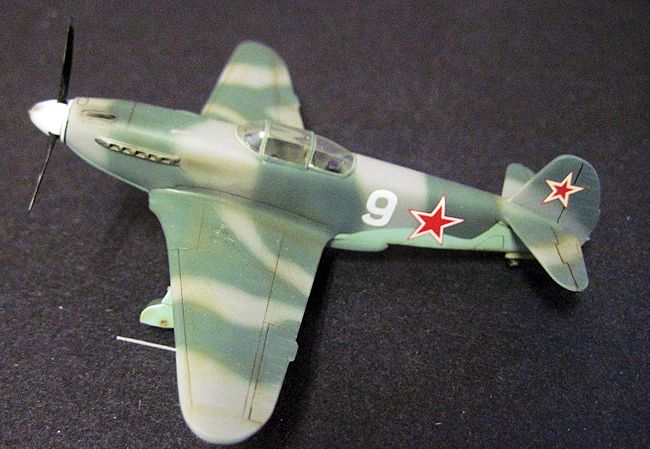
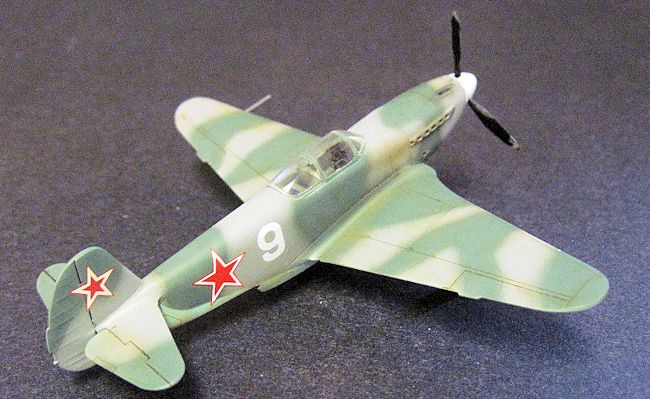
stripes on that tiny spinner as well! I decided to go with "White 9", a
Yak-3 that was flown by Djilos Moritsov of the 419IAP in 1944. This plane
was a little more unusual for it featured a white tactical number on the
fuselage and a white spinner. After the decals were sealed in with another
coat of Future the model was given an oil paint wash to dirty it up a bit
and highlight some of the recessed detail.
 With the model nearing completion, the landing gear units were cleaned up,
painted and assembled. I had previously painted them with the Gunze H48
Field Gray. All that was left was to paint the sliding sections of the oleos
with some Model Master Chrome Silver enamel and a lightened flat black for
the tires. All of these pieces and the gear doors presented no real problems
and went on well enough. The pitot tube had also been previously painted and
could now be added. The propeller had been previously painted with flat
black. It and the spinner assembly were glued together. The exhausts were
painted at this time too. One of the last things I did was to push on the
completed prop and spinner assembly. To complete the model some weathering
was done, using some various colored pastels to simulate dried mud and some
gun staining. With that the model was now complete.
With the model nearing completion, the landing gear units were cleaned up,
painted and assembled. I had previously painted them with the Gunze H48
Field Gray. All that was left was to paint the sliding sections of the oleos
with some Model Master Chrome Silver enamel and a lightened flat black for
the tires. All of these pieces and the gear doors presented no real problems
and went on well enough. The pitot tube had also been previously painted and
could now be added. The propeller had been previously painted with flat
black. It and the spinner assembly were glued together. The exhausts were
painted at this time too. One of the last things I did was to push on the
completed prop and spinner assembly. To complete the model some weathering
was done, using some various colored pastels to simulate dried mud and some
gun staining. With that the model was now complete.
It really felt good to finish this kit for a couple of reasons. For one I
overcame the small hurdles that it threw at me. I also was quite pleased
with how it turned out and have an appreciation for this little "mini mite"
fighter. It really is a small airplane! It has pleasing lines and looks like
a little racehorse. And most of all I was happy to complete this kit for it
was the very "first" model I bought upon getting back into the hobby over a
dozen years ago in 2002. Man where does the time go to!?
When this kit was originally released it was the most modern version
available in this scale. Previously there had been the old Heller kit which
was also reissued by Airfix. One or two other examples existed but the
Hasegawa kit was about the best one to be had if you were looking for one
that was up to date and modern. Overall it is a nice kit that I can
recommend. It looks nice in the box and for the most part goes together
well. The kit is not without a couple of faults though. The lack of more
interior detail doesn't help and the panel lines on the upper wings are
supposedly "too much" since the real airplane had wooden wings. The shape of
the spinner is also said to be a bit off. Despite these things it still
looks like a Yak-3 to me. If it looks like a Yak and quacks like a Yak then
it must be a Yak! Anyway that's enough yakking....:-) But at the end of the
day I have no real gripes about the kit other than the high price it can
command if bought new, either singly or in the more recent combo/twin pack
which is not cheap!
Now this kit has competition from the Hobby Boss kit and the most recent
Zvezda kit. I would rate the Hasegawa kit better than the Hobby Boss kit but
if you're looking for the top dog Yak-3 in this scale I would say then get
the Zvezda kit for it has the most detail and is the most modern up to date
kit.
Yak Fighter in action. Squadron Signal Publications copyright
1986
Jon Hudak
November 2014
Thanks to
for the review kit. You can find this one at your favorite hobby shop
or on-line retailer.
If you would like your product reviewed fairly and fairly quickly, please
contact
the editor
or see other details in the
Note to
Contributors.
Back to the Main Page
Back to the Review
Index Page