|
KIT: |
AER 1/72 Polikarpov I-153 |
|
KIT # |
7204 |
|
PRICE: |
AUD $6.00 |
|
DECALS: |
9 aircraft |
|
REVIEWER: |
Mark Fordham |
|
NOTES: |
Short run kit |
|
HISTORY |
 The most surprising thing
about the I-153 is that it was not superseded by the I-16 monoplane, in fact the
I-16 flew before the I-153 and I-15 and was in service before both and in 1939
actually replaced the I-16 in Mongolia because it was more agile. The I-153's
and I-15's were mixed in with the I-16 equipped squadrons so the VVS had the
best of both worlds, the higher speeds of the monoplanes with the agility of the
bi-planes, in reality the I-153 was only a few miles per hour slower than the
I-16 and far more maneuverable.
The most surprising thing
about the I-153 is that it was not superseded by the I-16 monoplane, in fact the
I-16 flew before the I-153 and I-15 and was in service before both and in 1939
actually replaced the I-16 in Mongolia because it was more agile. The I-153's
and I-15's were mixed in with the I-16 equipped squadrons so the VVS had the
best of both worlds, the higher speeds of the monoplanes with the agility of the
bi-planes, in reality the I-153 was only a few miles per hour slower than the
I-16 and far more maneuverable.
Many countries used the I-153 including the Finns, Chinese and even the Spanish Republicans, all drawn to the type's ruggedness and maneuverability. It was usually armed with four 7.62 ShKAS machine guns in the fuselage plus two 165lb bombs or six RS-82 rockets.
One of the most interesting modifications done to the I-153 was the addition of two ram jets under the wings in an attempt to boost the speed of the fighter for brief periods. On October 1940 a I-153 DM-4 (DM standing for "auxiliary motor") was clocked at a whopping 273 mph at 6,560 ft compared to the I-153's maximum speed of 241 mph.
|
THE KIT |
 With only 29 pieces on two
very small sprues you would think that this kit would be a "one nighter".
Well
folks, that is not going to be the case here, for those of you that like every
problem inherent in a East European short run kit read on. For those of you that
don't, run out and find the 1/72nd scale Heller I-153 because within a very
short time most people would put this model in the parts bin. (Confucius say:
"few parts do not always mean easy build")
With only 29 pieces on two
very small sprues you would think that this kit would be a "one nighter".
Well
folks, that is not going to be the case here, for those of you that like every
problem inherent in a East European short run kit read on. For those of you that
don't, run out and find the 1/72nd scale Heller I-153 because within a very
short time most people would put this model in the parts bin. (Confucius say:
"few parts do not always mean easy build")
Be prepared for some serious work with this one as it will require a lot of time and effort to get it resembling a I-153.
The instructions are printed on a cheap A4 single sheet and apart from the color call-outs contain not one word of English, pictorial exploded construction steps make for easy construction for those who cant read Russian.
The decal sheet has marking for no less than nine aircraft, six VVS aircraft using both types of Russian stars, a German aircraft, a Finnish aircraft and finally a Chinese aircraft.
|
CONSTRUCTION |
Construction starts not with the cockpit but with the fuselage on this one, once the fuselage halves had been cut from the very thick gates and cleaned up it was time to have a close look at the moldings, the fuselage has no detail what so ever and is missing the noticeable stringer effect along the rear fuselage and is completely devoid of panel lines forward of the cockpit, fit of the parts are not crash hot either with a lot of care needed to remove the warp out of the starboard half.
Comparing the the separate
rudder to plans shows that the trailing edge would scale out to be about 8 inchs
thick and that the rudder is around 4 mm too narrow, a new rudder was fashioned
from plastic card with the trim tab and extra plates added from 5 thou plastic
card. Some form of stringer detail
 was attempted by scribing a
few lines along the fuselage using a 11# blade, not 100% happy with the effect
but trying to reproduce the right effect is at the moment beyond my moderate
modeling skills, at the same time an effort was made to add a few panel lines
around the nose using plans and photos as a guide.
was attempted by scribing a
few lines along the fuselage using a 11# blade, not 100% happy with the effect
but trying to reproduce the right effect is at the moment beyond my moderate
modeling skills, at the same time an effort was made to add a few panel lines
around the nose using plans and photos as a guide.
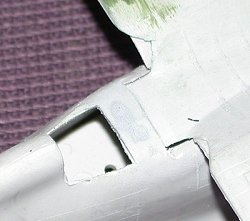
Moving onto the upper wing showed more work needed, the heavy rib tapes were completely removed and rescribed as above, at the same time I took the opportunity to thin out the trailing edges of the wing as again they scaled way too thick and at this time some sanding of the wing tips were in order to get them to look more like what's on the plans, once a closer profile was obtained it was time to clean up the gaps between the wing and fuselage, see attached photo
At this point the cockpit was assembled and painted some extra detail is needed as all you get out of the box is a floor and a seat, good old plastic card and sprue added the details which are all but invisible when finished, once dry the cockpit can be slid in from underneath and the lower wing glued on, as with every other part on this kit filler was needed to hide the join lines.
 Once the problems of the
upper wing where addressed it was time to repeat the work on the smaller lower
wings and fix the gaps caused by the "short shot" of the castings, for such a
small model it was using up a lot of filler!
Once the problems of the
upper wing where addressed it was time to repeat the work on the smaller lower
wings and fix the gaps caused by the "short shot" of the castings, for such a
small model it was using up a lot of filler!
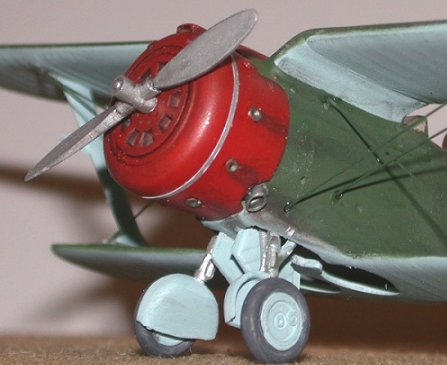
The nose came into some major work next as the exhausts consisted of nothing more than shallow depressions in the cowling, these were reworked with suitable thickness sprue glued in the depressions and once dry the ends were hollowed out a little to give some depth, the trailing edge of the cowling needed lots of thinning out to get it to slip over the fuselage and the cowling came into more filing to represent the large lower exhaust cut-out, phew! I might as well have scratch-built this little bird with the amount of work each part required.
The undercarriage was installed at this point and needed a little persuasion and trimming to fit but this was becoming the theme for this kit, every part needed some form of cleaning or detail addition before it could be used.
Final assembly consisted of thinning the tailplanes by half and they are still too thick, rescribing rib detail and reshaping the tips to a more accurate shape, the kits rear struts can be binned and new ones made up from stretched sprue as they are not the correct shape or thickness.
|
PAINTING & MARKINGS |
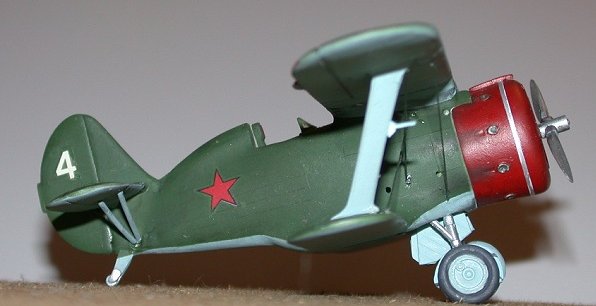
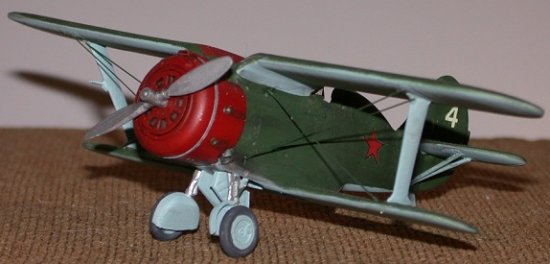
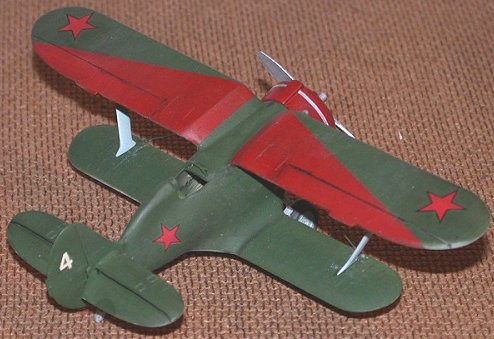
I like the simplicity of Russian aircraft color schemes in the early days of the war as most of the aircraft were painted in various shades of blue and green and the I-53 was no exception with most of the decal options being overall Green or Green over Blue.
As with most of my Russian aircraft the I-153 was painted using Humbrol Blue 65 and Green 105 with a drop or two of light grey added to "fade" the paint, the blue was sprayed on first using a Badger 200 @ 22 psi and left for a few hours to dry then after masking the green was gunned on, at that point I noticed a few bad sanding marks that had been missed and had to go back and fix them and re spray the green.
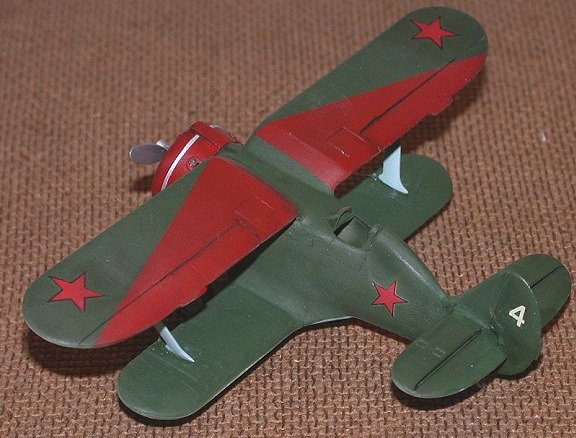
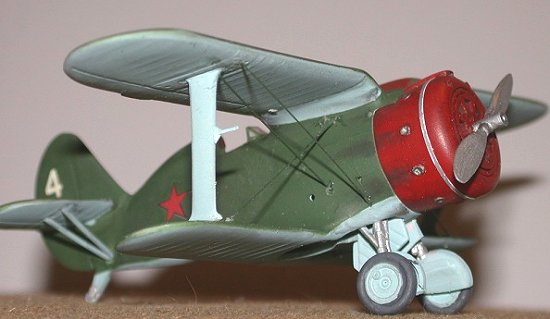 As I was sitting there
waiting for the paint to dry I was flicking through some color profiles that a
fellow internet modeller had sent me of the 1/48th scale Aeromaster decal
sheets, one of the profiles was of the top view of "White 4" with a red cowling
and red stripes on the upper wing, colorful I thought! as the profile only
showed the plan view and was unable to track down a side view the side stars
and position of the "White 4" are somewhat guessed. don't take them as gospel.
As I was sitting there
waiting for the paint to dry I was flicking through some color profiles that a
fellow internet modeller had sent me of the 1/48th scale Aeromaster decal
sheets, one of the profiles was of the top view of "White 4" with a red cowling
and red stripes on the upper wing, colorful I thought! as the profile only
showed the plan view and was unable to track down a side view the side stars
and position of the "White 4" are somewhat guessed. don't take them as gospel.
With the cowling repainted red and the red stripes adorned across the top wing the I-153 suddenly started looking kinda colorfull and cool.
On returning to the model a few days latter it was time to give it a quick whip over with a nylon pot scrubber to get rid of the bumps and blobs and then add the war grime using my usual HP printer ink wash and pastels, two coats of future were then added in preparation for the decals.
Trusting the feedback from the forum I decided to try the supplied kit decals, okay so they didn't dissolve in the water but they were so thin that they went a lovely shade of "yuck" over the green, a quick trip into the decal spares came up with some stars left over from the ICM I-16 project, nice decals but have a tenancy to sliver even on a gloss surface, careful overpainting went some way to fixing the problem the white 4 came from the spares box.
Finally a canopy was folded up from clear plastic card as for some strange reason the canopy is not included in the AER kit nor is it shown on the instruction sheet.
|
CONCLUSIONS |
 Not an easy kit by any
means and the old Heller kit is better in detail and ease of build, the AER
I-153 suffers from some shape issues like the rudder and upper wing but nothing
that a bit of plastic card and sandpaper cant fix, lots of work has to go into
it to bring it up to a acceptable model and the photos really do not show just
how crude this kit is.
Not an easy kit by any
means and the old Heller kit is better in detail and ease of build, the AER
I-153 suffers from some shape issues like the rudder and upper wing but nothing
that a bit of plastic card and sandpaper cant fix, lots of work has to go into
it to bring it up to a acceptable model and the photos really do not show just
how crude this kit is.
I really can't recommend this kit except to people that enjoy short run kits or scratch building. High point of the build was a fellow modeller remarking "Hey that's not bad for the old Heller kit" then all that sanding and filling suddenly becomes worthwhile
I don't believe that many of these AER I-153s will get finished as they do require more work than most people would be prepared to give them but hey, $6 x 4 weeks of modeling fun = good value for money. My thanks to FBN Productions for the review sample.
|
REFERENCES |
Aeromaster Decal Sheet “Fight Polikarpov Pt IV I-153”
Fighting Aircraft of WWII Bill Gunston ISBN 1-84065-092-3
http://kithobbyist.com/VVS
If you would like your product reviewed fairly and quickly by a site that has well over 150,000 visitors a month, please contact me or see other details in the Note to Contributors.