Maquette/ICM 1/48 Yak-7V
|
KIT #: |
? |
|
PRICE: |
$2.00 at a close-out sale |
|
DECALS: |
Two options |
|
REVIEWER: |
Lee
Fogel |
|
NOTES: |
A fun, quick build
that will require a bit of patience
|
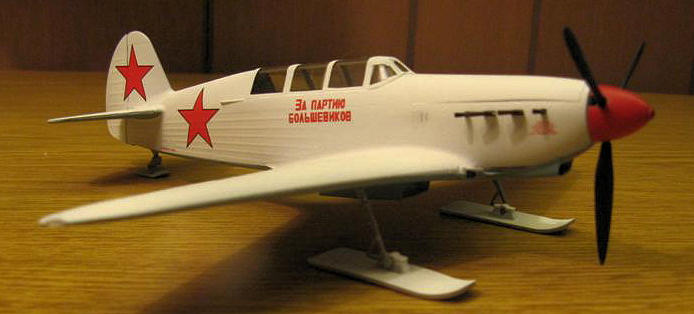
Developed in early 1942 the Yak-7V was an
improvement over its predecessor, the Yak-7UTI.
This newer version had fixed landing gear and was usually lacked
armament. A total of 697 Yak-7Vs
were built.
I was at my LHS (well,
its 220 miles away!) a few years back and happened to see this kit in their
close-out area. Taking a quick
gander I immediately noted that the contents looked like the
ICM
Yak-7 molds. It was marked down
from $7.99 to $2.99. Plus all
close-out items were an additional 33% off!
So, how could I possible go wrong?
I quickly plopped it onto the counter with the rest of my items.
 -Initial
Assessment-
-Initial
Assessment-
If you are familiar at all with
ICM
then you know that Maquette was/is one of their umbrella companies.
Upon opening the box you find three cream colored sprues with a sticky
mold release agent all over them. I
noticed that the plastic is a bit soft (like
the
AMT
kits of the 1990s)
with very finely recessed panel lines.
The cockpit is adequately detailed with the option of a decal front
instrument panel but not for the rear panel.
The seats do look a bit out of scale (on
the larger side).
There are parts that are shared with the
single-seat version as well as the choice of wheels or two sets of skis and
underwing rockets and launch rails along with a complete engine and three-piece
cowling. The instructions are blue
ink on white paper with a brief background of both the single and two-seat
versions. Overall the instructions
are good but seem to be a bit incomplete regarding the spares/options that are
included with the kit. For instance
there is no explanation for the difference in ski types and which would be
applicable for this kit. The canopy
is for the two seat version and is one piece and very clear with no distortion.
The decals appear to be typical Maquette/ICM
quality with concise instructions for color and placement.
ICM
decals are known to be a bit translucent and very hard to maneuver once onto the
model so be prepared for a bit of a fight…or just replace them.
Also, the red for the stars looks a bit too pink to my eyes but I could
be wrong on this.
I started things off by washing the tress in warm water with liquid
detergent. After the parts were set
aside to dry I looked over my options a bit closer.
I wanted to use the ski option and depict the aircraft in a winter
scheme. The kit makes no mention
of these parts but looking at my resources I chose part numbers 4 (x2),
14 and 15 to achieve this. Also,
this kit comes with a complete engine assembly.
However the
ICM
kits I have built in the past have major fit issues with the cowling panels
fitting properly with the engine installed.
So, with this in mind I declined to add the motor and relegated it to the
spares box. It is a
 nicely
detailed engine and is worth holding onto.
I did add a strip of sheet styrene to the inside of the side cowling
panels to glue the exhausts to though.
I chose the upper panel with a single gun port just for something a bit
different.
nicely
detailed engine and is worth holding onto.
I did add a strip of sheet styrene to the inside of the side cowling
panels to glue the exhausts to though.
I chose the upper panel with a single gun port just for something a bit
different.
Next up was to start painting and
assembling the cockpit. The pieces
fit together very well and soon I was ready to button this up.
The main parts were painted Model Master RLM 02 with the smaller details
picked out with Testors flat black, red, yellow and white.
A simple dry brush with Testors Silver was done and some light weathering
with pastels finished this off. For
the front instrument panel I used the supplied decal and added glass faces to
the dials with Testors Gloss Coat and a toothpick.
The rear instrument panel has little detail and no decal option.
So, I raided my leftovers and found a suitable PE panel and dials from an
Eduard Ki-46 detail set. I was
pleased with how my work on the instruments turned out so I moved on to the
seats. They look out of scale so I
made a pair using the bottom cut to size and the backs out of a Hasegawa SBD
bomb hatch cover. It had the right
curvature for a seat back and hey, what the heck else am I going to be able to
use it for!
There are no attachment points for the cockpit
framing and seats while the instrument panels are just trapped between the frame
rails. So, this makes it a bit of a
trick to get it all in place. I
test fit multiple times and used super glue to anchor it all together.
I glued the port frame rail onto the port fuse half first, test fit the
instrument panels and starboard fuse to this assembly and then glued the
starboard frame rail in. At this
time the fuselage halves
 were
mated and the instrument panels into place using Plastruct liquid glue.
There are no locator pins on any parts so make sure to take your time
lining things up. I installed the seats per the instructions.
They appear to sit a bit low.
For me, the placement of the cockpit parts and mating of the fuselage
halves was the most difficult part of the build.
were
mated and the instrument panels into place using Plastruct liquid glue.
There are no locator pins on any parts so make sure to take your time
lining things up. I installed the seats per the instructions.
They appear to sit a bit low.
For me, the placement of the cockpit parts and mating of the fuselage
halves was the most difficult part of the build.
Next I moved to the wings.
Since I chose to model a ski-equipped version I glued the tail ski into
place. Next the instructions call
for the gear doors to be glued flush to the lower wing regardless of the wheel
or ski options used. I did this and
then glued the topsides of the wings to the lower section.
The completed wings were then mated to the fuselage with Plastruct liquid
glue. The fuselage to wing root fit
was good with nary a gap topside.
On the underside there is a small gap where the midsection of the wings that
joins to the fuselage. I just used
a few passes with Plastistruct liquid glue to fill the area in.
It’s not perfect but with some putty and sanding you can make this area
flush if you so choose. The
ailerons are separate and you simply attach them to their respective spots.
They need a bit of trimming to fit into place properly though so trim and
fit a few times until you get a good fit.
The cowling is molded as three pieces.
It’s broken down into a top cowling piece along with two side cowling
pieces. It does take a bit of
lining up to get a clean fit to it.
Just take your time and triple-check it before you whip out the glue!
I had a small step
 on the
starboard side but I deemed I could live with it after a few passes with a
sanding stick.
on the
starboard side but I deemed I could live with it after a few passes with a
sanding stick.
The rear horizontal stabs and
separate vertical stab were glued and fit perfect.
The main landing gear is a bit fragile and the locator holes in the gear
bay are too big around thus creating a sloppy fit.
I used super glue on the main gear and added a bit of sheet styrene to
bulk up the attachment area. I left off
the skis at this time to add once the airframe was painted.
The exhausts were painted MM flat black then dry brushed with MM rust, MM
bronze metalizer and Testors steel.
The prop was taken from the spares pile as the kit piece looks uninspired.
I used a prop from the Tamiya Fw 190A-3 kit and slightly reshaped it.
The prop was then painted MM flat black and the hub detailed with Tamiya
silver. Finally, the prop spinner
was painted Dupli-Color Universal Red.
These parts were set aside to add at the end of the build.
I masked off the one-piece canopy with 3M blue masking tape as the
framing was thick enough to not need the use of Bare Metal Foil.
This was then attached in place in place with 5-minute epoxy.
I chose to pass on the kit supplied decals and instead sent out a
shout for spares. Mario Holly came
through with some leftovers from a Zvezda La-7.
The decals are thin and look to be good quality.
For the curious the slogan, directly translated, means “For Part of
Bolsheviks”. I started by
painting the underside MM Russian Underside Blue.
Once this was done I masked this section off and applied a two-tone
scheme on the topside consisting of MM Russian Topside Green and MM Flat Black.
For the winter white I used MM Flat White.
 The decals
were the applied and went on without a hitch.
However, I had to use the
ICM
decals for the underside stars and the data info.
I trimmed the carrier film from the
edges as there is a large amount around each decal.
Make sure to do this if you use the kit-supplied decals.
Anyhow, they went on without a hitch but when I put the gloss coat on the
following day the underside stars wrinkled.
The data stencils did not…go figure.
So, modelers beware!
The decals
were the applied and went on without a hitch.
However, I had to use the
ICM
decals for the underside stars and the data info.
I trimmed the carrier film from the
edges as there is a large amount around each decal.
Make sure to do this if you use the kit-supplied decals.
Anyhow, they went on without a hitch but when I put the gloss coat on the
following day the underside stars wrinkled.
The data stencils did not…go figure.
So, modelers beware!
The exhausts, prop and skis were added at this
time. A side note here on the skis;
the recessed area where the gear leg is cradled needs to be ground out a bit (parts
14 and 15). Also, the top
bracket (part 4) is too short and
will not cover the top of the gear leg when in place.
I used scrap sheet styrene to raise the attachment on the ski so that the
upper bracket would be able to be used.
Simple but it will need to be done so that the pieces fit together as
designed.
Weathering consisted of using
Formula P3
Armor
Wash
for an oily wash on the main gear.
I kept weathering nonexistent on the topside for a clean look and used chalk
pastels for light weathering underside.
For exhaust and gun residue I used my trusty set of chalk pastels and a
.07 Pentel mechanical pencil. The
landing lights were glued on using Model Master clear gloss lacquer.
This kit is a nice change of pace
from the various ‘109s, ‘190s, P-47s and P-51s we tend to gravitate to.
It’s very well detailed, small, goes together quick and makes for a neat
conversation and display piece with its skis and winter camouflage.
However, with iffy quality decals, no locating pins and vague
instructions regarding the cockpit assembly I would only recommend this kit to
someone with a bit of modeling experience and patience.
Give one a whirl and I believe you will be rewarded with a sharp and
unique addition to your collection.
vvs.hobbyvista.com
Lee
Fogel
November 2009
If you would like your product reviewed fairly and quickly, please
contact
me or see other details in the
Note to
Contributors.
Back to the Main Page
Back to the Review
Index Page