| KIT #: | A-Model #72164 and #72315, Hasegawa #AP27, ICM #72071, Clear Prop! #720246 |
| PRICE: | $12 ICM and A-Model, $30 Hasegawa and Clear Prop! |
| DECALS: | See article |
| REVIEWER: | Ryan Grosswiler |
| NOTES: | Injection molding of varying technology |
| HISTORY |
The Polikapov I-16, a fighter aircraft unlike anything else that would appear anywhere else in the world, was a product of both a nation that was struggling to recover from years of internal chaos and a flawed vision of what a future fighter force should look like. Nikolai Polikarpov had theorized that effective defensive airpower would consist of an even mix of maneuverable biplanes and fast monoplanes: that peculiar I-153 biplane was actually a slightly later design.
 Having
unwittingly pioneered Stalin's “Design and Engineering at Gunpoint” productivity
model, Polikarpov emerged from prison in 1933 determined to make up for lost
time, and was convinced that the way to do so was through a fast monoplane
fighter. The definitive I-16 was the result, and was flying and in production
within a remarkably short period. This timing would be its undoing, however: it
was an odd
technological half-step between the biplanes of the 1930s and the
high-performance monoplanes that would dominate the upcoming war. This, combined
with the statistic that Polikarpov's designs in general made up 98% of the
Soviet fighter force in June 1941 meant that the obsolete I-16 would bear the
full brunt of the Nazi invasion for the first year—taking some stupendous losses
in the process. Nonetheless, at least a dozen Soviet pilots would make ace on
the type.
Having
unwittingly pioneered Stalin's “Design and Engineering at Gunpoint” productivity
model, Polikarpov emerged from prison in 1933 determined to make up for lost
time, and was convinced that the way to do so was through a fast monoplane
fighter. The definitive I-16 was the result, and was flying and in production
within a remarkably short period. This timing would be its undoing, however: it
was an odd
technological half-step between the biplanes of the 1930s and the
high-performance monoplanes that would dominate the upcoming war. This, combined
with the statistic that Polikarpov's designs in general made up 98% of the
Soviet fighter force in June 1941 meant that the obsolete I-16 would bear the
full brunt of the Nazi invasion for the first year—taking some stupendous losses
in the process. Nonetheless, at least a dozen Soviet pilots would make ace on
the type.
Variants of the I-16 are designated by a bewildering array of “Type” numbers, but the modeler can simplify it as follows: the most fundamental external changes happened at the Type 10 point onward and were 1) a rearrangement of the exhaust ports when cowl guns were incorporated, and 2) ailerons shortened, starting at the outer wing panel rather than at the root. The other alterations, such as a switch from a closed canopy to open windshield, dimples on the cowl bottom for skis, cannon armament, etc, were more superficial. There was also the -UTI trainer, early-series aircraft that altered the fuselage fuel tank's shape to accommodate a new cockpit for the instructor, with the rear student's cockpit moved half a meter aft.
| THE KITS |
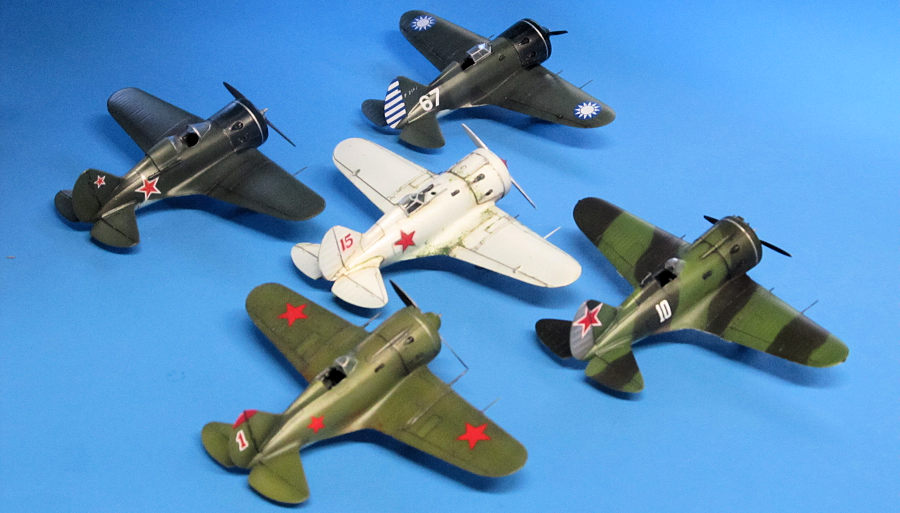
This is a build review of the five 1/72 I-16 kits which are available in 2023. I'm going to ignore the earlier Revell and the various resin kits that have been available over the years…
A-Model: (Type 6) Standard short-run fare here, but the surface detail is consistently quite fine and appealing. All parts and mating surfaces are obviously going to require cleanup. A marvelous array of options is present including both types of windshield/canopy, ski or wheeled gear, rockets, and prop with or without spinner. Interior detail is minimal and kit engineering is complicated on the front end; the forward fuselage being made up of 3 separate panels plus nose piece which are built up over a partial engine compartment. Decals for a single example on the box art. 65 parts.
 A-Model:
(-UTI) This second release of the I-16 from the stupendously prolific A-Model is
based in the same injection technology as the Type 6 above, but is actually a
totally new mold with a more simplified approach to the front end. This spells a
very different build experience than that of the kit above. As you shall see.
Decals for four international examples. 78 parts.
A-Model:
(-UTI) This second release of the I-16 from the stupendously prolific A-Model is
based in the same injection technology as the Type 6 above, but is actually a
totally new mold with a more simplified approach to the front end. This spells a
very different build experience than that of the kit above. As you shall see.
Decals for four international examples. 78 parts.
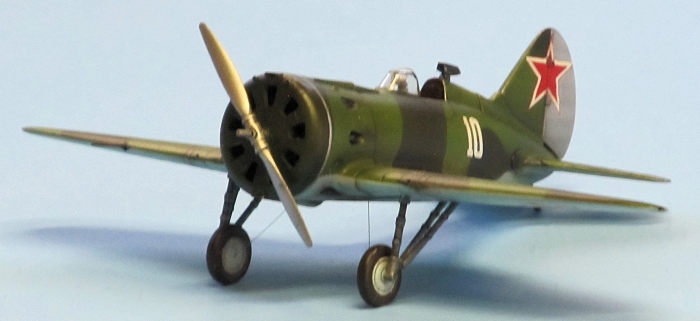
ICM: (Type 28) Reflecting ICM's molding techniques before the company went to its current standard of technology, quality is somewhere between the Hasegawa and A-Model efforts, leaning toward the latter's side. Some quite fine surface detail is countered by an unnecessarily complex front end. Anticipate a challenging build! Options are spinner or no spinner, tailwheel or skid, cannons or machine guns for the wing. Mine's a current release with 2 decal versions. Early releases had a clear windshield part much too wide, but this was corrected at some point. 52 parts.
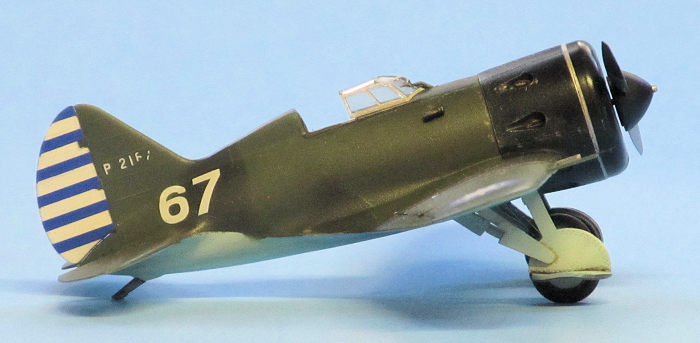
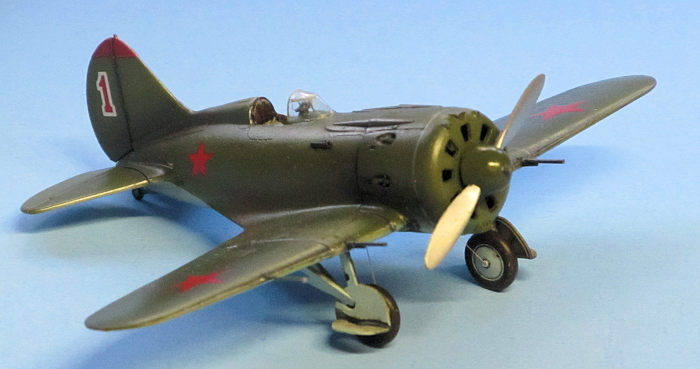
Hasegawa: (Type 18) Predictable Hasegawa. Crisp moldings, finely recessed panel lines, minimal interior. Options include tailwheel or skid, propeller with bare hub or spinner, cowling shutters open or closed, and external gun camera. Fine wire is thoughtfully included for the I-16's distinctive gear retraction mechanism. Fabric-over-frame detail is a little more heavy- handed than with the other four kits. Kit engineering is simple and straightforward. The 1995-dated decals were shattered and unusable. 42 parts.
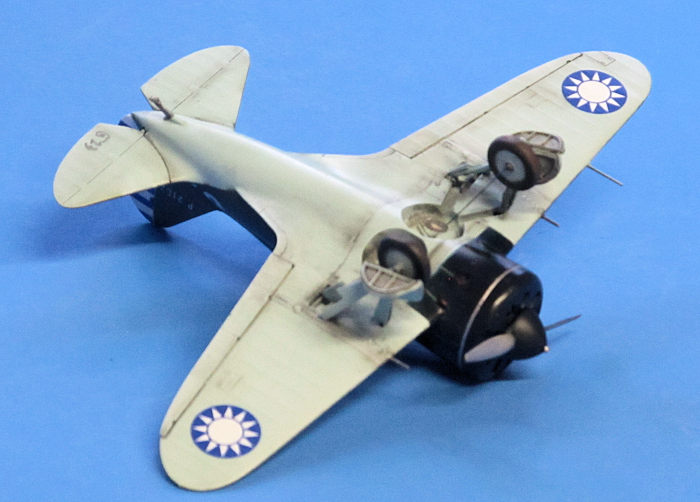
Clear Prop!: (Type 5) This review got held up for almost a year to await the release of this product. By far the most impressive of the five kits upon first inspection, it features clean, consistent raised and recessed detail and options for different armament and both canopy or windshield. Decals for four Soviet and two Chinese aircraft.
Note: ”Construction Time" as reported below is just that: everything before the first primer coat.
Let's see how they build!
| CONSTRUCTION |
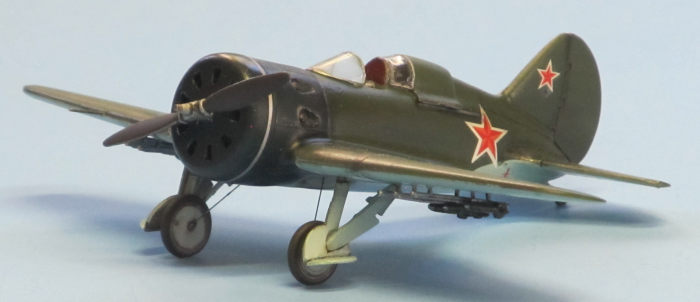
A-Model (Type 6):
I started by joining the fuselage halves, taking the time to sand their mating
surfaces so that the one-piece rudder molded to one side would fair more
smoothly to the other. Anticipating challenges soon, I skipped ahead to joining
the wing to this stub-fuselage.
I chose to leave Parts 19, 20, 22, and 23 loose to be dry-fit and checked
repeatedly and extensively before committing to cement. Dealing with this "joint
complex”, where the wing meets the fuselage, took 70% of construction time. I
completed this phase by rebuilding the trailing edge of the wing root fillet
with l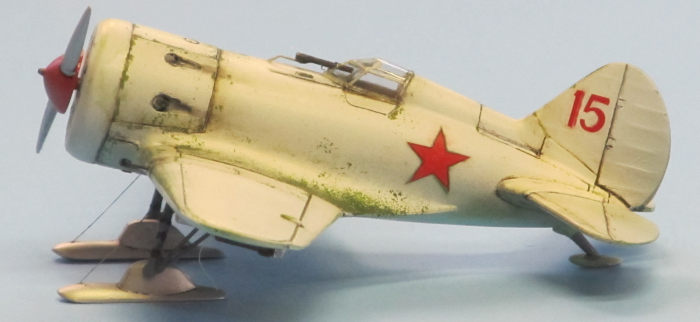 engths
of stretched sprue set along the joint, adding filler, and sanding to blend them
back to a sharp chine line.
engths
of stretched sprue set along the joint, adding filler, and sanding to blend them
back to a sharp chine line.
After this harrowing experience, constructing the rest of the model turned out to be anticlimactic. The engine was glued to the front end (part 18), and I continued by carving out some of the thickness of the lower circumference of part 20 where the two joined. Then the cowl panels were added, one at a time, starting with top (part 28), and doing the rest within about a ten-minute timeframe so I could not only sand-to-fit individual parts, but also poke and prod everything into alignment while the joints were all still pliable.
The cowl needed just a bit of filler in two spots up top. This done, the stabilizers, landing gear, and other little parts were attached with little drama.
Construction time: 08h 30m (whew!)
A-Model (-UTI): I left out the instrument panels, as they just got in the way. Then general assembly commenced. Suffice to say that, in contrast to its company stablemate, this kit went quickly and smoothly, at least as short-run kits go. My only suggestion would be to spend some time sanding the joint between the upper fuselage assembly and the lower wing part; the wing roots stick up a bit too proudly in section from the outer wing panels otherwise.
In common with all the other I-16 kits here, care needs to be taken in lining up the engine/prop shaft/cowl front assembly; you might want to opt for a sleeved brass prop shaft. The bare-hub propeller is a bit chunky compared to that provided by the other manufacturers, but after painting and a wash looked okay. In contrast, the main wheels are really crude and I replaced them with the alternate parts from the Clear Prop! kit.
Construction time: 05h 30m (compare)
 Hasegawa:
The fuselage parts were joined. Then the simplified engine and firewall were
attached. Then the forward end (C3) was cemented in place. Here is the only
potential source of trouble on this very easy kit: make sure that the prop shaft
hole on the engine part lines up with the corresponding hole in C3; they'll
likely go out of alignment if you're not paying attention. I made sure they
didn't by temporarily dry-fitting the prop spinner shaft through both to keep
them in place as they cured.
Hasegawa:
The fuselage parts were joined. Then the simplified engine and firewall were
attached. Then the forward end (C3) was cemented in place. Here is the only
potential source of trouble on this very easy kit: make sure that the prop shaft
hole on the engine part lines up with the corresponding hole in C3; they'll
likely go out of alignment if you're not paying attention. I made sure they
didn't by temporarily dry-fitting the prop spinner shaft through both to keep
them in place as they cured.
The following day I cleaned up the fuselage seams, drilled out the engine exhausts, and assembled the three wing parts to the fuselage, running liquid cement into all the joints and spending ten minutes or so "working" the pliable plastic to perfect fit and alignment. This was sanded and cleaned up the third day, and the gun bulges, stabilizers, and all the little bits were added.
Construction time: 02h 45m (a fast builder could cut this in half))
ICM: Noting the interior detail on this product, I started by cutting off one of the cockpit doors for later open posing. Next, I assembled the fuselage halves (A2 & A3) to the lower center section (A1). It helps to have the outer wings (A4 & A5) handy to test fit against this assembly after it sets but before it cures: little adjustments to the wing root now (especially in thickness) will assure a better match later. As this cured, I attached the exhaust stacks to the cowl panels. The instructions would otherwise have you a) assemble all six cowling pieces while b) simultaneously threading all six exhausts through and attaching the engine while c) offering up the completed engine/firewall/cowl assembly to the rest of the fuselage.
 I then
spent the next 90 minutes throwing every modeling assembly technique,
work-around, and cheat developed over 45 years of active modeling at getting
this model's front end assembled. I carved away all the interior exhaust
portions. I thinned the mating edges of all the panels. I flexed stuff while it
was still pliable. I carved away everything that interfered with fit. Somehow I
got it together, but it still required a bit of filling, sanding, and scribing
to get it where it needed to go.
I then
spent the next 90 minutes throwing every modeling assembly technique,
work-around, and cheat developed over 45 years of active modeling at getting
this model's front end assembled. I carved away all the interior exhaust
portions. I thinned the mating edges of all the panels. I flexed stuff while it
was still pliable. I carved away everything that interfered with fit. Somehow I
got it together, but it still required a bit of filling, sanding, and scribing
to get it where it needed to go.
In contrast, the rest of assembly went off without a hitch. This includes the single-piece wing panels fitting along a complex joint line and tail surfaces slotted into the fuselage with a tail cone following. Landing gear and other little bits followed, no problems.
Construction time: 04h 15m (half of it with elevated blood- pressure)
Clear Prop!: Finishing this article was held up almost a year so I could receive and include this product. Fit and detail are fantastic, the only exception being some trimming and sanding being required at the wing saddle and again where the cowl part (B42) meets the fuselage assembly for a near-perfect fit throughout. The kit's instructions would have you assemble the complex landing gear as independent units and then add them to the fuselage: save yourself the stress and assemble each in place on the model. This kit's landing gear far and away captures the real I-16's spindly, complicated apparatus beneath the best of the five molds.
Construction time: 03h 15m
| COLORS & MARKINGS |
 All five
models were finished in enamels followed by Future, then decals, then another
coat of Future, weathering with oils, and
finally a semi-gloss clear lacquer to seal it all up(
the I-16 was fairly glossy in service). The winter-scheme A-Model Type 5 got
some experimental weathering via the foam-daubing method; I really liked it and
will develop this technique more.
All five
models were finished in enamels followed by Future, then decals, then another
coat of Future, weathering with oils, and
finally a semi-gloss clear lacquer to seal it all up(
the I-16 was fairly glossy in service). The winter-scheme A-Model Type 5 got
some experimental weathering via the foam-daubing method; I really liked it and
will develop this technique more.
As previously stated, Hasegawa's decals were dead a long time so were replaced by elements scrounged from the spares box. A- Model's UTI decals shattered when soaked with water, so were given a single coat of Microscale liquid decal film and worked okay after that.
| CONCLUSIONS |
All five molds all look subtly different as finished models.
A-Model: (winter finish) This used to be the only means injected to get your early-airframe Type 5, but the Clear Prop! release ended that monopoly. Oddly though, for all the work, I am the most satisfied with this finished model of the five. Also, the high cost of the CP! kit here in North America might continue keeping this kit viable as it is 1/3 the price.
A-Model:
(-UTI) Yes, I know the
terms "a" and "model", when capitalized and joined by a hyphen, strike fear into
the hearts of modelers worldwide, but this is a thankful exc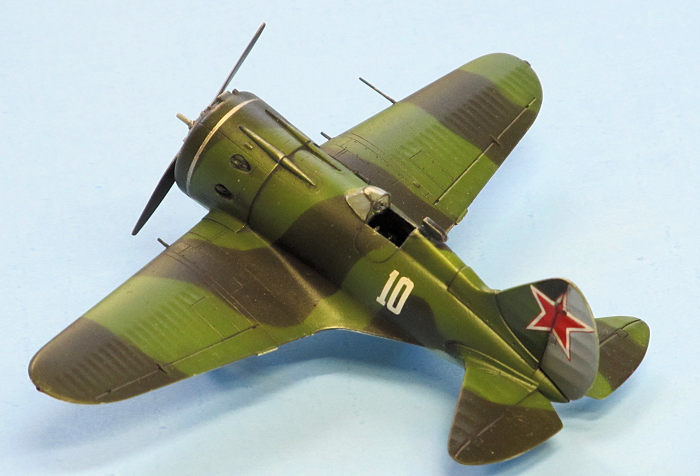 eption
and a truly good limited-run kit. The wing leading edge looks ever so slightly
too-swept to my eye, so if taking on this product you'll want to look into that.
eption
and a truly good limited-run kit. The wing leading edge looks ever so slightly
too-swept to my eye, so if taking on this product you'll want to look into that.
Hasegawa: (White "10") obviously the easiest and quickest build. The wing-taper problem, while baffling, is not in my opinion as bad as all the online drama would imply and isn't that noticeable unless you know the aircraft really well or the other models are parked nearby. The rest of the model looks good. If you're a beginner or simply want an I-16 in your lineup soonest then this is the kit for you.
ICM: (Red "1") The product that is the darling among Polikarpov boffins online, despite that front end. It does still feature the finest detail of these five kits, and is inexpensive and accurate, but the fearsome engineering and complexity is enough to give even the most experienced modeler pause. If this does not scare you, or if you want to depict your model 'unbuttoned' with engine, armament, and accessory bay detail visible, then go with this kit.
Clear Prop!: (Chinese AF) A good combination of relative simplicity and high detail—I would rate it the best kit of the five presented here. If this manufacturer continues to the later 4-gun series aircraft this kit is destined to become the definitive I-16 in 1/72. However, Its high price in North America could prevent it from reaching the wider market it deserves.
Overall: Any of these kits will give provide you a worthy replica of Nikolai Polikarpov's classic fighter, it just depends on what you're willing to spend: time or money!
| REFERENCES |
Abanshin, Michael. Fighting Polikarpov. Aviation International, Tacoma, WA 1994. No ISBN
Various draftsmen. Aircraft Archive: Classics of World War Two. Argus Books, UK, 1989. ISBN 0-85242-985-1
Gunston, Bill. The Osprey Encyclopedia of Russian Aircraft 1875-1995. Osprey Publishing, 1995. ISBN 978-1855324053 Gordon, Yefim. Soviet Air Power in World War 2. Midland Publishing Ltd., 2010. ISBN 978-1857803044
December 2006
Copyright ModelingMadness.com. All rights reserved. No reproduction in part or in whole without express permission from the editor.
If you would like your product reviewed fairly and fairly quickly, please contact the editor or see other details in the Note to Contributors.