HobbyBoss 1/72 MiG-3
| KIT #: | 80229 |
| PRICE: | $10.00 |
| DECALS: | Two options |
| REVIEWER: | Juan C Corea |
| NOTES: | Easy assembly kit, builds into a late version MiG-3 |
| HISTORY |
The MiG-1/3 series of fighters were derived from the I-200 fighter prototype originally conceived by the Polikarpov design bureau as a high altitude interceptor by way of building the smallest airframe that could house the biggest engine available at the time, a massive V-12 Mikulin AM-37 of 2850 cubic inches displacement (for reference, that is slightly larger than the Double Wasp engine of later Corsair fame), resulting in a rather sleek airframe of mixed construction with a steel-tube fuselage skinned in plywood and wooden wings with an stainless steel main spar. After Nikolai Polikarpov fell from the Soviet leadership’s grace in 1939, the design effort was assigned to the newly created design bureau of Mikoyan and Gurevich, thus starting a name that would later become synonymous with Soviet fighter aircraft.
 First
flight of the I-200 would be on April 5, 1940 and it would prove to be an
exceptionally fast aircraft. Not all was well, however, as it also proved to
have worrisome handling, being rather tail heavy and having nasty stall and spin
characteristics and the engines were found to be less than reliable. By that
time, however, the Soviet leadership was growing desperate over the war against
the Germans they knew was coming sooner than later, and it was ordered into
production as the MiG-1 in october of that year. Only 100 examples were produced
before the production lines were shifted in favor of the improved Mig-3, which
attempted to remedy some of the most outstanding defects of its predecessor, by
lengthening the nose by 100 mm and increasing the dihedral of the outer wing
sections.
First
flight of the I-200 would be on April 5, 1940 and it would prove to be an
exceptionally fast aircraft. Not all was well, however, as it also proved to
have worrisome handling, being rather tail heavy and having nasty stall and spin
characteristics and the engines were found to be less than reliable. By that
time, however, the Soviet leadership was growing desperate over the war against
the Germans they knew was coming sooner than later, and it was ordered into
production as the MiG-1 in october of that year. Only 100 examples were produced
before the production lines were shifted in favor of the improved Mig-3, which
attempted to remedy some of the most outstanding defects of its predecessor, by
lengthening the nose by 100 mm and increasing the dihedral of the outer wing
sections.
When the Germans invaded in June 1941, about 37 percent of the VVS frontline fighter units were equipped with the MiGs. Being optimized for high altitude combat, they found themselves at a disadvantage when fighting Bf109’s at the lower altitudes at which most combat encounters were fought in the Eastern front, a situation not helped by the fact that even with improvements they were considered a handful to fly by all but the most experienced pilots. Production was finally wrapped up in December 1941, as the engine production facilities were needed for the AM-38 engine that powered the Il-2 Sturmovik.
As more suitable aircraft entered service, the MiG fighters were gradually relegated to second-line units with only a few examples retained for the high altitude intercept role until around 1943, until finally expended. Today, three examples remain, all rebuilt in Russia from crashed examples in the 2010’s.
| THE KIT |
 This is
one of the Hobby Boss line of simplified “easy assembly” kits in 1/72 scale. As
is usual with the range, it comes in a side opening box with the instructions
and painting guide printed in color on the bottom of the box. Inside the box,
the wing and fuselage are provided as single separate parts, along with the
radiator and the underside of the nose. A single bagged sprue contains the rest
of the parts, and two clear sprues (thoughtfully wrapped in foam) provide for
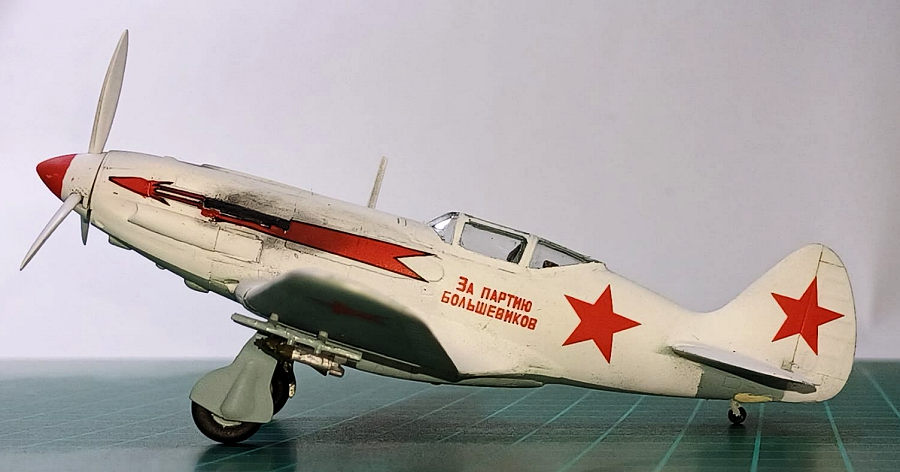
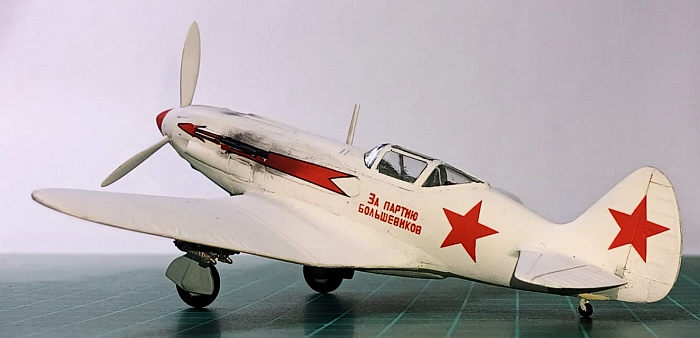
open and closed canopy options. A small decal sheet provides two options, one is
Soviet ace Aleksandr Pokryshkin’s White 5 from late 1941 and the other for one
of the last MiG-3’s built, in a fetching winter camouflage scheme with a red
arrow on the nose and the slogan “For the Bolshevik Party”, this being the
subject of a rather well-known propaganda photo taken on its delivery to the
12th Fighter Aviation Regiment in February 1942.
This is
one of the Hobby Boss line of simplified “easy assembly” kits in 1/72 scale. As
is usual with the range, it comes in a side opening box with the instructions
and painting guide printed in color on the bottom of the box. Inside the box,
the wing and fuselage are provided as single separate parts, along with the
radiator and the underside of the nose. A single bagged sprue contains the rest
of the parts, and two clear sprues (thoughtfully wrapped in foam) provide for
open and closed canopy options. A small decal sheet provides two options, one is
Soviet ace Aleksandr Pokryshkin’s White 5 from late 1941 and the other for one
of the last MiG-3’s built, in a fetching winter camouflage scheme with a red
arrow on the nose and the slogan “For the Bolshevik Party”, this being the
subject of a rather well-known propaganda photo taken on its delivery to the
12th Fighter Aviation Regiment in February 1942.
All panel lines (what few there are in a mostly wooden-skinned aircraft) are nicely recessed, and shapes and proportions look fine to my untrained eye. There are no ejector pin marks in troublesome places, and no flash or other molding defects. However, the outlines of the flaps and radiator outlet are missing and need to be scribed. The main deficiency of the kit lies in the cockpit, which is molded as a single piece with no instrument panel at all, a molded-in seat and a stub control stick with no spade grip. There is also no sidewall detail or foot recesses.
As it comes int the box, the kit will build into a late version MiG-3, with the underwing pitot tube, late style exhaust stacks and wing slats. According to some sources, Pokryshkin’s airplane may have been an early version, so depending on your sources, some small modifications may be in order.
| CONSTRUCTION |
I have long been a fan of the MiG-3’s looks, with that long nose and set-back cockpit reminding me of the late thirties racing aircraft. I have had the Emhar kit in my stash for some time, but that pooch has its share of fleas and repeatedly I took it from the stash only to return it for another time. Upon finding this kit, and reading some favorable reviews, I decided to have a try at it.
First impressions showed a nice fit, and main assembly
was very quick, with very little filling, except for the underside of the nose
under the prominent cooling intakes and the rear wing to fuselage joint. Given
that things were progressing nicely, I decided to spruce up the rather Spartan
cockpit. 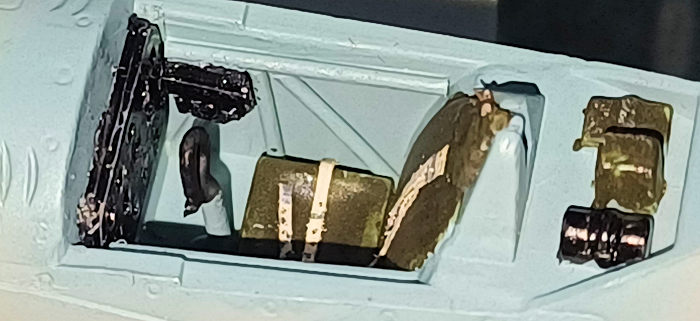 An
instrument panel and switchbox were made from styrene stock, using the reference
pictures from Massimo Tessitori’s excellent Soviet Warplanes website, and some
thin rod provided the prominent steel tube structure visible in the photos. The
cockpit was then sprayed in Model Master Russian underside blue, to match the
blue-gray primer used in the original, details were picked out in the
appropriate colors, and a spade grip was made from wire and attached to the
control stick stub provided. Some seatbelts made from tape completed the task,
and the closed canopy part masked and attached. Here was the only significant
fit problem, as it did not blend with the fuselage top, so some filling and
filing was needed.
An
instrument panel and switchbox were made from styrene stock, using the reference
pictures from Massimo Tessitori’s excellent Soviet Warplanes website, and some
thin rod provided the prominent steel tube structure visible in the photos. The
cockpit was then sprayed in Model Master Russian underside blue, to match the
blue-gray primer used in the original, details were picked out in the
appropriate colors, and a spade grip was made from wire and attached to the
control stick stub provided. Some seatbelts made from tape completed the task,
and the closed canopy part masked and attached. Here was the only significant
fit problem, as it did not blend with the fuselage top, so some filling and
filing was needed.
After that, the now mostly assembled aircraft was turned upside down, and the flaps and cooling outlet scribed. I also cut out the molded-in landing light and replaced it wit a piece of clear sprue cut to match. The tailwheel doors were removed and some putty made for the canvas cover fitted to late-build aircraft, and the tailwheel attached. The radiator inlet was improved with shutters made from thin strip and with that done, it was time for paint.
| COLORS & MARKINGS |
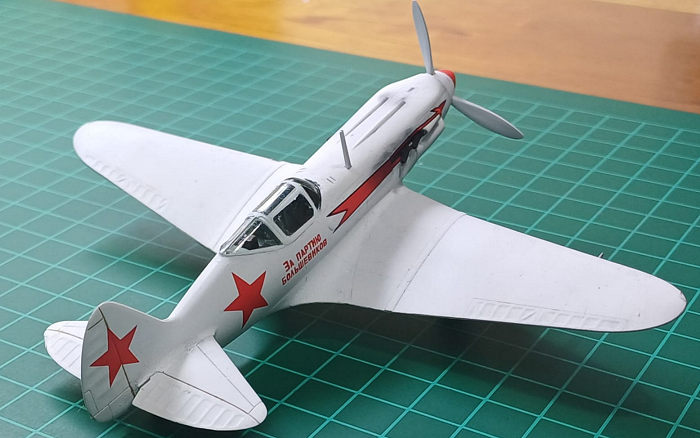
Having decided on the white winter scheme, painting was simplicity itself. The whole aircraft was sprayed with Tamiya White surface primer, including the propeller and spinner which were still separate from the main airframe. The upper surfaces were masked, and the undersides including the wheel wells and landing gear painted in the same underside blue used for the cockpit. After letting the paint cure, the whole thing was gloss coated with Holloway House Quick Shine, as the current substitute for Future.
 The Hobby
Boss decals performed flawlessly, requiring only some Microset, the only
exception being the arrow decals, which needed some slicing over the recesses
for the exhausts and a bit of Solvaset. After decaling, the undersides got a
panel line wash with some Tamiya brown wash, and the top surfaces with light
gray. The spinner was masked and the tip painted with Gloss Red of the Testors
square bottle variety.
The Hobby
Boss decals performed flawlessly, requiring only some Microset, the only
exception being the arrow decals, which needed some slicing over the recesses
for the exhausts and a bit of Solvaset. After decaling, the undersides got a
panel line wash with some Tamiya brown wash, and the top surfaces with light
gray. The spinner was masked and the tip painted with Gloss Red of the Testors
square bottle variety.
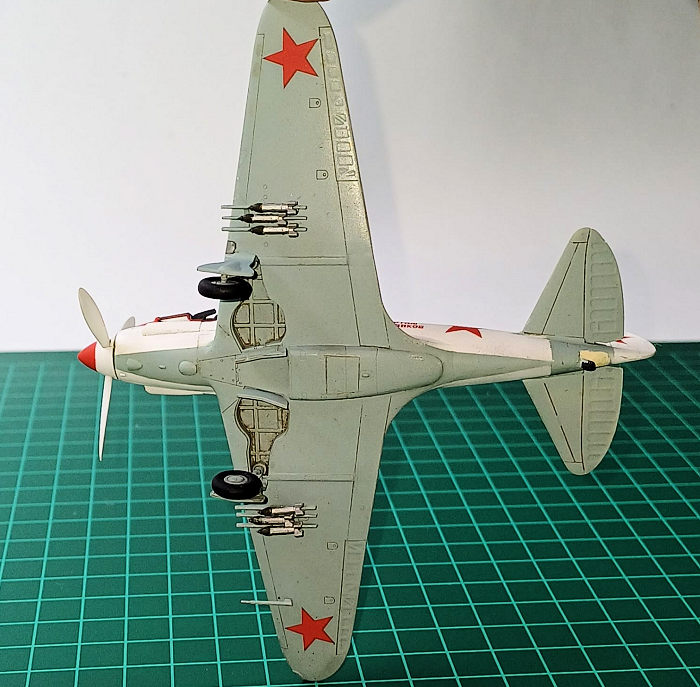
With the paint job essentially complete, the exhaust stacks were brush painted with some Exhaust (what else?) metallizer, having previously added the first stack, which was not represented in the kit, with a tiny piece of styrene rod, and drilled. After that, they were added, landing gear assembled and fitted, and the rather fiddly underwing rockets painted with steel bodies and olive drab warheads. The final bits were glued in place, and some minimal weathering consisting of exhaust and gun gas staining added to represent an essentialy brand new aircraft. A light coat of Testors Dullcote sealed it all, and with that I could call it done.
| CONCLUSIONS |
hese kits may be simplified, but they make for a very nice pain-free building experience, and with some simple additions turn into very presentable models. The nice fit and low parts count leave time to turn these into real stunners if you’re so inclined. Definitely recommended for builders of any skill level.
| REFERENCES |
https://en.wikipedia.org/wiki/Mikoyan-Gurevich_MiG-3
https://massimotessitori.altervista.org/sovietwarplanes/pages/mig3/mig3.html
Bill Gunston and Yefim Gordon. MiG aircraft since 1937 (1998)
Piotr Butowski and Jay Miller. OKB MiG- A History of the design bureau and its aircraft (1991)
| FINAL CONSTRUCTION |
Copyright ModelingMadness.com. All rights reserved. No reproduction in part or in whole without express permission.
If you would like your product reviewed fairly and fairly quickly, please contact the editor or see other details in the Note to Contributors.