Accurate Miniatures 1/48 IL-2
|
KIT # |
3408 |
|
PRICE: |
@ 15.00 second hand |
|
DECALS: |
missing on this kit |
|
REVIEWER: |
|
|
NOTES: |
No aftermarket bits used during modification. |
|
HISTORY |
Soon after the beginning of
operation « Barbarossa », the Luftwaffe pilots noticed that, although
heavily armoured, the Il-2 attack plane was very vulnerable to attacks
from the rear. The consequence was that Sturmovik losses grew
tremendously 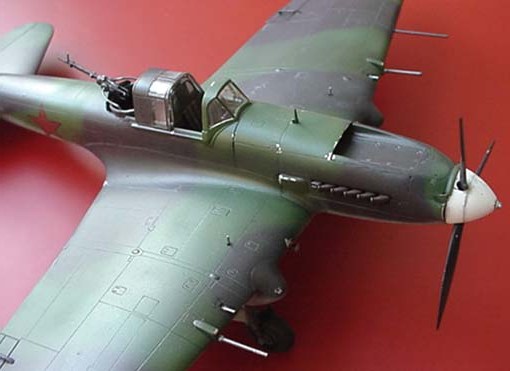 through 1942, reaching an unacceptable level, even for Stalinian standards. During those dark days, a Sturmovik pilot surviving
10 missions was made a Hero of the Soviet Union… that says it all.
Projects were made to add an MG-position behind the pilot, but the
Russian engineers had to face a big problem : Stalin, who had proclaimed
the vital importance of the Sturmovik to the Red Army, had forbidden any
modification that would stop or slow production in any way, every delay
being considered a sabotage and treason – with most unpleasant
consequences for the offenders...
through 1942, reaching an unacceptable level, even for Stalinian standards. During those dark days, a Sturmovik pilot surviving
10 missions was made a Hero of the Soviet Union… that says it all.
Projects were made to add an MG-position behind the pilot, but the
Russian engineers had to face a big problem : Stalin, who had proclaimed
the vital importance of the Sturmovik to the Red Army, had forbidden any
modification that would stop or slow production in any way, every delay
being considered a sabotage and treason – with most unpleasant
consequences for the offenders...
Thus, until the rear defence position could be made standard in the heavily-stressed factories and the first Il-2m’s were turned out, Sturmovik regiments had to rely on their own abilities to get the badly needed two seaters. So, unit mechanics started to remove Scarff-rings and whatever machine-guns they could find on obsolete Polikarpov observation biplanes, cut out a semi-circular opening behind the Il-2’s cockpits and install the “cannibalized” weapons the best they could, just adding a leather band or an ammunition crate for the gunner to sit on. Sure it was crude and primitive, but it worked, and losses started to decrease… to a certain point.
|
THE KIT |
finding the right plane…
As
a long-time fan of the soviet « flying tank », I sure was happy about
AM’s release of the Il-2 series. At last, there was an opportunity to
build this historically all-important aircraft, and this in the
best-possible quality : precisely engraved panel
 lines, accurate and rich
detail, well made instructions with a lot of historical information,
excellent transparent parts, no fitting problems, in one word : a true
out-of-the box kit. yet, you know how modelers are… as soon as I had
secured the Il-2m3 two-seater and the Il-2 single-seater with skis, I
started to miss a two-seater with the early, straight wing.
lines, accurate and rich
detail, well made instructions with a lot of historical information,
excellent transparent parts, no fitting problems, in one word : a true
out-of-the box kit. yet, you know how modelers are… as soon as I had
secured the Il-2m3 two-seater and the Il-2 single-seater with skis, I
started to miss a two-seater with the early, straight wing.
Two options were possible : kitbash the 2 kits to make an Il-2m, or scratchbuild an MG stand on the Il-2. As I still wanted to build both of them some day, I didn't want to sacrifice any of these precious models, and decided to wait for a better solution. This happened two years later when I bought an Il-2 (summer version) from an IPMS buddy. The kit was cheap, and had no decals, but at last I had a base to work on (I always have certain inhibitions starting to cut into an expensive kit). As kitbashing still was no option (I like the type 3 too), and I could find no fitting MG or transformation kit, I decided to do as the Russian mechanics did, and scratchbuild the whole thing, after having a close look to the few pictures available in the “Il-2 Sturmovik in Action” Squadron Signal Book by my compatriot Hans-Heiri Stapfer.
|
CONSTRUCTION |
Getting started…
I decided to make the Scarff-ring first, as this would give me the diameter of the hole I would later grind out of the fuselage. After unsuccessfully looking for a convenient part in my scrap-box, I chose to assemble a discarded Phantom II underwing tank, cut a fitting “slice” out of it, then sand it to shape. This having been made to my satisfaction, I could go to step 2…
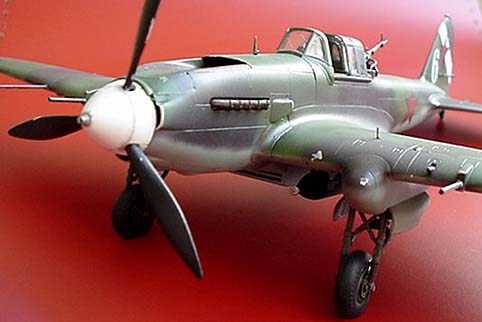
Plastic surgery !
Oh! - to grab a grinding tool
and saw and start vandalising an AM kit ! That sure made me sweat… All I
had to do was to remove the fuselage part aft of the cockpit where the
inelegant “hump” of the single-seater begins, grind that semi –circular
opening to the “ F-4 tank-slice’s” dimensions, shorten t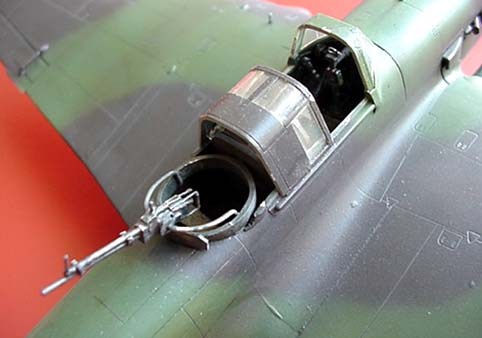 he rear canopy,
and add some structural details inside the fuselage using stretched
sprue… that was it ! All I had to do afterwards was to build the AM Sturmovik according to the plan… a piece of cake, as long as you work
carefully ! Just be cautious about the air intake assembly, as it is the
most complicated part of the kit and requires particular attention, and
don’t forget to discard the radio + mast, as these were also disassembled
on the real aircraft for evident reasons of saving weight.
he rear canopy,
and add some structural details inside the fuselage using stretched
sprue… that was it ! All I had to do afterwards was to build the AM Sturmovik according to the plan… a piece of cake, as long as you work
carefully ! Just be cautious about the air intake assembly, as it is the
most complicated part of the kit and requires particular attention, and
don’t forget to discard the radio + mast, as these were also disassembled
on the real aircraft for evident reasons of saving weight.
The final details
Once the Il-2 was put together, I had to scratchbuild a machine-gun. Here, I have to apologize to the gun specialists, this one being more a “generic” weapon made to resemble a Russian MG of earlier type than some actual one… I was lacking precise documentation on the subject, and searched the web in vain for a useable document. Yet, at first sight, it looks like the real thing, and I was happy with the results (what surely makes me a “good enough” modeler, I guess…), then, after installing a suitably small ammunition case stolen from a 1/35 tank kit in the bottom of the fuselage (the poor gunners had to reload in flight), a sheet styrene armour plate on the Scarff-ring and a “leather strap” made from tin foil, I drilled a hole through my MG’s body and added a curved metal axis to it, allowing at least elevation movement… et voilà !
|
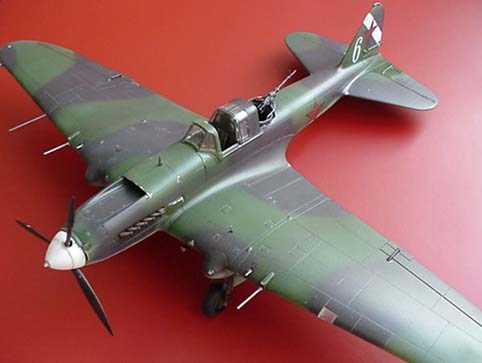
CAMOUFLAGE & MARKINGS |
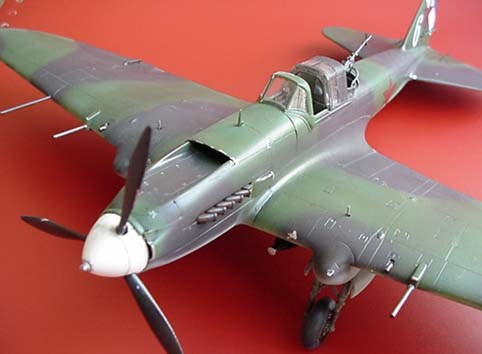 As I’m an afficionado of the
excellent “Il-2 Sturmovik” PC combat flight simulation game, and the
kit’s decals were missing, I came on the idea of building an aircraft I
had personally “flown” in the game… After checking the accuracy of the
scheme on a VVS-related website, I chose the 1942 typical dark green/
dark brown / light blue camo with a diagonal white recognition band and a
simple number on the fin – no patriotic slogans or personal markings here
- my intention was to represent one of those many anonymous Sturmoviks
that helped stop the Nazi onslaught in the darkest moments of WWII. The
Tamiya acrylic colours were home-mixed (official tones were not that
important in 1942 USSR either, some factories even using glossy tractor
paint !), then airbrushed. As the life expectation of a factory-fresh
Sturmovik did not exceed a few missions, I chose to be quite discrete on
weathering, just underlining the panel lines and adding a little
post-shading and pastels. Of course, there is no photographic evidence to
this particular plane, but with so many Il-2’s built, it’s absolutely
credible. The decals were taken from the large sheet generously provided
with the 1/48 ICM Yak 9.
As I’m an afficionado of the
excellent “Il-2 Sturmovik” PC combat flight simulation game, and the
kit’s decals were missing, I came on the idea of building an aircraft I
had personally “flown” in the game… After checking the accuracy of the
scheme on a VVS-related website, I chose the 1942 typical dark green/
dark brown / light blue camo with a diagonal white recognition band and a
simple number on the fin – no patriotic slogans or personal markings here
- my intention was to represent one of those many anonymous Sturmoviks
that helped stop the Nazi onslaught in the darkest moments of WWII. The
Tamiya acrylic colours were home-mixed (official tones were not that
important in 1942 USSR either, some factories even using glossy tractor
paint !), then airbrushed. As the life expectation of a factory-fresh
Sturmovik did not exceed a few missions, I chose to be quite discrete on
weathering, just underlining the panel lines and adding a little
post-shading and pastels. Of course, there is no photographic evidence to
this particular plane, but with so many Il-2’s built, it’s absolutely
credible. The decals were taken from the large sheet generously provided
with the 1/48 ICM Yak 9.
|
CONCLUSIONS |
I had great fun working on this project. My Sturmovik’s been presented in several competitions and exhibitions, with no particular success, however. Some friends of mine told me it was due to the dark, dull and anonymous scheme… well, I might some day add some faded winter camo to make it more glamourous, but for the moment I like it as it is…
May 2003
|
REFERENCES |
Squadron Signal “Il-2 Sturmovik in Action”.
If you would like your product reviewed fairly and quickly by a site that has over 200,000 visitors a month, please contact me or see other details in the Note to Contributors.