Monogram 1/48 TBD Devastator
| KIT #: | 7575 |
| PRICE: | $easy to find |
| DECALS: | One option |
| REVIEWER: | Stephen Youn, MD |
| NOTES: | Starfighter Decals set #4801 TBD-1 Devastators in War Paint and Microscale 48-46 U.S. Insignia WWII Blue Borders, |
| HISTORY |
Douglas TBD Devastator at the Battle of Midway
Disclaimer: the historical information provided has been acquired from a internet search of multiple sites/sources as well as print publications. There are inconsistencies between references in some aspects of history and this is understandable given the available historical record and contemporary record keeping and data collection of the World War II era. I welcome constructive corrections and substantiated revisions.
Battle of Midway, June 4, 1942
The Battle of Midway was a decisive naval battle in
the Pacific Theater of World War II which was fought between June 4 and June 7,
1942. This year represents the 75th
anniversary of this historic battle which occurred six months after Japan's
attach on Pearl Harbor, Hawaii. The United States Navy under Admirals Chester
Nimitz, Frank Jack Fletcher, and Raymond A. Spruance succeeded in decisively
defeating an attacking fleet of the Imperial Japanese Navy near Midway Atoll 1,
486 miles northwest of the Hawaiian islands. By every measure of the day the
advantage was greatly in favor of the Imperial Japanese Navy which had inflicted
devastating damage upon the US Navy Pacific fleet on December 7, 1941 at Pearl
Harbor as well as overwhelming the defenses of the Philippines, a US Territory
at the time. The proud fleet of the United Kingdom had also been dealt a severe
defeat near Singapore on December 10, 1941 with the sinking of the battleship
HMS Prince of Wales and the battle c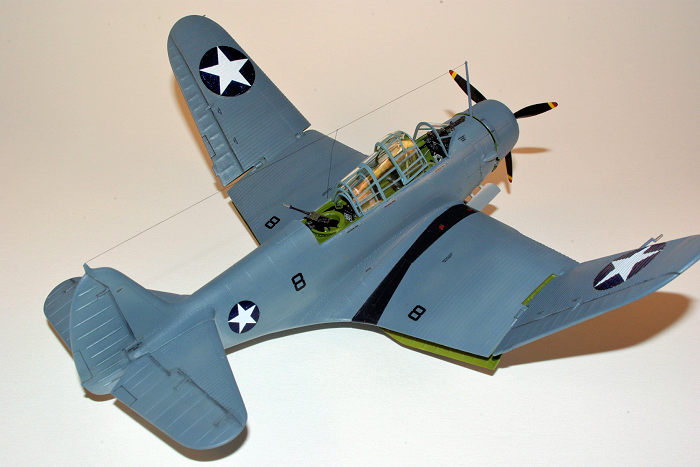 ruiser HMS Repulse by Japanese aircraft.
Land based aircraft as well as carrier based aircraft torpedo attacks played a
decisive role in the engagement as well as in the subsequent Battle of Coral Sea
between the Imperial Japanese Navy and a combined United States Navy and
Australian Navy force from May 4 and May 8, 1942. With the advantage of surprise
gained by US Navy crytanalysts breaking the Japanese Navy JN-25b communication
code the numerically inferior US force was able to position itself in advance of
the attacking Japanese force for a surprise strike. Army, Navy and Marine
aircraft from Midway Atoll discovered and attacked the Japanese fleet without
significant result followed by a decisive series of attacks by the the air
groups from the USS Enterprise and the USS Yorktown with dive bombing attacks by
those ships' Douglas SBD squadrons accounting for the sinking of four Japanese
aircraft carriers, the Akagi, Kaga, Hiryu, and Soryu. One of the most tragic and
heroic stories of the battle focused on the men of the three carrier borne
torpedo squadrons involved in the decisive first day of the battle.
ruiser HMS Repulse by Japanese aircraft.
Land based aircraft as well as carrier based aircraft torpedo attacks played a
decisive role in the engagement as well as in the subsequent Battle of Coral Sea
between the Imperial Japanese Navy and a combined United States Navy and
Australian Navy force from May 4 and May 8, 1942. With the advantage of surprise
gained by US Navy crytanalysts breaking the Japanese Navy JN-25b communication
code the numerically inferior US force was able to position itself in advance of
the attacking Japanese force for a surprise strike. Army, Navy and Marine
aircraft from Midway Atoll discovered and attacked the Japanese fleet without
significant result followed by a decisive series of attacks by the the air
groups from the USS Enterprise and the USS Yorktown with dive bombing attacks by
those ships' Douglas SBD squadrons accounting for the sinking of four Japanese
aircraft carriers, the Akagi, Kaga, Hiryu, and Soryu. One of the most tragic and
heroic stories of the battle focused on the men of the three carrier borne
torpedo squadrons involved in the decisive first day of the battle.
On
December 7, 1941, the standard torpedo bomber used by the US Navy was the
Douglas TBD-1 Devastator that had entered fleet service on October 5, 1937 with
VT-3 (Torpedo 3 squadron). At the time it was the US Navy's most modern and
first all metal aircraft when contemporary fighters and dive bombers were fabric
covered biplanes. Powered by a Pratt & Whitney R-1830-60 Twin Wasp producing 900
hp maximum speed was 206 mph and the plane could carry a single torpedo or
equivalent 1200 pounds of bombs. A total of 130 TBD-1 aircraft were manufactured
sufficient to equip squadrons with eighteen planes each. Nonetheless with the
rapid progress in aviation technology the TBD was obsolete by December 1941 as
it was lacking armor, self-sealing fuel tanks, and was slow with a short range.
Armed with the notoriously unreliable Bliss-Levitt Mark XIII aerial torpedo, the
TBD 's cruising speed was 130 mph coincided with the maximum speed that the Mark
XIII could be dropped. To make matters worse the maximum drop altitude was 120
feet and the maximum range was 6300 yards. Given the long run in to dropping
range of the intended target ship the TBD would be exposed to both flak and
fighters for prolonged intervals. Nonetheless US Naval aviators continued to
soldier on with the TBD as the Pacific fleet began a series of harassing raids
upon Japanese held strongholds such as the Gilbert Islands and Wake Island. By
May 4, 1942 and the Battle of the Coral Sea, TBDs flown by VT-2 and VT-5
achieved torpedo hits on the IJN carrier Shoho contributing to her sinking.
Although these actions revealed the short comings of the TBD in range and speed
as well as the problems with the Mark XIII torpedo the limited success also led
senior officers to believe the TBD could still be a effective weapon. Due to
combat attrition from the early 1942 US Navy raids on Kwajelein Atoll, Marcus
Island, and Wake Island by June 1942 as the three active Pacific Fleet carriers
available for the p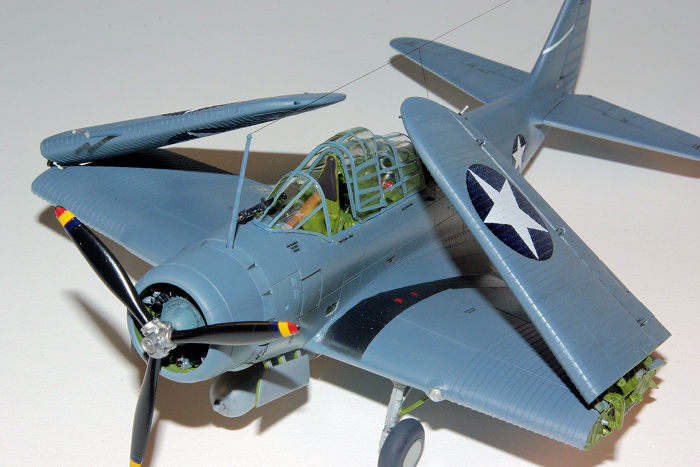 ending Battle of Midway (USS Enterprise, USS Yorktown, and
USS Hornet) set sail from Pearl Harbor only 41 TBDs were available among the
three torpedo squadrons assigned. Neither Enterprise with VT-6, and Yorktown
with VT-3 reassigned from the torpedo damaged USS Saratoga, could muster a full
squadron. VT-3 replaced VT-5 on the Yorktown with VT-5's pilots ordered to
return to the mainland to work up on the new Grumman TBF torpedo bomber then
entering operational service. VT-6 picked up the remainder of Yorktown's TBDs to
make up a complete squadron.
ending Battle of Midway (USS Enterprise, USS Yorktown, and
USS Hornet) set sail from Pearl Harbor only 41 TBDs were available among the
three torpedo squadrons assigned. Neither Enterprise with VT-6, and Yorktown
with VT-3 reassigned from the torpedo damaged USS Saratoga, could muster a full
squadron. VT-3 replaced VT-5 on the Yorktown with VT-5's pilots ordered to
return to the mainland to work up on the new Grumman TBF torpedo bomber then
entering operational service. VT-6 picked up the remainder of Yorktown's TBDs to
make up a complete squadron.
Midway U.S. Navy Torpedo Squadrons listed in the order they attacked the Japanese fleet
Torpedo Squadron 8, VT-8, USS Hornet
A
experienced naval aviator, Lieutenant Commander John C. Waldron, born August 24,
1900, took command of of the newly formed Torpedo Squadron 8 during the summer
of 1941 as the air group was being assembled for the new fleet carrier USS
Hornet (CV-8). With VT-8 having been off loaded at Alameda Naval Air Station in
April so that the Hornet could load Colonel James Doolittle's sixteen B-25B
“Toyko Raiders” aircraft, Midway would be the squadron's first combat. On the
eve of the battle Commander Waldron called his men together and distributed a
plan of attack. He ended by saying to his men that if worst came to worst he
wanted each man to do his utmost to destroy the enemy. “ If there is only one
plane left to make a final run-in,” he told his men, “I want that man to go in
and get a hit. May God be with us all. Good luck, happy landings, and give 'em
hell.” The next day, June 4, 1942, flying in Bureau number 1506, marked “T-16”,
he led the 15 TBDs launched from the Hornet in search of the Japanese fleet.
Prior to launching LCDR Waldron disputed the Commander Air Group's search
coordinates and after being airborne soon split off his squadron from the rest
of the Hornet's planes leading VT-8 directly to the Japanese fleet. Waldron had
found the Japanese fleet one hour before any other American carrier aircraft.
Despite the lack of Navy fighter and dive bomber support he led his men to
attack the IJN carrier Kaga in two divisions; one of eight planes and another of
seven. Attacked by Zeros of the combat air patrol the slo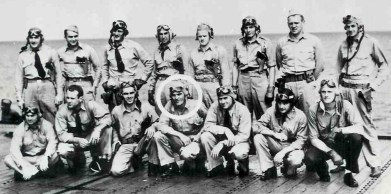 w and low TBDs were
shot down one by one. As a result of this action VT-8 was awarded the
Presidential Unit Citation and LCDR Waldron was posthumously awarded the Navy
Cross as were all the other members of the squadron. Of the thirty airmen the
only survivor of the action was Ensign George Gay, flying Bureau number 1518,
marked “T-14”. His recollection documented in a war time interview provided what
little is known of the last minutes of VT-8. Upon sighting the Japanese fleet
around 930AM Waldron attempted to transmit their position without success and
then initiated the attack. Gay estimated thirty-five Zeros jumped the sixteen
lumbering TBDs as they started their slow run in at 120 mph to the target
carriers. He saw LCDR Waldron's plane burst into flames then plunge in to the
sea followed by two other planes in his division. Gay's TBD was the only plane
to reach the drop range and he released his torpedo at the carrier he thought
was Soryu but it missed due the ship's maneuvering. As he cleared the ship he
turned toward its' wake and was attacked again by Zeros with the result of being
shot down into the sea. His gunner, Robert Huntington, ARM 3/c was killed but
Gay was able to get free before the plane sank. He was rescued the next day by a
Navy PBY Catalina.
w and low TBDs were
shot down one by one. As a result of this action VT-8 was awarded the
Presidential Unit Citation and LCDR Waldron was posthumously awarded the Navy
Cross as were all the other members of the squadron. Of the thirty airmen the
only survivor of the action was Ensign George Gay, flying Bureau number 1518,
marked “T-14”. His recollection documented in a war time interview provided what
little is known of the last minutes of VT-8. Upon sighting the Japanese fleet
around 930AM Waldron attempted to transmit their position without success and
then initiated the attack. Gay estimated thirty-five Zeros jumped the sixteen
lumbering TBDs as they started their slow run in at 120 mph to the target
carriers. He saw LCDR Waldron's plane burst into flames then plunge in to the
sea followed by two other planes in his division. Gay's TBD was the only plane
to reach the drop range and he released his torpedo at the carrier he thought
was Soryu but it missed due the ship's maneuvering. As he cleared the ship he
turned toward its' wake and was attacked again by Zeros with the result of being
shot down into the sea. His gunner, Robert Huntington, ARM 3/c was killed but
Gay was able to get free before the plane sank. He was rescued the next day by a
Navy PBY Catalina.
Torpedo Squadron 6, VT-6, USS Enterprise
Lieutenant Commander Eugene E. Lindsey assumed command of the squadron in
September, 1941. Awarded the Distinguished Flying Cross for successful
leadership of his squadron in attacks on Kwajelein and Wotje Atolls in the
Marshall Islands in February 1942 he suffered a over side landing of his TBD
into the sea on May 28, 1942 and sustained several cracked ribs, a punctured
lung, and m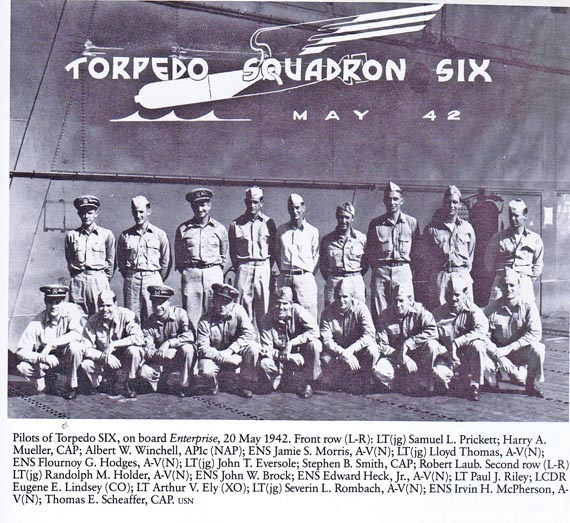 ultiple lacerations. He refused to let his injuries keep him from the
battle and launched in Bureau number 0289 marked “Black-1” leading fourteen TBDs
into the air. Intercepting the main Japanese force at 930AM his squadron sighted
the ships at about 30 miles distance. Setting up an anvil attack on the closest
carrier, Kaga, he split his squadron into two sections for the attack with
Lieutenant Arthur V. Ely leading the other section. To reach the carrier the
planes needed to penetrate the outer screening warships 15 miles out and then
the inner screen 6 miles out. Attacked by Zeros at the outer screen matters were
made worse when Kaga turned north forcing Ely's section into a stern chase and
Lindsey's section into a wide half circle clockwise around the outside of the
screen to reach the carrier's port bow. Ely's section was cut down plane by
plane by the slashing attacks from the Zeros. Only two of the seven TBDs
survived to make their drops; those flown by enlisted pilots Machinist A. Walter
Winchell and Chief Machinist Stephen B. Smith. Though damaged both planes
approached within 1000 yards of Kaga and made their drops. Smith managed to
escape and return to the Enterprise.
ultiple lacerations. He refused to let his injuries keep him from the
battle and launched in Bureau number 0289 marked “Black-1” leading fourteen TBDs
into the air. Intercepting the main Japanese force at 930AM his squadron sighted
the ships at about 30 miles distance. Setting up an anvil attack on the closest
carrier, Kaga, he split his squadron into two sections for the attack with
Lieutenant Arthur V. Ely leading the other section. To reach the carrier the
planes needed to penetrate the outer screening warships 15 miles out and then
the inner screen 6 miles out. Attacked by Zeros at the outer screen matters were
made worse when Kaga turned north forcing Ely's section into a stern chase and
Lindsey's section into a wide half circle clockwise around the outside of the
screen to reach the carrier's port bow. Ely's section was cut down plane by
plane by the slashing attacks from the Zeros. Only two of the seven TBDs
survived to make their drops; those flown by enlisted pilots Machinist A. Walter
Winchell and Chief Machinist Stephen B. Smith. Though damaged both planes
approached within 1000 yards of Kaga and made their drops. Smith managed to
escape and return to the Enterprise.
Walt Winchell flying Bureau number 0367, marked “Black 8” recalled his part in the action:
“We were on a northwesterly course and the enemy carriers were on a westerly course traveling at about 25 knots. We were caught astern and forming a line formation went into a power glide down to attack altitude trying to get up on the port side for a beam attack. The carrier turned to starboard keeping us astern and to port. Fighters attacked at about 15 miles distance and we encountered anti-aircraft fire at about 8 miles. We were flying at 120 knots and the relative closing speed was very slow. The Zeros were all around us and I observed my wing mate plunge into the sea directly in front of my TBD. Then my plane became the target of at least five Zeros. As I turned in for my run on the Kaga, the Zeros began coming in on me in pairs. At the same time the ships were throwing up a terrific anti-aircraft barrage. The Zeros would sight in with their 7.7 mm guns and when their tracers were coming in on the TBDs they would open up with the big 20 mm cannons. Our TBD was hit several times with 20 mm and there was gasoline all over the cockpit. The gas tanks were hit and she was dumping gas from her right wing tank all the while I was taking violent evasive action. Finally I made my drop at 800 yards from an altitude of approximately 40 feet. We immediately ran into fierce anti-aircraft fire. The Japs’ main batteries were firing into the water so as to make a wall of water for us to run into. Each time I managed to see the flash of their main batteries I tried to take the necessary evasive action. Still trying to keep down low on the water to prevent the Japs from coming up on the bottom side of the aircraft. During all of this my radioman, Douglas M. Cossitt, ARM 3c shot down two Zeros. About ten minutes after the last of the fighters broke off the old bird ran out of gas and we made a crash landing in the sea. Before our TBD sank we managed to remove the rubber raft, first aid kit, emergency rations, two parachutes and our fresh water canteens. We had survived a trying ordeal and would spend the next seventeen and a half days in the Pacific awaiting rescue.” After surviving adrift at sea for seventeen days Winchell and Cossitt were rescued by a PBY on June 21, 1942 and were the last American survivors rescued.
 Spared the Zero's attention while trying to reach attack position, LCDR
Lindsey's section drew fierce opposition when they began their run-in. One
gunner, William C. Humphrey ARM 1/c succeeded in shooting down a Zero but five
of the seven planes in Lindsey's section, including Lindsey himself, were shot
down by Zeros. The surviving two TBDs released their torpedoes without noting
hits and managed to escape eventually returning to land on the Enterprise.
Eighteen of their squadron colleagues had perished in the attack.
Spared the Zero's attention while trying to reach attack position, LCDR
Lindsey's section drew fierce opposition when they began their run-in. One
gunner, William C. Humphrey ARM 1/c succeeded in shooting down a Zero but five
of the seven planes in Lindsey's section, including Lindsey himself, were shot
down by Zeros. The surviving two TBDs released their torpedoes without noting
hits and managed to escape eventually returning to land on the Enterprise.
Eighteen of their squadron colleagues had perished in the attack.
|
TORPEDO SIX CASUALTIES from official June 8, 1942 Action Report CV-6 USS Enterprise |
||
|
Plane |
Pilot |
Gunner |
|
6T1 |
LtCdr. E.E. Lindsey, USN. |
GRENAT, C.T., 279 45 11, ACRM, USN. |
|
6T2 |
Ens. S.L. Rombach, A-V(N), USNR. |
GLENN, W.F., 360 18 53, ARM2c, USN. |
|
6T6 |
Lt.(jg) J.T. Eversole, USN. |
LANE, J.U., RM2c, 299 90 90, USN. |
|
6T9 |
Ens. R.M. Holder, A-V(N), USNR. |
DURAWA, G.J., 300 32 99, ARM3c, USN. |
|
6T10 |
Lt. A.V. Ely, USN. |
LINDGREN, A.R., 223 42 69, RM3c, USN. |
|
6T12 |
Ens. F.C. Hodges, A-V(N), USNR. |
BATES, J.H., 368 48 44, RM2c, USN. |
|
6T13 |
Lt. P.J. Riley, USN. |
MUSHINSKI, E.J., 268 28 74, ARM2c, USN. |
|
6T14 |
Ens. J.W. Brock, USN. |
BLUNDELL, J.M., 410 41 61, ARM3c, USN. |
|
6T7 |
Lt.(jg) L. Thomas, USN. |
LITTLEFIELD, H.F., 238 59 08, ARM2c, USN. |
|
6T8 |
Mach. A.W. Winchell, USN. (survived, rescued 6/21/42) |
COSSITT, D.M., 413 55 55, RM3c, USNR. (survived, rescued 6/21/42) |
|
Torpedo SIX |
Bureau No. |
(Ten (10)) |
|
6T1 - TBD-1 |
0289 |
|
|
6T2 - TBD-1 |
1512 |
|
|
6T6 - TBD-1 |
0366 |
|
|
6T7 - TBD-1 |
0294 |
|
|
6T8 - TBD-1 |
0367 |
|
|
6T9 - TBD-1 |
0378 |
|
|
6T10 - TBD-1 |
0342 |
|
|
6T12 - TBD-1 |
0365 |
|
|
6T13 - TBD-1 |
1505 |
|
|
6T14 - TBD-1 |
0327 |
|
Torpedo Squadron 3, VT-3, USS Yorktown
Lieutenant Commander Lance Edward “Lem” Massey, born September 20, 1909, assumed
command on April 14, 1942. A graduate of the US Naval Academy in 1930, he was
promoted to the rank of Lieutenant Commander in January 1942. On February 1,
1942, flying with VT-6 his squadron made the first airborne torpedo attack in US
Naval history against Japanese shipping at Kwajelein Atoll, in the Marshall
Islands and he was credited with sinking the 18,000 ton Japanese freighter
Bordeaux Maru for which he was awarded the Distinguished Flying Cross. Leading
VT-3's twelve TBDs (two failed to launch due to engine problems) off the USS
Yorktown on June 4, 1942, in TBD bureau number 0285 marked as T-1 he and his
gunner were shot down and killed attacking the IJN carrier Soryu. The squadron
was attacked by at least eight Zeros fifteen miles from the Japanese carriers.
Five TBDs survived the run in to make torpedo drops although all were evaded by
the carrier. Leaving the attack o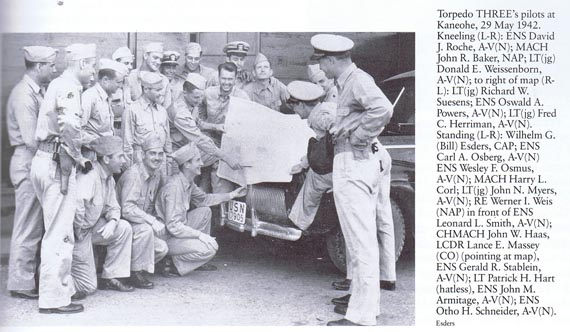 nly two TBDs survived only to later ditch close
to the American fleet. For his actions Lt. Commander Massey was posthumously
awarded the Navy Cross as were his fellow eleven pilots. Of the entire attacking
squadron of twenty-four men only two pilots and one radioman/gunner survived the
battle.
nly two TBDs survived only to later ditch close
to the American fleet. For his actions Lt. Commander Massey was posthumously
awarded the Navy Cross as were his fellow eleven pilots. Of the entire attacking
squadron of twenty-four men only two pilots and one radioman/gunner survived the
battle.
However the battle was not yet over and on June 6 the three surviving TBD-1s from VT-6 made airworthy by emergency maintenance were launched from Enterprise to attack the straggling Japanese heavy cruisers Mogami and Mikuma trailing the retreating Japanese fleet. The TBD pilots were under specific orders by Admiral Spruance not to attack if opposition was encountered so due to heavy flak no torpedo attacks were made. Instead the Mikuma was sunk by SBD dive bombers from the Enterprise and Hornet. So ended the Battle of Midway for the three torpedo squadrons. It is very sobering to think that these brave and gallant men, knowing the long odds against survival did their utmost to complete their mission using a weapon system made obsolete by the pace of war technology. Most paid the ultimate price to defend their nation and such sacrifice should always be remembered.
After Midway the TBDs would remain in combat service only with VT-4 for anti-submarine patrol in the Atlantic Ocean with the remainder used for training. They were replaced by the Grumman TBF and subsequently the TBM Avenger, faster and more heavily armed but ultimately used less as a torpedo attacker than as a level bomber. After Midway it became clear that aerial torpedo attack was a high risk, high casualty tactic; this was verified in all theaters of the war for all Allied and Axis combatants who used it. Without air superiority it was nearly suicidal due to the need for low altitude and long, low altitude target runs to deliver the unguided weapon against a moving target. In a interesting side note the defective performance issues of the Mark XIII which mandated the early low/slow attack profiles were later resolved by the scientists and engineers at the California Institute of Technology whose extensive studies by mid 1944 led to the development of the drag ring made of plywood covering the torpedo nose and the shroud or tail ring modification to the tail fins. These modifications were in addition to the commonly pictured break away plywood tail fin box added early in the war which did little to improve performance. In additional to other guidance system, detonator and structural changes, these add on devices revolutionized the Mark XIII performance allowing drops at authorized altitudes up to 800 feet and speeds up to 300 knots and therefore greatly changing the flight attack profiles for torpedo attack. In fact, by early 1945 Mark XIII torpedoes were being dropped by TBM Avengers from altitudes as high as 7000 feet at up to 300 knots airspeed with hot, straight and normal runs observed and by 1945 a resurgence of successful use by Navy torpedo bombers against the Japanese Navy occurred.
| THE KIT |
Monogram's TBD kit was state of the art when released
in 1975 with excellent molding of fine parts, raised panel lines and rivets, a
good basic interior including seats, control sticks, pilot instrument panel with
raised details, and Pratt & Whitney R1830 engine with fourteen cylinders. It
provided the option of extended or folding wings as well as open or closed
canopy. A engine access panel and folding platform can be assembled open or
closed. Doors over the bomb aiming windows can be assembled open or closed. It
can be built carrying a Mark XIII torpedo or as a level bomber carrying 100
pound bombs on the wings. Also included are three figures; one pilot figure and
two deck crew figures all of which are very well done. Close examination of the
pilot figure reveals it to be a sculptured reproduction from a well known
photograph of LCDR John Waldron taken shortly before the Battle of Midway.
Thick, glossy Monogram style decals are included for the markings for three
 aircraft including a good supply of data stencils. The first is a VT-2 TBD-1 BuNo 0300 in pre-war “golden wings” colors, later lost on board the USS
Lexington when she was sunk at the Battle of the Coral Sea May 8, 1942. Second
is BuNo 0338 a blue-gray over light gray aircraft in early WW II markings
including the red roundel within the star and red and white rudder stripes but
incorrectly labeled as 8-T-1 of VT-8. Based on historical references this TBD
apparently was assigned to VT-6 as T-11, and damaged in action but not lost at
the Battle of Midway. The third is a VT-6 aircraft BuNo 0308 in blue-gray over
white (this is likely a mistake on the color assignment since by Midway all
combat aircraft were to have been repainted with light gray under surfaces) with
all red insignia markings absent. This is another mislabel as BuNo 0308 was
assigned to VT-8, as T-5, and not VT-6 and was shot down at Midway. Instructions
are fairly detailed and painting and decal application diagrams and instructions
are given with painting color instruction matched to then contemporary Monogram/Humbrol
paint colors. After Monogram was purchased by Revell the kit was re-issued in
2003 with a bonus book by well known aviation author Bert Kinsey. That version
included decals for a VT-6 TBD-1 BuNo 1512 (also shot down at Midway) in Wake
Island raid markings and for a pre-war VT-6 BuNo 0323 (lost in a crash on March
3, 1941) as it appeared in 1939 in pre-war colors.
aircraft including a good supply of data stencils. The first is a VT-2 TBD-1 BuNo 0300 in pre-war “golden wings” colors, later lost on board the USS
Lexington when she was sunk at the Battle of the Coral Sea May 8, 1942. Second
is BuNo 0338 a blue-gray over light gray aircraft in early WW II markings
including the red roundel within the star and red and white rudder stripes but
incorrectly labeled as 8-T-1 of VT-8. Based on historical references this TBD
apparently was assigned to VT-6 as T-11, and damaged in action but not lost at
the Battle of Midway. The third is a VT-6 aircraft BuNo 0308 in blue-gray over
white (this is likely a mistake on the color assignment since by Midway all
combat aircraft were to have been repainted with light gray under surfaces) with
all red insignia markings absent. This is another mislabel as BuNo 0308 was
assigned to VT-8, as T-5, and not VT-6 and was shot down at Midway. Instructions
are fairly detailed and painting and decal application diagrams and instructions
are given with painting color instruction matched to then contemporary Monogram/Humbrol
paint colors. After Monogram was purchased by Revell the kit was re-issued in
2003 with a bonus book by well known aviation author Bert Kinsey. That version
included decals for a VT-6 TBD-1 BuNo 1512 (also shot down at Midway) in Wake
Island raid markings and for a pre-war VT-6 BuNo 0323 (lost in a crash on March
3, 1941) as it appeared in 1939 in pre-war colors.
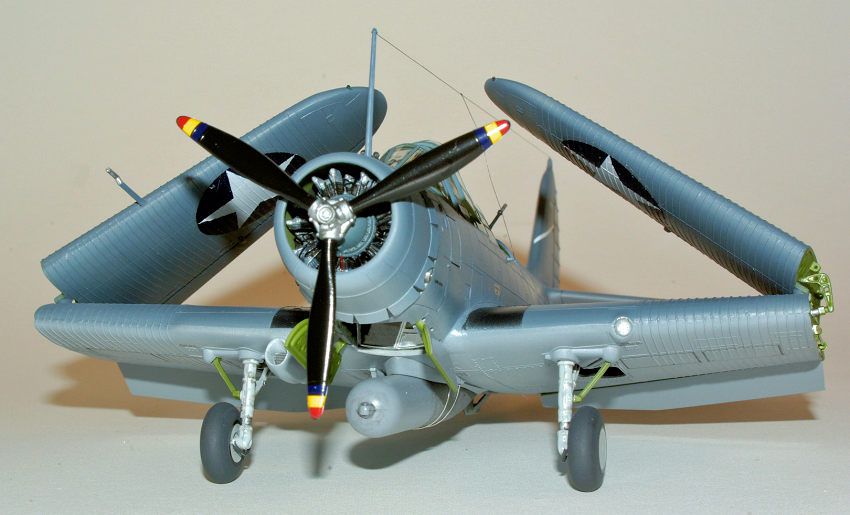
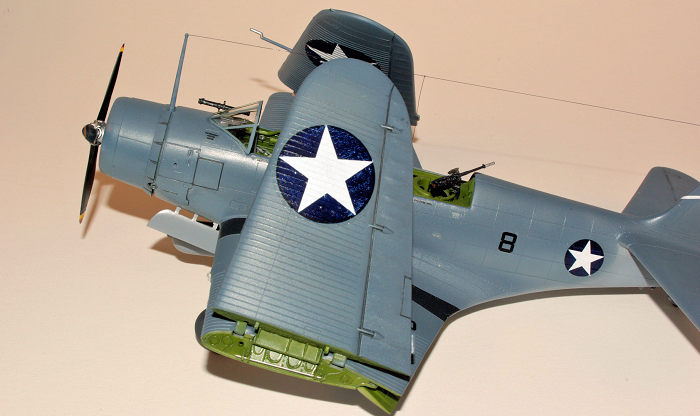
Years ago I had acquired several of these kits and after discovering additional historical information through several hours of internet searches regarding the Battle of Midway decided to proceed with building one to represent Walt Winchell's plane, “Black 8”. Initially planning on a out of the box build I found myself adding things as the construction progressed.
| CONSTRUCTION |
I originally intended my usual out of the box build
but as I examined the kit and the great work of other modelers with the Monogram
TBD decided to add more detail in a effort to push my building envelope a bit. I
deviated from the instructions slightly as I wanted to build the model with the
wings folded (a first for me since it was kit option). I painted the cockpit
Testors Model Master Interior Green. Although all prewar TBDs had interiors
painted in aluminum lacquer at some point apparently it was changed to interior
green according to the references. Studying the references, especially Steve
Ginter's great book, I added detail in the cockpit with scratch built flap,
landing gear, wing fold and hydraulic pump levers on the right pilot panel. I
added the wing fold lock crank and wheel on the left side, some levers, some
control cables using fine wire and some odds and ends wire to represent
hydraulic lines. I used instrument decals from the spares supply to represent
radio equipment dials. The instrument panels were finished by painting a base
coat of white enamel followed by a coat of Future. After airbrushing Testors
Model Master Instrument Black the white on the raised panel
 features was
revealed by lightly brushing away the black with a dry brush of paint thinner.
The dials were then covered with a coat of Future to simulate the glass. The
entire cockpit was given a wash of consisting of a mix of a few drops of Tamiya
black X-1, ½ volume Future, and ½ volume water. There are two side windows below
the pilot for the bombardier/assistant pilot which I glued in place using
acrylic plastic cement (I use and like a commercial water thin and fast drying
solvent cement available at Tap Plastics, a commercial plastics store) used for
gluing acrylic sheet followed by covering the clear part with Micro Mask before
painting. I used the kit seats but added seat belts made of masking tape and
painted accordingly (the TBD-1 did not have shoulder harnesses). No photo etch
parts were used (I didn't have any anyway). The arresting hook was serially
masked and painted in black and white stripes and the lightening holes were
drilled in the gun mount ring. Although the instructions call for the bomb
aiming doors to be closed when a torpedo is installed I wanted them open
(modeler's discretion) so one could view the lower cockpit. If you leave the
doors open at a minimum a firewall floor should be added out of 0.010 sheet
styrene cut to fit since otherwise the pilot cockpit is open in front of the
bomb aiming windows. After cementing the fuselage halves together with the
cockpit parts installed I discovered a gap in the bottom of the firewall area.
The instructions call for the bottom section of the wing to be installed next
followed by the upper sections. Test fitting revealed a gap between the upper
wing edge and the fuselage that was large on both sides. I dealt with this by
using 0.010 sheet styrene to fill the gap then thinned by careful shaving with a
#15 scalpel blade as required. This was followed by attaching the right and left
upper wing panels with acrylic cement. (On a side note, after almost completing
the TBD for this article, I started a second model and I managed this problem in
a easier and much simpler way as I realized the gap problem is mostly a result
of the upper wing half lacking support at the fuselage joint since there is no
built in reinforcing rib to keep the top wing section from bowing with pressure.
The solution is to glue a few 1/16th
styrene strip tabs below the fuselage joint line a distance equal to the
thickness of the upper wing panel and to shave off a small amount of the upper
wing panel edge so that it butts up tight against the fuselage joint. Once glued
in place only a very narrow gap was left which was easily filled with thinned
Bondo). In addition the instructions call for a torpedo fairing (part #26) to be
installed if building the TBD with a torpedo and wing plate (part #58) if
building the plane as a bomber. On the actual aircraft when the torpedo was
carried the tail/propeller end of the torpedo sat in a recessed opening in the
wing protruding into the fuselage. On the real airplane this area was only
partially boxed in with open framing. Since interior pictures show a floor for a
“tunnel” leading from the assistant pilot/bombardier second cockpit to just
below the pilot's feet, I decided to use the wing floor plate and glued it above
the fairing and just behind the bomb aiming window. A representative Norden
bombsight (part #24) is attached to the front of the floor plate. When viewed
from above through the pilot's cockpit it looks more realistic since the bomb
sight will be visible (barely). It is also slightly visible through the open
viewing doors covering the bomb aiming window (part #73). I then boxed in the
floor using 0.020 sheet styrene. I encountered a poor fit where the rear part of
the lower wing meets the fuselage and dealt with this by adding scrap plastic
sheet tabs inside the fuselage to reinforce the joint followed by application of
Bondo Auto Body putty and re-contouring the area. (on the second model built
this problem was much reduced as a result of the revised method of dealing with
the fuselage-upper wing gap). The gap on the bottom fuselage at the firewall was
closed with 5 minute epoxy followed by contouring the dried epox
features was
revealed by lightly brushing away the black with a dry brush of paint thinner.
The dials were then covered with a coat of Future to simulate the glass. The
entire cockpit was given a wash of consisting of a mix of a few drops of Tamiya
black X-1, ½ volume Future, and ½ volume water. There are two side windows below
the pilot for the bombardier/assistant pilot which I glued in place using
acrylic plastic cement (I use and like a commercial water thin and fast drying
solvent cement available at Tap Plastics, a commercial plastics store) used for
gluing acrylic sheet followed by covering the clear part with Micro Mask before
painting. I used the kit seats but added seat belts made of masking tape and
painted accordingly (the TBD-1 did not have shoulder harnesses). No photo etch
parts were used (I didn't have any anyway). The arresting hook was serially
masked and painted in black and white stripes and the lightening holes were
drilled in the gun mount ring. Although the instructions call for the bomb
aiming doors to be closed when a torpedo is installed I wanted them open
(modeler's discretion) so one could view the lower cockpit. If you leave the
doors open at a minimum a firewall floor should be added out of 0.010 sheet
styrene cut to fit since otherwise the pilot cockpit is open in front of the
bomb aiming windows. After cementing the fuselage halves together with the
cockpit parts installed I discovered a gap in the bottom of the firewall area.
The instructions call for the bottom section of the wing to be installed next
followed by the upper sections. Test fitting revealed a gap between the upper
wing edge and the fuselage that was large on both sides. I dealt with this by
using 0.010 sheet styrene to fill the gap then thinned by careful shaving with a
#15 scalpel blade as required. This was followed by attaching the right and left
upper wing panels with acrylic cement. (On a side note, after almost completing
the TBD for this article, I started a second model and I managed this problem in
a easier and much simpler way as I realized the gap problem is mostly a result
of the upper wing half lacking support at the fuselage joint since there is no
built in reinforcing rib to keep the top wing section from bowing with pressure.
The solution is to glue a few 1/16th
styrene strip tabs below the fuselage joint line a distance equal to the
thickness of the upper wing panel and to shave off a small amount of the upper
wing panel edge so that it butts up tight against the fuselage joint. Once glued
in place only a very narrow gap was left which was easily filled with thinned
Bondo). In addition the instructions call for a torpedo fairing (part #26) to be
installed if building the TBD with a torpedo and wing plate (part #58) if
building the plane as a bomber. On the actual aircraft when the torpedo was
carried the tail/propeller end of the torpedo sat in a recessed opening in the
wing protruding into the fuselage. On the real airplane this area was only
partially boxed in with open framing. Since interior pictures show a floor for a
“tunnel” leading from the assistant pilot/bombardier second cockpit to just
below the pilot's feet, I decided to use the wing floor plate and glued it above
the fairing and just behind the bomb aiming window. A representative Norden
bombsight (part #24) is attached to the front of the floor plate. When viewed
from above through the pilot's cockpit it looks more realistic since the bomb
sight will be visible (barely). It is also slightly visible through the open
viewing doors covering the bomb aiming window (part #73). I then boxed in the
floor using 0.020 sheet styrene. I encountered a poor fit where the rear part of
the lower wing meets the fuselage and dealt with this by adding scrap plastic
sheet tabs inside the fuselage to reinforce the joint followed by application of
Bondo Auto Body putty and re-contouring the area. (on the second model built
this problem was much reduced as a result of the revised method of dealing with
the fuselage-upper wing gap). The gap on the bottom fuselage at the firewall was
closed with 5 minute epoxy followed by contouring the dried epox y. Some minor
putty work was required to fill joint seams elsewhere. The top and bottom
folding sections of the wing tips were then glued together and the joint
finished by careful wet sanding after drying. Additional scratch built detail
using pieces of 0.010 sheet styrene and brass wire was added to the rib covering
the open wing (part #51) to represent the wing locking mechanism which is very
prominent in photographs. The wing tip identification lights are represented by
raised panel lines outlining a protruding area representing the lights. Close
examination of photos shows this is incorrect as the actual lights were housed
in small cylindrical housings protruding from the front of the wing tip leading
edge. Therefore the contour was smoothed out by sanding, a small hole drilled
and a small rod of clear stretched sprue was inserted to represent the light.
The engine is molded with two rows of seven cylinders and I glued the halves
together and used fine copper wire inserted in drilled holes to represent
ignition wires. The engine was hand painted to match color photos available on
the internet. At this point the model was ready for paint since I wanted to do
the final assembly of the wings in the folded position last. One should note
that assembling the model with the wings extended will leave a gap on the top of
the wing between the hinge points where the outer and inner sections join if
assembled per the instructions. The best way to correct this would be to butt
join the two sections; it seems much easier to build the model with folded wings
and I took the easy way out. One important construction point is that if one is
assembling the folded wings as a last step it is important to not glue the
alignment post on the outer, rear aspect of each inner wing panel. Gluing this
point is the only joint that holds the upper and lower wing sections together
but if glued it will not be possible to insert the outer wing section into the
hinge and then install the wing rib (part #51) to lock everything in place.
After painting, decal application, and assembly of the small parts such as the
doors, cockpit parts, aerial mast behind the engine cowling, landing gear with
wheels, and canopy in the open position, the torpedo was added and the wings
were assembled in the folded position. Care is needed with the landing gear as
the brake lines are integrally molded in the parts and they are easily broken
(alternatively they can be replaced with fine wire). Dropped flaps are a option
but attachment is tenuous as provided so I drilled holes for 1/64th
inch brass rod to facilitate attachment to the wings in the flap down position.
A telescopic gun sight (part #22) is provided but photos show a very prominent
Mark XIV analog Torpedo Sight just to the left of the telescopic sight. I
scratch built a representation from Plastruct channel, rod, and 0.010 sheet
styrene components. On the TBD the Mark XIII torpedo was held by in place by two
steel cables; I used wire to represent this. Monogram's representation of the
Mark XIII is not completely accurate but I decided not to do the work needed to
make a more accurate representation for how one would appear in June, 1942. The
final task was antenna wires. I used strands of my daughter's straight hair
attached with cyanoacrylate glue for this. A detail not specified in the kit
instructions is that at the Battle of Midway photos confirm all VT-8 aircraft
carried twin belt fed 0.30 caliber machine guns in the rear cockpit instead of
the originally provided single machine gun with attached ammunition box. This
was a change ordered by LCDR Walton just before the Battle of Midway and the
guns were spare weapons originally assigned to the SBD squadrons on board. Since
this twin gun set is not provided in the kit it will have to be fabricated or a
after market component used in order to represent a VT-8 aircraft at Midway.
Another item is that the three hinge bomb window doors with lightening holes
originally provided in early production TBD-1s was replaced by doors with two
hinges without lightening holes in the later production although it is not clear
at what bureau number this change was made. I used the three hinge doors
provided with the kit.
y. Some minor
putty work was required to fill joint seams elsewhere. The top and bottom
folding sections of the wing tips were then glued together and the joint
finished by careful wet sanding after drying. Additional scratch built detail
using pieces of 0.010 sheet styrene and brass wire was added to the rib covering
the open wing (part #51) to represent the wing locking mechanism which is very
prominent in photographs. The wing tip identification lights are represented by
raised panel lines outlining a protruding area representing the lights. Close
examination of photos shows this is incorrect as the actual lights were housed
in small cylindrical housings protruding from the front of the wing tip leading
edge. Therefore the contour was smoothed out by sanding, a small hole drilled
and a small rod of clear stretched sprue was inserted to represent the light.
The engine is molded with two rows of seven cylinders and I glued the halves
together and used fine copper wire inserted in drilled holes to represent
ignition wires. The engine was hand painted to match color photos available on
the internet. At this point the model was ready for paint since I wanted to do
the final assembly of the wings in the folded position last. One should note
that assembling the model with the wings extended will leave a gap on the top of
the wing between the hinge points where the outer and inner sections join if
assembled per the instructions. The best way to correct this would be to butt
join the two sections; it seems much easier to build the model with folded wings
and I took the easy way out. One important construction point is that if one is
assembling the folded wings as a last step it is important to not glue the
alignment post on the outer, rear aspect of each inner wing panel. Gluing this
point is the only joint that holds the upper and lower wing sections together
but if glued it will not be possible to insert the outer wing section into the
hinge and then install the wing rib (part #51) to lock everything in place.
After painting, decal application, and assembly of the small parts such as the
doors, cockpit parts, aerial mast behind the engine cowling, landing gear with
wheels, and canopy in the open position, the torpedo was added and the wings
were assembled in the folded position. Care is needed with the landing gear as
the brake lines are integrally molded in the parts and they are easily broken
(alternatively they can be replaced with fine wire). Dropped flaps are a option
but attachment is tenuous as provided so I drilled holes for 1/64th
inch brass rod to facilitate attachment to the wings in the flap down position.
A telescopic gun sight (part #22) is provided but photos show a very prominent
Mark XIV analog Torpedo Sight just to the left of the telescopic sight. I
scratch built a representation from Plastruct channel, rod, and 0.010 sheet
styrene components. On the TBD the Mark XIII torpedo was held by in place by two
steel cables; I used wire to represent this. Monogram's representation of the
Mark XIII is not completely accurate but I decided not to do the work needed to
make a more accurate representation for how one would appear in June, 1942. The
final task was antenna wires. I used strands of my daughter's straight hair
attached with cyanoacrylate glue for this. A detail not specified in the kit
instructions is that at the Battle of Midway photos confirm all VT-8 aircraft
carried twin belt fed 0.30 caliber machine guns in the rear cockpit instead of
the originally provided single machine gun with attached ammunition box. This
was a change ordered by LCDR Walton just before the Battle of Midway and the
guns were spare weapons originally assigned to the SBD squadrons on board. Since
this twin gun set is not provided in the kit it will have to be fabricated or a
after market component used in order to represent a VT-8 aircraft at Midway.
Another item is that the three hinge bomb window doors with lightening holes
originally provided in early production TBD-1s was replaced by doors with two
hinges without lightening holes in the later production although it is not clear
at what bureau number this change was made. I used the three hinge doors
provided with the kit.
| COLORS & MARKINGS |
In deciding on the finish for the aircraft from
VT-6 I was able to find references with a one photo of BuNo 0367 from early 1942
when the aircraft still had the red circle in star and red/white stripe rudder
insignia. Prior to the war all aircraft carried their squadron designations as
“squadron number”-”mission letter “T”-”squadron aircraft number 1 through 18” on
the fuselage, hence, 6-T-8. Each squadron had six sections made up of three
aircraft. Although apparently compliance varied from squadron to squadron after
the declaration of war by April 1942 the squadron number was removed and by the
time of Midway the mission letter “T” designation was also apparently removed
leaving only the squadron aircraft number. This was apparently the case for all
VT-6 aircraft by June, 1942 an d is verifiable against the photographic record.
Period photographs from May, 1942 show that VT-8 aircraft still carried the
mission letter “T”, hence “T-14” for Ensign Gay's aircraft and “T-16” for LCDR
Waldron's aircraft. Most decal sets including the Monogram set provide the
numbering in the pre-war configuration so one will have to decide which should
be applied. Based on the best information available to my review I went with the
solitary aircraft number designation for VT-6. Interestingly photographs at the
time also show wide variation between aircraft even in the same squadron and
among squadrons of the size of the national insignia on the wings and fuselage
ranging from 24 inches to 60 inches in diameter.
d is verifiable against the photographic record.
Period photographs from May, 1942 show that VT-8 aircraft still carried the
mission letter “T”, hence “T-14” for Ensign Gay's aircraft and “T-16” for LCDR
Waldron's aircraft. Most decal sets including the Monogram set provide the
numbering in the pre-war configuration so one will have to decide which should
be applied. Based on the best information available to my review I went with the
solitary aircraft number designation for VT-6. Interestingly photographs at the
time also show wide variation between aircraft even in the same squadron and
among squadrons of the size of the national insignia on the wings and fuselage
ranging from 24 inches to 60 inches in diameter.
From Lynn Ritger's webpage: “Aircraft bureau number 0367, Aircraft lost with VT-6 as T-8, National Archives photo of T-8 manned and spotted on deck of CV-6 on 11 April 42 shows faded BG-LG scheme, over sized stripes covering entire rudder assembly, one LSO stripe up left side of fin, slightly overlapping to right side, BuNo just visible, small fuselage star just forward of horizontal stab, no. 8 just aft of gunner's cockpit ("Golden Wings", Sullivan/Lucabaugh, Squadron Pubs., pg. 11 top)”
The model's fuselage and cockpit openings were filled with tissue wrapping paper and masked before airbrushing. Unfortunately I did not have a supply of ANA Blue Gray so I decided to try a custom mix of Testors Model Master Intermediate Blue with generic black and white added to try to match the ANA color chip in the Monogram US Navy color guide book. In retrospect it looks like the color is too blue and too light. I lightened Humbrol Matt Gray #27 (I have a large supply and need to use it up) with Testors Model Master Insignia White to match the corresponding ANA color. On “Black 8” I did not pre-shade panel lines with black since the contemporary photos seem to show little weathering as the aircraft carried the colors only a few months before Midway. I also wanted to try Tamiya panel line wash for the first time. I tried to make the coverage tones somewhat variable across the sections of the model to avoid a uniform appearance. After the color coats had dried I airbrushed Testors Glosscote lacquer prior to decal application. The wing corrugations caused some problems with the decals laying down despite several applications of Microset and Solvaset although after about six sessions of fine needle puncture of decal bubbles and Solvaset the decals went down flat. The very complete Starfighter sheet provides sufficient markings and stencils for two complete planes but allows up to eight different specific aircraft schemes due to different combinations of markings and insignia from different dates. These include a TBD-1 from squadron VS-42 (May 1941), three VT-6 planes from March 1941 through April 1942, a VT-2 plane from May 1942 at the Battle of the Coral Sea, and three VT-8 planes, one from February 1942 and then LTCR Waldron's T-16 and Ensign Gay's T-14 from Midway. Bureau numbers for four different aircraft are provided. Unfortunately the specific aircraft BuNo for the VT-6 aircraft I selected are not included so rather than apply incorrect numbers I left the numbers off the vertical fin.
The canopy sections are tedious to paint especially since I wanted “Black 8” to have each section open. Monogram supplies the separate components and I masked off the sections to remain clear using small squares of Tamiya masking tape laid down in overlapping pieces. I take a 10 mm strip then cut across it with a sharp #11 scalpel blade to generate somewhat random size rectangular pieces. It is time consuming but for my old eyes it is a lot easier than cutting tape applied to the canopy and works better than a liquid masking agent like Micro Mask. The canopy parts were pre-treated by a dip in Future floor protector, and allowed to dry for a couple of weeks before masking and painting. The inside surfaces were masked completely with Tamiya tape and then Testors MM Interior Green was airbrushed followed by the custom blue-gray. Unfortunately the sections are also somewhat thick which presented a problem in posing the pilot's section open as it will not sit correctly. Carefully thinning the rear edge helped a little but a better solution would require a vacuum formed canopy. Using one also would allow the track mechanism to be represented. I attached the clear parts with Testors Clear Parts and Window Maker adhesive.
| CONCLUSIONS |
 Having several of the original Monogram issued TBD
kits languishing in my collection for many years the 75th
anniversary of the Battle of Midway seemed like the right occasion to build
them. Thanks to the wonder of internet searching I was able to uncover much
information that was new to me that added to the adventure of discovery for a
arm chair historian like me. The Monogram kit has some simplified features which
ease construction for a beginning builder and some inaccuracy issues but the
part count is low and it builds up into an nice model out-of-the-box in my
humble opinion although it can definitely benefit from as much modeling skill as
one can bring as demonstrated by some outstanding reviews/build articles on
several modeling web sites. With skill and effort as well as aftermarket parts
(none of which I used) and decals it can provide the basis to build into a
exceptional model. I can not compare it to the much more recent Great Wall kit
(which I do not have) although from reviews it looks like a fantastic state of
the art accurate kit with a full interior albeit with some
construction/engineering issues. Completion of the project provided a
opportunity to learn more about a historically significant battle the
consequences of which are largely unappreciated by the great majority of
Americans today and provide a small tribute to the unbelievably brave and
gallant men who flew, fought, and died in the Douglas TBD-1 in the early dark
days for the U.S. Navy in the Pacific Theater during World War II.
Having several of the original Monogram issued TBD
kits languishing in my collection for many years the 75th
anniversary of the Battle of Midway seemed like the right occasion to build
them. Thanks to the wonder of internet searching I was able to uncover much
information that was new to me that added to the adventure of discovery for a
arm chair historian like me. The Monogram kit has some simplified features which
ease construction for a beginning builder and some inaccuracy issues but the
part count is low and it builds up into an nice model out-of-the-box in my
humble opinion although it can definitely benefit from as much modeling skill as
one can bring as demonstrated by some outstanding reviews/build articles on
several modeling web sites. With skill and effort as well as aftermarket parts
(none of which I used) and decals it can provide the basis to build into a
exceptional model. I can not compare it to the much more recent Great Wall kit
(which I do not have) although from reviews it looks like a fantastic state of
the art accurate kit with a full interior albeit with some
construction/engineering issues. Completion of the project provided a
opportunity to learn more about a historically significant battle the
consequences of which are largely unappreciated by the great majority of
Americans today and provide a small tribute to the unbelievably brave and
gallant men who flew, fought, and died in the Douglas TBD-1 in the early dark
days for the U.S. Navy in the Pacific Theater during World War II.
| REFERENCES |
1. Naval Fighters Number Seventy-One, Douglas TBD-1 Devastator, Steve Ginter, 2006 (Outstanding aircraft reference with photos)
2. TBD Devastator in Action, Al Adcock, Aircraft Number 97, Squadron/Signal Publications, 1989 (extensive photo collection)
3. Douglas TBD-1 Devastator, Aero Series Volume 23, B.R. Jackson and T. E. Doll, Aero Publishers, Inc, 1973
4. Miracle at Midway, Gordon W. Prange, Penguin Books, 1982 (excellent historical account and analysis of the battle)
5. Battle of Midway, https://en.wikipedia.org
6. The Douglas TBD-1 Devastator, Lynn Ritger, http://tbd_devastator.tripod.com/ (one stop source for TBD photos and battle history)
7. Hyperwar, U.S. Navy in World War II, (extensive collection of documents, history)
8. The U.S. Torpedo Squadrons at Midway 1942 – An Unavoidable Sacrifice, Pete Hill,
9. The Official Monogram U.S. Navy & Marine Corps Aircraft Color Guide, Volume 2, John M. Elliott, Monogram Aviation Publications, 1987 (Definitive work on U.S. Navy/Marine colors and markings, four volume set)
10. Navy Air Colors, Vol 1, 1911-1945, Thomas E. Doll, Squadron/Signal Publications, 1983 (excellent overview of U.S. Navy camouflage and markings)
11. Aerodata International, U.S. Navy Carrier Bombers of World War II, Squadron/Signal Publications, 1982 (excellent information, photos, color illustrations, and 3-view drawings)
12. Mark 13 Torpedo, (Wikipedia has a series of fascinating articles on U.S. Navy torpedoes)
27 April 2017
Copyright ModelingMadness.com. If you would like your product reviewed fairly and fairly quickly, please
contact
the editor or see other details in the
Note to
Contributors. Back to the Main Page
Back to the Review
Index Page
Back to the Previews Index Page