| KIT #: | ? |
| PRICE: | 30 Euro |
| DECALS: | Six options |
| REVIEWER: | Fernando Rolandelli |
| NOTES: |
| HISTORY |
After having to make do during the first half or so of the war with fighter
types which went from inadequate to undistinguished (Roc, Skua, Gladiator,
Fulmar, Sea Hurricane, Martlet), by the second half there was a flurry of
outstanding ones (Seafire, Corsair, Firefly, Hellcat). Of those, Hellcats were
preferred in small Light Fleet or escort carriers. In the BPF, the only Fleet
carrier embarking Hellcats was HMS Indomitable, carrying the 5th
Fighter Wing, comprising 1839th
and 1844th
Sqns. Others went to
 escort
carriers, such as those of 898th
Sqn, which sailed to Ceylon on board of HMS Attacker.
Tactical use of Hellcat seems to have been mostly offensive, in flak-busting
attacks supporting Tarpon/Avenger/Barracuda strike packages.
escort
carriers, such as those of 898th
Sqn, which sailed to Ceylon on board of HMS Attacker.
Tactical use of Hellcat seems to have been mostly offensive, in flak-busting
attacks supporting Tarpon/Avenger/Barracuda strike packages.
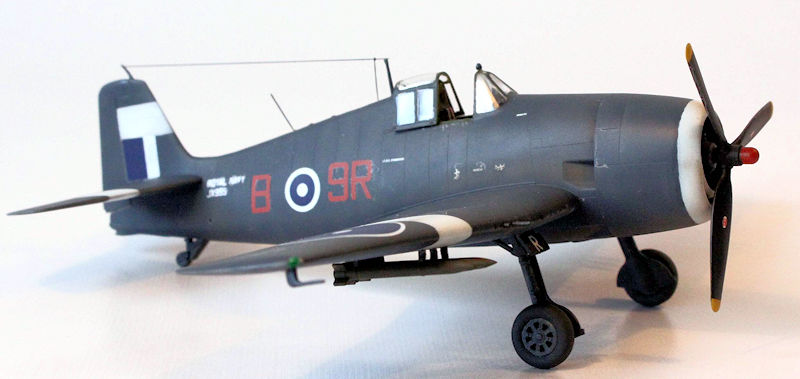
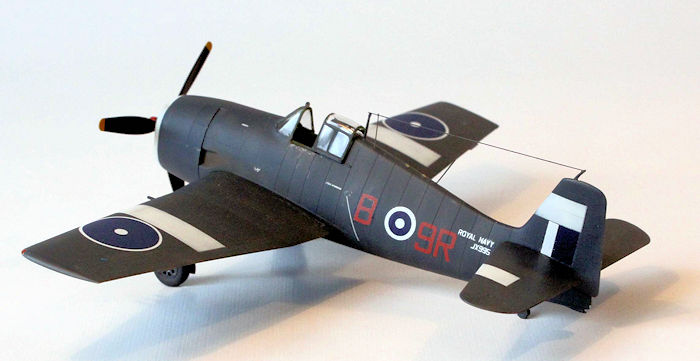
The aircraft was tried operationally with rockets, at first having the cumbersome British designed rail installation (similar to that in Fireflies, which eventually took that role) and later with the American “zero-length” launchers, in which the rockets (HVARs) are attached to two small stubs fixed in the wing’s undersurface. As these installation only became available at a certain point in F6F-5 production run, it was present only on some late Mk.II . There are very few pictures depicting FAA Hellcats with the stubs installed; one of them shows JX995, “B9-R” of 898th Sqn at Ceylon, Racecourse airdrome (another shows “B9-A”) Whether the rockets were actually used operationally, let alone in action, has been long debated. The squadron history consigns that it was involved in training with rockets; those could only be the American HVAR in “zero-length” launchers type. If you agree to consider “training” an operational activity (I personally think it is) we have an answer.
| THE KIT |
Eduard’s 1/72nd
Hellcat is certainly a contender for the “best WW2 kit in 1/72nd”
contest. It is well detailed, accurate; easy to build and has no traps. Well,
almost; I personally consider the ventral tank installation one of the poorest
designs seeing in modern kits. Nevertheless, “it is called modeling”, and
 certainly
you can get a fair result with the proper care. The “twin FAA” boxing is a
winner on its own right: two complete kits that can be built as Mk.I or II
(both! All 1/72 Hellcats come with the same plastic parts regardless of the
boxing, complete for a -3, -5 or -5N), with all the accoutrements of a
“Profipack” (PE –even Sutton harnesses!- and masks)plus an absolute killer of a
decal sheet at an almost ridiculously low price.
certainly
you can get a fair result with the proper care. The “twin FAA” boxing is a
winner on its own right: two complete kits that can be built as Mk.I or II
(both! All 1/72 Hellcats come with the same plastic parts regardless of the
boxing, complete for a -3, -5 or -5N), with all the accoutrements of a
“Profipack” (PE –even Sutton harnesses!- and masks)plus an absolute killer of a
decal sheet at an almost ridiculously low price.
Such is the sadomasochistic nature of modelers that I decided for the second time to forgo the very interesting options in the decal sheet to fall into a very old Aeromaster sheet of American aircraft in the FAA, issued when this was a shadow area only fractionally covered by the kit industry. Obviously, it was plagued with errors (“Errormaster”?), some of which I successfully dodged, while in some I fell.
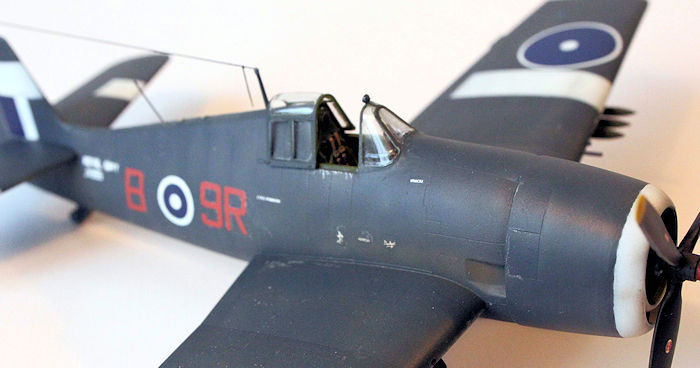
| CONSTRUCTION |
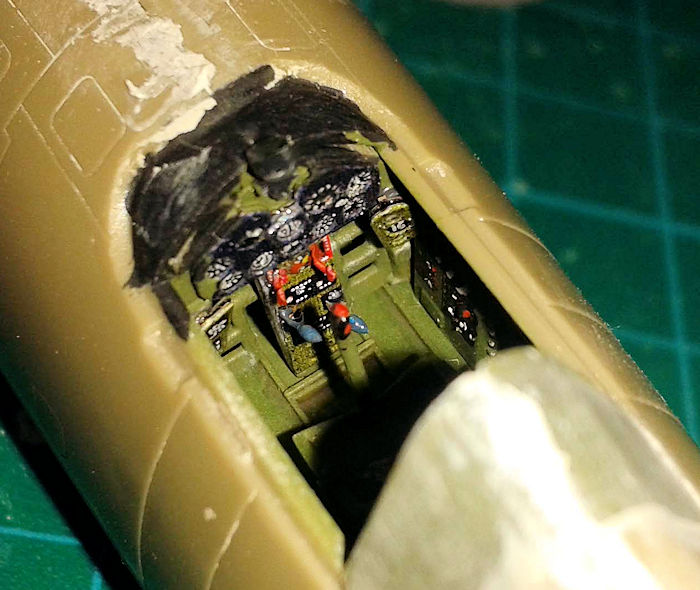 Virtually
uneventful. I assembled the cockpit with the full PE garnishing, painted
everything Interior Green and closed the fuselage without further ado. Engine
cowling is a three-piece affair that can be troublesome; I also painted it
Interior Green. The engine I glued a bit downwards to show the very apparent
downwards thrust of the original, though the effect is probably a bit
exaggerated. As the picture I saw of JX995 doesn’t show the infamous ventral
tank, I happily left it out. I used the rockets, nevertheless. Puttying and
sanding in between the MG tubes was tricky, but the wings themselves went into
the fuselage slots with no glue at all. I left the (incorrectly closed) wheel
bays all alone.The windscreen didn’t fit that well (weirdly, it looks like the
windscreen for the -3, Mk.I version fits better!), but the “wider” hood rode
over the spine properly.
Virtually
uneventful. I assembled the cockpit with the full PE garnishing, painted
everything Interior Green and closed the fuselage without further ado. Engine
cowling is a three-piece affair that can be troublesome; I also painted it
Interior Green. The engine I glued a bit downwards to show the very apparent
downwards thrust of the original, though the effect is probably a bit
exaggerated. As the picture I saw of JX995 doesn’t show the infamous ventral
tank, I happily left it out. I used the rockets, nevertheless. Puttying and
sanding in between the MG tubes was tricky, but the wings themselves went into
the fuselage slots with no glue at all. I left the (incorrectly closed) wheel
bays all alone.The windscreen didn’t fit that well (weirdly, it looks like the
windscreen for the -3, Mk.I version fits better!), but the “wider” hood rode
over the spine properly.
Final assembly, including undercarriage legs (though I usually shorten those in the big 1/48th brothers, I leave them alone in the little ones), rockets and aerials went without incident.
| COLORS & MARKINGS |
 For the
sake of the environment (I mean, my own man-cave environment) I try to use
acrylic paints whenever I can. This time, however, I was not at all convinced
with the look (in the bottle) of the Xtracrylixs Gloss Sea Blue AN623;
therefore, resorted to the Xtracolour version which weirdly proved markedly
different and more to my liking. I did a heavy preshade with some areas in
Yellow and White to provide contrast (in the end, it hardly makes a different,
unless you have an eye for extreme subtlety) I painted the GSB in mottle fashion
over these, and then made some more, very restrained, mottling with a lightened
version. The White ID stripes I painted afterwards, achieving “instant
weathering”; I patterned them after the Eduard instructions for “C7-B” (it later
transpired that at least some 898th
Sqn machines had them wider and a bit displaced to the wingtip, covering
partially the roundel. I fell into that one; but to be fair in the picture of
“B9-R” that is not conclusively apparent). Prop hub is Red; that, though
undocumented, would be compatible with the colour in the code letters. I painted
the position lights straight on the fuselage undersurfaces, applying a Silver
dot, a White Glue drop and then the proper Tamiya Clear. The square landing
light in the left wing leading edge was painted Silver and then a thinnedTamiya
Clear Yellow (I know, it is a simple White light, but it looks like a light with
that over coat)
For the
sake of the environment (I mean, my own man-cave environment) I try to use
acrylic paints whenever I can. This time, however, I was not at all convinced
with the look (in the bottle) of the Xtracrylixs Gloss Sea Blue AN623;
therefore, resorted to the Xtracolour version which weirdly proved markedly
different and more to my liking. I did a heavy preshade with some areas in
Yellow and White to provide contrast (in the end, it hardly makes a different,
unless you have an eye for extreme subtlety) I painted the GSB in mottle fashion
over these, and then made some more, very restrained, mottling with a lightened
version. The White ID stripes I painted afterwards, achieving “instant
weathering”; I patterned them after the Eduard instructions for “C7-B” (it later
transpired that at least some 898th
Sqn machines had them wider and a bit displaced to the wingtip, covering
partially the roundel. I fell into that one; but to be fair in the picture of
“B9-R” that is not conclusively apparent). Prop hub is Red; that, though
undocumented, would be compatible with the colour in the code letters. I painted
the position lights straight on the fuselage undersurfaces, applying a Silver
dot, a White Glue drop and then the proper Tamiya Clear. The square landing
light in the left wing leading edge was painted Silver and then a thinnedTamiya
Clear Yellow (I know, it is a simple White light, but it looks like a light with
that over coat)
The Aeromaster decal sheet comes with the code letters in Red. While that is not
common, it cannot be ruled out. The picture of “B9-R” show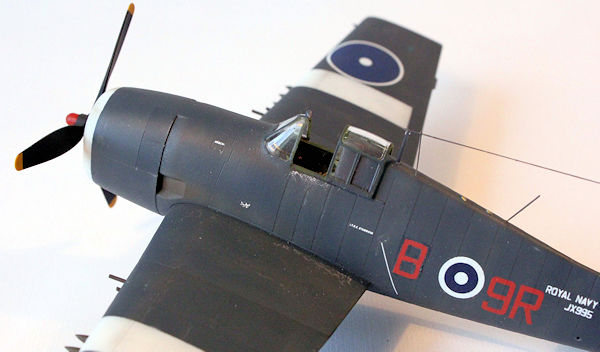 s
the letters clearly darker than the White in the adjacent roundel, but, how much
darker, impossible to say. Another firm colour candidate would be Sky. The
official 898th
Sqn page, however, shows this machine sporting Red colours; whether it is a
mistake dragged on from somewhere, I cannot tell. The upper wing roundels in the
sheet are the same small size as in lower wing and fuselage; obviously the
Americans in Aeromaster wouldn’t find a reason why different sized roundels
would be applied to the same airframe. I fell into the trap, but managed to
escape in time, using the roundel in the Eduard sheet (which are however a
slightly different shade) I added the individual letter in the front
undercarriage door; it probably should have read “9R”, but I couldn’t find a
matching pair. I followed the standard fashion and applied the individual letter
only.
s
the letters clearly darker than the White in the adjacent roundel, but, how much
darker, impossible to say. Another firm colour candidate would be Sky. The
official 898th
Sqn page, however, shows this machine sporting Red colours; whether it is a
mistake dragged on from somewhere, I cannot tell. The upper wing roundels in the
sheet are the same small size as in lower wing and fuselage; obviously the
Americans in Aeromaster wouldn’t find a reason why different sized roundels
would be applied to the same airframe. I fell into the trap, but managed to
escape in time, using the roundel in the Eduard sheet (which are however a
slightly different shade) I added the individual letter in the front
undercarriage door; it probably should have read “9R”, but I couldn’t find a
matching pair. I followed the standard fashion and applied the individual letter
only.
A moderate weathering followed. Exhaust fumes were mimicked with a first coat of Light Grey, followed by a Burnt Umber one. The same BU was randomly streaked and mottled all over the airframe. It is not darker than GSB, and produced a nice, soft, dusty effect. Very restrained chipping was applied with a Silver pencil.
| CONCLUSIONS |
As I said before, building this kit is a very pleasing exercise. It certainly leaves you wanting to build more, which is one of the best effects a kit can make on you.
| REFERENCES |
- “Royal Navy Aces of WW II”, Andrew Thomas, Osprey Publications;
- “Model Aircraft Monthly” 2005-8, SAMI Publications;
- “Fleet Air Arm Aircraft, 1939-1945”, Ray Sturtivant and others, Air Britain Publications;
- “Grumman F6F Hellcat”, Andre Zbiegniewski, Monographs n° 10, Kagero Publications;
December 2015
Copyright ModelingMadness.com
If you would like your product reviewed fairly and fairly quickly, please contact the editor or see other details in the Note to Contributors.