| KIT #: | 8221 |
| PRICE: | $34.98 MSRP |
| DECALS: | Five options |
| REVIEWER: | William Reece |
| NOTES: |
| HISTORY |
Enjoying a 19:1 kill ratio the big, powerful and tough Hellcat is the
most successful naval fighter ever built.
The Hellcat accounted for 75% of all
| THE KIT |
 The Hellcat is my favorite fighter plane and I was excited with
Eduard’s decision to release a new kit in 1/48th scale.
It would be easy to argue that Hasegawa’s 1/48th scale F6F
is a state of the art kit. By
comparison the Eduard F6F-3 is superior.
It is well designed with a very comprehensive instruction sheet, two
frets of color photo etch and a decal sheet with five aircraft that cover
the range of the F6F-3’s combat life.
I really like the Eduard kits because they are complete, with nothing
else to buy. A new feature not
found in either the Otaki or Hasegawa releases of the F6F-3 is the inclusion
of a three piece cowling that covers all three variations used during the
production of the F6F-3. Pay particular attention to which one the aircraft
you’ll be doing uses. There
were many discussions on various modeling web sites about the ‘smile’ of the
Eduard kit on modeling websites. The
consensus is that Eduard has gotten it as close as anyone is likely to come
given the limitations of injection molding. The kit even includes a photo
etched screen for the center air intake.
The Hellcat is my favorite fighter plane and I was excited with
Eduard’s decision to release a new kit in 1/48th scale.
It would be easy to argue that Hasegawa’s 1/48th scale F6F
is a state of the art kit. By
comparison the Eduard F6F-3 is superior.
It is well designed with a very comprehensive instruction sheet, two
frets of color photo etch and a decal sheet with five aircraft that cover
the range of the F6F-3’s combat life.
I really like the Eduard kits because they are complete, with nothing
else to buy. A new feature not
found in either the Otaki or Hasegawa releases of the F6F-3 is the inclusion
of a three piece cowling that covers all three variations used during the
production of the F6F-3. Pay particular attention to which one the aircraft
you’ll be doing uses. There
were many discussions on various modeling web sites about the ‘smile’ of the
Eduard kit on modeling websites. The
consensus is that Eduard has gotten it as close as anyone is likely to come
given the limitations of injection molding. The kit even includes a photo
etched screen for the center air intake.
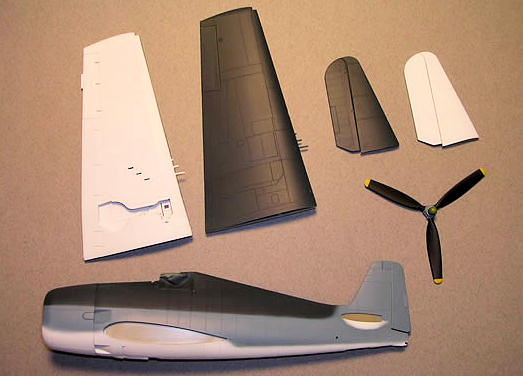
The surface detail of the kit is state of the art for 1/48th
scale and includes very fine engraved panel lines with beautiful rivet
details. The fuselage is particularly nice and molded in cutouts for the
windows behind the cockpit. The lapped panel effect along the length of the
fuselage is very good and I took extra care during construction not to
obliterate it.
The landing gear is very well detailed for a 1/48th
scale kit. The struts have a
good amount of detail and include links, doors, molded on brake lines and
the gears that rotate the main strut into the wheel bay. I think the
discussion about the length of the struts has been over done.
This could be fixed by the modeler if desired.
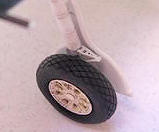
The tires however are too narrow for a fleet Hellcat and lack either
checkerboard or block tread usually seen in photos.
Resin tires and wheels are almost a requirement.
This was the one knock I had one the kit that I couldn’t solve
without going to the aftermarket. One could add a 0.015” piece of plastic
sheet between the wheel halves to thicken them.
The wheel detail is fairly good and I like the two piece hubs that
greatly simplify painting.
The prominent up-lock for the landing gear is provided in the wheel
bay. The remainder of the wheel bay
is rather basic. An advanced
modeler could spend considerable time adding detail to this area.
Still it’s better than any previous
1/48th kit.
 The engine is well detailed with fine cooling fins and a multi part
gear case. Also included are a
PE ignition harness, data plate and Pratt and Whitney logo in color.
The engine is well detailed with fine cooling fins and a multi part
gear case. Also included are a
PE ignition harness, data plate and Pratt and Whitney logo in color.
There are two sliding canopy portions provided, one for a closed
cockpit and the other slightly larger to allow it to be posed open.
This is a very nice touch.
A windscreen with the built-in bullet proof glass, appropriate for
the F6F-3N and F6F-5 is also included but not used.
Clear lenses for the wingtip
navigation lights, fuselage recognition lights and deck approach light are
included. Eduard forgot to
include lenses for the blue formation lights located on the top of the wings
near the ailerons. Scribed
concentric circles are there instead.
The kit also includes the forward leaning antenna mast seen on the first 909 Hellcats. Though it’s not referenced in the instructions. Strangely not included are the fairings for the inboard machine gun barrels of the first approximately 909 aircraft.
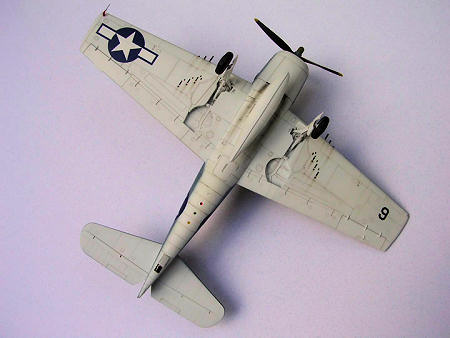
The decals are comprehensive and include markings for five
Hellcats that cover the F6F-3s combat career and full stencils.
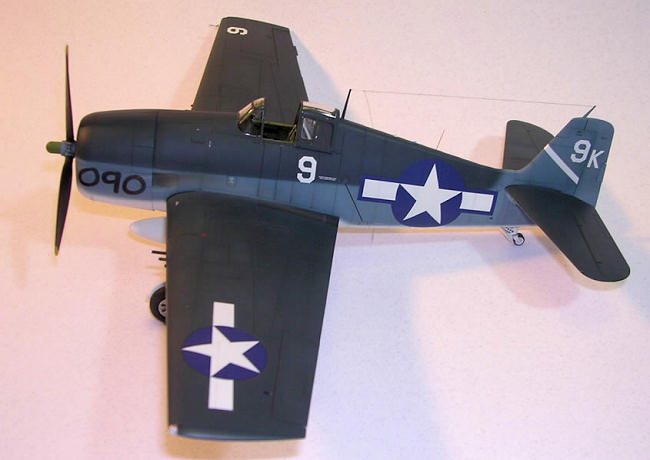
A first for any Hellcat kit is the proper national insignia for the
upper left wing which was painted with a 1:1 mix of Insignia White and Light
Gray with no blue border. One
marking option includes the short-lived Insignia Red bordered US markings.
Eduard now also offers several photo etched sheets for this kit that were not available when I built my example. These enhance an already good kit.
| CONSTRUCTION |
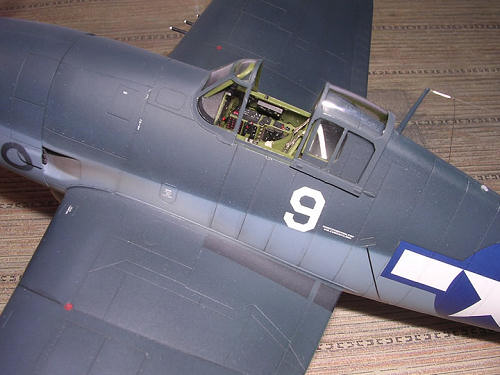
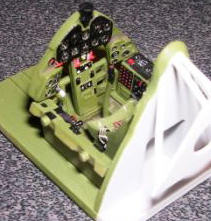
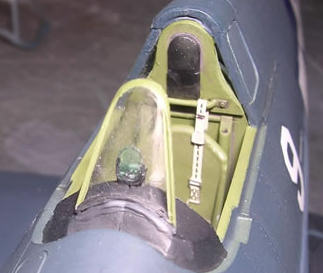
 Construction as usual begins in the cockpit.
The cockpit is rather basic compared to the Hasegawa kit and
initially I was a bit disappointed. The molding is soft and certainly not
crisp like a Monogram kit. I
didn’t care for the interior green color Eduard chose to use on the PE set
included so I masked the black portions off and repainted the required areas
with Testors, Model Master Acryl, FS 34151 Interior Green. I added a bit of
black to this to tone the color
Construction as usual begins in the cockpit.
The cockpit is rather basic compared to the Hasegawa kit and
initially I was a bit disappointed. The molding is soft and certainly not
crisp like a Monogram kit. I
didn’t care for the interior green color Eduard chose to use on the PE set
included so I masked the black portions off and repainted the required areas
with Testors, Model Master Acryl, FS 34151 Interior Green. I added a bit of
black to this to tone the color
 down a little.
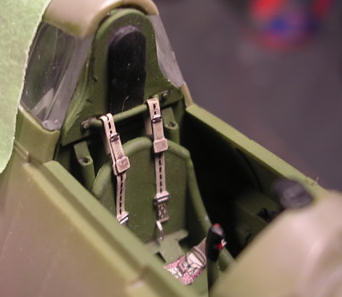
I scratched a new radio panel on the right side cockpit wall as well
as the trim wheels and engine controls on the left side.
I attached the PE gauges to the plastic instrument panel and then
used clear Acryl gloss to attach the instrument panel face to the gauge PE.
I thought it worked quite well and I’ll use that method in the
future. I replaced part G35, the
seatbelt bar with a piece of 0.020” wire for a more petite look.
I also drilled small holes in the
tops of the seat frame bars and added a chaffing pad to the bottom of the
headrest which I
down a little.
I scratched a new radio panel on the right side cockpit wall as well
as the trim wheels and engine controls on the left side.
I attached the PE gauges to the plastic instrument panel and then
used clear Acryl gloss to attach the instrument panel face to the gauge PE.
I thought it worked quite well and I’ll use that method in the
future. I replaced part G35, the
seatbelt bar with a piece of 0.020” wire for a more petite look.
I also drilled small holes in the
tops of the seat frame bars and added a chaffing pad to the bottom of the
headrest which I
 painted black.
I gave the interior a thin wash with Bob Ross
painted black.
I gave the interior a thin wash with Bob Ross
I also filled the detail for the ADI tank located on the right
fuselage side behind the rear vision window.
This tank was not fitted until BuNo 40634 with the advent of the
R-2800-10W engine.
The lapped fuselage panels are very nice. I put layers of masking tape on each side of the panel when sanding the seams to prevent damage.
I used very little CA glue filler along the fuselage
center seam along with a bit of Mr. Surfacer.
I used a blunt point needle to remake the lost rivet detail and a
hobby knife blade to re-scribe the panel lines.
For the aircraft I was building I needed the second
 cowling option
with the exhaust bulge but without the lower cowl flap.
I found the cowling required careful fitting to avoid a center seam.
The ‘smile’ cowling front fit perfectly.
cowling option
with the exhaust bulge but without the lower cowl flap.
I found the cowling required careful fitting to avoid a center seam.
The ‘smile’ cowling front fit perfectly.
I filled the round holes on the ends of the elevators with CA glue and sanded them smooth. This seems to be a feature of many Hellcat drawings and appear to be lightening holes in the metal elevator structure. I could not find one photo of a fleet Hellcat where these holes were visible through the fabric.
I assembled the wings and tail planes and set them aside. Don’t forget to add the machine gun barrels before gluing the wings. I cut the rudder trim tab free and positioned it turned to the left. I filled the aileron trim tab on the right aileron with CA glue and sanded it flush since this adjustable tab was only on the F6F-5.
A fixed tab was located on the right aileron and I used
0.010” plastic sheet to make one.
I re-established the rib tapes with coats of primer when painting the
aileron. The Hellcat I was
modeling did not have the landing light under the port wing and I filled the
 seam with Mr. Surfacer. Most
Hellcats should not have this light.
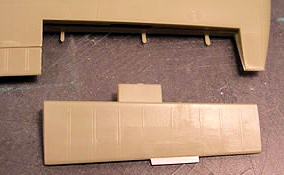
I was not impressed with the fit of the flaps which are provided as
separate parts. I think they’re
provided in order to get a sharp trailing edge.
I wish I had spent more time fitting them to get a good joint.
Next time I’ll assemble them to the top half of the wing to get a
clean seam. I used Mr. Surfacer
and CA glue to fill the gaps.
seam with Mr. Surfacer. Most
Hellcats should not have this light.
I was not impressed with the fit of the flaps which are provided as
separate parts. I think they’re
provided in order to get a sharp trailing edge.
I wish I had spent more time fitting them to get a good joint.
Next time I’ll assemble them to the top half of the wing to get a
clean seam. I used Mr. Surfacer
and CA glue to fill the gaps.
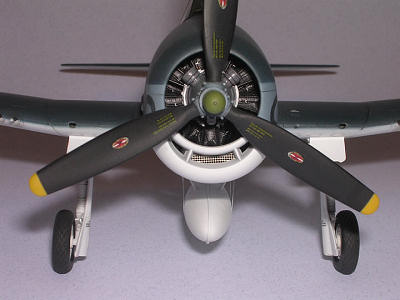
I painted the engine with Testors, Metalizer Stainless Steel and gave
it a wash with Bob Ross
I was not impressed with the propeller.
The blades seemed thick and perhaps shaped too wide near the hub.
I sanded the blades to be a bit thinner and sharpened the trailing
edges. The bolts on the hub were very poorly done so I cut twelve pieces of
0.020” plastic rod to length and cut notches in the hub and glued the rod
into place. The result was a much improved propeller hub.
I painted the blades Polly Scale, Steam Power Black with Insignia
Yellow tips. I primed the tips
white before applying the yellow.
The center hub was painted Intermediate Blue after masking the
blades. Since my Hellcat flew
from the
 Next I moved on to the landing gear which I assembled to get the
alignment correct but left the legs able to be removed from the wings for
painting. Pay particular
attention to the details of construction and you’ll be rewarded with
perfectly fitting landing gear. I
drilled lightening holes in the oleo scissors. I used True Details
checkerboard tires.
Next I moved on to the landing gear which I assembled to get the
alignment correct but left the legs able to be removed from the wings for
painting. Pay particular
attention to the details of construction and you’ll be rewarded with
perfectly fitting landing gear. I
drilled lightening holes in the oleo scissors. I used True Details
checkerboard tires.
I took some time to sand away a great deal of the bulges
on them to prevent them from looking too flat.
I sprayed the wheels white and used a circle template to make a
circular mask and then painted the tires a color I call ‘Soft Black’, which
is a mix of several different grays and Polly Scale, Steam Power Black.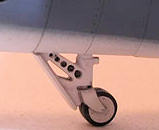
I drilled the lightening holes deeper in the tail wheel strut and added one near the top that Eduard left off. The kit tire is the proper solid rubber one usually seen aboard aircraft carriers.
The centerline tank is missing the vertical seam usually seen on
Hellcats until very late in the war.
I
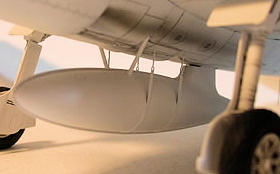 used some 0.020” X 0.020” Evergreen strip that I thinned on one
side and glued it along the center of the tank.
The strip was flexible enough to conform to the complex tank.
I think the result is quite good. I
purposely didn’t fill the area where the tank meets the fuselage as photos
show a gap in this area. I
scribed a filler cap into the tank with some brass tube of the correct size
that was sharpened on the end.
This also makes an inexpensive punch.
used some 0.020” X 0.020” Evergreen strip that I thinned on one
side and glued it along the center of the tank.
The strip was flexible enough to conform to the complex tank.
I think the result is quite good. I
purposely didn’t fill the area where the tank meets the fuselage as photos
show a gap in this area. I
scribed a filler cap into the tank with some brass tube of the correct size
that was sharpened on the end.
This also makes an inexpensive punch.
I cut a notch in the oil cooler outlet door; part G2, to clear the tank seam to match photos of full scale Hellcats.
| COLORS & MARKINGS |
Painting:
At this point, I stuffed tissue into the cockpit and masked it. I
sprayed the bottom of the model and landing gear using Polly Scale, Reefer
White. For the upper surfaces I used Aero Master Acrylic, 1046 Intermediate
Blue and Aero Master Acrylic, 1044 Sea Blue using a Badger 155 Anthem and a
Badger 100 GF airbrush. I mix
in about 25% Polly Scale, Clear Gloss with my flat colors
 and thereby avoid
a gloss coat before decaling.
This always gives a smooth finish.
I masked the demarcation between the Sea Blue and the Intermediate
Blue with masking tape pulled slightly away from the surface and used a thin
mix of the colors to get the blending between shades.
For this I add Liquitex, Airbrush Medium to add body to the paint and
to prevent spider webbing and runs.
I used a semi-circular paper mask underneath the horizontal
stabilizers. I used the
included canopy masks and sprayed the frames interior green before painting
them Sea Blue. They preformed
perfectly and gave sharp, crisp canopy frames.
Make sure you use the mask for either the open or closed sliding
canopy since they’re slightly different in size.
I masked off the wing walks on the upper wing surfaces according to
reference photos and sprayed them with my ‘Soft Black’ mix.
and thereby avoid
a gloss coat before decaling.
This always gives a smooth finish.
I masked the demarcation between the Sea Blue and the Intermediate
Blue with masking tape pulled slightly away from the surface and used a thin
mix of the colors to get the blending between shades.
For this I add Liquitex, Airbrush Medium to add body to the paint and
to prevent spider webbing and runs.
I used a semi-circular paper mask underneath the horizontal
stabilizers. I used the
included canopy masks and sprayed the frames interior green before painting
them Sea Blue. They preformed
perfectly and gave sharp, crisp canopy frames.
Make sure you use the mask for either the open or closed sliding
canopy since they’re slightly different in size.
I masked off the wing walks on the upper wing surfaces according to
reference photos and sprayed them with my ‘Soft Black’ mix.
I wanted to do a ‘
After I was satisfied with the decals I sprayed a mixture of 50% Polly Scale, Clear Flat and Clear Satin on the model. I think this mix gives the impression of painted metal better than either flat or satin will.
| FINAL CONSTRUCTION |
 Before I moved on to final assembly I gave each panel
line a dark wash with either Bob Ross, Midnight Black oil paint (a brownish
black color) for the upper surfaces or a medium gray oil wash for the
bottom. I use a 00000 liner
brush and run this mix into each and every panel line.
It’s not as tedious as it sounds and highlights the panel lines
without overpowering them.
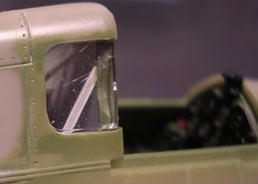
Using the kit supplied F6F-5 frameless canopy, I cut the armored glass panel
from the canopy and shaped it to fit behind the windscreen. When I was happy
with the fit I used white glue to attach it to the shroud in front of the
sight. I am very satisfied with
the results.
Before I moved on to final assembly I gave each panel
line a dark wash with either Bob Ross, Midnight Black oil paint (a brownish
black color) for the upper surfaces or a medium gray oil wash for the
bottom. I use a 00000 liner
brush and run this mix into each and every panel line.
It’s not as tedious as it sounds and highlights the panel lines
without overpowering them.
Using the kit supplied F6F-5 frameless canopy, I cut the armored glass panel
from the canopy and shaped it to fit behind the windscreen. When I was happy
with the fit I used white glue to attach it to the shroud in front of the
sight. I am very satisfied with
the results.
 I also painted the bulbs of the wing tip lights the
appropriate Tamiya Clear color along with the Red, Green and Blue
recognition lights on the fuselage bottom.
Eduard left a little notch inside these lenses to simulate the bulbs.
A nice touch. I added
the two IFF antennas on the top and bottom of the fuselage using old tooth
brush bristles that I painted silver.
I inserted them into size # 80 holes I drilled with a pin vise.
I also painted the bulbs of the wing tip lights the
appropriate Tamiya Clear color along with the Red, Green and Blue
recognition lights on the fuselage bottom.
Eduard left a little notch inside these lenses to simulate the bulbs.
A nice touch. I added
the two IFF antennas on the top and bottom of the fuselage using old tooth
brush bristles that I painted silver.
I inserted them into size # 80 holes I drilled with a pin vise.
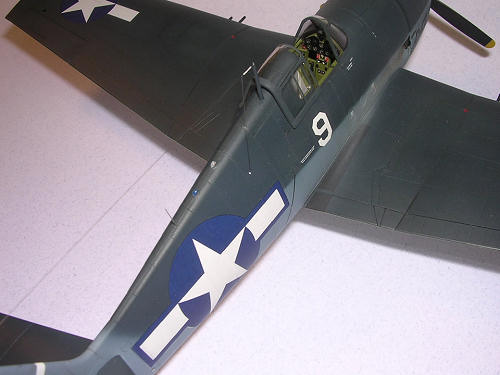
I strung the radio antenna using 0.003” monofilament fly fishing line. I attach the long run of the antenna first using thin CA glue. Next I attached the antenna lead from the main wire and pulled it down to the insulator on the side of the fuselage. I don’t get too worried about everything being taught. After the CA has fully set I use a hair dryer set to low heat to tighten everything up. I added an insulator using white glue painted white and I painted the antenna wire with Testors, Burnt Iron Metalizer. I added some minimal chipping along the top of the cockpit sill and on the foot and hand holds with a silver Prismacolor pencil.
| CONCLUSIONS |
Eduard’s new Hellcat is a winner.
I really like Eduard’s concept of a complete kit with photo etched
parts and high quality decals.
I like not having to fuss with aftermarket details or even decals to get a
unique and attractive model right out of the box.
 The fit and engineering of the kit is very good with no big issues.
It was an easy build without a lot of filling needed.
I was initially unimpressed with the cockpit but with careful work I
was able to produce a cockpit that is very good by kit standards.
I was unhappy with the kit tires and replaced them.
Some detail items such as the propeller needed addressing but the
overall impression of the kit makes it a superior product.
The surface detail, especially the panel effect on the fuselage is
finer than any other Hellcat in this scale.
An F6F-5 kit has been announced and a Dual Combo kit, featuring two
Hellcats and markings for the Royal Navy, Fleet Air Arm has recently been
released by Eduard. I will definitely add more Eduard Hellcats to my
collection.
The fit and engineering of the kit is very good with no big issues.
It was an easy build without a lot of filling needed.
I was initially unimpressed with the cockpit but with careful work I
was able to produce a cockpit that is very good by kit standards.
I was unhappy with the kit tires and replaced them.
Some detail items such as the propeller needed addressing but the
overall impression of the kit makes it a superior product.
The surface detail, especially the panel effect on the fuselage is
finer than any other Hellcat in this scale.
An F6F-5 kit has been announced and a Dual Combo kit, featuring two
Hellcats and markings for the Royal Navy, Fleet Air Arm has recently been
released by Eduard. I will definitely add more Eduard Hellcats to my
collection.
While it’s not the perfect kit, Eduard has raised the bar a few notches with the addition of this kit to their line. With the application of modeling skills and some enjoyable efforts this kit makes into the best 1/48th scale Hellcat available. I have a nice Hellcat on my shelves and enjoyed building it from start to finsh. It’s hard to as for much more.
Thanks to me and my hard earned hobby money for the review kit.
September 2008
If you would like your product reviewed fairly and fairly quickly, please contact the editor or see other details in the Note to Contributors.