Academy 1/72 PBY-5A 'Black Cat'
| KIT #: | 12487/2137 |
| PRICE: | $33.00/27.00 |
| DECALS: | one option in each kit |
| REVIEWER: | Torben Plesberg |
| NOTES: | PBY-5A & PBY-6A Flyvevåbnet (RDAF) 1956 & 1963 |
| HISTORY |
For a general history of the Catalina, see here. In the following I will deal with the Catalina in Danish service with Flyvevåbnet.
In June 1947 six PBY-5A were bought from Canada for the Danish Naval Air Service. It was not until 1950 the Royal Danish Air Force was established as an autonomous unit of the Danish defense system. The Catalinas were operated from Naval Air Station “Margretheholm” in the heart of Copenhagen. In 1951 the Cats were supplemented by a further two planes as MAP aircraft from the USA. They were named Munin and Hugin after the ravens of the ancient Nordic God Odin.
The tasks of the Cats were SAR missions in Denmark and - most important: transport of personal and cargo in Greenland, as well as ice reconnaissance. One Cat was permanently based at Narssarssuaq in Greenland. The SAR missions were performed solely by the Cats, until the appearance of the Sikorsky S-55 helicopter, which was able to pick up people from vessels moving, since the aircraft did not have sufficient power to hover above a spot. The S-55 could fly directly to this spot and bring the people in question safely on shore. If the Pembroke did not have enough endurance, the Cat would take off and find the people, who needed help. The Cat had a superior endurance, and was often able to land on the sea and take the patients on board and bring them to an AFB near a hospital.
However,
the Pembroke was already phased out in 1960, leaving the SAR support missions to
the Cats, which from now mostly were of the PBY-6A version. They were operated
by squadron 722, the rescue squadron of Flyvevå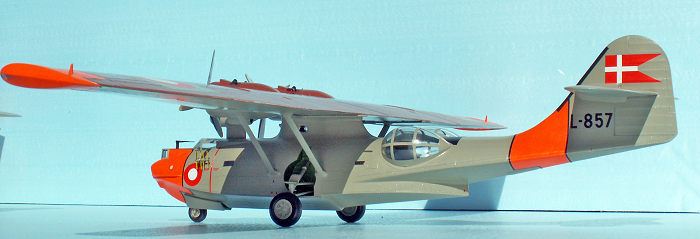 bnet.
There was permanently one Cat on alert station at Skrydstrup (AFB) and one at
Væløse (AFB).
bnet.
There was permanently one Cat on alert station at Skrydstrup (AFB) and one at
Væløse (AFB).
Speaking of Cats in Greenland as cargo planes, a Cat navigator (Ole Nikolajsen) states that the biggest problem of the Catalina is the weight! During the war the maximum takeoff weight was 28.000 lbs. The Danish cats were filled with devices for better navigation and for arctic operations, and the max. takeoff weight was raised to 36.000 lbs. Later this figure was raised to 42.000 lbs. - more fuel was needed for IFR flights, because the demand for reserves was greater. The navigator also had a second job as the loadmaster. On one occasion Nikolajsen was fooled by false information on the cargo documents: The weight of a 50 liter can with kerosene was alleged to be 25 lbs. This figure was used for the weight calculations! It was almost impossible to get the cat airborne. It took more than five minutes with overheated engines, before the Cat finally got out of the water. The navigator realized the hard way that the weight of 50 liters of kerosene in a can is 50 kilos – not 25 lbs.! The takeoff weight on this very special occasion was well above 45.000 lbs. The kerosene was for the depots of the sledge patrol “Sirius”, the famous military unit that secures Danish sovereignty in the vast unpopulated area of North East Greenland. The Sirius patrol was a consequence of a legal dispute in the early thirties between Denmark and Norway about the sovereignty of the area. Denmark won the dispute at the International Court in Haag thanks to a very capable Danish solicitor. The Sirius patrol is necessary to avoid new disputes in the future. Denmark is definitely present in North East Greenland!
In 1966 the S-55 helicopters were replaced by the S-61 Sea King. And because of this aircrafts much greater endurance and speed, the Cats were not needed more, and they were transferred to the transport squadron, 721 where they remained until they were phased out in 1970. The Cats were especially useful in Greenland, where their ability to take off and land from the sea was very important, as there were only a few airports and airstrips on this huge island.
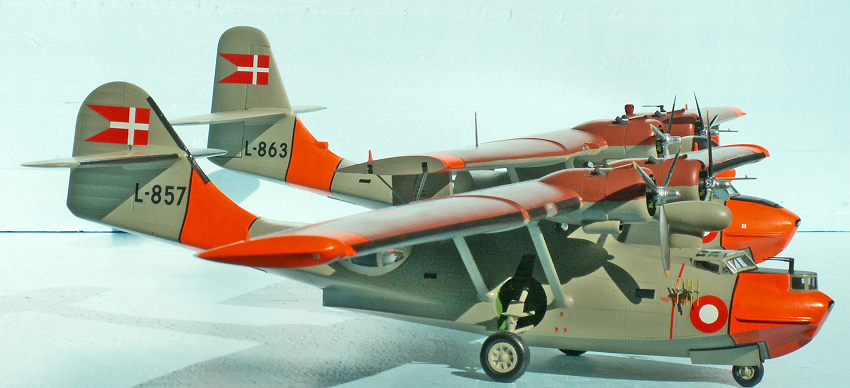
The PBY-5As were phased out between 1953 and 1969, and they were either scrapped or used for fire-exercises. However, one plane was kept after it was phased out on 14-10-1967, the L-857 “Munin”. In 1982 it was sold to a farmer in the vicinity of the village of Grevinge, where I live (from Oct. 1983). I have several times seen the Cat. However, it was in a rather bad condition and not worth taking pictures of! Late in the nineties, the Cat was sold to the Norwegian Air Force Museum, where the plane was completely restored - but not to flying condition! The L-857 is the subject of my model of the PBY-5A Catalina – of course!
The last flying Danish PBY-5A was the L-853 named “Pluto”. This plane made a bad sea landing on 9-11-1969 at Gilleleje, and the plane was damaged beyond repair. There was one casualty of the crew.
The
PBY-6As were kept flying until 1970, but at that time only four were left. In
1963 three Cats were lost in Greenland. The
 L-862 and
L-864 were destroyed in a hangar fire at Nassarssuaq. The L-865 hit a mountain
in bad weather conditions during a flight from Narssarssuaq to Grønnedal (the
navy HQ of Greenland). There were twelve casualties: the crew of six and six
passengers. This plane still had the old radar of the PBY-5A, and some people
thought that the crash might not have occurred, if the plane had got the new
type of radar. In 1964 the L-867 made a forced landing on the sea outside
Upernavik, and the airframe was sunk by the ice before it could be salvaged.
L-862 and
L-864 were destroyed in a hangar fire at Nassarssuaq. The L-865 hit a mountain
in bad weather conditions during a flight from Narssarssuaq to Grønnedal (the
navy HQ of Greenland). There were twelve casualties: the crew of six and six
passengers. This plane still had the old radar of the PBY-5A, and some people
thought that the crash might not have occurred, if the plane had got the new
type of radar. In 1964 the L-867 made a forced landing on the sea outside
Upernavik, and the airframe was sunk by the ice before it could be salvaged.
Of the four surviving planes, the L-863 and the L-868 were sold to the USA. However, both of these planes later crashed, one of them with casualties. The last two planes are preserved: the L-861 is to be seen in the Danish Air Force Museum, and the L-866 was sold to the RAF Museum at Cosford, where it can be seen to day, and for the time being even outdoors! The L-866 was flown to RAF Colerne on May 30 1974 from Værløse. The flying time was 8:20 hours, and this was the very last flight of a Danish Catalina. On November 7 1973 the L-866 made a test flight to check if it was safe to make a flight to England. During this test flight, there was a loud bang: Some 12-14 square meters of the fabric covering of the starboard wing was torn off by the wind. The plane landed without further incidents. A repair was necessary before the flight to Colerne!
The subject of my PBY-6A model is the L-863. The reason for this choice is that I took a series of photos of this plane at Kastrup Airport on 28 February 1963. At that time the Cats were part of squadron 722, the badge of which was a Saint Bernhard with a small barrel of brandy - later the 8 legged horse of the god Odin, the Sleipner for the S-61 Sea King. However, my pictures clearly show the badge of squadron 721, which is a winged dolphin! The PBY-6As did not have names like the PBY-5As.
| THE KIT |
The kit come
in fairly large boxes with a picture of a “black Cat” taking off from the sea
somewhere during WWII. The engineering is very much the same as with the kit of
Revell. However, the rivets are very small and recessed just like the panel
lines. There are five sprues with parts in black styrene, and one with the clear
parts. The surface of the black plastic parts is very nice, the clear parts are
also very clean and crisp – especially the large blisters. The instructions is a
fold out sheet with 6 pages A4. Page one repeats the
 picture of
the box and gives some general information on doing the kit in English and
Korean. Pages two to five show in six steps how to assemble the kit. Page six
shows the sprues and the position of the numbered parts. If you follow the
instructions, it is almost impossible not to end up with a very attractive
Catalina model, strictly to a 1/72 scale. The decal sheet has only one option
for a “black cat”. However, I used some alternative decals for the Danish cats
from Stoppel Decals. There are two options for the nose turret, the newer one
with a raised stand for the double MG and a older not raised one, which can be
mounted with or without a gun. The L-858 was the only Danish Cat which was
delivered with the new type of turret! There are options for the exhausts, too.
The only difference between the kits from the two different boxings is, that the
2137 has soft silicone tires, and the 12487 has injected wheel units. The
plastic wheels are nicer than the silicone ones, because they are without large
sink marks! The silicone tires do not need to be painted – it is not possible
either!
picture of
the box and gives some general information on doing the kit in English and
Korean. Pages two to five show in six steps how to assemble the kit. Page six
shows the sprues and the position of the numbered parts. If you follow the
instructions, it is almost impossible not to end up with a very attractive
Catalina model, strictly to a 1/72 scale. The decal sheet has only one option
for a “black cat”. However, I used some alternative decals for the Danish cats
from Stoppel Decals. There are two options for the nose turret, the newer one
with a raised stand for the double MG and a older not raised one, which can be
mounted with or without a gun. The L-858 was the only Danish Cat which was
delivered with the new type of turret! There are options for the exhausts, too.
The only difference between the kits from the two different boxings is, that the
2137 has soft silicone tires, and the 12487 has injected wheel units. The
plastic wheels are nicer than the silicone ones, because they are without large
sink marks! The silicone tires do not need to be painted – it is not possible
either!
| CONSTRUCTION |
12487 (PBY-5A): As mentioned elsewhere I had started the construction of a Danish PBY-5A some fifty years ago. This model was never finished as intended, but was converted into a Swedish Tp 47 Catalina, see here. Now it was time to revive my old project!
When making a Cat, the most important thing to consider is the weight, as stated by navigator Nikolajsen, i.e. nose weight. And a lot of it! My experience from the Swedish Tp 47 was useful here. All of the weight must be glued in place before the assembly of the fuselage halves. There is room beneath the floor of the office, and in the nose beneath the turret, and in the nose wheel well. The nose weight amounted to 70 grams, and the weight of the finished model is 185 g, which is rather heavy, corresponding to 69 tons for the full scale plane. The interior of the cockpit and the blister room must be painted before assembly with US interior green, HB 226. In the blister room, the Danish Cats had no armament, but in return a large brown floor above the bottom of the rear fuselage. All cargo was loaded and unloaded through an opened blister. Therefore this floor was necessary. It is important to make this triangular floor precisely, and for this purpose I had to make several templates, before the right shape was obtained. It was not even necessary to glue the floor. It just snapped in place when the fuselage was assembled. The floor had three small pieces of plastic sprue on the underside to secure the right distance from the bottom of the fuselage.
I choose
to model the Cat with the floats in up position, and the wing was finished with
engines, but no p ropellers
yet. Remember, before gluing the wing halves together, to drill out the marked
holes for an eventual armament and fuel dumping pipes in the lower wing half!
The Danish Cats were all unarmed. The carburetor intakes on top of the engines
were scratch built, there were no such parts with the kit. The exhausts of the
kit were too poor, and I made some new ones from 2 mm gauge brass tube. The 1.5
mm hole was drilled to be 1.8 mm gauge, and the tubes were cut to a length of
3.5 mm and with a 45 degrees cut in the bottom to get the right slope backwards.
Another scratch built part was the anti -collision beacon situated near the
front of the wing between the engines. This was made of a small piece of clear
sprue from the kit. The radar dome of the kit is far too small, and I made a new
one in the correct size (length= 28 mm) - turned in the lathe from a suitable
piece of Ureol, “artificial wood” without the shortcomings of genuine wood
(grains etc.). The plinth of the radar dome was also made of Ureol.
ropellers
yet. Remember, before gluing the wing halves together, to drill out the marked
holes for an eventual armament and fuel dumping pipes in the lower wing half!
The Danish Cats were all unarmed. The carburetor intakes on top of the engines
were scratch built, there were no such parts with the kit. The exhausts of the
kit were too poor, and I made some new ones from 2 mm gauge brass tube. The 1.5
mm hole was drilled to be 1.8 mm gauge, and the tubes were cut to a length of
3.5 mm and with a 45 degrees cut in the bottom to get the right slope backwards.
Another scratch built part was the anti -collision beacon situated near the
front of the wing between the engines. This was made of a small piece of clear
sprue from the kit. The radar dome of the kit is far too small, and I made a new
one in the correct size (length= 28 mm) - turned in the lathe from a suitable
piece of Ureol, “artificial wood” without the shortcomings of genuine wood
(grains etc.). The plinth of the radar dome was also made of Ureol.
The nose turret should be the older type, and it should be mounted “backwards” since there is no need for the gun opening. The frames of the turret should be painted before the assembly of the fuselage. The only problem is to fill out the space between the sides of the turret and the nose section of the aircraft. This was done by some roughly cut pieces of plastic card, and the rest was done by using filler. Behind and above the nose observation station there is a horseshoe ILS antenna, which had to be scratch-built, as it is not with the kit. The SARAH antennas under each side of the cockpit had to be scratch built, too. They were not quite simple to make: 0.9 mm gauge steel wire for the frames, and 0.4 mm hard brass wire for the antennas. A frame looks like a cross with the outer leg bent forward as seen from above, and the two components were soldered together after having been hammered flat. There are five antennas in each SARAH unit. The holes for these had to be drilled in the frames using a 0.5 mm drill. These items were the very last to be placed on the finished model. If they were parts of the kit, they would have been very fragile and probably broken. The metal units are very strong.
The wing is not married to the fuselage until the paint job is finished. The procedure is done by placing the wing upside down, and glue the fuselage to the wing and at last glue the four support struts in place on the fastening points of the wing and fuselage. The support struts all had the right length, which made it rather easy to glue them correctly in place. The Revell kit was not to this standard, because one of the struts had to be shortened by 3 mm to fit properly.
 2137
(PBY-6A conversion): It is possible to make this conversion without buying a
conversion kit on the aftermarket. But you must have some reliable information
about the exact shape of the 6A version. Most obvious is the much higher fin and
rudder, but the tail planes are also different – same span, but with a larger
area, and the nose is without a turret or observation station. I have a drawing
of the Danish Catalina by Povl Akselstad Petersen, which was released in 1968.
This drawing was later published in the Airfix Magazine (1969). I bought the
drawing from Povl himself on a meeting of the Danish Aviation Historical
Society. On this drawing you will find all necessary information to do a PBY-5A
and a PBY-6A of the Danish Air Force. The only drawback of this drawing is, that
it is not to a constant scale. The scale is about 1/120, and all the measures of
the drawing must be multiplied by 1.65 on an average to get a 1/72 scale.
2137
(PBY-6A conversion): It is possible to make this conversion without buying a
conversion kit on the aftermarket. But you must have some reliable information
about the exact shape of the 6A version. Most obvious is the much higher fin and
rudder, but the tail planes are also different – same span, but with a larger
area, and the nose is without a turret or observation station. I have a drawing
of the Danish Catalina by Povl Akselstad Petersen, which was released in 1968.
This drawing was later published in the Airfix Magazine (1969). I bought the
drawing from Povl himself on a meeting of the Danish Aviation Historical
Society. On this drawing you will find all necessary information to do a PBY-5A
and a PBY-6A of the Danish Air Force. The only drawback of this drawing is, that
it is not to a constant scale. The scale is about 1/120, and all the measures of
the drawing must be multiplied by 1.65 on an average to get a 1/72 scale.
I produced the necessary templates for the tail modification, and made the parts of Ureol. An important issue was, exactly how much had to be cut away from the PBY-5A tail and replaced by the new parts? My photo shows, how I did this job. It took quite a long time, before my conversion kit was ready for application, because I had to make small corrections several times. However, in the end I got what I wanted.
The nose modification was much easier. I mixed a sufficient amount of Plastic Padding and placed it upon the nose - securing, that the right shape of the 6A nose would be hidden inside, and supposed to appear after some intensive sanding. This material works very well with plastic parts – and with wood. It does not shrink, because the hardening is a chemical process, the drawback is that it stinks, and a well ventilated working area is mandatory! When the stuff had hardened, it was only a matter of sanding to get the 6A nose, and some filling with the usual filler. There is a door on the upper side of the nose to give access to a crew member for the mooring process.
 The radar
dome was of a different type compared to the 5A. It is rather voluminous and not
possible to make on the lathe because it is not circular. It took a couple of
hours to shape the dome from a piece of Ureol. The plinth was also quite
different from that of the 5A. Not so tall, but a lot wider.
The radar
dome was of a different type compared to the 5A. It is rather voluminous and not
possible to make on the lathe because it is not circular. It took a couple of
hours to shape the dome from a piece of Ureol. The plinth was also quite
different from that of the 5A. Not so tall, but a lot wider.
The anti collision beacon is the same as with the 5A. However, its position is different: In the rear of the port engine nacelle. The horseshoe ILS antenna is placed on the port wing, and on the starboard wing there is a pointed rod antenna. The exhausts are similar to the 5A. And just to make another difference I glued the floats in down position. This makes the painting job more complicated, but is worth the extra effort. The 6A has some plates at the inner sides of the landing lights. The purpose of these plates must be to protect the crew from getting the strong light from the landing lights in the eyes. And a little closer to the engines there are some intakes at the front edge of the wing, the purpose of these is not known to me.
| COLORS & MARKINGS |
The biggest challenge when modeling a Danish Cat is getting the right colors. They are quite special. The fuselage, fin, tail planes and underside of the wing are a warm light grey, and the upper side of the wing is brown-red, a little more brown than red. I have come across a couple of good suggestions to reasonable colors: HB 72 Khaki Drill and HB 73 wine. These colors are good together, however, the HB 72 is a little too dark, add some white. Another combination is HB 166 Light Aircraft grey and HB 100 red brown. These colors are also matching each other, the red brown being a little too bright and red, add some brown.
 I had an
alternative, which should be the very best solution to the color problem. In
1967 I got a piece of paper with samples of the original colors of the Danish
Catalina from a guy, who was in Flyvevåbnet, and who had flown the Catalina in
Greenland. At that time I was working on the old Airfix kit, and converting it
to a model 6A – with a movable rudder. I used the samples to mix the right
shades of colors for my model. It takes a long time, but it is worth the effort,
when the colors of your model are identical to the colors of the real thing. I
did not use up all of the paint I had mixed, only a small part of the content of
the small HB tins. After the painting job of the Airfix Catalina, L-865, I put
some extra thinner in the tins for a long time storage. I had no idea of when or
if I would need these colors again. The L-865 is not in my possession any more,
since I gave it to my uncle in Canada, when he was on a visit in Denmark. It was
a suitable Danish souvenir!
I had an
alternative, which should be the very best solution to the color problem. In
1967 I got a piece of paper with samples of the original colors of the Danish
Catalina from a guy, who was in Flyvevåbnet, and who had flown the Catalina in
Greenland. At that time I was working on the old Airfix kit, and converting it
to a model 6A – with a movable rudder. I used the samples to mix the right
shades of colors for my model. It takes a long time, but it is worth the effort,
when the colors of your model are identical to the colors of the real thing. I
did not use up all of the paint I had mixed, only a small part of the content of
the small HB tins. After the painting job of the Airfix Catalina, L-865, I put
some extra thinner in the tins for a long time storage. I had no idea of when or
if I would need these colors again. The L-865 is not in my possession any more,
since I gave it to my uncle in Canada, when he was on a visit in Denmark. It was
a suitable Danish souvenir!
Fifty years later, I needed the colors for my Academy Catalina models. I was very excited, when I opened the tins after this long storage! And I was very happy, when I realized that the paints were exactly as good now, as they were when I used them for the Airfix model in 1967. Both colors were glossy, which is best for decaling the models.
Both models were primed twice with aluminium Aqua Color from Revell. The warm light grey color covered at once, and it was not necessary with a second coat. The upper side of the wing got the red brown, however, a second coat was necessary. The day-glow areas were masked after the priming, because the white will cover better upon aluminium than upon the other colors. Besides it is a way to save some of the precious 50 years old paints.
The 2 mm masking tape was moved 2 mm, and the masked areas got Reefer White from Testors three times to cover properly. Then the white areas got day-glow color 4 times to cover properly, another product of Testors. The black outlining of the day-glow areas was a decaling job. The one mm black stripes were part of the decal sheet for Danish Catalinas from Stoppel.
The
canopies were masked and got a coat of US Interior Green, and then a coat of the
warm light grey standard Catalina color. The windows in the roof to the rear are
covered by metal plates, because ice from the pro pellers
would destroy them in the winter, in Greenland also in the spring and autumn!
The blister framing was made as decals. A peace of clear decal paper got first a
coat of US Interior Green, and then a coat of Catalina grey. In this connection
it is worth mentioning, that the front of the blisters are different. The glazed
area is larger on the 5A than on the 6A.
pellers
would destroy them in the winter, in Greenland also in the spring and autumn!
The blister framing was made as decals. A peace of clear decal paper got first a
coat of US Interior Green, and then a coat of Catalina grey. In this connection
it is worth mentioning, that the front of the blisters are different. The glazed
area is larger on the 5A than on the 6A.
On the upper side of the wings there are 2 squares painted Catalina grey. This is necessary to make a contrast between the national insignia and the red brown color of the wing. Otherwise the national insignia would appear only as a small white disc! The size of these squares are 36 by 36 mm. They were made as decals. Some very old decals with Shell and Gulf logos were used after being painted with the Catalina grey. It takes a very sharp knife or scalpel to cut out these squares, and the decals worked perfectly, even after more than 50 years in my stocks.
The black anti- glare areas in front of the canopy were masked and painted with Engine Black from Testors. This paint was also used for the front of the large radome of the 6A. The walkways on the top of the wings between the engines and blisters were also made as decals, the Engine Black being used as color for these, too. The 6A has some further small windows in the fuselage. They were made with small pieces of black decal paper.
For the 5A the wings and fin were masked for the de-icing devices, and the paint was again Engine Black. The 6A does not have this system, and the wing is accordingly less complicated to paint! In return the floats were down, and this meant some more masking and painting to make the day-glow area right.
The
decaling with the national insignia was easy enough, because the quality of the
decals was good. However, it was rather difficult to place the flags on the fins
parallel with the horizontal line of the fuselage. Especially with the 6A this
was a real problem – I had to try twice before I was successful. PAP’s Catalina
drawing shows the position of the small NATO symbol markings, and it was a time
consuming job to get all these tiny decals (2 by 2 mm) in the right places.
These symbols were all with Stoppel‘s Catalina sheet. The sheet h as
markings for both the 5A and the 6A, and for all 16 aircraft. However, the
national insignias are only for one aircraft. The last decal to be applied was
the squadron badge of 721 on the 6A. This badge came from an America decal
sheet: Flying Colors Danish squadron badges - especially made for IPMS Denmark.
as
markings for both the 5A and the 6A, and for all 16 aircraft. However, the
national insignias are only for one aircraft. The last decal to be applied was
the squadron badge of 721 on the 6A. This badge came from an America decal
sheet: Flying Colors Danish squadron badges - especially made for IPMS Denmark.
After painting and decaling the fuselages should be married to the wings. Fortunately this was a rather easy operation, especially because the support struts all had the correct length. There was a small paint job to make the struts Catalina grey.
All of the small details were added at this stage: the Horseshoe ILS antennas, the SARAH antennas (the frames are grey, the antennas yellow, the anti collision lights, and the propellers, which are aluminium with black front edges of the blades and yellow tips. The fuel dumping tubes were also added, they are parts of the kits.
| CONCLUSIONS |
I was happy to finish my 50 year old project making a Danish PBY-5A, and a 6A as an extra, because I had two kits. I can only warmly recommend the Catalina kits of Academy. The quality is very high, and beginners as well as more experienced modelers should do one of these kits, if they want to model the most famous flying boat ever! The aftermarket offers a lot of alternative decals, if you find the “Black Cat” too gloomy.
| REFERENCES |
https://da.wikipedia.org/wiki/Consolidated_PBY_Catalina
http://flymuseum:dk/fly/224-consolidated-pby-6a-catalina
http://www.draken.dk/Flyvevaabnet/FlyvevaabnetsFly/Catalina.html
http://www.ipms.dk/IPMS-nyt/IPMS-Nyt%20124.pdf
IPMS nyt Maj 2009 124 page 12-18 Consolidated PBY-5A og PBY 6A Catalina I dansk tjeneste.
13 October 2017 Copyright ModelingMadness.com Thanks to If you would like your product reviewed fairly and
fairly quickly, please
contact
the editor
or see other details in the
Note to
Contributors.
Back to the Main Page
Back to the Review
Index Page
Back to the Previews Index Page