| KIT #: | PA 144 |
| PRICE: | $ |
| DECALS: | One option |
| REVIEWER: | Nicolai Plesberg |
| NOTES: | 1967 release. Falcon vac canopy |
| HISTORY |
With the advent of the F6F Hellcat the Allied air forces in the Pacific were winning the air war against the Japanese air forces, most notably against the once so dreaded Mitsubishi Zero, which so effectively had hacked Allied airpower out of the sky during the first year of the Pacific war. Even so, the growing Allied success was a combination of the Allied planes, namely the aforementioned F6F (not forgetting the F4U Corsair) and the fact that pilots had improved combat experience, while the Japanese still suffered from those crippling defeats at Midway and the Solomon Islands, which cost them their most skilled pilots not to mention their largest carriers. They were never able to recover from these defeats by training new pilots, nor rebuilding its carrier force because it takes time and the Japanese didn’t have the necessary time at this stage of the war.
The Hellcat was, because of its weight (fully loaded the Hellcat weighted more than double of the Zero), not able to turn directly with the Zero in a dogfight, so the Navy put out a request for a carrier based interceptor, which should be capable of outrunning, out climbing and outmanoeuvring anything in service or under design at that time. To achieve this, the Navy was willing to sacrify range and armament.
 Grumman’s engineers responded
to the request by taking the best feature of the Hellcat, namely by keeping the
Pratt & Whitney R-2800 Double Wasp, and then simply design the smallest possible
airframe this monster of a fuel thirsty engine would fit into. The main goal was
to reduce weight and this was mostly accomplished by reducing fuel capacity the
resulting airframe being sleeker, but without compromising the Grumman trademark
of rugged construction. The Hellcat´s armament of six .50 cal. machine guns were
reduced to four in the new fighter, since it was reasoned to be adequate to
destroy the lighter build and less rugged Japanese aircraft, such as the Zero,
which fireballed immediately if hit.
Grumman’s engineers responded
to the request by taking the best feature of the Hellcat, namely by keeping the
Pratt & Whitney R-2800 Double Wasp, and then simply design the smallest possible
airframe this monster of a fuel thirsty engine would fit into. The main goal was
to reduce weight and this was mostly accomplished by reducing fuel capacity the
resulting airframe being sleeker, but without compromising the Grumman trademark
of rugged construction. The Hellcat´s armament of six .50 cal. machine guns were
reduced to four in the new fighter, since it was reasoned to be adequate to
destroy the lighter build and less rugged Japanese aircraft, such as the Zero,
which fireballed immediately if hit.
The first prototype designated XF8F-1 flew on 21 August 1944, and the first production F8F-1 Bearcat (as the new Grumman fighter was named) in November 1944 and in the following months Bearcats were delivered to squadrons, and training commenced simultaneously. By July 1945 the first squadrons were almost combat ready, but the war ended before any Bearcats had reached the combat zone. The Bearcat served in first line service in the US Navy until 1951-52, when jets finally had surpassed its performance – the Bearcat could climb faster than most early jets, but by 1950 this gap had rapidly been closed.
The Bearcat also attracted foreign service; with the Armée de l’Air in Indochina the French used it in the fighter bomber role and it served with distinction during the battle for Dien Bien Phu in 1954. In service it was known as the “Beercat” because most French personnel did mispronounce its name. Ex- French machines served with the VNAF (South Vietnamese Air Force) until 1959, when these were replaced by Trojans (and later Skyraiders). Also Thailand received more than 100 Bearcats, where they served until around 1960.
The Bearcat has also been used as civilian racing aircraft more or less modified to attain as high a speed as possible. Notably the Conquest 1, Daryl Greenamyer´s Bearcat, set a new world speed record for non-jet aircraft at 482.5 mph (776.3 km/h) in August 1969. A later record pushed this figure up past 520 mph in 1989, but that was achieved in a highly modified and tuned Bearcat named Rare Bear.
| THE KIT |
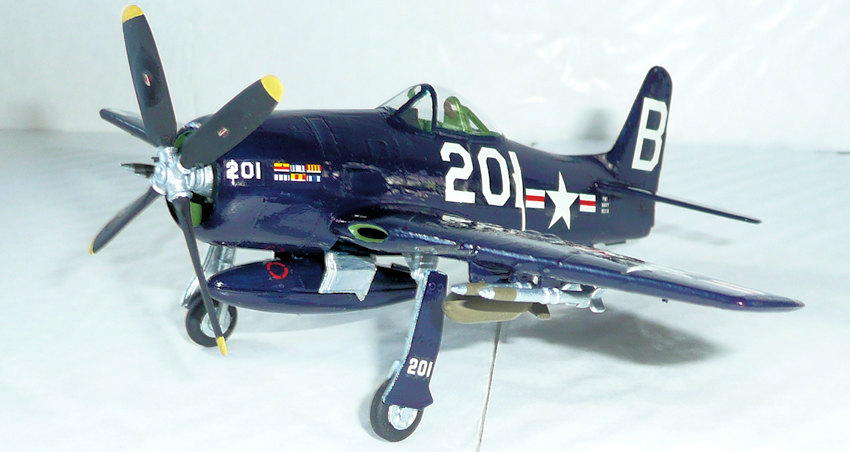
 This is the old but venerable
Monogram kit in 1/72 scale which, considering its age (on my box as well as
instructions says 1967) still seems ok. Molded in a dark blue plastic you get 31
parts, including the display stand, and two parts in clear plastic; namely the
windscreen and canopy. However, I had bought this kit second hand, so quite a
few parts were missing. The prop, prop shaft, two of the four rockets, but most
importantly and annoying, too: the canopy! I considered for a time what to do.
But then I remembered that Revell had merged with Monogram. So I send an email
to Revell asking them, if they where able to help me. They replied willingly,
and requested the kit number plus the missing parts numbers.
This is the old but venerable
Monogram kit in 1/72 scale which, considering its age (on my box as well as
instructions says 1967) still seems ok. Molded in a dark blue plastic you get 31
parts, including the display stand, and two parts in clear plastic; namely the
windscreen and canopy. However, I had bought this kit second hand, so quite a
few parts were missing. The prop, prop shaft, two of the four rockets, but most
importantly and annoying, too: the canopy! I considered for a time what to do.
But then I remembered that Revell had merged with Monogram. So I send an email
to Revell asking them, if they where able to help me. They replied willingly,
and requested the kit number plus the missing parts numbers.
After sending them the required information and waiting for a few weeks I got the parts minus the canopy! I asked myself how that could be. I had clearly written “Kanzel” (canopy in German) in the email. I came to the conclusion that it might have been the fact that the canopy (and windscreen for that matter) didn’t have a part number; it was apparently some sort of a Monogram trademark from that time not to number the clear parts; I don’t know if Revell has changed that in the mold nowadays. But apparently so much for German efficiency! In the end the problem was solved, as I bought a set of Falcon vac canopies where a canopy for Monograms Bearcat was included and thereby correcting Revell’s spare parts mistake. The decal sheet looked okay despite its age. Some yellowing effect of the carrier film could be detected.
| CONSTRUCTION |
I began construction by cleaning up all the parts, both from flash (not that much) and sprue attachment points as well as in soapy water. The wing pieces, bombs and droptank were glued together as well as the propeller to the shaft. Then I painted the gear legs, inner side of gear doors and engine Silver (Humbrol 11 Acrylic). The cylinders got a touch of burnt metal (Humbrol 53 Acrylic), the seat was glued in place, then I painted the interior plus gear bays green zinc chromate (Model Master 1734). Later I learned it was more or less painted gloss sea blue, but what else should I believe…than the instructions?!
After all this had been followed up (read painted a second time), I glued the instrument panel decal to the left fuselage half with white glue, the black painted stick to the floor and the engine plus tail plane to the left fuselage half also. I dry fitted the right fuselage half to make sure the engine and tail plane did not dry out of alignment. According to the instructions the propeller should have been fitted at this stage by flaring the end of the shaft once through the engine, but I decided to leave it off to ease of painting later. In order to get a tight fit with the engine I painted the propeller shaft a couple of times so it still would revolve and could be left off until the kit was finished.
 The next day the
main wing got the same treatment by gluing it into the left fuselage half, then
after a couple of hours gluing the fuselage together ensuring everything was in
flush and securing the fuselage / wing joins with extra glue. After drying and
treatment of the fuselage join with filler and sanding I concentrated on the
cockpit area by touching up the zinc chromate, scratching a gun sight, painting
it Black (Humbrol 33 Acrylic) together with the instrument panel shroud.
The next day the
main wing got the same treatment by gluing it into the left fuselage half, then
after a couple of hours gluing the fuselage together ensuring everything was in
flush and securing the fuselage / wing joins with extra glue. After drying and
treatment of the fuselage join with filler and sanding I concentrated on the
cockpit area by touching up the zinc chromate, scratching a gun sight, painting
it Black (Humbrol 33 Acrylic) together with the instrument panel shroud.
Then the, kind of, big thing had arrived, namely the Falcon vac canopy. It was removed from the sheet and by help of a small pair of nail pliers cutting off as much of the redundant material as I dared, then by careful sanding with various grades of sandpaper I had a whole and well fitting canopy to my Bearcat. It was glued in place with Humbrol Gloss Cote. The framing was then painted zinc chromate – twice and then blue (Humbrol 15 Acrylic) twice – together with the outside of gear doors and the drop tank.
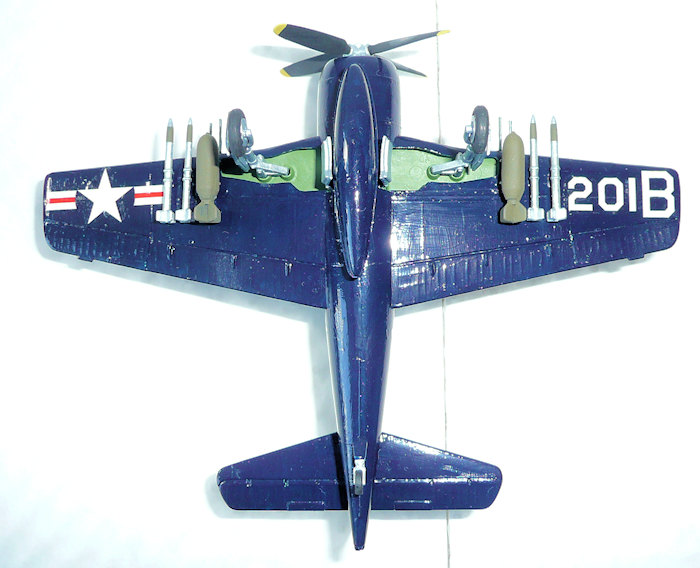
At this stage I focused on the cannon barrels (the kit is a F8F-2 all right); the left ones had broken off and the right ones seemed a bit thick, so they were carefully thinned and the left ones cut from stretched sprue, holes drilled and glued in place. After a careful wash with soapy water and cleaning with an antistatic cloth the gear was glued in place and the model went to the paint shop.
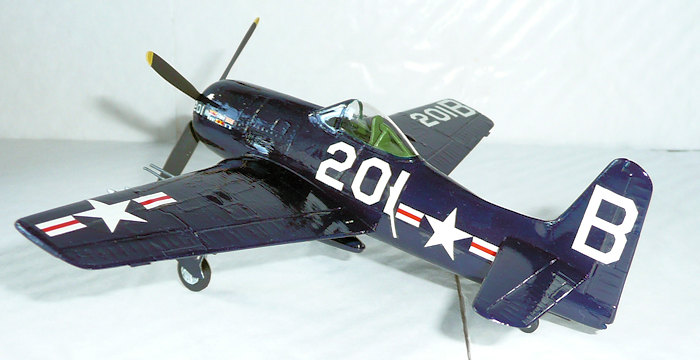
| COLORS & MARKINGS |
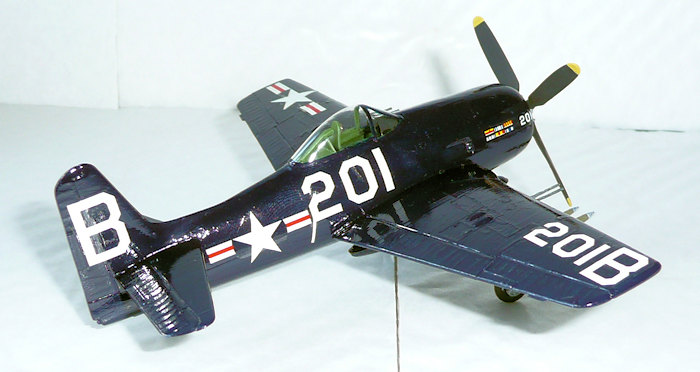
Since I had chosen to paint the
gear doors with Humbrol 15 Midnight Blue, which I took to be a close match to
the gloss sea blue color of the real planes, I then took my tinlet of ’15, but
this time the enamel variant. It was an almost perfect coverage with one layer,
but wait – the tone of the enamel was considerably lighter than the acrylic
variant. WHAT?? That came to me as a surprise. But it must have something to do
with differences of the color itself – in different batches of the same color –
so nothing new was really the case. Anyway I decided that the acrylic one looked
more like the real thing, so two layers of this went on with
 plenty of drying
time between each layer. After a few touch up sessions the markings went on; as
the paint was gloss I felt no need to use my Gloss Cote to gloss the surface!
plenty of drying
time between each layer. After a few touch up sessions the markings went on; as
the paint was gloss I felt no need to use my Gloss Cote to gloss the surface!
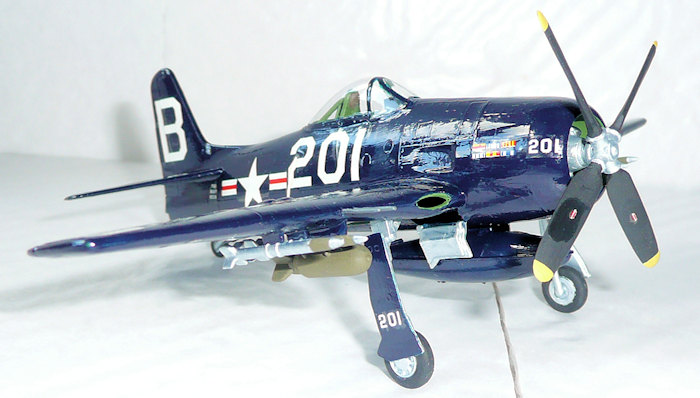
Despite their age the decals went on with no hassles other than there was silvering – a lot of it! Especially the small numbers at the cowling edge were reluctant to stick well to the surface because of the curved shape of the cowling, but when dry I Gloss Coted the decals and around them (not the whole surface of the model was gloss coted; that I deemed unnecessary), I was actually able to eliminate almost all of the silvering. At the same time I marked four spots with the gloss cote on the prop blades for the prop logos, as they seemed prominent on pictures and I was also complementing some other prop planes at the same time. I used some Hamilton Standard logos even though I’m aware the Bearcat had an Aeroproducts prop, but I only had Hamilton Standard and Curtiss Electric logos at my disposal. Anyway I reasoned the Hamilton Standard logos to closely look enough like the Aeroproducts ones to use them. The only things left to do was the marking of the navigation lights, gluing the under wing stores in place and, after securing the propeller logos with Humbrol Matt Cote and pushing the prop in place, the model was finished.
| CONCLUSIONS |
Well it’s a beauty still after 45+ years. Maybe old-fashioned in some areas, but definitely still worth constructing although aftermarket decals would be a good idea. Even though I have the Frog kit in my stash only time will tell how that goes together; the Monogram one went easily together and can be recommended to modelers of all ages and skills.
| REFERENCES |
Profile Publications no 107: The Grumman F8F Bearcat © Harold Andrews 1966
American Warplanes, by Bill Gunston 1986 Salamander books Ltd. ISBN 0-517-61351-4
Vietnam: The war in the air, by René J. Francillon 1987 Arch Cape Press ISBN 0-517-62976-3
http://en.wikipedia.org/wiki/Grumman_F8F_Bearcat
May 2016
Copyright ModelingMadness.com
If you would like your product reviewed fairly and fairly quickly, please contact the editor or see other details in the Note to Contributors.