| KIT #: | 5264 |
| PRICE: | $16.98 |
| DECALS: | Two options |
| REVIEWER: | Zach Pease |
| NOTES: | Great kit at an affordable price with lots of potential |
| HISTORY |
The history of the Stearman is pretty well known. It was nearly ubiquitous at training bases for the USAAF, USN and RCAF/RAF in Canada between the late 1930’s and the end of the Second World War. It trained an entire generation of American pilots and good amount of commonwealth pilots as well.
It is in my personal opinion one of the most beautiful aircraft of its time and you can still find many of them flying as private aircraft and on the air show circuits today..
| THE KIT |
For such a critical and beautiful aircraft such as the Stearman it is shocking that the only two kits in 1/48 are the ancient Lindberg kit and this one. I am not precisely familiar with the Lindberg kit but I am familiar with many of their other classic age biplane kits. Some are accurate but basic and some are basic and inaccurate. Their Stearman had the rep of the latter but for years it is all we had. Then a few years ago, here comes Revell, announcing a new mold Stearman. Low and behold, they produced not only an accurate model, but a true gem of a kit. The moldings are sharp and the engineering is smart. Detail is petite with recessed panels where appropriate and nice fabric effect throughout. The engine and accessory section can be exposed with nice detail provided and offers a nice basis to add more detail if you wish. The interior is also well appointed.A wooden and a metal prop are provided so take a look at the airframe you are modeling and ensure you use the correct one. I have the Revell USA boxing and it is molded in a nice medium grey. In talking with some folks on the interwebs, I am told that the Revell Germany boxing is molded in a more vibrant yellow. If that is the boxing you grab, sure to pick up some surface primer to go with it. Be cognizant of engines as the kit engine is the most common for the Kaydet but others were used so do your research if you are looking at a particular aircraft as you may need to look at aftermarket options for some of the other power plants.
Decals are provided for a pre war blue and yellow USAAC aircraft with the star and meatball insignia and an overall yellow USN example from 1945 with the star and bar insignia. This seems great at first blush, but just a little time in a google image search will reveal both schemes to be modern restored warbird airframes. The decal sheet even goes so far as to provide the FAA N-buzz numbers for both airframes.... To be frank, this frosts my cookies. I believe that we are living in an era where research is relatively easy, and wartime schemes would not have been all that hard to find had the folks at Revell spent more than ten minutes on google images researching potential schemes. In addition to this, the yellow fuselage codes for the AAC options are much much too lemony and should be chrome yellow.The US ARMY logo for the lower wing is in black and should be insignia blue. The USN scheme is more accurate as presented so if you want to use the kit decals I would suggest this one ((just omit the civil codes).. Decals are provided for the propeller to portray the woodgrain and metal leading edges of the prop. This is a nice option if you are looking to save time perhaps on a more involved process of painting the wood grain on the prop.
Bottom line for me on the decals...replace them. There have been many nice sheets released to cater to this kit with USN, USAAF and international options. Caracal Models, XtraDecal, Iliad Design and Starfighter decals all come to mind as having very nice sheets for this kit and I can say all of them are of good quality.
| CONSTRUCTION |
Construction starts with the interior and it is quite nice indeed. Rib
detail is molded into the fuselage sides aft of the engine section and the
modeler is given full interior framing to add to this. Decals are given for the
control panels and the instructions indicate rear and front panels so the
modeler can get this correct. I used the decals instead of my typical airscale
individual instrument decals and I wish I had used the
 airscale decals in the
end. The Revell panel decals look ok but they are flat and uninteresting to the
eye and to me look too simplistic. Granted, this is not a busy panel but
nonetheless the Revell decals fall short for me. The seats have nice lap belts
molded onto them and I painted these a linen color and used chrome silver for
the hardware. I spent some time thinking about it and it strikes me that lap
belts may only be accurate for a pre-war airframe and maybe some early to
early-mid-war Stearman airframes but for later war examples or newer
manufactured PT-17’s and N2S-5’s you should probably source some pe belts that
include a shoulder harness as well. I did not have this epiphany until after I
closed the fuselage around the interior so nuts to that I guess. My N2S-3
encourages the cadets to hold on during inverted maneuvers… All of the interior
parts are trapped in the frame and then this is very positively located in the
fuselage sides before closing them up. There is room for more detail and in an
AMS mood I would have enjoyed adding it but if I am being honest, you don’t see
all that much once you install the top deck.
airscale decals in the
end. The Revell panel decals look ok but they are flat and uninteresting to the
eye and to me look too simplistic. Granted, this is not a busy panel but
nonetheless the Revell decals fall short for me. The seats have nice lap belts
molded onto them and I painted these a linen color and used chrome silver for
the hardware. I spent some time thinking about it and it strikes me that lap
belts may only be accurate for a pre-war airframe and maybe some early to
early-mid-war Stearman airframes but for later war examples or newer
manufactured PT-17’s and N2S-5’s you should probably source some pe belts that
include a shoulder harness as well. I did not have this epiphany until after I
closed the fuselage around the interior so nuts to that I guess. My N2S-3
encourages the cadets to hold on during inverted maneuvers… All of the interior
parts are trapped in the frame and then this is very positively located in the
fuselage sides before closing them up. There is room for more detail and in an
AMS mood I would have enjoyed adding it but if I am being honest, you don’t see
all that much once you install the top deck.
After the interior I built and painted the engine. I found the pushrods a little fiddly but they look nice once installed. After the engine was set I added the bits to the accessory section. Here you can save time if you are not exposing this section and likely leave items out as you will not see them once the forward fuselage panels are added. I installed all the bits behind the engine, but in all honesty none of it will be seen unless you pose an access panel open, so you could leave these bits out to speed the build along. Once you are done with the engine section you attach the upper fuselage over the cockpit, the lower fuselage forward of the wing and the two upper panels that form the forward fuselage around the engine section. At this point the the tail and horizontal stabilizer are also added. I then glued the bottom and top wing sections together and installed the bottom wing.
Major construction, aside from adding the top wing, was now complete. I lightly sanded the upper rear fuselage seam and the forward fuselage around where the two panels come together over the engine section and I needed a little filler on the bottom fuselage seem but overall filling and sanding for this project took all of 10, maybe 15 minutes. Overall everything fit great, so good in fact that in some cases it was hard to remove items that I test fit as they just clicked into place.
| COLORS & MARKINGS |
Here is where I stalled a little on this kit. As I noted, the kit decals are warbird schemes, and I did not want that. I went ahead and ordered the Starfighter Decals sheet for USAAC PT-13 and PT-17 Kaydets. The sheet is printed by Cartograph and is quite nice, offering codes and insignia to portray almost any USAAC Kaydet you like. This sheet corrects all of the sins I mentioned on the USAAC section of the kit decals. The instructions give you six examples you can choose from. One small criticism here, Two of the schemes they give you have letters at the beginning of the fuselage codes but no letter codes are given on the sheet. I understand that I can source this from elsewhere but if the decal instructions are giving a scheme I usually expect all decals for that scheme to be included in the sheet. Also the sheets give you four each of every insignia worn by the Kaydet except the red bordered stars and bars; You only get two of them. So, if you find a scheme with four of the red bordered insignia you will need to find two more of the appropriate size.
 None of the schemes offered on the sheet spoke to me in the end. I like
the silver dope and international orange example but this one needed an H for
the codes and that quickly dampened my enthusiasm when I realized I had no H.and
I did not want to go find one and spend more money on a decal sheet from which I
would need just two H’s. There was an overall yellow option operating out of
Thunderbird Field in AZ presented but it had little in the way of markings and
seemed blah.
None of the schemes offered on the sheet spoke to me in the end. I like
the silver dope and international orange example but this one needed an H for
the codes and that quickly dampened my enthusiasm when I realized I had no H.and
I did not want to go find one and spend more money on a decal sheet from which I
would need just two H’s. There was an overall yellow option operating out of
Thunderbird Field in AZ presented but it had little in the way of markings and
seemed blah.
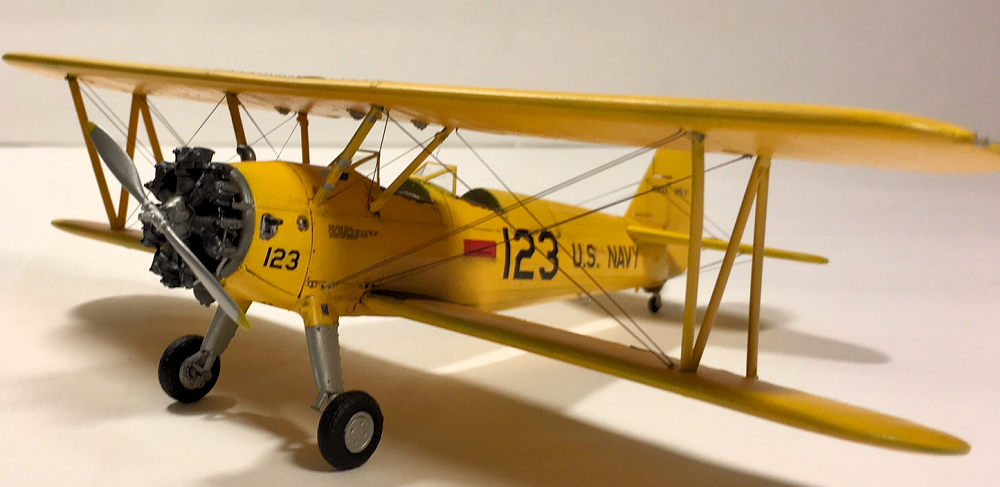
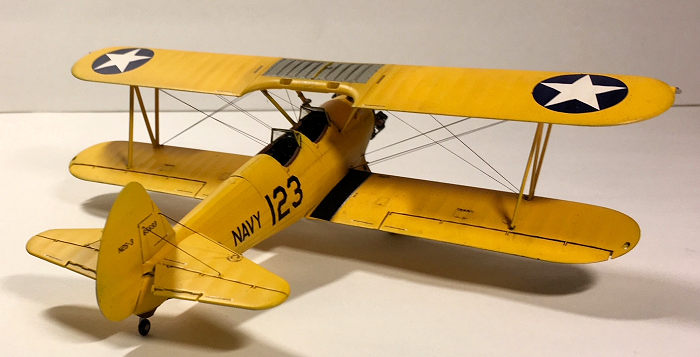
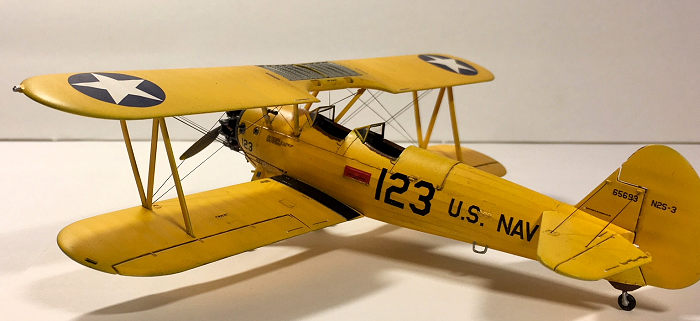
I decided that I wanted to do a USN N2S-3 and I took to the internet to find a scheme. Let me tell you something, if you search N2S-3 Stearman or N2S-3 (or 5) Kaydet, google gives you nothing but images of warbirds in a multitude of schemes varying from fantasy to relatively accurate. Trying to add phrases like WW2 photos to the search phrase did not improve things. Finally, I tried to searching N2S-3 (or 5) with naval air station names. Ultimately I found a great picture of the ramp at NAS Corpus Christi showing N2S-3 Steamen and N3N Yellow Perils taxiing towards take off. It’s a neat picture and it shows N2S-3’s in overall yellow with two roundels on the top wing and black US Navy and fuselage codes. I know I could have bought a book for reference but I cheaped out.
Armed with this image I went to my paint drawer only to discover that
the only chrome yellow I had was the small Color of Eagles bottle. I used this
on my Hasegawa F4B and didn’t care for it much at all. I decided to mix some
chrome yellow as I had two Tamiya flat yellows and simply added small amounts of
red to one until I got to Chrome yellow. I used the Color of Eagles paint as a
guide for color. I know that Chrome yellow is a gloss color but I often like to
use flat paints as they lay down easier and then use a gloss coat at the end to
get the glossy look. I find this also creates a less shiny finish which feels
more accurate for aircraft in almost daily use like this airframe would have
been. I began painting by priming with Badger Stynylrez Black Primer. I recently
started using this product and I love it. It is easy to use, hard as a rock and
creates a very nice surface for painting. I then sprayed the entire airframe
yellow then masked and sprayed the lower sections of the landing gear legs
Valejo Metal Color Semi Matte Aluminum. I am in a testing period with these
acrylic metallics and I have liked some of them. This one goes the way of many
semi matte metallic colors and is not that great. I used it for the gear legs
and the radiator and it looks ok
 but I am not going to go nuts using it. Once
the yellow was dry I loaded up my airbrush with Future and gave the whole thing
a quick clear gloss coat to prep for decals. Both the Starfighter and kit decals
worked well and responded nicely to MicroSol. I used the walkway decals from the
Starfighter sheet as they were pretty nice (much nicer than those supplied on
the Revel sheet). I used a mix of stencils from both sheets. The starfighter
sheet stencils are readable under magnification so I was careful not us any that
said US Army since I was doing a navy aircraft.
but I am not going to go nuts using it. Once
the yellow was dry I loaded up my airbrush with Future and gave the whole thing
a quick clear gloss coat to prep for decals. Both the Starfighter and kit decals
worked well and responded nicely to MicroSol. I used the walkway decals from the
Starfighter sheet as they were pretty nice (much nicer than those supplied on
the Revel sheet). I used a mix of stencils from both sheets. The starfighter
sheet stencils are readable under magnification so I was careful not us any that
said US Army since I was doing a navy aircraft.
Once decals were complete I added a dark grey wash to the panel lines. I wanted the airframe to look well used as I am sure that these planes would have had nearly constant use during the war as successive classes of pilots cycled through. To this end I also used Alcad II’s Light Sheen clear coat which gives a nice discernible sheen to the finish but not a bright glossy finish as I felt that would be too much for an aircraft of this period. This was applied after the wash was done and a few additional stencils applied.
| FINAL CONSTRUCTION |
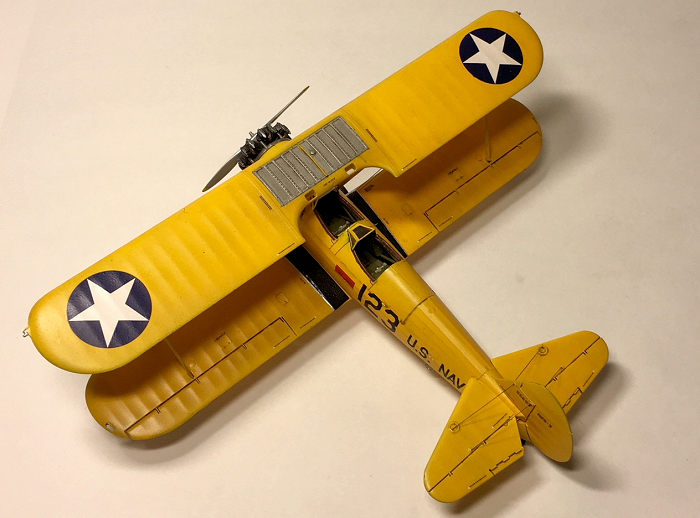
At this point I added a couple small bits around the nose and then added the windscreens. These had been masked and primed and I painted them and then installed them at this point. Then it was time to look at installing the top wing. The cabane struts for this kit are molded with the fuselage and thus offer a solid foolproof alignment point. I decided to attach the top wing to the cabanes and then add the interplane struts once the wing was attached. This ensured easy alignment and no juggling as I tried to attach four struts simultaneously. The cabanes clicked right into their attachment points and once the glue was dry I place superglue in the interplane strut locating holes and the struts clicked in place with very little effort. Once completed the whole wing assembly feels very strong and robust. Once the wing was dry I added the engine and main wheels. At this point I had only to move on the rigging.
There are many ways to rig a biplane model. Some modelers source very fine gauge wire and secure it with super glue at each end. There are many ways using monofilament. One technique involves anchoring one end of the mono in a drilled anchor point in the top wing and then threading the line through a hole drilled all the way through the bottom wing and securing it with super glue. This can also be done with the bottom to top wing and works best when the wings are single piece as otherwise the end can get lost between the hole in one side before coming out the other. The other monofilament method involves using turnbuckles. These are not appropriate on every biplane (RFC types typically used internal turnbuckles for example). However on the types that use them this is the most genuine looking method. For this method one sets rings (these can be made from wire or purchased) and then anchors the mono to a ring. Then you run the mono to the ring on the other end and secure it with CA glue. Conversely you can also use micro tubing to represent the turnbuckle itself. In this case you would run the line through the tubing then the ring and double back through the tubing and secure the line with CA and then trim the end. If you want a beautiful rig job (and want to go blind and lose your sanity) this is THE method. You can also use stretched sprue which is like wire but sometimes needs tightening. Someone once told me to wave a match that was just blown out near the lines to tighten them. This always seemed fraught with peril to me…..
 My chosen method for this project is arguably the easiest but perhaps
not the most precise way to rig a biplane. I used EZ-line which is an elastic
line that comes in heavy and fine diameters and can be found on Amazon or from
speciality hobby retailers. Drill holes as anchor points to begin with. Do this
prior to adding the top wing and take your time to position everything where you
need it. Once the top wing is in place I take a small brush and apply CA
accelerator to the hole where I want to anchor my first line. I then cut a line
to the approximate length I need then dip the end in CA and using tweezers I
apply that end to the hole with the accelerator and count to 10. Then I take the
other end in the tweezers and check the length. Ideally it should be a little
shorter than need be. The strategy here is to stretch the line to the other
anchor hole and secure it with CA. By stretching you ensure a taut line and
there is no need for precise measurement as with wire or stretched sprue. So,
once my first end is secure I trim the line a little if needed and then add
accelerator to the other hole and use a needle to add CA to the remaining end of
the line. Then it’s tweezer time again. I grasp the line and place the CA-ed end
in the anchor hole, count to 10, say a prayer and then let go with the tweezers.
If the stars are aligned you will have a taut line in place and you can move on
to the next one. This is not a foolproof process and it sometimes takes a couple
of tries to get a line set but it does work. It is not the most precise as
sometimes the line sticks near where you want but not where you want it and it
is up to you as the modeler to decide if you need to fix that. Generally try to
work inside out so you don’t have to disturb lines you already set as you move
along. The reason I use CA on the line is so I do not have to place dobs of
super glue on the wings and fuselage. This was my first attempt at ez line where
I dipped the line in accelerator and placed in a dot of glue. This gets too
messy especially if you need to make more than one attempt to set a line.
My chosen method for this project is arguably the easiest but perhaps
not the most precise way to rig a biplane. I used EZ-line which is an elastic
line that comes in heavy and fine diameters and can be found on Amazon or from
speciality hobby retailers. Drill holes as anchor points to begin with. Do this
prior to adding the top wing and take your time to position everything where you
need it. Once the top wing is in place I take a small brush and apply CA
accelerator to the hole where I want to anchor my first line. I then cut a line
to the approximate length I need then dip the end in CA and using tweezers I
apply that end to the hole with the accelerator and count to 10. Then I take the
other end in the tweezers and check the length. Ideally it should be a little
shorter than need be. The strategy here is to stretch the line to the other
anchor hole and secure it with CA. By stretching you ensure a taut line and
there is no need for precise measurement as with wire or stretched sprue. So,
once my first end is secure I trim the line a little if needed and then add
accelerator to the other hole and use a needle to add CA to the remaining end of
the line. Then it’s tweezer time again. I grasp the line and place the CA-ed end
in the anchor hole, count to 10, say a prayer and then let go with the tweezers.
If the stars are aligned you will have a taut line in place and you can move on
to the next one. This is not a foolproof process and it sometimes takes a couple
of tries to get a line set but it does work. It is not the most precise as
sometimes the line sticks near where you want but not where you want it and it
is up to you as the modeler to decide if you need to fix that. Generally try to
work inside out so you don’t have to disturb lines you already set as you move
along. The reason I use CA on the line is so I do not have to place dobs of
super glue on the wings and fuselage. This was my first attempt at ez line where
I dipped the line in accelerator and placed in a dot of glue. This gets too
messy especially if you need to make more than one attempt to set a line.
At any rate I worked steadily using this method and after not too much work I had a rigged stearman. Some of my double flying wires are less than perfect but overall I am happy. The one big thing EZ-line rigging gave me was confidence to try rigging. For a long time I was afraid of rigging biplanes and avoided it but this method was non-threatening, if you will. Now as I work through biplane projects I find that the confidence just using this method has given me has me considering some of the other methods too. As in other spheres of the hobby, sometimes you just have to jump in the deep end and figure it out and the confidence comes with doing it.
Once the rigging was done I added the steps at the rear of the fuselage and everything was pretty complete.
| CONCLUSIONS |
This is a really great kit with precise fit and good engineering. It looks great when completed and given that it is an easy build it encourages the modeler to build more of them for the numerous markings this aircraft wore over its service life. Revell also offers a civilian wingwalker/aerobatic boxing as well for folks who want something more colorful. So my recommendation is, go pick one of these up and grab some easy line and build this kit! It would be a superb choice for someone looking for their first biplane model.
9 April 2018
Copyright ModelingMadness.com
If you would like your product reviewed fairly and fairly quickly, please contact the editor or see other details in the Note to Contributors.
Back to the Main Page Back to the Review Index Page Back to the Previews Index Page