| KIT #: | 2050 |
| PRICE: | AUD$4 at a swap meet |
| DECALS: | two options |
| REVIEWER: | Peter Hobbins |
| NOTES: | Currently out of production |
| HISTORY |
The Brewster Aircraft Corporation had a rather chequered history as they moved from coach building into aircraft manufacture in the 1930s. In creating both the SBA and the F2A, they applied some innovative thinking and modern construction techniques to naval aircraft design, in the hope of winning lucrative US Navy contracts. This they achieved, but by the time that they had set up production facilities and began delivering aircraft, they were well over a year behind schedule and their products fell well short of their initial promise. Add to this some dodgy dealings in order to supply aircraft to desperate European nations – to the detriment of their increasingly impatient domestic customer – and financial scandals within the company, and the stage was set for their rapid demise. Not long after the US entry to World War II, the USN took over the company and its facilities and abandoned the F2A and SB2A projects, turning Brewster into simply a production facility for other designers’ aircraft, notably the Vought F4U Corsair.
 As their only type to see combat, the F2A or Model 239/339
Buffalo has been widely condemned as a death trap. This conclusion was reached
largely after the poor showing of USN Buffalos at Midway, and to some extent
based on RAF/RAAF/RNZAF and NEIAF experiences in Malaya, Singapore and Java. The
reality is a little more complex. While it is true that the Buffalo Mk I was
rejected by the RAF for European service, quite a number of Commonwealth pilots
in the Far East felt that the basic airframe had some merit. On a good day, its
performance was marginally enough to intercept Japanese bombers (if not A6Ms or
Ki-43s) and the armament of four 0.5 inch machine guns was adequate to knock
down many lightly constructed opponents. However, both the desperate situation
in Singapore after 8 December 1941, coupled with poor quality control at the
Brewster factory, effectively crippled the Buffalo as an operational aircraft.
The guns would frequently fail to fire, the undercarriage was prone to collapse
and the Wright Cyclone engines – which in most cases were reconditioned
ex-airliner units – rarely delivered the promised horsepower. Even when the guns
were replaced with British .303 Brownings and all unnecessary weight was
stripped out of the airframes, the small numbers of serviceable aircraft were
never enough to seriously hamper Japanese operations. As a number of pilots
commented, though, the Buffalo was built like its namesake so one was at least
likely to survive when inevitably shot down!
As their only type to see combat, the F2A or Model 239/339
Buffalo has been widely condemned as a death trap. This conclusion was reached
largely after the poor showing of USN Buffalos at Midway, and to some extent
based on RAF/RAAF/RNZAF and NEIAF experiences in Malaya, Singapore and Java. The
reality is a little more complex. While it is true that the Buffalo Mk I was
rejected by the RAF for European service, quite a number of Commonwealth pilots
in the Far East felt that the basic airframe had some merit. On a good day, its
performance was marginally enough to intercept Japanese bombers (if not A6Ms or
Ki-43s) and the armament of four 0.5 inch machine guns was adequate to knock
down many lightly constructed opponents. However, both the desperate situation
in Singapore after 8 December 1941, coupled with poor quality control at the
Brewster factory, effectively crippled the Buffalo as an operational aircraft.
The guns would frequently fail to fire, the undercarriage was prone to collapse
and the Wright Cyclone engines – which in most cases were reconditioned
ex-airliner units – rarely delivered the promised horsepower. Even when the guns
were replaced with British .303 Brownings and all unnecessary weight was
stripped out of the airframes, the small numbers of serviceable aircraft were
never enough to seriously hamper Japanese operations. As a number of pilots
commented, though, the Buffalo was built like its namesake so one was at least
likely to survive when inevitably shot down!
The Dutch operating in the Far East had aircraft with more powerful (and more reliable) engines, which performed noticeably better than the versions exported to the British. The Finns also operated their Buffalos for years after 1941 and swore by them, even at one stage contemplating local manufacture until it was found that their replacement wooden wings made the airframe just too heavy.
| THE KIT |
For an aircraft that is largely remembered for its failures, the Buffalo has been well served by kit manufacturers. Revell brought out a USN version in their initial batch of 1960s 1:72 kits. Airfix followed with this kit in 1973 and Matchbox released a Buffalo amongst its very first plastic models at around the same time. Since then, both Hasegawa and Special Hobby/MPM have also released a range of versions!
 This Airfix offering is actually quite a nice kit and should
not be overlooked, despite its age. The shapes are largely correct, the
engineering is sound, and the details are OK although some scratchbuilding is
required to ‘busy up’ areas such as the cockpit, engine and wheel wells. The
main failing with the kit is that the engine cowling is too short and must be
extended by several millimetres in order to correctly represent an F2A-1/2 or
Buffalo Mk I.
This Airfix offering is actually quite a nice kit and should
not be overlooked, despite its age. The shapes are largely correct, the
engineering is sound, and the details are OK although some scratchbuilding is
required to ‘busy up’ areas such as the cockpit, engine and wheel wells. The
main failing with the kit is that the engine cowling is too short and must be
extended by several millimetres in order to correctly represent an F2A-1/2 or
Buffalo Mk I.
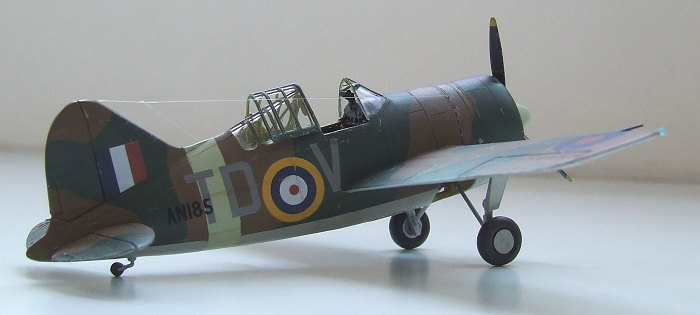
The kit consists of 42 injection-moulded pieces, including a three-part canopy and a clear insert for the underfuselage glazing. Panel lines are raised but detail is quite crisp with minimal flash, even in my 1990s boxing. Variations include USN or Commonwealth windshield, gunsight, tailwheel and tailhook options. These are reflected in the two decal options from 1941 (USS Lexington or 453 Squadron RAAF), and like other recent Airfix decals these are of very nice quality, including good colour fidelity, registration and thinness. The instructions are 4 pages A4, of which one page comprises the simple construction diagrams and one page the four-view painting guides.
| CONSTRUCTION |
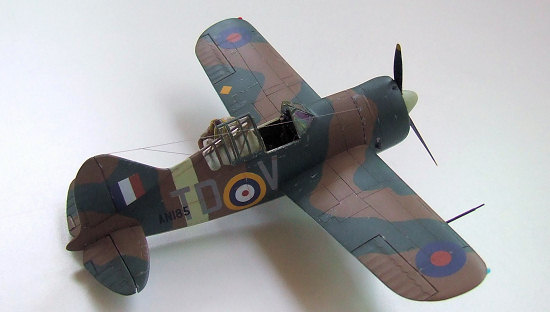
As with most models of this ilk, my first construction step was to sand off the raised panel line detail, which was straightforward on an airframe this small (I did mask the control surface ribbing so as not to lose that detail too). I also took this opportunity to sand off the breech bulges on the upper wings, as I wanted to represent one of the very last RAAF aircraft on Singapore that had their machine guns replaced with British .303s. Because these guns were smaller than the original armament, the ground crews bashed the breech bulges flat in an attempt to enhance streamlining. They also removed the external aerial mast for the same reason. These were part of the quest for a better-performing Buffalo that the Aussie pilots named the ‘super sports special’!
I then surveyed the kit components and headed for the spares
box. In particular, I added several items from the even more elderly Revell
Buffalo, including the engine cowling, undercarriage legs and propeller, all of
which were more appropriate for the RAAF machine I wanted to build. I also
located, cleaned up and painted an Aeroclub replacement Wright Cyclone, only to
find later that it simply wouldn’t fit into the engine cowling so I had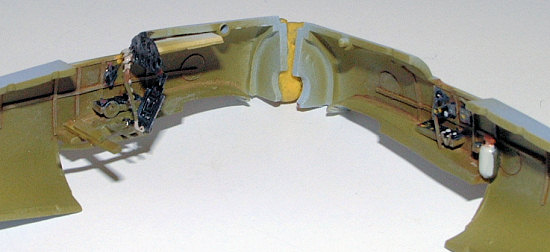 to go back to the kit item! This was no huge drama as the Airfix engine is not
too bad on its own, although I did add some piping detail with fuse wire.
to go back to the kit item! This was no huge drama as the Airfix engine is not
too bad on its own, although I did add some piping detail with fuse wire.
The wide fuselage and extensive glazing means that the Buffalo cockpit really does require a fair bit of detail. This was achieved with various bits of spare photoetch (some of it intended for the Buffalo’s competitor, the Grumman F4F) and lots of scratchbuilding from plastic. The interior was painted chromate green with various detail colours and a brown oil paint wash. After mating up the fuselage halves, a small insert of plastic was plugged into the tailcone area – the kit only features the shorter USN tailcone, whereas the British versions lacked the carrier hook and therefore had a longer tail. This was faired in with filler and sanded to shape. At the other end, the Revell cowling was cut down and glued onto the front of the Airfix kit, resulting in a fuselage of the correct length. The diameter of the two cowlings differed, necessitating a lot of sanding to ensure a seamless blend. I had previously created some airscoop channels inside the forward cowl from spare bomb parts, and these were hollowed out. One problem with increasing the chord of the cowl was that I unthinkingly glued the engine in the place indicated by the instructions, only to find that it sat too far back in the new cowl. Given that the bluff front of the Buffalo’s engine is one of its defining features, this was a bit of a shame.
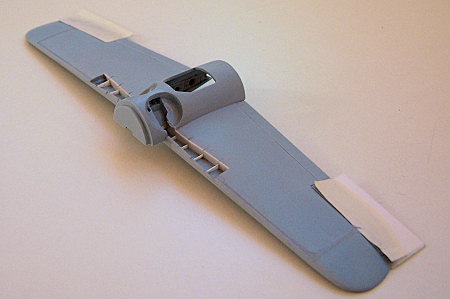 The three-piece wings were assembled next. During the
process I boxed in the wheel wells and added some rib detail from plasticard. I
also carefully faired in the under fuselage glazing (which took some time as it
was a loose fit) and added a little rib detail to the wing roots (although, of
course, this isn’t visible in the assembled model). Luckily, I also remembered
to paint the inside of the wing section – i.e. the bottom of the fuselage – with
chromate, as this area is visible through the canopy when the model is
assembled. The roll-over bar on the upper fuselage decking was created next from
Evergreen rod, after which the forward and rear canopy sections were attached,
masked and carefully blended in with filler and sanding. At this point all of
the panel lines on the wings, fuselage and tailplanes were scribed according to
plans in the Monografie book. Again, this didn’t take very long owing to the
small size of the model and the lack of complex curves.
The three-piece wings were assembled next. During the
process I boxed in the wheel wells and added some rib detail from plasticard. I
also carefully faired in the under fuselage glazing (which took some time as it
was a loose fit) and added a little rib detail to the wing roots (although, of
course, this isn’t visible in the assembled model). Luckily, I also remembered
to paint the inside of the wing section – i.e. the bottom of the fuselage – with
chromate, as this area is visible through the canopy when the model is
assembled. The roll-over bar on the upper fuselage decking was created next from
Evergreen rod, after which the forward and rear canopy sections were attached,
masked and carefully blended in with filler and sanding. At this point all of
the panel lines on the wings, fuselage and tailplanes were scribed according to
plans in the Monografie book. Again, this didn’t take very long owing to the
small size of the model and the lack of complex curves.
This really left just the main construction ‘chunk’ of adding the wing to fuselage and popping on the tailplanes (from which I had separated the elevators). Then the Revell undercarriage legs were assembled (with thin plasticard doors) but not attached to airframe until painting was well underway.
| COLORS & MARKINGS |
Once the wheel wells were sprayed in chromate, they were
masked off and the main spraying began. Based on the Red Roo book, I chose
colours that were US matches for RAF-specified shades of grey, black, green and
brown. First, however, I sprayed the Sky fuselage band and spinner, then when
they were dry I masked them off. The light grey was sprayed on half of the
underside first, followed by masking and successive spraying of the brown, green
and black. I used the Red Roo diagrams in creating the camouflage pattern, as
the Airfix instructions are somewhat incorrect, especially regarding the area of uppersurface
camouflage which should extend along the fuselage under the wings. This
particular demarcation varied from Squadron to Squadron – or even aircraft to
aircraft – so do check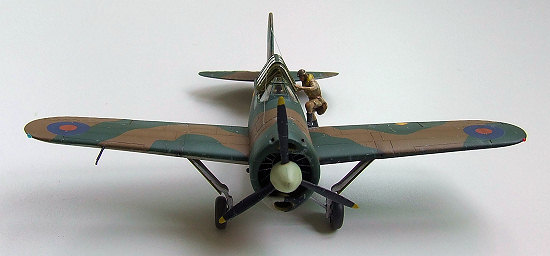 references carefully. After each shade was sprayed, it was followed up by a
lightened tint of the same colour for post-fading. I was quite vigorous in this
regard as I wanted to represent a machine in February 1942, right at the end of
several months of hard wear and weather exposure.
references carefully. After each shade was sprayed, it was followed up by a
lightened tint of the same colour for post-fading. I was quite vigorous in this
regard as I wanted to represent a machine in February 1942, right at the end of
several months of hard wear and weather exposure.
Because I had used Gunze paints, which dry to a satin finish, I decided not to spray a clear varnish before decaling. Rather, I just polished up the paint with some Micromesh cloths, and this worked out fine. The Airfix decals were not only accurate, but they applied easily and the carrier film essentially disappeared once I used a bit of Mr Mark Softer. I only resorted to the spares box to find some dashed line decals to represent the cooling slots behind the engine cowling; this isn’t quite accurate but I couldn’t think of a better way to create this tricky effect. At this point a raw umber oil wash was run into the panel lines and recesses, with the excess wiped away with a Q-tip. This just left some scuffing with light grey paint, followed by a spray with Dullcote, and the model was finished.
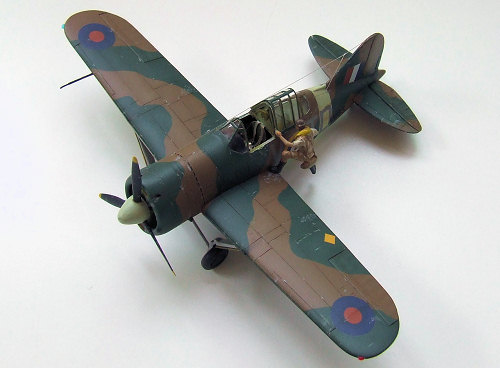
The sliding canopy segment was actually thin enough that I could place it over the rear section without resorting to a vacform replacement, and as I was building an armour kit at the same time, I decided on a whim to add a figure to the model. The pilot climbing into his Buffalo is actually a Prieser Luftwaffe figure, suitably resculpted and painted in tropical kit to represent a weary RAAF chappie heading off for one more fruitless interception attempt …
| CONCLUSIONS |
While it has now been superseded by both Hasegawa and
Special Hobby/MPM kits, the Airfix Buffalo still stands up OK in terms of shapes
and accuracy (apart from the engine cowling). This was one of those projects I
undertook in the knowledge that I would have to add some scratchbuilt detail,
rescribe and engineer a few corrections, but because the base kit is relatively
small and soli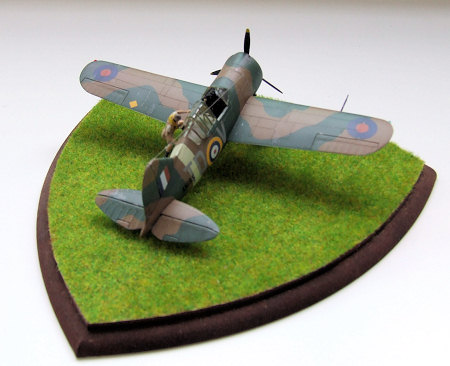 d, the whole
process ran smoothly along and never stumped me. It’s a good little model for
trying out some of those techniques, and like a lot of the later Airfix kits,
shouldn’t be discarded simply because it’s getting a bit long in the tooth.
d, the whole
process ran smoothly along and never stumped me. It’s a good little model for
trying out some of those techniques, and like a lot of the later Airfix kits,
shouldn’t be discarded simply because it’s getting a bit long in the tooth.
| REFERENCES |
Gary Byk. Buffalo Down Under. Melbourne: Red Roo Publications, 1998.
Cam Care. ‘The battered, battling Buffalos of the RAAF’. Flightpath Volume 11, Number 3, pp. 76–79.
Brian Cull, Paul Sortehaug and Mark Haselden. Buffaloes Over Singapore. London: Grub Street, 2003.
James Ritchie Grant. ‘Buffalo’s in the RAAF’. Flightpath Volume 2, Number 1, pp. 76–79.
Waldemar Pajdosz. F2A Buffalo (Monografie Lotnicze #10). Poland: A.J. Press 1993.
December 2006
If you would like your product reviewed fairly and fairly quickly, please contact the editor or see other details in the Note to Contributors.