| KIT #: | 02257 |
| PRICE: | $60.00 or so |
| DECALS: | Two options |
| REVIEWER: | Donald Zhou |
| NOTES: | Advantages: Well detailed, Accurate (mostly), Big and Choices of armaments. But most NOTABLY, corrected the side slant issue!!!! Disadvantages: engine still wrong, no instruction on the “teeth” decals for the Princeton markings, and some fit issues |
| HISTORY |
Umm….I’ll refer you to Mr. “History Reviewer” Tom Cleaver and one of his many reviews on the said plane.
Again, as Mr. Cleaver so well reiterated, the Hellcat WAS NOT designed as a counter to the famed Zero as the myth dictates….In fact, it entered service in fall of 1943, if it was started in 1942, there was simply no time for it (Before anyone can give me “the Mustang was designed and built in only 106 days”, that was another myth! Edgar Schmued started design that eventually first birthed the Mustang as early as 1936! When the British first came calling, North America was already more than ready and pulled a subterfuge on them!).
In fact, what the “Atukan Zero” did was it
highlighted the many known weaknesses of the Zero (specifically, if you hit it
with an incendiary bullet right at a spot between the fuselage and the wing
root, you can easily set off the entire wing tank and lit the entire Zero into a
flaming coffin) and its deficiencies (in a confirmation by famed Japanese pilot
Saburo Sakai after the war, and what we learned from the Zero, especially for
the A6M2 version, the Zero can’t dive nearly as fast here due to a stabilizer
problem that was not completely licked, especially in a left hand dive. Anything
over 450MPH, the Zero tends to enter a nasty flat spin where there is no
recovery). It’s from these that the Americans eventually came up with their
famed “Zoom and Boom” ta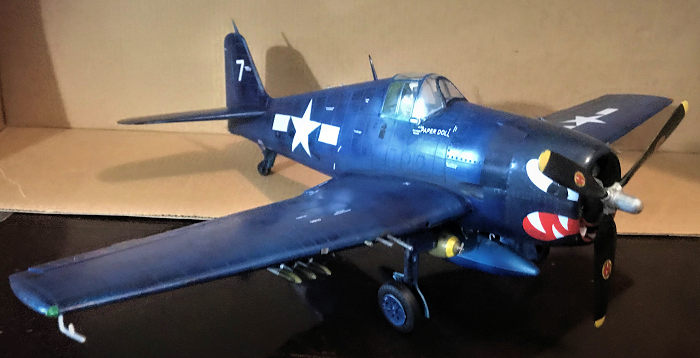 ctics
that made Zero into mincemeat. The fact of the matter is, especially in
maneuvers below 250MPH, none of the American fighters, Hellcat, Corsair,
Thunderbolt and Mustang can outmaneuver a Zero. However, the problem for the
Japanese fighter was, except that, the American Fighters pummel it in everything
else, speed, climb (whether snap or sustained) and especially dive. Against the
even more flimsy Japanese Army fighter the Hayabusa, Allies code name Oscar,
Famed American pilot “Tex” Hill, who was with the “Flying Tigers” at the time,
used his P-40 to outdive an Oscar and killed it when the Oscar tried to pull out
and promptly flew itself, literally, to pieces! The Hellcat can’t outmaneuver
the Zero, but below 250MPH, it can follow the Zero through the first 45 degrees,
over 300 MPH, usually the speed experienced pilots want, and taught newbie pilot
to come in, preferably from a favorable altitude in a dive, the F6F can follow
through more than 90 degrees after the Zero! This means the Hellcat pilots would
come in from higher altitude, get a good speed going in a dive, trap the Zero in
its weakest position, follow through with a slight maneuver to get into
position, take a few pot shots and if they miss, simply turn left and dive away
where the Zero can’t follow and then translate all that energy into a climb back
into position to try again. Later, against all those poor poor neophyte Japanese
pilots, these tactics resulted in slaughterhouses such as the “Marianas Turkey
Shoot”.
ctics
that made Zero into mincemeat. The fact of the matter is, especially in
maneuvers below 250MPH, none of the American fighters, Hellcat, Corsair,
Thunderbolt and Mustang can outmaneuver a Zero. However, the problem for the
Japanese fighter was, except that, the American Fighters pummel it in everything
else, speed, climb (whether snap or sustained) and especially dive. Against the
even more flimsy Japanese Army fighter the Hayabusa, Allies code name Oscar,
Famed American pilot “Tex” Hill, who was with the “Flying Tigers” at the time,
used his P-40 to outdive an Oscar and killed it when the Oscar tried to pull out
and promptly flew itself, literally, to pieces! The Hellcat can’t outmaneuver
the Zero, but below 250MPH, it can follow the Zero through the first 45 degrees,
over 300 MPH, usually the speed experienced pilots want, and taught newbie pilot
to come in, preferably from a favorable altitude in a dive, the F6F can follow
through more than 90 degrees after the Zero! This means the Hellcat pilots would
come in from higher altitude, get a good speed going in a dive, trap the Zero in
its weakest position, follow through with a slight maneuver to get into
position, take a few pot shots and if they miss, simply turn left and dive away
where the Zero can’t follow and then translate all that energy into a climb back
into position to try again. Later, against all those poor poor neophyte Japanese
pilots, these tactics resulted in slaughterhouses such as the “Marianas Turkey
Shoot”.
| THE KIT |
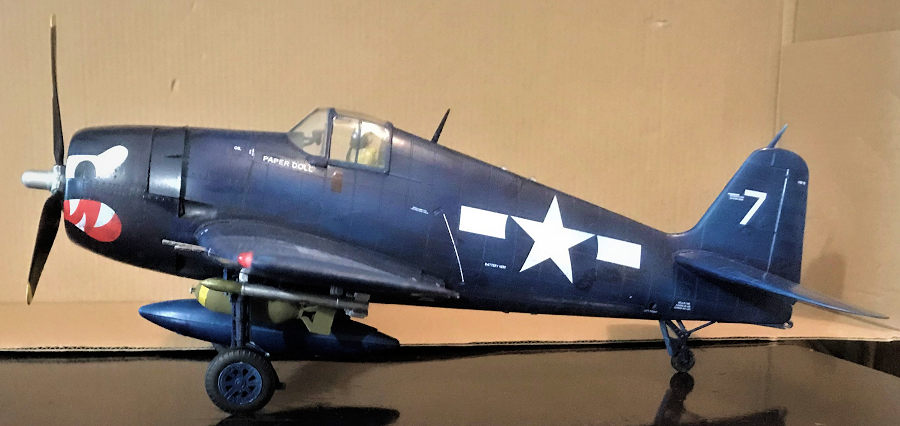
Again, Tom Cleaver has detailed description of the kit in his reviews so go check it out. Short of it, as Tom said, the Trumpeter’s Hellcats beats out the ancient Hasegawa version on all account except the price….And these days, if you know where and how to look, this kit may even beat the Hasegawa one on the price too! The kit is well made, outline is correct, including the slight “chin” that’s missing on several other Hellcat kits, and Trumpeter finally laid off the gimmicks by using strengthening spars that allow you to either fold or unfold the wings without the metal rods that are too weak to hold anything together. Mostly though, well, you see, I built the original F6F-5N kit like Tom’s back in the day……That model got trashed on the way here from China long time ago. I always wanted another F6F kit since now I have my F4U-1A completed and all I need is to build that darn F4F kit and my trifecta is complete. I first wanted the Hasegawa kit cause yes, as mentioned by Tom and discovered by me with the original -5N kit, the too rounded side was a serious turned off. Unfortunately, the Hasegawa kit is now over 90 bucks on eVilicious Bay so no go…So finally, after a sigh and ready to adapt Tom’s way of fixing the side problem, I ordered this Trumpeter’s kit, the F6F-5 kit off of Amazon for only $50! It’s usually $60 dollars now…Guess someone wants to get rid of it. I actually wanted this kit cause it contains a very unusual markings off of a squadron on the Princeton, the one with a gaping and grimacing “Hellcat” face with bloodshot eyeballs. Both markings turns out for the same aircraft. This is because after the Princeton was sunk by one of the first Kamikaze aircrafts, the surviving Hellcats landed elsewhere. It seems this is one of the survivors. Unfortunately for the markings, one night in the hangers of the other aircraft carriers, the surviving Hellcats had their “faces” painted right over with some dark sea blue colors so the first marking, that of Lt. Carl A. Brown of the Princeton, eventually became an aircraft serving on the USS Macau, VF-29.
 When it
finally arrived, with a sigh, I opened the box and went right to the fuselage
sprue and try to see how much damage I needed to fix…And…and….And nothing! No
damage at all!!! WHA…?!?!?!?!?! I had to look again, and again, and again, and
again before finally finding the offending round bulge on the fuselage side.
It’s still there…Guess Trumpeter can’t fix the bulge at the very end to the wing
root joint. Other than that, I had to really look but could not find the bulge
on the side over the cockpit! It’s now so slab sided, if you compare my pictures
to the one’s Tom built, the -5N version and the -3 British version, it look much
closer to the real thing! Say what you will about Trumpeter, they admit
sometimes they mess up and are willing to fix it. The P-47D bubbletop canopy for
example. You’ll see what I mean whenever I finish it (it’s next on the table),
and this is another prime example. It seems after the initial brouhaha, they
gone and fixed the fuselage side for the follow up versions to the point right
now, it’s pretty much accurate in all accounts.
When it
finally arrived, with a sigh, I opened the box and went right to the fuselage
sprue and try to see how much damage I needed to fix…And…and….And nothing! No
damage at all!!! WHA…?!?!?!?!?! I had to look again, and again, and again, and
again before finally finding the offending round bulge on the fuselage side.
It’s still there…Guess Trumpeter can’t fix the bulge at the very end to the wing
root joint. Other than that, I had to really look but could not find the bulge
on the side over the cockpit! It’s now so slab sided, if you compare my pictures
to the one’s Tom built, the -5N version and the -3 British version, it look much
closer to the real thing! Say what you will about Trumpeter, they admit
sometimes they mess up and are willing to fix it. The P-47D bubbletop canopy for
example. You’ll see what I mean whenever I finish it (it’s next on the table),
and this is another prime example. It seems after the initial brouhaha, they
gone and fixed the fuselage side for the follow up versions to the point right
now, it’s pretty much accurate in all accounts.
Not to say there isn’t any problems, the engine is still slightly too long, causing the front exhaust pipes not to touch the front row of cylinders. Nothing much since I’m closing up shops anyways. Then there are still the fit problems if you choose to have the wings unfolded like mine but nothing a littler modeling skills will fix with this one!
| CONSTRUCTION |
Construction begins with the cockpit. Heard from some that the cockpit features both details from the -3 and -5 but no one can tell unless they have detailed drawings or where to look. I chucked the seat belts and grabbing the seated pilot figure from my “Birdcage” Corsair kit, forced him into this. Unfortunately, I lost the gunsight clear piece so sigh…Another piece for the cockpit monster!
 Next up,
the engine….As much as Trumpeter later got the hang of making the R-2800 with
love and you can indeed build them to be a very fine rendition of the real thing
that can beat the pants off of even the resin aftermarket, this one is not the
case. It’s not all that detailed and again, the front is slightly too long,
meaning the first row of exhaust pipes can’t contact them. I just built it,
haphazardly colored it and then slap it to the front of the fuselage and called
it a day. Now, I did not do anything to the air compressor and the radios in the
back where you can’t see them so I closed up the fuselage at this point.
Next up,
the engine….As much as Trumpeter later got the hang of making the R-2800 with
love and you can indeed build them to be a very fine rendition of the real thing
that can beat the pants off of even the resin aftermarket, this one is not the
case. It’s not all that detailed and again, the front is slightly too long,
meaning the first row of exhaust pipes can’t contact them. I just built it,
haphazardly colored it and then slap it to the front of the fuselage and called
it a day. Now, I did not do anything to the air compressor and the radios in the
back where you can’t see them so I closed up the fuselage at this point.
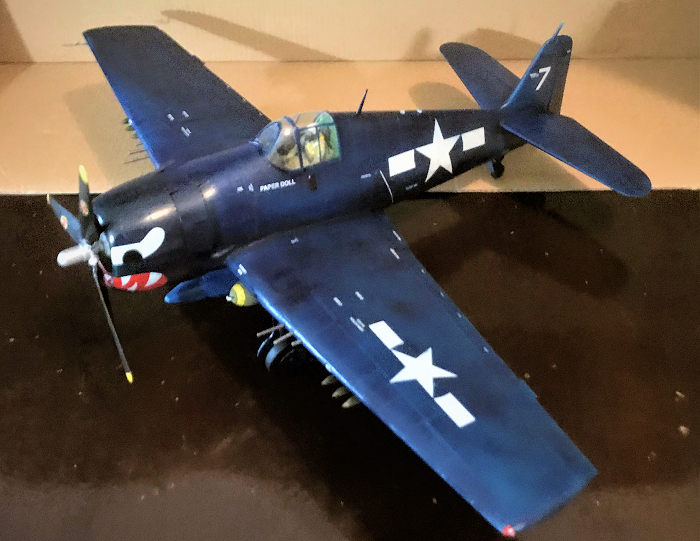
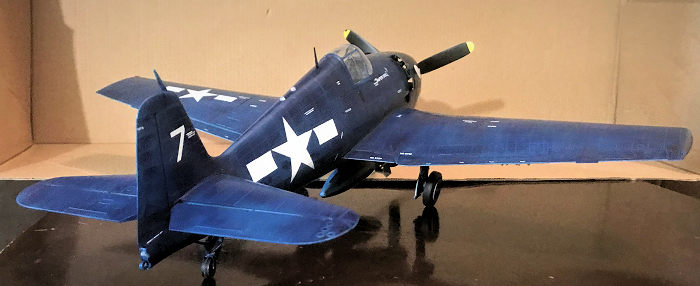
Next the wings. Since I chose the unfolded option, its paramount you jab the two joint supports into and tightly through the support mounts. Otherwise, huge seams will appear like my -5N version. This version, some seams still appeared, require me to use putty to putty them up. I left off the landing gears, the doors etc until later. Time for paint!
| COLORS & MARKINGS |
Overall painting for both markings is Dark Sea
Blue, or in my case slightly more diluted Royal Sea Blue from Tamiya. I did
not ding up the aircraft….As Tom and so many other historian said, ding it
up, rust it up and these aircrafts belong in a junk yard instead. Yes, I
over sun faded and dinged up my Corsair but that’s a Solomon island bird,
it’s practically the only birds you can weather it to hell and get away with
it cause except the most precious stuff like ammo and fuel, replacement
parts and paints are of secondary con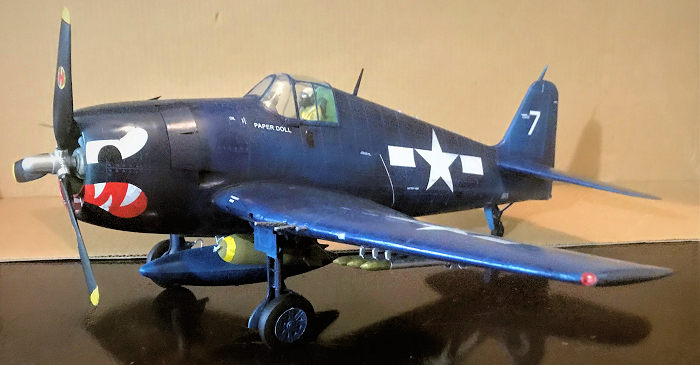 cerns.
Maintenance are only pulled on aircrafts to keep them flying and fighting,
no more, no less so those birds quickly faded under the tropic suns and
their wings quickly got dinged up from the sand and people walking on them,
Warp to 1944-1945, which are the years the two markings represents,
logistics had long caught up, especially on a carrier deck in the open seas
at this stage, nearly all if not all the aircrafts are carefully maintained
and covered up in paint cause aluminum corrode like hell in open water
conditions. In fact, in some cases, the first thing waiting for a naval
aircraft after they get taken down below in the hanger decks are six men
with paint cans waiting! They would go over the aircraft, up down left right
at least three times, painting over any dings that are present! So yeah, the
paint on this version will be pretty even except I toned the spray pressure
down and diluted the paint a little over so the coverage won’t be that even
to represent sun fading a little bit. Other than that, after the first coat,
the decals went on. This is at a time when Trumpeter hasn’t gone too thin
decals that fold on you at the slightest provocation. The only minor problem
is that there are several what looks like obvious teeth that goes into the
air intake “mouth” except there is no instructions to go over what goes
where. I eventually figured it out. No big deal but annoying nonetheless.
After the second thin coating goes on, the model is basically all painted. I
then took my bottle of acrylics Jet Black and washed it over, more heavily
on the exhaust area and the main painting is done!
cerns.
Maintenance are only pulled on aircrafts to keep them flying and fighting,
no more, no less so those birds quickly faded under the tropic suns and
their wings quickly got dinged up from the sand and people walking on them,
Warp to 1944-1945, which are the years the two markings represents,
logistics had long caught up, especially on a carrier deck in the open seas
at this stage, nearly all if not all the aircrafts are carefully maintained
and covered up in paint cause aluminum corrode like hell in open water
conditions. In fact, in some cases, the first thing waiting for a naval
aircraft after they get taken down below in the hanger decks are six men
with paint cans waiting! They would go over the aircraft, up down left right
at least three times, painting over any dings that are present! So yeah, the
paint on this version will be pretty even except I toned the spray pressure
down and diluted the paint a little over so the coverage won’t be that even
to represent sun fading a little bit. Other than that, after the first coat,
the decals went on. This is at a time when Trumpeter hasn’t gone too thin
decals that fold on you at the slightest provocation. The only minor problem
is that there are several what looks like obvious teeth that goes into the
air intake “mouth” except there is no instructions to go over what goes
where. I eventually figured it out. No big deal but annoying nonetheless.
After the second thin coating goes on, the model is basically all painted. I
then took my bottle of acrylics Jet Black and washed it over, more heavily
on the exhaust area and the main painting is done!
| FINAL CONSTRUCTION |
 There
are still quite a bit left. The first thing are the wheels. I had to steal
the tail wheel from my Birdcage Corsair kit after somehow losing the kit’s
wheel. This forced me to get another set off of eVil Bay at $20! Sigh, they
are much nicer for sure but also super expensive! Ohh well. Gonna use those
wheel sets for my Birdcage then…
There
are still quite a bit left. The first thing are the wheels. I had to steal
the tail wheel from my Birdcage Corsair kit after somehow losing the kit’s
wheel. This forced me to get another set off of eVil Bay at $20! Sigh, they
are much nicer for sure but also super expensive! Ohh well. Gonna use those
wheel sets for my Birdcage then…
Anyways, the gears, struts and wheels are painted and weathered in the usual way. Again, no problem with the rubber tires. Trumpeter’s rubber tires do not “melt” plastics since I now have a bevy of them and none do.
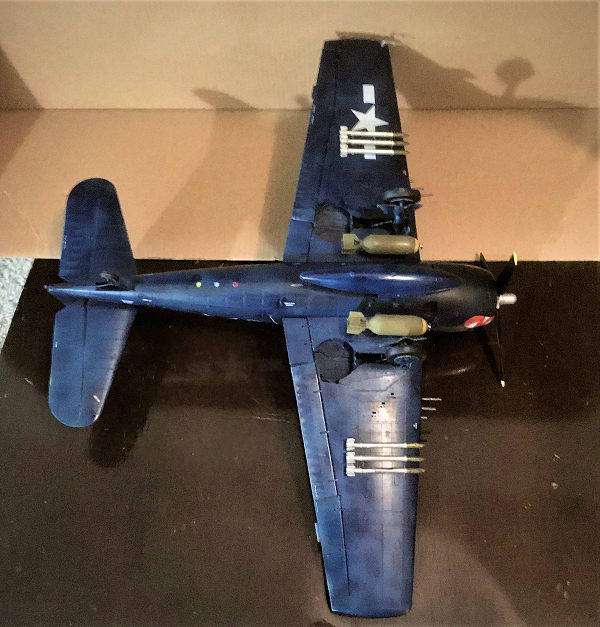
Next are the weapons. The only difference between this and the -5N version is that the wing radome is replaced by a small fret of drop tanks and weapons including 2x 500lbs bombs and six “Holy Moses” HVAR rockets. The rockets are assembled and I just grabbed two bombs off of my spare box to use here. They went on without a fuss. I actually wanted to fill in the holes and just make a “air patrol” bird with the drop tank but was too lazy to do fill in the holes so made the weapons to fill them up. Same with the belly tank. I do know the holes for the sway braces are there but was too lazy to make them out of my spare photo-etch so they remain empty for now.
Next are the prop and the rest. The prop was easy and painted like the call out. Then the decals were put on and finished. The rest are the navigation lights and the antenna. These were put on without a fuss. Model done!
| CONCLUSIONS |
Well, would I recommend this
model? WELL DUH!! Despite the initial bad rap from that place that shall not be
named, this kit is now well worth it for what you get. If you can get one of the
later production versions, it’s even more so since Trumpeter corrected the
fuselage side to be more slab sided, like the real thing. The o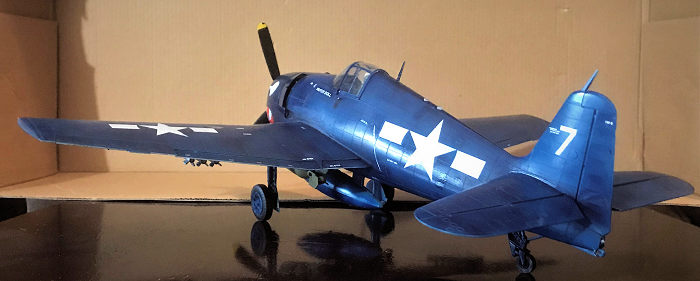 nly
big problem is the engine, but that’s a quibble if you are not gonna display it
and the folding wing joint if you are unfolding the wings. Otherwise, it is
accurate, correct in outline and have enough armaments to really outfit your
Hellcat. Would Tamiya do better if they decide to make a 1/32 scale Hellcat?
Probably, would it be THAT much better that at a probable cost of $132 than this
kit? IMO, with the corrections Trumpeter made, unlike the Corsair (except the
F4U-4, which Tamiya has not made yet), it’s not gonna be THAT much better than
this kit. If you can get it at say, $50, which is what I got, then you can build
up a serious looking F6F and not take a huge hit in the pocket books or shelf
space like the 1/24 scale Airfix kit. Some in my club want me to tackle it but
that thing is even too big for my tastes and I got enough big kits already!!!
Highly recommended!
nly
big problem is the engine, but that’s a quibble if you are not gonna display it
and the folding wing joint if you are unfolding the wings. Otherwise, it is
accurate, correct in outline and have enough armaments to really outfit your
Hellcat. Would Tamiya do better if they decide to make a 1/32 scale Hellcat?
Probably, would it be THAT much better that at a probable cost of $132 than this
kit? IMO, with the corrections Trumpeter made, unlike the Corsair (except the
F4U-4, which Tamiya has not made yet), it’s not gonna be THAT much better than
this kit. If you can get it at say, $50, which is what I got, then you can build
up a serious looking F6F and not take a huge hit in the pocket books or shelf
space like the 1/24 scale Airfix kit. Some in my club want me to tackle it but
that thing is even too big for my tastes and I got enough big kits already!!!
Highly recommended!
23 July 2021
Copyright ModelingMadness.com. All rights reserved. No reproduction in part or in whole without express permission.
If you would like your product reviewed fairly and quickly, please contact the editor or see other details in the Note to Contributors.