| KIT #: | 4781 |
| PRICE: | 44$ |
| DECALS: | Two options |
| REVIEWER: | Francisco Santoro |
| NOTES: | First time using Vallejo paints. |
| HISTORY |
From the
kit’s instructions: “The prototype of the Vought F4U Corsair first flew on 29th
May 1940 in response to the United States Navy’s request for a carrier based
fighter that matched the performance then being achieved by land based aircraft.
Design work began in 1936 under Rex B. Beisel to build a very compact airframe
around the new Double Wasp engine. The distinctive
 inverted
gull wing design gave adequate ground clearance for the 4,06m Hamilton Standard
propeller without needing very long undercarriage legs. Powered by the Pratt and
Whitney 1800hp R2800 Double Wasp engine, the Corsair was the first US fighter to
exceed 400mph in level flight. Entering service with Marine squadron VMF-214 in
late 1942, the first Corsairs remained land based due to ongoing work to make
the new aircraft safe for carrier operations. Gradual design improvements
incorporated on the production line meant that the early F4U-1s were quite
different from those that followed, the most noticeable point being the lightly
framed blown Perspex cockpit hood that replaced the earlier “bird cage” style
hood. The modified aircraft were later referred to as F4U-1As. As well as the
Vought production line at Bridgeport, Connecticut, Corsairs were also built by
Goodyear at Akron, Ohio and Brewster at Long Island, New York. The F4U-1A
Corsair was armed with six 50 caliber Browning machineguns in the wings and some
could carry a single 450kg bomb in place of the centre line droptank. Total
Corsair production was 12571, the last of which was delivered in January 1953.”
inverted
gull wing design gave adequate ground clearance for the 4,06m Hamilton Standard
propeller without needing very long undercarriage legs. Powered by the Pratt and
Whitney 1800hp R2800 Double Wasp engine, the Corsair was the first US fighter to
exceed 400mph in level flight. Entering service with Marine squadron VMF-214 in
late 1942, the first Corsairs remained land based due to ongoing work to make
the new aircraft safe for carrier operations. Gradual design improvements
incorporated on the production line meant that the early F4U-1s were quite
different from those that followed, the most noticeable point being the lightly
framed blown Perspex cockpit hood that replaced the earlier “bird cage” style
hood. The modified aircraft were later referred to as F4U-1As. As well as the
Vought production line at Bridgeport, Connecticut, Corsairs were also built by
Goodyear at Akron, Ohio and Brewster at Long Island, New York. The F4U-1A
Corsair was armed with six 50 caliber Browning machineguns in the wings and some
could carry a single 450kg bomb in place of the centre line droptank. Total
Corsair production was 12571, the last of which was delivered in January 1953.”
| THE KIT |
 Originally
released in the 1970s, this kit was subsequently re-released until 2013. In
2005, the toy manufacturer 21st
Century Toys released in kit form their F4U-1A/D in 1:32. Back to 2013, when
Revell last released this old tooling, Tamiya came with their own Corsair, a
Birdcage one, which would spawn a family of Corsairs until 2017, when Tamiya
released an F4U-1D.
Originally
released in the 1970s, this kit was subsequently re-released until 2013. In
2005, the toy manufacturer 21st
Century Toys released in kit form their F4U-1A/D in 1:32. Back to 2013, when
Revell last released this old tooling, Tamiya came with their own Corsair, a
Birdcage one, which would spawn a family of Corsairs until 2017, when Tamiya
released an F4U-1D.
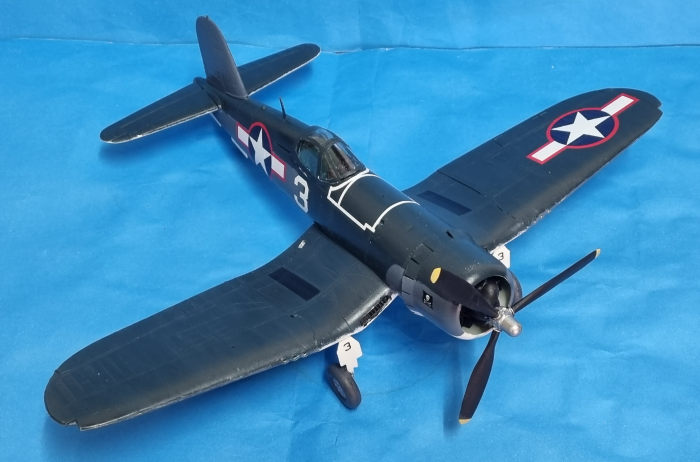
The kit comes in the old Revell blue box with a very nice artwork of a Corsair attacking some ships in the Solomon Islands (the decals are for two aircraft in this campaign).
Instructions are of the Revell past style of a black and white drawings with Revell only paint callouts.
Total number of sprues is of 5, four grey and one clear. There’re a total of 64 parts, making this kit a very simple one. Options for the kit include an open canopy, full engine, spinning propeller and foldable wing mechanisms. A pilot is also included.
| CONSTRUCTION |
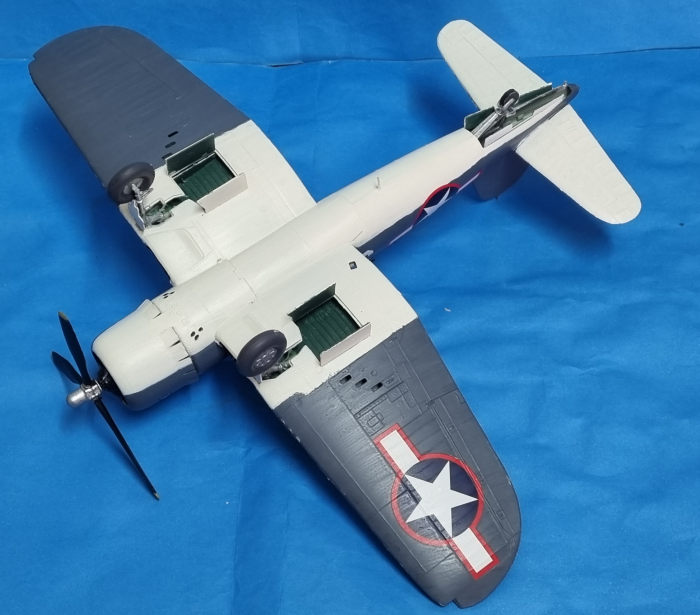
I wanted to build this kit with the wings in the extended position, so I began the build with this assembly. I first glued the wingspars and the pieces that locate the wings in place and left them to dry. Once these pieces were set, I glued the top wings and taped them together. While these parts were drying, I glued the radiator faces to the inner wing and painted them black, and then added the outer lower wings, taping them so they’d set properly.
 I left the
wings aside and started work on the engine and cockpit. I painted the cockpit
parts in Interior Green (Revell 48 Sea Green), with the instrument panel painted
in matt black (Revell 08 Matt Black). I also painted the inner parts of the
fuselage halves in Interior Green. The engine was glued unpainted except for the
face, which was painted entirely in black. To speed up the construction process
I painted the propeller in matt black with yellow tips and a metallic hub. The
wheels were painted with metallic inner parts and Revell 78 Tank Grey for the
tyres (the same colour I use for my German aircraft cockpits). I also painted
the tailwheel strut and wheel. Once the paint on every part had dried, I glued
them together. The cockpit and tail wheel strut were then installed to one
fuselage half, and the other half was glued in place.
I left the
wings aside and started work on the engine and cockpit. I painted the cockpit
parts in Interior Green (Revell 48 Sea Green), with the instrument panel painted
in matt black (Revell 08 Matt Black). I also painted the inner parts of the
fuselage halves in Interior Green. The engine was glued unpainted except for the
face, which was painted entirely in black. To speed up the construction process
I painted the propeller in matt black with yellow tips and a metallic hub. The
wheels were painted with metallic inner parts and Revell 78 Tank Grey for the
tyres (the same colour I use for my German aircraft cockpits). I also painted
the tailwheel strut and wheel. Once the paint on every part had dried, I glued
them together. The cockpit and tail wheel strut were then installed to one
fuselage half, and the other half was glued in place.
Once the fuselage halves had cured, I test fitted the wings. These fitted well on the front and back, but had gaps on the wingroots, so I added a spreader bar under the cockpit so I could close the gaps. The wings were then taped and left to dry overnight so I could have a solid join. Meanwhile, I glued the horizontal stabilizers. Once the glue had dried I filled the gaps with CA and sanded them flush, losing some rivets in the process.
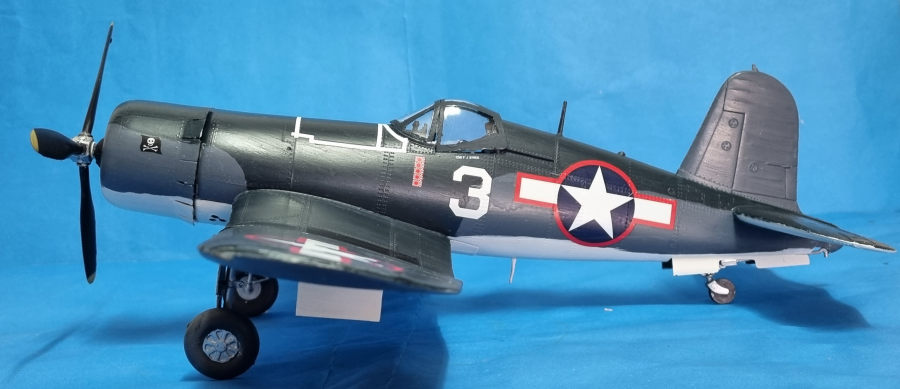
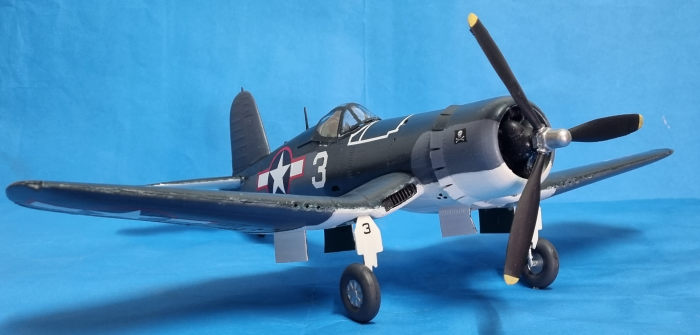
| COLORS & MARKINGS |
The
colour scheme on both aircraft is the same, uppers in Dark Sea Blue, middle
areas in Intermediate Blue, and lower surfaces in white. Revell doesn’t offer
paints for Dark Sea Blue nor Intermediate Blue, so I bought two new paints from
Vallejo. According to several sources, these paints are very delicate and don’t
take very well masking unless you prime the surface. I did so
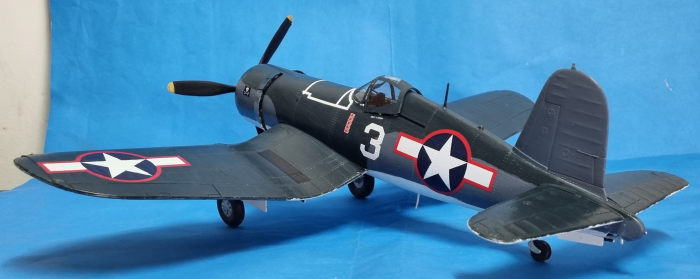 with Revell
76 Light Grey, and then free handed the colours. The Vallejo Model Color paints
didn’t need thinning, being ready for brushing from the bottle and covering the
surface in less than four coats, both the Dark Sea Blue and Intermediate Blue.
The white undersides needed some persuasion to fully cover the surface though. I
then masked the lower wing white areas and painted the outer lower wings in
Intermediate Blue. I then glossed the surface with Revell’s gloss varnish and
applied the decals, which reacted very well to Microsol, though some needed a
bit of pressing with a cotton bud so they would conform to the raised rivets.
The decals were left to set overnight, and then the model was matt coated.
with Revell
76 Light Grey, and then free handed the colours. The Vallejo Model Color paints
didn’t need thinning, being ready for brushing from the bottle and covering the
surface in less than four coats, both the Dark Sea Blue and Intermediate Blue.
The white undersides needed some persuasion to fully cover the surface though. I
then masked the lower wing white areas and painted the outer lower wings in
Intermediate Blue. I then glossed the surface with Revell’s gloss varnish and
applied the decals, which reacted very well to Microsol, though some needed a
bit of pressing with a cotton bud so they would conform to the raised rivets.
The decals were left to set overnight, and then the model was matt coated.
The landing gear was glued. These are a very flimsy assembly, so it was glued with UHU Model Cement and then reinforced with epoxy glue. The landing gear doors were added into place, the wheels were glued, the propeller added, and the clear parts were glued with white glue, and then the model was finished.
| CONCLUSIONS |
The Corsair is a big aircraft, bigger in height than a Bf 110 and almost of the same wingspan. I’m proud of finally having a US aircraft in my collection of 1:32 scale models. I wouldn’t have been able to do this one had it not been for the availability of the Vallejo paints. Regarding the model itself, it was a good kit, not as detailed as the Tamiya one, but if found cheap it can be built into a good model.
| REFERENCES |
Kit Instructions and Scalemates for the mini time line.
20 March 2023
Copyright ModelingMadness.com. All rights reserved. No reproduction in part or in whole without express permission.
If you would like your product reviewed fairly and fairly quickly, please contact the editor or see other details in the Note to Contributors.