| HISTORY |
HobbyBoss 1/48 FM-2 Wildcat
| KIT #: | 80330 |
| PRICE: | $18.00 |
| DECALS: | Two options |
| REVIEWER: | Fernando Rolandelli |
| NOTES: | Vector Conversion Set ($26.00) |
| HISTORY |
Grumman was
asked to develop a lightweight fighter for use aboard CVEs, and that
project, originally XF4F-8, was transferred to General Motors (already
producing the FM-1, similar to the F4F-4 but with only four guns) as the
FM-2. The most salient feature of the variant was the replacement of the
Pratt & Whitney R-1830 two row radial for a Wright Cyclone R-1820 one row
(which demanded a different cowl), a different
 exhaust
arrangement and some aerodynamic refinements. Eventually the most produced
of all variants, with 4,437 delivered, it performed yeoman’s work in the ASW
role within US Navy composite squadrons, never in the limelight exception
made of the gallant stand of the CVEs of the three “Taffies” of the Task
Group 77.4 against Kurita, in the “Battle of Samar” phase of “SHO 1
Operation”, a series of battles collectively known as “Battle of Leyte
Gulf”, where –I assume- the fighter component was composed by FM-2s, and
even that is overlooked.
exhaust
arrangement and some aerodynamic refinements. Eventually the most produced
of all variants, with 4,437 delivered, it performed yeoman’s work in the ASW
role within US Navy composite squadrons, never in the limelight exception
made of the gallant stand of the CVEs of the three “Taffies” of the Task
Group 77.4 against Kurita, in the “Battle of Samar” phase of “SHO 1
Operation”, a series of battles collectively known as “Battle of Leyte
Gulf”, where –I assume- the fighter component was composed by FM-2s, and
even that is overlooked.
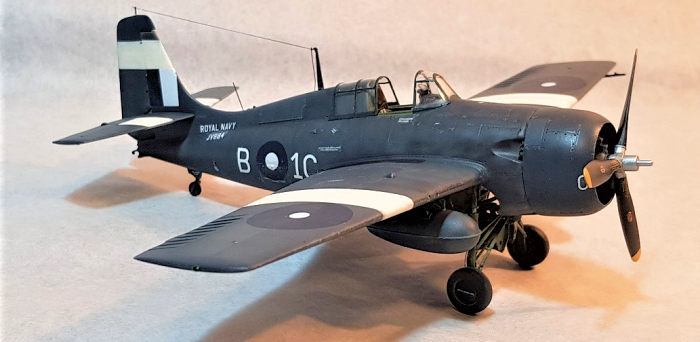
Use of the Wildcat VI by the Fleet Air Arm was a bit more proactive, especially in the late phases of the North Atlantic campaign, where both Mk. Vs and VIs from no less than half a dozen escort carriers, including 882 Sqn’s Wildcats aboard HMS Searcher, took part as fighter cover for attacks against shipping all along the Norwegian coastline. Later the carrier was designated and even undertaken a refurbishment for Eastern service, though it only arrived there in August 1945, operating until October, together to her faithful 882 Sqn.
| THE KIT |
Only little short of the acclaimed Tamiya kit, Hobby Boss Wildcat kits render a good, fairly accurate replica of the original with minimum fuss and low price, including the early non-folding wing variants. However, this particular kit, No. 80330, is the least accurate of them all, having the special FM-2 features very poorly represented. Sometime ago I built this kit OOB, and the result, though unmistakably different from the rest of the Wildcat models, is not really accurate. Vector came to the rescue with a resin conversion and upgrade, which is gorgeous and really justifies the oddity of the “set to convert the kit into itself”. Having the set at my disposal, I set to rebuild the kit into a better representation of the FM-2.
| CONSTRUCTION |
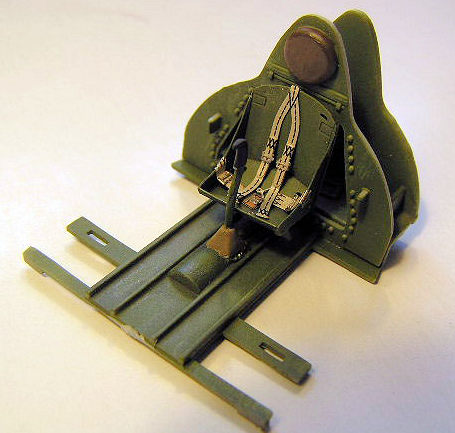 I
rebuilt the cockpit, using the customary Eduard PE set (FE246, for the
Tamiya F4F-4), plus the equally customary Squadron vacuformed canopy (9505,
for the Monogram kit). A FAA machine should have British seatbelts, so I
used the ones in Eduard 49006 (after pondering options, I did not use the
Sutton, but the “RAF late”, as shown, for instance, in Eduard’s recent
Hellcat I/II boxing). I also worked a bit the gunsight, adding knobs and
cables, and placing it on the lip of the coaming instead of in the middle of
it; I have seen both configurations, but this gives a better sight of the
device. The whole was painted in Xtracolors Interior Green.
I
rebuilt the cockpit, using the customary Eduard PE set (FE246, for the
Tamiya F4F-4), plus the equally customary Squadron vacuformed canopy (9505,
for the Monogram kit). A FAA machine should have British seatbelts, so I
used the ones in Eduard 49006 (after pondering options, I did not use the
Sutton, but the “RAF late”, as shown, for instance, in Eduard’s recent
Hellcat I/II boxing). I also worked a bit the gunsight, adding knobs and
cables, and placing it on the lip of the coaming instead of in the middle of
it; I have seen both configurations, but this gives a better sight of the
device. The whole was painted in Xtracolors Interior Green.
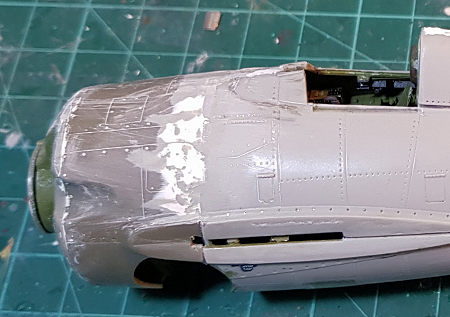
The heart of
the conversion involves sawing off the nose of the kit and replacing it with
the resin piece, which is presented as the complete “barrel”, so you have to
glue the fuselage halves first. This certainly diminishes your chances to
get a good fit and inevitably some “steps” developed, which were filled and
smoothed with putty. The resin piece looks a bit smaller than the fuselage
in diameter, which later complicated the fit of the wings (the foremost part
of the wing fairing comes in the resin nose) The fit was reasonable and
could be smoothed.
 The
inside of the wheel well and rear engine accessories compartment is somewhat
different to a P&W, lacking the intercoolers to begin with, and having
instead a prominent oil cooler, included in the conversion set, together to
a number of engine bearers. As I had the compartment already built, I made
only the most substantial changes. To this “barrel”, the front firewall is
added, and, to it, the rear of the engine. I added some cables and ducts to
give a busier look, but even looking intently from the wheel well openings,
the end result is very complete. Everything was painted Xtracolor Interior
Green.
The
inside of the wheel well and rear engine accessories compartment is somewhat
different to a P&W, lacking the intercoolers to begin with, and having
instead a prominent oil cooler, included in the conversion set, together to
a number of engine bearers. As I had the compartment already built, I made
only the most substantial changes. To this “barrel”, the front firewall is
added, and, to it, the rear of the engine. I added some cables and ducts to
give a busier look, but even looking intently from the wheel well openings,
the end result is very complete. Everything was painted Xtracolor Interior
Green.
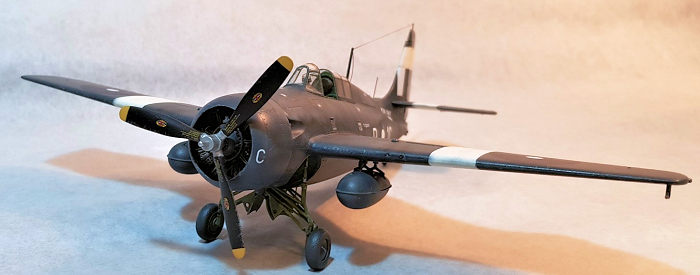
Then come the engine, a gorgeous piece made of the central core, and the nine cylinders. The cooling grilles and frontal ring and accesories are provided, but you have to add the rockers and ignition wires. This is glued to the firewall, but I rather fit it into the cowling and only then glue the whole assembly into the firewall; I thought I would have more juggling margin that way. It worked, but the exhaust pipes threatened to throw the cowling too low; I had to sand and finally practically bury the lower ones to keep the cowling in line to the top of the fuselage. It sits nevertheless leaving a noticeable gap in between. I pondered replacing the propeller with the Cutting Edge product, but decided against after carefully looking at pictures; the kit’s one looks fine.
 Wings
were carefully glued then. HB has the wings as separated pieces, while
Tamiya has them in one piece to the lower fuselage. This ensures perfect
dihedral; though I had no problem with the dihedral of any HB Wildcat I
built, in this case the conversion meddled with the wing’s fairings. In the
event, I had to make some hair-rising corrections with the kit already
painted, but thing ended up well. The conversion set also provides the
rudder, which is much better shaped than the kit’s, but it is noticeably
slimmer than the fin. I solved the problem by gluing it deflected, which
masked the difference. The three landing assistance lights on the underbelly
were absent and were made by gouging a recess with a suitable sized drill,
painting it Silver, then in the appropriate Tamiya Clear colour, then making
a “lens” with a drop of White glue.
Wings
were carefully glued then. HB has the wings as separated pieces, while
Tamiya has them in one piece to the lower fuselage. This ensures perfect
dihedral; though I had no problem with the dihedral of any HB Wildcat I
built, in this case the conversion meddled with the wing’s fairings. In the
event, I had to make some hair-rising corrections with the kit already
painted, but thing ended up well. The conversion set also provides the
rudder, which is much better shaped than the kit’s, but it is noticeably
slimmer than the fin. I solved the problem by gluing it deflected, which
masked the difference. The three landing assistance lights on the underbelly
were absent and were made by gouging a recess with a suitable sized drill,
painting it Silver, then in the appropriate Tamiya Clear colour, then making
a “lens” with a drop of White glue.
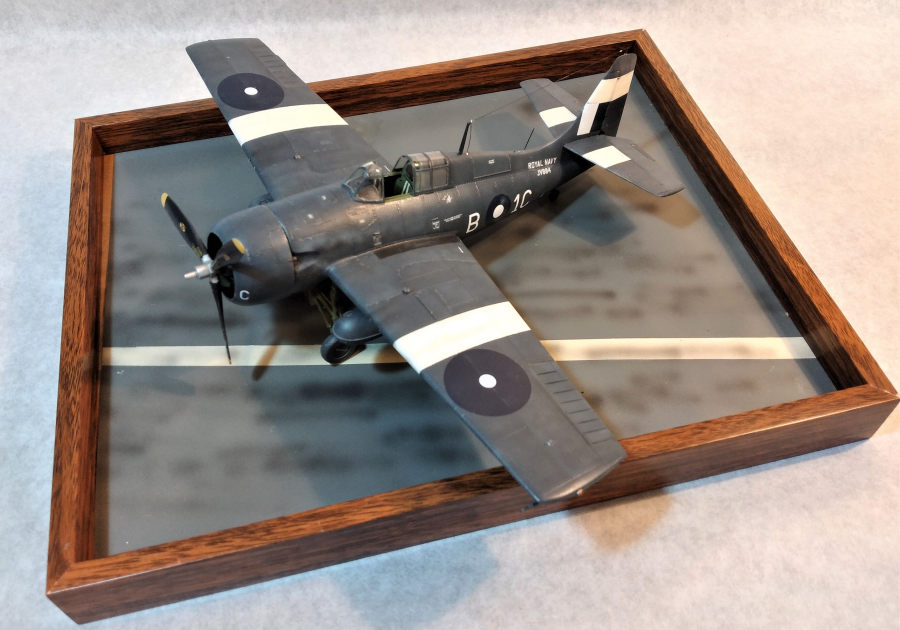
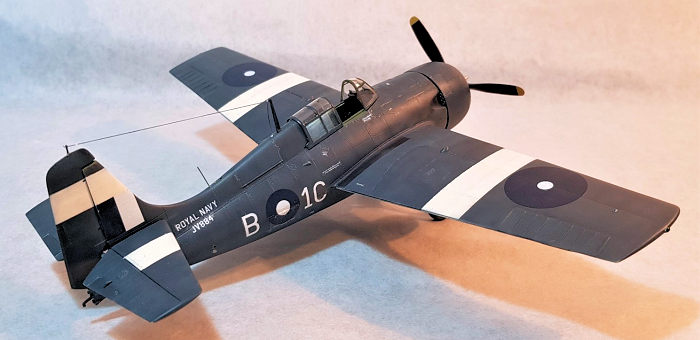
| COLORS & MARKINGS |
 After
pondering making a EDSG/DSG machine, the potential mess of the putty (Tamiya
and Mr. Surfacer, on which I had rescribed panel lines and some rivets) on
the smoothed over nose made me choose the overall Sea Blue Gloss JV884. In
the end the nose was well faired over and virtually no blemish was on sight.
I used WEMM’s FS25042. To give the finish some interest, I preshaded the
primed model heavily in both dark and clear colours, both masked and free
hand. I insisted specially on moving surfaces and the wing fold. The paint
itself I made “mottle fashion”, and some post-shade with a lightened version
of the colour was made. The real paint was very tough and not prone to
weathering, but the model would look simply too plain that way. The White ID
bands were painted over the dark paint, giving and “instant fading” effect.
FAA decals were sourced from the Techmod 48051 sheet, dedicated to the
Wildcat VI, with five machines, three in EDSG/DSG/Sky and two in SBG. I
applied a thorough glossy coat using Xtracrylix Gloss Varnish with a
handbrush. The decals are very thin and care is needed to handle them, as
any good quality decal.
After
pondering making a EDSG/DSG machine, the potential mess of the putty (Tamiya
and Mr. Surfacer, on which I had rescribed panel lines and some rivets) on
the smoothed over nose made me choose the overall Sea Blue Gloss JV884. In
the end the nose was well faired over and virtually no blemish was on sight.
I used WEMM’s FS25042. To give the finish some interest, I preshaded the
primed model heavily in both dark and clear colours, both masked and free
hand. I insisted specially on moving surfaces and the wing fold. The paint
itself I made “mottle fashion”, and some post-shade with a lightened version
of the colour was made. The real paint was very tough and not prone to
weathering, but the model would look simply too plain that way. The White ID
bands were painted over the dark paint, giving and “instant fading” effect.
FAA decals were sourced from the Techmod 48051 sheet, dedicated to the
Wildcat VI, with five machines, three in EDSG/DSG/Sky and two in SBG. I
applied a thorough glossy coat using Xtracrylix Gloss Varnish with a
handbrush. The decals are very thin and care is needed to handle them, as
any good quality decal.
| CONCLUSIONS |
The Vector set really wins the day; without it, the model looks like a hybrid lacking many of the subtle characteristics of a FM-2. I wouldn’t advise to build any FM-2 HB kit OOB without it. Pity, for the rest of the family are very accurate and this one provides all the relevant pieces as new moulds. The differences to a FM-1 or Wildcat V are very noticeable indeed, especially the width of the cowling opening and the tall rudder.
| REFERENCES |
Articles at Hyperscale by Bruce Archer, and by Paul Fontenoy at the defunct FAA SIG.
“The Grumman Wildcat in Detail and Scale”, Bert Kinzey
“Britain’s Fleet Air Arm in WW2”, Ron Mackay, Schiffer.
“Modelling the F4F Wildcat”, Mark Glidden, Osprey Modelling, Osprey Publishing
31 August 2021
Copyright ModelingMadness.com. All rights reserved. No reproduction in part or in whole without express permission.
If you would like your product reviewed fairly and fairly quickly, please contact the editor or see other details in the Note to Contributors.