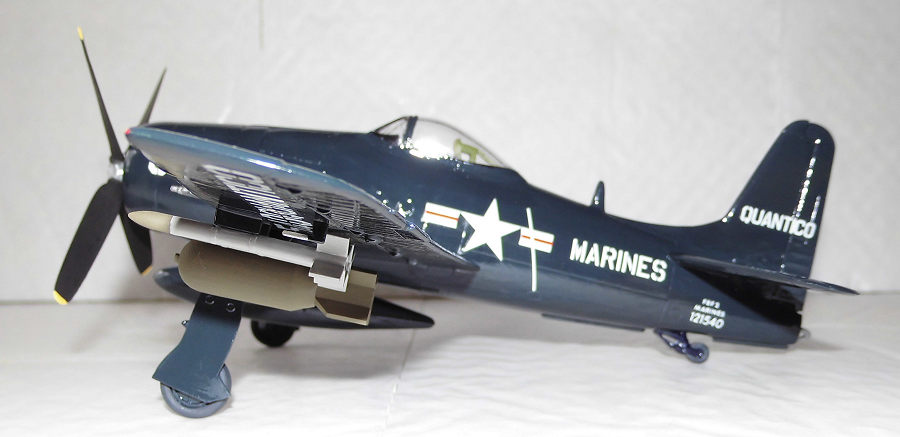
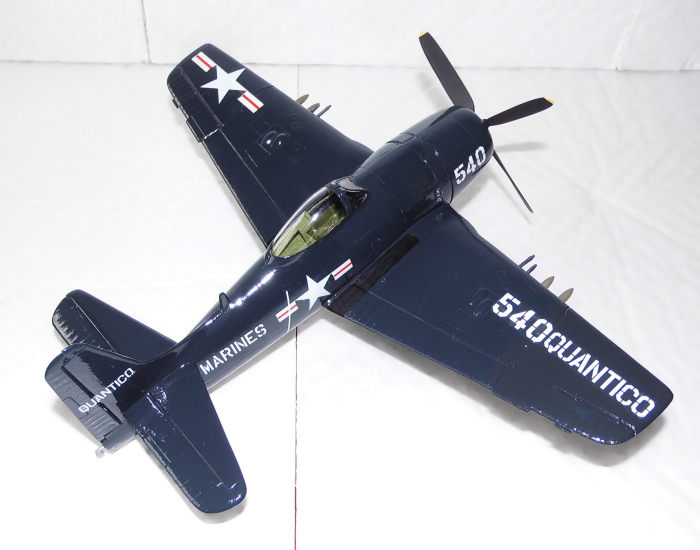
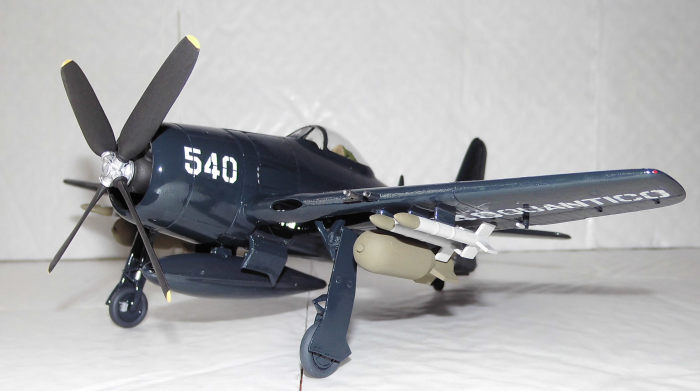
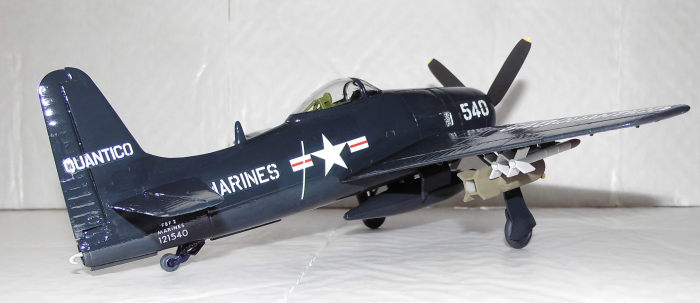
Italeri/Testors 1/48 F8F-2 Bearcat
| KIT #: | 803 |
| PRICE: | $ |
| DECALS: | One option |
| REVIEWER: | Nicolai Plesberg |
| NOTES: | Cutting Edge corrected tail set CEC48425 |
| HISTORY |
For a full brief on the Bearcat’s history, please go here.
| THE KIT |
 This
was, to my understanding of it, originally tooled by Hawk back in the 60s so it
is one of those golden oldies that just get reboxed from time to time in other
guises. This boxing is done by Italeri (sorry Italaerei as it was spelled back
in those days – the 1970s) in partnership with Testors and consists of 37 parts
molded in light grey styrene and two parts in clear, the windscreen and canopy.
The detailing for the time is a mix of raised and engraved panel lines which for
a kit this age must be considered acceptable. The instructions are clear and
show detail painting along the construction although there are some blank spots,
which research must fill out! Decals are for a Marines bird out of Quantico and
printed by Cartograf (enough said).
This
was, to my understanding of it, originally tooled by Hawk back in the 60s so it
is one of those golden oldies that just get reboxed from time to time in other
guises. This boxing is done by Italeri (sorry Italaerei as it was spelled back
in those days – the 1970s) in partnership with Testors and consists of 37 parts
molded in light grey styrene and two parts in clear, the windscreen and canopy.
The detailing for the time is a mix of raised and engraved panel lines which for
a kit this age must be considered acceptable. The instructions are clear and
show detail painting along the construction although there are some blank spots,
which research must fill out! Decals are for a Marines bird out of Quantico and
printed by Cartograf (enough said).
| CONSTRUCTION |
Some other reviews have highlighted the errors in this kit; I admit, that I only dealt with those that was, under the circumstances, possible to deal with; namely the vertical tail, the interior and the gear legs. So here goes:
As this was commenced years ago, I had painted and assembled the propeller / engine / cowling assembly, it was virtually impossible for me to deal with the front cowling issue; I was in no mood to disassemble the cowling assembly, because it was done before I got aware of that issue anyway. I can just say that the engine front together with the inner cowling surface and propeller was painted flat black so nothing could be seen anyway – the missing second bank of cylinders do not show, or only very hardly if it is painted black so that was the easiest way of getting around that issue! As I resurrected it the next order of business was to scratch build a usable interior. It got really busy with side consoles, a piece was glued to the floor to raise the kit seat that I chose to stay with. An ejector pin mark in the seat had to be eradicated, but as soon as this was accomplished it was glued in place. While the interior dried I glued the drop tank and bombs together. The oil cooling intakes in the wing roots were modified to more look like the reality and after that accomplishment the wings were glued together. Some seam treatment of the bombs, wings and drop tank was next once they had set.
 I
strengthened the cockpit side panels by utilising some Evergreen strip. Then I
removed the pour stubs from the replacement tail set from Cutting Edge. Although
it was designed for the Hobbycraft kit, I found it easily adaptable to this kit.
So I found out after removing the tail section from both fuselage halves that it
was almost a drop in fit!
I
strengthened the cockpit side panels by utilising some Evergreen strip. Then I
removed the pour stubs from the replacement tail set from Cutting Edge. Although
it was designed for the Hobbycraft kit, I found it easily adaptable to this kit.
So I found out after removing the tail section from both fuselage halves that it
was almost a drop in fit!
I then returned to the interior, made a stick, drilled a hole and glued it to the floor. Some adjustment of the side panels were necessary to get the fuselage to close around it – it took several sessions before the fit was home! I had also modified the mounting tabs so they could accommodate my scratch-built interior. Once everything was in order the interior and cockpit sidewalls was painted Interior Green (Model Master 4736) and it took a couple of coats before the coverage was satisfying. The side panels, instrument panel and stick handle was painted flat black. The head cushion on the seat was painted khaki and the instrument panel was glossed to accept the instrument decal. While that dried I puttied some irregular areas on the resin tail pieces as the casting was apparently not so good as could have been wished for. The instrumentpanel decal was applied and the puttied areas on the resin parts were sanded and puttied once more to near perfection of the surface. The surplus edges of decal film on the instrument decal were cut away before it was sealed in with a clear flat varnish. When that was done, it was glued into the left fuselage half once I had secured that the fit was ok.
The last
thing to be done was to modify and paint the tail gear unit before the fuselage
halves could be joined. The tail gear is too short and therefore the model will
stand with the wrong stance but it is very easy to correct. The original
mounting tabs are cut off and a new is glued on top of the gear leg – the
correct diameter of this is 1,6 mm and provides sufficient thickness to get the
correct stance. The tail gear plus its bay are painted gloss sea blue and the
tire a suitable black – like tire black. When the tail gear was finished it was
glued to the left fuselage half together with the interior before the fuselage
halves were joined. When the fuselage had set I found it necessary to strengthen
the seam with CA glue here and there to secure the seam before it was sanded and
puttied (it’s no good to do this if the seam breaks up!). The next step was to
adapt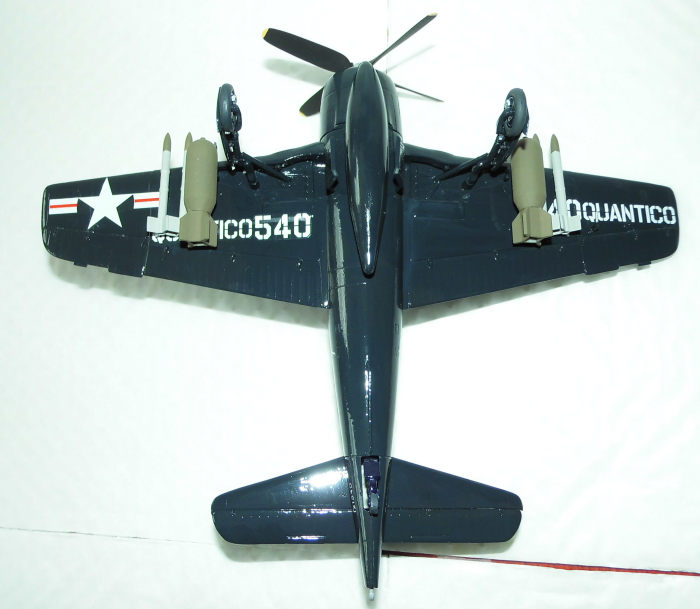 and glue the resin fin and rear fuselage piece to the rear of the fuselage
with slow drying CA glue. The rudder was omitted until the rest had been faired
in with some putty. The head piece support was glued in place behind the seat
and the last touch up sessions in the cockpit area was performed.
and glue the resin fin and rear fuselage piece to the rear of the fuselage
with slow drying CA glue. The rudder was omitted until the rest had been faired
in with some putty. The head piece support was glued in place behind the seat
and the last touch up sessions in the cockpit area was performed.
As the fuselage was just short of the rudder and cowling I glued the wings on securing the correct positioning of these. The horizontal stabilisers were glued in place next and at the same time, I gluefilled the wing seams to strengthen the wing / fuselage seams. It took some sessions to complete, as did the stabilizers, as I really wasn’t in the mood to use filler as such. I actually succeeded in reducing the amount of necessary filling in the wing and stabiliser seams quite a bit. Only very modest amounts of filler were used in those seams, which was the goal anyway. When all seams had been dealt with to my satisfaction, I glued the loose elevator plus rudder and the keel plate (the latter items part of the Cutting Edge parts) with slow drying CA glue. The cowling was also glued to the fuselage making the airframe complete.
The remaining issue that I was going to deal with was the missing retraction struts on the main landing gear legs. They were pretty easy to do because I had my Monogram Bearcat to look at; is it not strange that Monogram did make the gear legs complete with retraction struts in 1/72 scale when Hawk apparently was not able to do so in 1/48 scale? I’m just wondering! They were cut from stretched sprue and glued to the gear legs. While they were drying I finished up the cockpit; adding a gun sight, painting it and, after cleaning them, gluing the clear parts on top of the cockpit opening. Then the gear legs were glued into the gear bays. Some gaps at the canopy / windscreen were filled with clear gloss (as usual) and then I painted gear legs, gear bays, wheel hubs and inner side of gear doors Gloss Sea Blue. Then the canopy framing went flat black and the model cleaned before it went to the paint shop.
| COLORS & MARKINGS |
First I painted the canopy framing Gloss Sea Blue then doing some touch up on the gear / bays before the rest of the airframe got the first coat of GSB. It took two more coats before the coverage was perfect. The oleos went silver, brakes on the backside of wheel hubs went grey metallic and tires went tire black. The ordnance was also painted at this stage; the bombs went olive drab, the rockets, which I substituted with some better looking ones from Tamiya’s Skyraider kit, were painted light grey / olive drab.
 As the
surface was gloss I applied the decals directly without any obstacles; but that
is also what to expect from Cartograf printed decals! While the decals dried I
made a tail hook from a suitable piece from my spare parts bin. When decals had
dried I wiped them with a moist antistatic cloth before they were sealed in with
a coat of gloss clear.
As the
surface was gloss I applied the decals directly without any obstacles; but that
is also what to expect from Cartograf printed decals! While the decals dried I
made a tail hook from a suitable piece from my spare parts bin. When decals had
dried I wiped them with a moist antistatic cloth before they were sealed in with
a coat of gloss clear.
The final bits, such as the tail hook, cannon barrels, walkways, gear doors and other small issues were dealt with and added to the model one by one. The last things to be glued in place were the ordnance. Here I found out that it might had been a good idea to keep the kit’s own rockets, because the Tamiya ones does seem to have too large fins, as they turned out to be difficult to add side by side. Nevertheless I got them to sit although it may not be regular spacing between them (Query: is it just me or do the HVAR rockets from Tamiya’s Skyraider kit have too big / thick fins?) and with that the Bearcat was finished.
| CONCLUSIONS |
 Well, despite the age of this kit it nevertheless can get to look about right
with some modeling efforts put into it and maybe one or two aftermarket parts.
To do so, however, some skills are required, but for a novice builder it may be
a good kit to practice on (no worries on accuracy here!). I am aware of two
other kits in 1/48 scale; from Hobbyboss and Hobbycraft. Neither of those two
seems to be perfectly accurate from what I‘ve read. I actually have the
Hobbycraft kit in my stash; disguised as an Academy reboxing. To me it looks
more accurate than this one; at least it has a decent interior and the engine
has the required two banks of cylinders. But if accuracy is really so important
maybe we should ask someone like, say, Eduard to make
the
ultimate 1/48 scale kit of a Bearcat? With their gorgeous 1/48 scale Spitfire
and Bf109G kits it wouldn’t be so much to imagine!
Well, despite the age of this kit it nevertheless can get to look about right
with some modeling efforts put into it and maybe one or two aftermarket parts.
To do so, however, some skills are required, but for a novice builder it may be
a good kit to practice on (no worries on accuracy here!). I am aware of two
other kits in 1/48 scale; from Hobbyboss and Hobbycraft. Neither of those two
seems to be perfectly accurate from what I‘ve read. I actually have the
Hobbycraft kit in my stash; disguised as an Academy reboxing. To me it looks
more accurate than this one; at least it has a decent interior and the engine
has the required two banks of cylinders. But if accuracy is really so important
maybe we should ask someone like, say, Eduard to make
the
ultimate 1/48 scale kit of a Bearcat? With their gorgeous 1/48 scale Spitfire
and Bf109G kits it wouldn’t be so much to imagine!
| REFERENCES |
Profile Publications no 107: The Grumman F8F Bearcat © Harold Andrews 1966
American Warplanes, by Bill Gunston 1986 Salamander books Ltd. ISBN 0-517-61351-4
Vietnam: The war in the air, by René J. Francillon 1987 Arch Cape Press ISBN 0-517-62976-3
Nicolai Plesberg
10 February 2020 Copyright ModelingMadness.com. All rights reserved If you would like your product reviewed fairly and fairly quickly, please contact the editor
or see other details in the
Note to
Contributors. Back to the Main Page
Back to the Review
Index Page
Back to the Previews Index Page