Eduard 1/72 F6F-3 Hellcat
| KIT #: | 7457 |
| PRICE: | $15.00 or so |
| DECALS: | Four options |
| REVIEWER: | Spiros Pendedekas |
| NOTES: | Weekend Edition |
| HISTORY |
VF-27 was first
established as VGF-27 at NAS Norfolk, VA in April 1942. Redesignated as VF-27 in
March 1943 and initially equipped with F4F-4 Wildcats, it was a busy squadron,
taking part in many operations. In early 1944 it was re-equipped with F6F-3
Hellcats and, after a brief but intensive training in Hawaii, it was embarked
aboard the USS Princeton CVL-23. All 24 machines embarked featured the famous
cat-mouth at
 their
front, a decoration designed by three of the squadron pilots, Carl Brown,
Richard Stambrook, and Robert Burnel (the latter considered “The artist of
VF-27”) and applied with the help of all squadron pilots.
their
front, a decoration designed by three of the squadron pilots, Carl Brown,
Richard Stambrook, and Robert Burnel (the latter considered “The artist of
VF-27”) and applied with the help of all squadron pilots.
The squadron was most active and very effective aboard the Princeton, claiming,
among others, 30 kills during the "Great Marianas Turkey Shoot" on June 19th
(though losing their commander Lt. Cdr Wood there). The success of the VF-27
(and the Princeton itself) continued during the following months, wrecking at
times havoc on the Japanese. It was not to last for long, though, as on 24
October, a single bomb dropped from an undetected D4Y Suisei exploded on the
Princeton’s flight deck amidst fuelled and armed TBF Avengers, causing multiple
explosions that doomed the ship, forcing allied ships to sink it by launching
torpedoes seven hours later.
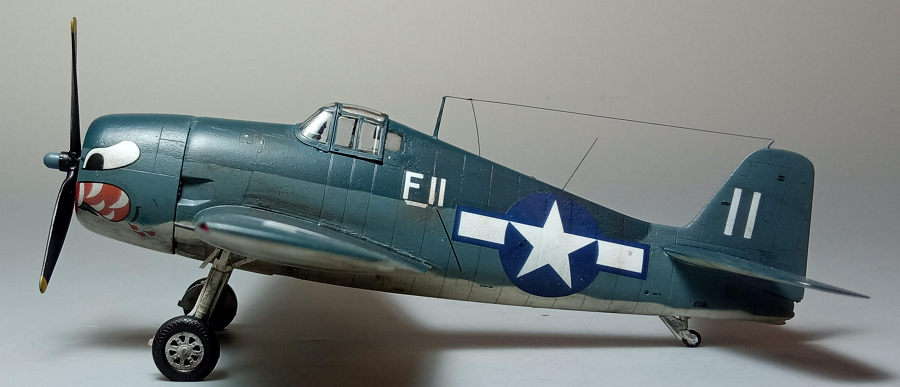
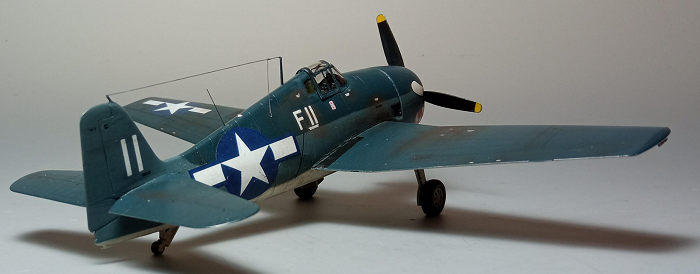
The nine cat-mouth Hellcats that were airborne by the time the Princeton was
hit, could manage to safely land on other carriers. One of those survivors was
an uncommonly marked VF11 machine, featuring two kills on the starboard side.
Soon after all cat-mouths were painted over, thus ending a legendary chapter in
the U.S. Naval Aviation.
| THE KIT |
This is the 2021 F6F-3 “Weekend Edition” of the very nice Eduard 1/72 Hellcat family of kits which initially hit the shelves in 2011 and have been reboxed numerous times (practically covering all major variants) and in many editions (ProfiPack, Weekend, Overtrees). The specific kit was yet another present from my good Polish friend Bernard Sobczyk, who was kind enough as to even include in the box the basic camo colors and the interior green, all of the excellent Mr Hobby line, together with a Quickboost exhaust set! For a look at the kit's contents you may read its preview found at the ever growing MM archives.
| CONSTRUCTION |
I started by putting together the very nice
cockpit, then trapped it between the fuselage halves, together with the oil
cooler outlet duct which is very neatly rendered. The correct for this version
rear view windows are provided as full transparent parts and were attached at
this time, as well.
Basic interior color was Mr Hobby H58 Interior Green, whereas the instrument
panel, front anti-glare area, side consoles, stick grip and the head cushion
were painted black. The opaque styrene gunsight was highlighted with my fine tip
silver pen.
 I decided
to use the very comprehensive instrument decals which nicely succumbed onto the
raised instruments with some decal softener. Same with the seat, where the
really good looking seat belt decals were applied onto them, their
two-dimensional looks barely noticeable under my go-to closed canopy. The seat
and stick (as well as the tail wheel) were left off, to be attached at later
stages.
I decided
to use the very comprehensive instrument decals which nicely succumbed onto the
raised instruments with some decal softener. Same with the seat, where the
really good looking seat belt decals were applied onto them, their
two-dimensional looks barely noticeable under my go-to closed canopy. The seat
and stick (as well as the tail wheel) were left off, to be attached at later
stages.
The main wings were then assembled and attached, followed by the tail planes.
Though the wing guns triplets were supposed to be trapped between the wing
halves, such an arrangement would pose a real challenge for my brutal techniques
when sanding the wing leading edges, so I decided not to use them and add the
gun barrels at end stages. The three piece cowling was assembled at this stage,
as well, concluding basic assembly.
Overall fit was really nice, only needing some minor filing and sanding and I
believe most “normal” modelers (not Yours Truly) will have good chances not
using any filler at all, just some scraping of the seams here and there.
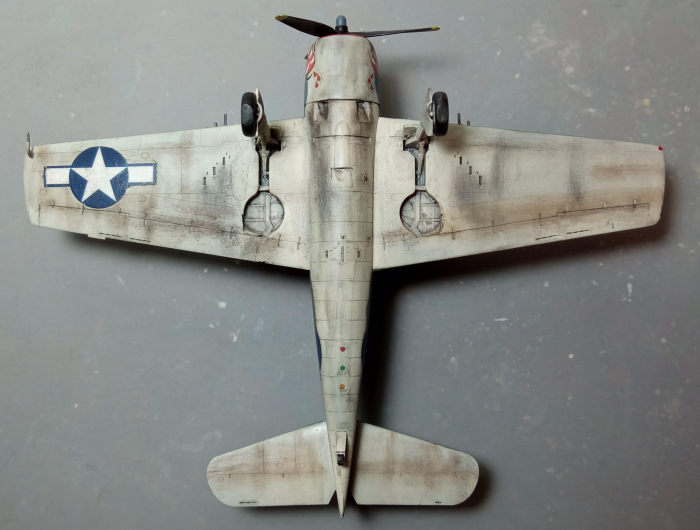
Since all undersides, bays, door innards and landing gear were to be painted
white, I attached everything underneath, temporarily affixed the engine cowling
and took the bird to the paint shop!
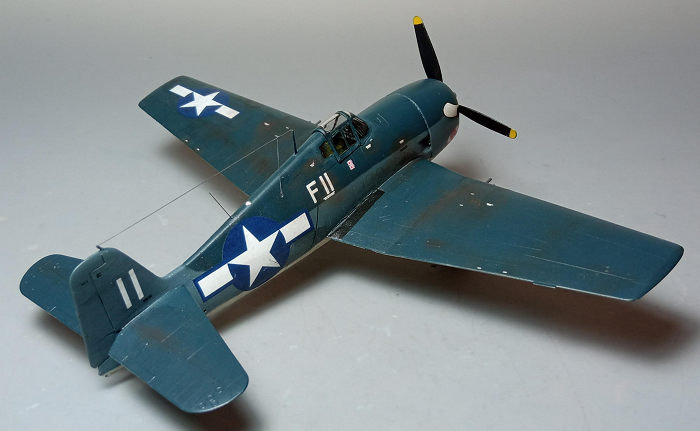
| COLORS & MARKINGS |
I first gave all undersides, including all attached
landing gear bits and wheel rims, a coat of Mr Hobby H1 White, then masked it
off and sprayed Mr Hobby 366 Intermediate Blue. After also masking it off, I
applied the top Navy Blue, for which I used Mr Hobby H54. For the fuselage
demarcation lines, I used strings of tak, in order to achieve the desirable
(particularly for the scale) tight but not dead hard effect. A coat of Future
prepared the bird for decaling.
 I used the
kit decals, in order to represent USS Princeton’s VF-27 Cat Mouth bird which
carried the uncommon and very nice looking F11 codes. I also applied most of the
very comprehensive stencils provided, though I am not sure how many of them were
either applied or overpainted at "the specific plane the specific time". Being
relatively thin, the decals can easily fold to themselves if (mis) handled too
much, so try to position them right first time. Decals behaved excellently,
easily detaching from their backing paper and eagerly following all surface
contours, including the challenging Cat Mouth area, with no silvering taking
place whatsoever. Well done Eduard!
I used the
kit decals, in order to represent USS Princeton’s VF-27 Cat Mouth bird which
carried the uncommon and very nice looking F11 codes. I also applied most of the
very comprehensive stencils provided, though I am not sure how many of them were
either applied or overpainted at "the specific plane the specific time". Being
relatively thin, the decals can easily fold to themselves if (mis) handled too
much, so try to position them right first time. Decals behaved excellently,
easily detaching from their backing paper and eagerly following all surface
contours, including the challenging Cat Mouth area, with no silvering taking
place whatsoever. Well done Eduard!
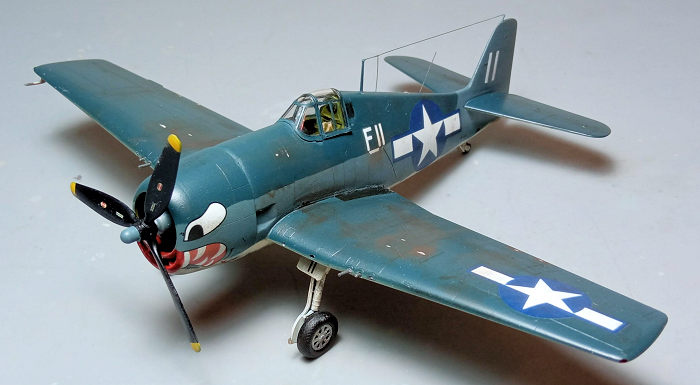
| FINAL CONSTRUCTION |
The main wheels were assembled and, after filing
the tires to look weighted, were attached in position with the bird nicely
standing on its feet. All tires, including the rear solid one, were painted
black with white rims and I really liked how easy it was to paint the separate
front rims and simply press-fit them to the tires, achieving a spotless result
with minimal effort. Oleos were also highlighted with a fine tip silver pen this
time, as well.
 The fine
looking engine was assembled and attached, followed by the cowling.
Its cylinders were painted black, then heavily dry brushed with silver, whereas
the crankcase was painted a light blue gray, the exhausts Testors Burned Metal
and the cowling innards interior green. The nice looking one piece prop had
black blades, yellow tips and the correct for the specific plane intermediate
blue hub. After having its decal stenciling applied, it was attached in
position.
The fine
looking engine was assembled and attached, followed by the cowling.
Its cylinders were painted black, then heavily dry brushed with silver, whereas
the crankcase was painted a light blue gray, the exhausts Testors Burned Metal
and the cowling innards interior green. The nice looking one piece prop had
black blades, yellow tips and the correct for the specific plane intermediate
blue hub. After having its decal stenciling applied, it was attached in
position.
Time for some weathering, which consisted of a black allover wash (heftier in
the landing gear area), followed by application of dark brown and black dry
pastels, to simulate dirt, grime and even engine staining at all candidate
areas. Though I was really tempted to apply some chipping, to my understanding
those birds onboard had the slightest hint of chipping, "dinging" and the like
quickly overpainted by the technical personnel in order to fight corrosion in
that hard sea environment, so I merely applied very little silver dry brushing
at the rear edges of the wing walk areas and at the prop tips. A satin coat gave
the bird its final hue.
The six wing guns that had not been installed at early stages, were cut off from
their supporting block and carefully inserted and secured with glue at their
individual positions, paying attention in observing their correct protrusion
lengths. They were then painted Testors Burned Metal. The pitot was attached at
this time, as well, its body painted per the white surrounding area and its tip
Testors Burned Metal.
 The
transparencies had their well defined frames hand painted and attached in place,
with fit being really nice. The front mast was attached in position, followed by
the fin located rear mast which was represented by a piece of stretched sprue,
as the original molded on the fin had no chances whatsoever to endure my less
then delicate building and handling qualities.
The
transparencies had their well defined frames hand painted and attached in place,
with fit being really nice. The front mast was attached in position, followed by
the fin located rear mast which was represented by a piece of stretched sprue,
as the original molded on the fin had no chances whatsoever to endure my less
then delicate building and handling qualities.
Thin stretched sprue was used to represent the aerial wire (run from the one
mast to the other), together with the smaller “lead-in” wire (entering the
fuselage at the starboard topsides) and the “dorsal rod antenna”, entering the
fuselage tad aft of the dorsal beacon ID light (the latter represented by a blob
of chrome paint), with suitable mini holes accordingly having been drilled.
Finally, tiny blobs of red and green clear paints were applied to represent the
wingtip lights, before calling the fearsome Cat done!
| CONCLUSIONS |
Eduard is among the leaders in plastic modeling and
this offering easily justifies why, being clearly a superb kit of the iconic
Hellcat. General shape is spot-on, molding is superb, panel lines are nicely
engraved, detailing is all over great, clear parts are excellent, fit is super
and the same stands for the decals. Out of the box a really nice Hellcat can
emerge, with the ease of construction and the superb instructions deeming it
suitable for less experienced modelers, even beginners.
True, being a Weekend edition means missing the extra detailing PE fret of the
ProfiPack version (in our case it also prevents the bombs to be used), and,
additionally, missing the masking set. Considering the cost of the PE and mask
sets alone, the price of the ProfiPack version makes it a bargain, especially
if you are after the PE and masks.
On the other hand, the detail supplied in styrene in this Weekend version is
more than sufficient, let alone the fact that PE is not to everyone's taste.
Equally importantly, the choice of four very interesting decal options means
that the “Weekend Edition” builder is not any more restrained to a sole decal
option, as might have been the case in the past.
Happy Modeling!
31 October 2023
Copyright ModelingMadness.com. All rights reserved. No reproduction in part or in whole without express permission.
If you would like your product reviewed fairly and fairly quickly, please contact the editor or see other details in the Note to Contributors.