Hasegawa 1/48 F6F-3 Hellcat
| KIT #: | 09134 (Jt34) |
| PRICE: | € 19 on sale |
| DECALS: | Two options |
| REVIEWER: | Spiros Pendedekas |
| NOTES: | Initial release |
| HISTORY |
Designed as a successor to the F4F Wildcat, the Hellcat’s origins can be traced back in 1938, with the contract for the prototype XF6F-1 signed on 30 June 1941. Instead of the Wildcat's narrow-track, hand-cranked, main landing gear retracting into the fuselage, the Hellcat had wide-set, hydraulically actuated landing gear that rotated through 90° while retracting backwards into the wings. The wing itself was mounted lower on the fuselage and was able to be hydraulically or manually folded, with each panel outboard of the undercarriage bay folding backwards from pivoting on a specially oriented, Grumman-patented "Sto-Wing'' diagonal axis pivoting system much like its predecessor, the Wildcat. The sloping down of the top front fuselage section, together with the cockpit itself being mounted high, gave the pilot good visibility.
 Whereas the
aircraft was originally aimed to use the Wright R-2600 Twin Cyclone two-row,
14-cylinder radial engine driving a three-bladed Curtiss Electric propeller, in
less than a year after the signing of the contract, BuAer directed Grumman to
install the more-powerful 18-cylinder Pratt & Whitney R-2800 Double Wasp radial
engine, driving a three-bladed Hamilton Standard propeller. This wise decision
was based on combat accounts of encounters between the F4F Wildcat and A6M Zero.
While the change of power plant necessitated strengthening of the airframe, the
overall performance was estimated to increase by 25%.
Whereas the
aircraft was originally aimed to use the Wright R-2600 Twin Cyclone two-row,
14-cylinder radial engine driving a three-bladed Curtiss Electric propeller, in
less than a year after the signing of the contract, BuAer directed Grumman to
install the more-powerful 18-cylinder Pratt & Whitney R-2800 Double Wasp radial
engine, driving a three-bladed Hamilton Standard propeller. This wise decision
was based on combat accounts of encounters between the F4F Wildcat and A6M Zero.
While the change of power plant necessitated strengthening of the airframe, the
overall performance was estimated to increase by 25%.
The type was designed to take damage and get the pilot safely back to base. A bullet-resistant windshield was used, together with armor fitted around the cockpit, the oil tank and oil cooler. A 250 US gal self-sealing fuel tank was fitted in the fuselage.
Standard armament on the F6F-3 consisted of six .50
in (12.7 mm) Browning air-cooled machine guns with 400 rounds per gun. A
center-section hardpoint under the fuselage could carry a single 150 US gal drop
tank, while later aircraft had single bomb racks installed under each wing,
inboard of the undercarriage bays; with these and the center-section hard point,
late-model F6F-3s could carry a total bomb load in excess of 2,000 lb. Six 5 in
(127 mm) High Velocity Aircraft Rockets (HVARs) could finally be carried – three
under each wing on "zero-length" launchers.
The first production F6F-3, powered by an R-2800-10, flew on 3 October 1942,
with the type reaching operational readiness with VF-9 on USS Essex in February
1943. Night-fighter sub variants were also developed. In total, 4,402 F6F-3s
were built through until April 1944, when production was changed to the improved
F6F-5.
| THE KIT |
 Hasegawa
quarter scale Hellcats first appeared in 1995, then regularly reboxed till 2015.
By all means great kits, solidly holding their own even nowadays, despite being
superseded by newer offerings. It is reported that the cowling chin is less
prominent than it should be, but this might neither be too obvious nor too
bothersome for a number of us, let alone the fact that I have come across one
reported case where Hasegawa included corrected cowling in a kit.
Hasegawa
quarter scale Hellcats first appeared in 1995, then regularly reboxed till 2015.
By all means great kits, solidly holding their own even nowadays, despite being
superseded by newer offerings. It is reported that the cowling chin is less
prominent than it should be, but this might neither be too obvious nor too
bothersome for a number of us, let alone the fact that I have come across one
reported case where Hasegawa included corrected cowling in a kit.
The specific kit is the 1995 initial release F6F-3, bought in 2003 from a local toy/hobby shop (now, sadly, closed) at a price I could not refuse. For a more in depth look at this fine kit’s contents, you might read its preview found at the MM archives.
| CONSTRUCTION |
I started by putting together the nice cockpit, attaching all its elements onto the cockpit floor (the 2-piece instrument panel, the foot pedals, the side consoles with the separate nice top faces, the hand pump lever and the 3-piece rear bulkhead). The seat and the control stick were left off, to be attached at later stages
Basic interior color was Hu226 Interior green, with the instrument panel, console faces and grips painted black. I decided not to use the instrument decal but, rather, dry-brush with silver the instrument faces (including the side consoles) and add various “knobs” by pinning red, white and yellow paint. The molded on seat belts were painted linen with brass buckles. The cockpit, out of the box, will be more than sufficient for a good number of us.
I continued by attaching the rear view windows from
the insides of the fuselage halves. To do so, the corresponding fuselage
sections had to be carefully cut-off (as the same fuselage parts are used for
the non-rear window versions) and I admit my job was below average there. After
painting the visible innards the same interior green, I joined the fuselage
halves, trapping the cockpit in-between. The main wing was then assembled by
attachi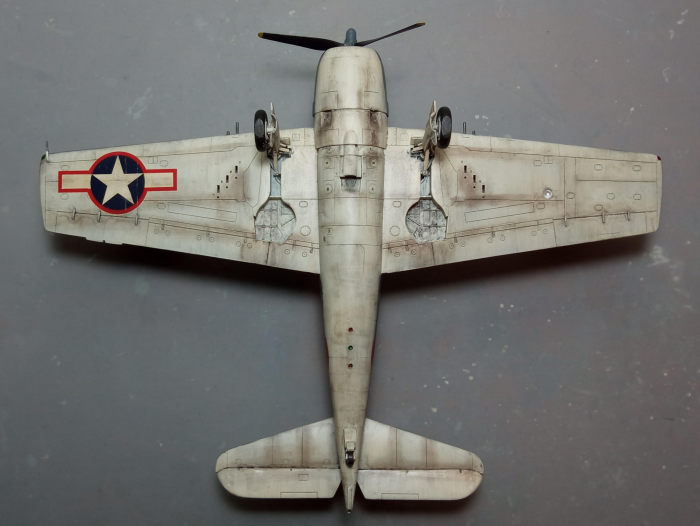 ng
the top halves onto the one piece single half, then affixed the fuselage on top.
The arresting hook was attached at this time, as well. Fit was really nice
everywhere, with some extra attention needed to the rear wing to fuselage
underside joint (likely an operator error).
ng
the top halves onto the one piece single half, then affixed the fuselage on top.
The arresting hook was attached at this time, as well. Fit was really nice
everywhere, with some extra attention needed to the rear wing to fuselage
underside joint (likely an operator error).
The 2-piece horizontal stabilizers were next assembled. I decided to add some
life and separate the elevators by patiently running the back side of my hobby
knife through their hinges. Whereas the separation itself was uneventful, the
corresponding cut surfaces showed some inevitable voids that had to somehow be
filled. To do so, I used liquefied styrene which, while more or less doing the
job, an amount run to the elevators and stabilizers innards, causing some
shrinking that had to be addressed (waiting for the phenomenon to stop, fill,
sand, repeat), so, should you decide to separate the elevators, better treat the
voids with some sort of sheet styrene instead and sand smooth.
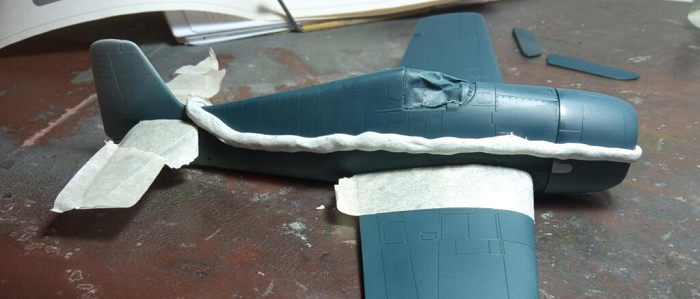
After attaching the horizontal stabilizers, I gave the completed basic model a
filling and sanding round (not that much really, as fit was great), blanked the
interior with a combination of wet tissue and masking tape, temporarily attached
the cowling and took the bird to the paint shop!
| COLORS & MARKINGS |
Reversing all modeling paint rules, I started with the darker color and first gave the top areas a coat of Hu77 (for the Navy Blue) which dried to a nice dark blue shade, then masked it off. I was ready to apply the intermediate blue, when I noticed that I had forgotten to attach the two mini cowling fairings just in front of the exhausts. After attaching them, I applied the intermediate blue using Hu144. For the fuselage demarcation line, I used strings of tac in order to obtain a well defined but not totally “hard” result.
Before proceeding to the underside white, my laziness prevailed and I decided to assemble and attach the main landing gear, together with all doors and the tail wheel, and paint them altogether, since they were all painted with the same underside white, including the wheel wells. Pieces of stretched sprue were suitably attached, to represent brake lines and smaller ones to represent the tiny rods that connect the front larger doors to the main legs.
The oil cooler exit louver was also attached at this time, at a slightly “open” position, as seen at net available pics. Since the oil cooler outlet face itself was provided as a flat section by the kit, I attached a suitably cut piece of mesh on it, to deem the looks more interesting, especially now that it would be more visible due to the louver being attached “open”.
 After
masking the intermediate blue (again, using strings of tac for the demarcation
lines), I went on and applied Hu130 Satin White at all undersides. My long
expired Hu130 supplies meant that the paint dried to an off-white, more like
“ivory” shade, which, in my case, was not a bad thing at all, since it would
match the old style Hasegawa ivory shade the “white” decal sections exhibited!
Upon removing the masks, I retouched a few areas that needed attention and gave
the bird a coat of Future to prepare it for decaling.
After
masking the intermediate blue (again, using strings of tac for the demarcation
lines), I went on and applied Hu130 Satin White at all undersides. My long
expired Hu130 supplies meant that the paint dried to an off-white, more like
“ivory” shade, which, in my case, was not a bad thing at all, since it would
match the old style Hasegawa ivory shade the “white” decal sections exhibited!
Upon removing the masks, I retouched a few areas that needed attention and gave
the bird a coat of Future to prepare it for decaling.
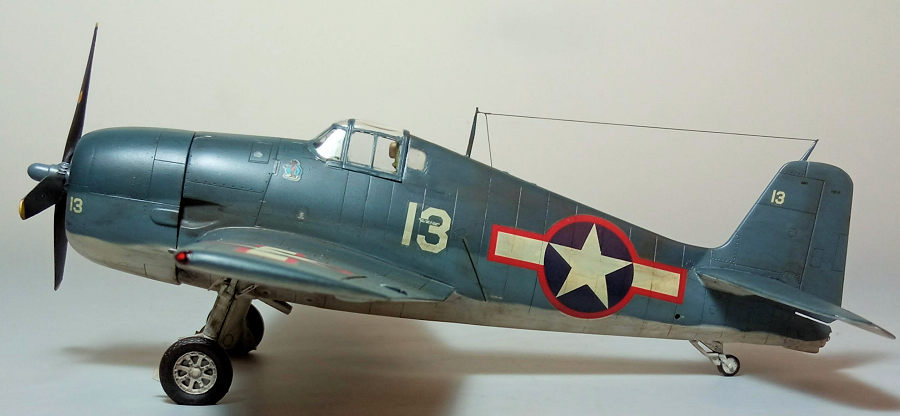
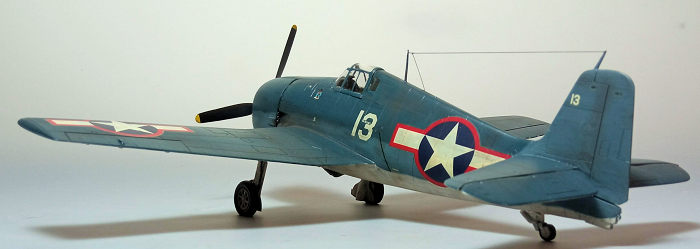
I used the kit decals, in order to represent #13 machine, as it stood on USS
Lexington in December 1943. There is solid information that the specific plane
was assigned to Arthur Payne Whiteway, who served with VF-16 aboard the
Lexington from 1943 until the end of the war, participating in every major naval
action in the Pacific including the great Marianas Turkey Shoot where he scored
a victory over a Zero.
Decals took their time to detach from their backing paper, but behaved adequately, despite being almost 30 years old, adhering well and, with the help of decal softener, succumbing satisfactorily to surface contours. A coat of Future sealed them.
| FINAL CONSTRUCTION |
Finalizing the cockpit, I attached the seat, control stick, gunsight and head cushion (the latter painted “leather”). The wheels were filed to look weighted and, after being painted white with black tires, were attached to the main legs. The brake lines were carefully painted black,as was the rear hard rubber tire whereas the oleos were finished in silver by using my fine tip silver pen. Finally, the elevators were attached at a “drooped” position.
 The nice
looking 4-piece engine was assembled and attached to the cowling. I decided to
add engine wire harnesses from stretched sprue. The cylinders were painted
black, then heavily dry brushed with silver, whereas the crankcase was painted
light gray and the cowling innards Hu226 Interior green. The tiny exhausts had
their ends drilled to look more realistic and, after being painted Testors
Burned Metal, were attached in position, followed by the completed
engine/cowling sub assembly.
The nice
looking 4-piece engine was assembled and attached to the cowling. I decided to
add engine wire harnesses from stretched sprue. The cylinders were painted
black, then heavily dry brushed with silver, whereas the crankcase was painted
light gray and the cowling innards Hu226 Interior green. The tiny exhausts had
their ends drilled to look more realistic and, after being painted Testors
Burned Metal, were attached in position, followed by the completed
engine/cowling sub assembly.
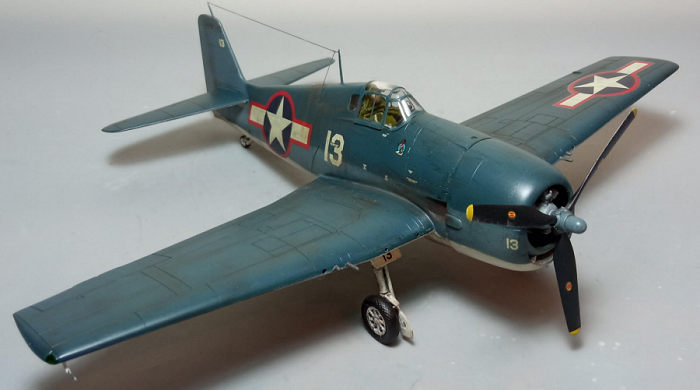
It was then time for some weathering: I started by applying a light black wash at all panel lines, followed by a heavier application at the landing gear, engine and oil cooler exit areas. I continued by applying dark brown/black dry pastels at all areas where dirt, grime or engine staining would accumulate. A final satin coat sealed everything.
The transparencies had their frames hand painted and attached in position, with fit being quite good. The small rear view mirror had beforehand been attached to the windscreen, painted black with “chrome” reflecting area. I decided not to attach the inner front armored glass, as I figured the fit would give me issues and, truth be told, its absence is practically unnoticeable through my closed canopy.
The nice looking prop got intermediate blue hub, black blades and yellow tips. After receiving its blade stencil decals, it had its leading edges dry brushed with silver and finally affixed in position via the famous poly-cap attachment method. I could not resist and applied a few chips and dings on the airframe at that time, but not too many, as the naval ground crew would immediately touch up any suspect areas to protect them from the salty conditions.
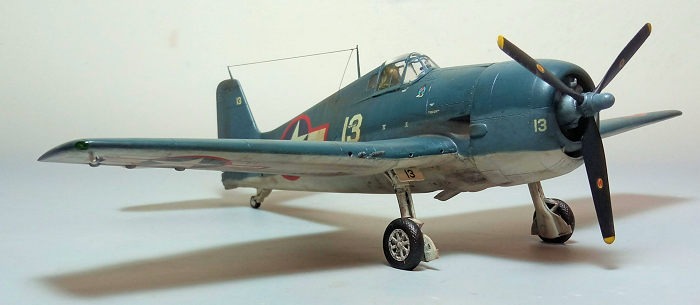 The pitot
was attached, its main body painted white and its tip burned metal, with the
same color used for the guns,which were attached at this time as well. The front
and rear antenna masts were attached, with thin stretched sprue run between them
and also towards a hole opened to the starbard mid-fuselage section, to
represent the aerial wire (actually, the rear mast was molded onto the fin, but
I decisively cut it off at early stages, as it had no chance in surviving my
brutal handling qualities…).
The pitot
was attached, its main body painted white and its tip burned metal, with the
same color used for the guns,which were attached at this time as well. The front
and rear antenna masts were attached, with thin stretched sprue run between them
and also towards a hole opened to the starbard mid-fuselage section, to
represent the aerial wire (actually, the rear mast was molded onto the fin, but
I decisively cut it off at early stages, as it had no chance in surviving my
brutal handling qualities…).
I decided not to use the otherwise distinctive drop tank, as I had observed these birds often not carrying them and I liked those bare Hellcat looks more. The dorsal clear recognition lights were represented by pins of my fine silver pen, followed by tiny blobs of cyanoacrylate. The port underwing landing light housing was painted chrome and had its transparency lens press-fitted. The rest of the lights (wingtip and formation) were accordingly represented by blobs of red, green and amber clear paints, before calling the iconic Hellcat done!
| CONCLUSIONS |
The Hasegawa Hellcats, though now classics, are still great kits: apart from the lower chin “issue” (with its significance varying among us) , their general shapes are unquestionably correct, molding is superb, panel lines are nicely engraved, overall detailing is excellent (the key areas especially included) and transparencies are super as are the instructions. Decals featured the “ivorizing white/ older times Hasegawa” phenomenon, but were otherwise great and, to my understanding, at newer/latest kit versions the decal sheets are correct with the “white” being actually white. The uncomplicated construction and great parts' fit deem this kit ideal even for a beginner who wants to try his skills in 1/48.
Understandably, this 30 year old kit is superseded
by more modern offerings (with the superb Eduard inevitably springing into
mind), but, still, this classic fellow feels definitely at home even today. The
latest reboxing took place in 2015, so, per the Hasegawa trend, it might occur
that we see future releases. In any case, if you have one or find one at a good
price, give it a go: a really fine Hellcat will emerge!
Happy Modeling!
8 August 2023
Copyright ModelingMadness.com. All rights reserved. No reproduction in part or in whole without express permission.
If you would like your product reviewed fairly and fairly quickly, please contact the editor or see other details in the Note to Contributors.