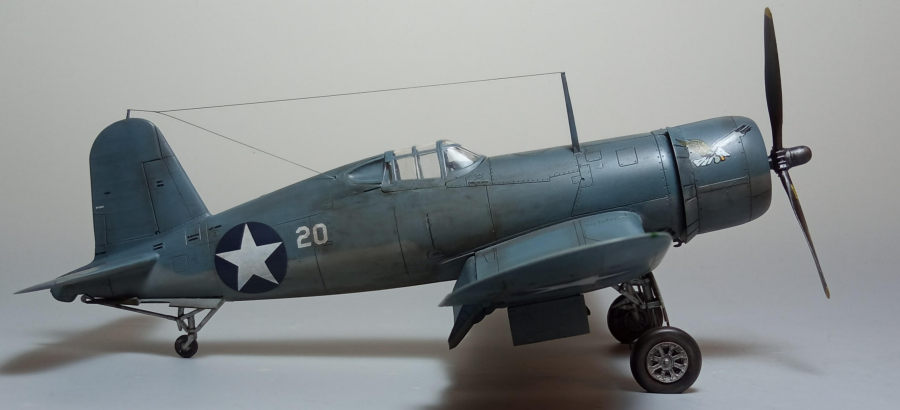
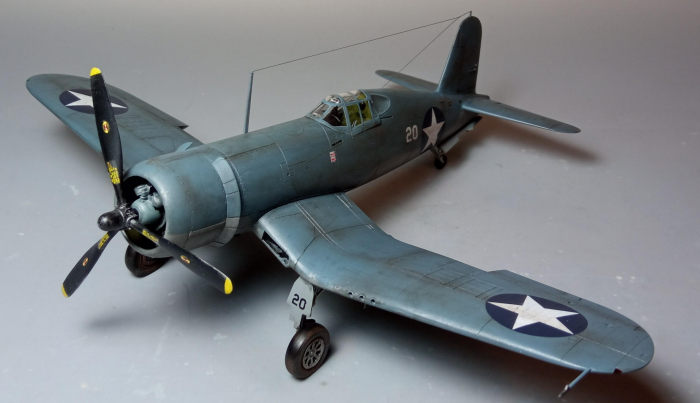
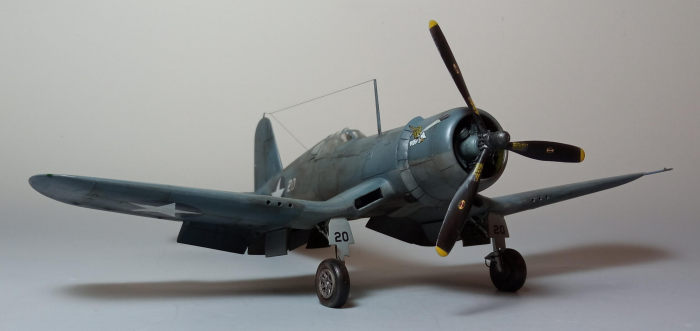
Tamiya 1/48 F4U-1 Corsair
| KIT #: | 61046 |
| PRICE: | Around €20 |
| DECALS: | Four options |
| REVIEWER: | Spiros Pendedekas |
| NOTES: |
| HISTORY |
Marine Fighting
Squadron 213 (VMF-213) was formed on July 1, 1942 at Marine Corps Air Station
Ewa, Hawaii and was a reserve fighter squadron in the United States Marine
Corps. The squadron left Ewa on February 21, 1943 and arrived at Espiritu Santo
on March 1, receiving their first F4U Corsairs a few days later. Nicknamed the
"Hell Hawks", VMF-213 fought during World War II in the Philippines and at the
battles of Iwo Jima and Okinawa. With its assignment to the USS Essex
 (CV-9) and
Air Group 4, along with VMF-124, it was one of the first two Marine squadrons to
augment carrier air groups during World War II.
(CV-9) and
Air Group 4, along with VMF-124, it was one of the first two Marine squadrons to
augment carrier air groups during World War II.
In mid-1943, the squadron harmonized the six .50 inch wing guns of their Mk I Vought F4U Corsairs to converge to a point 300 ft ahead. Their usual tactic was to dive upon an enemy from the front and slightly to one side (a high-side attack using full deflection) and fire when at the convergence distance. The squadron was credited with downing 117 enemy aircraft during the war.
On July 17, 1943, VMF-213 was tasked with escorting a flight of TBF Avenger bombers in a strike against Japanese naval forces at Kahili, Bougainville. An estimated thirty Zeros swooped in on the Americans over the target. Four of them jumped onto the tail of F4U-1 #02421, flown by First Lieutenant Foy "Poncho" Garison. Within seconds, the plane's wing tanks caught fire, and it crashed into the sea, with “Poncho” not seen attempting to flee before the Corsair vanished from view. Lieutenant Garison was declared dead on July 18, 1944.
| THE KIT |
 This
is the first kit of the quarter scale F4U family that Tamiya decided to treat us
with from as early as 1996, a really nice kit that has become a classic through
the years. For a more detailed look at this fine kit’s contents, as well as a
short history of the F-4U Corsair, you may read the preview here.
This
is the first kit of the quarter scale F4U family that Tamiya decided to treat us
with from as early as 1996, a really nice kit that has become a classic through
the years. For a more detailed look at this fine kit’s contents, as well as a
short history of the F-4U Corsair, you may read the preview here.
The specific kit was the initial release, bought around 2005 from a (sadly now
closed - a sign of the times) toy/hobby shop of Chalkis, my hometown. Spending
almost 20 years in my Shelf of Doom, it lately was pulled out, with the build
sneaking in between some of my in progress more complicated builds, in order to
re-boost my mojo (few things can be greater modeling mojo boosters than the
easily buildable quarter scale WWII single engine Tamiya kits).
| CONSTRUCTION |
Though not as uncomplex
as, say, the Tamiya 1/48 Spitfire Vb, the kit is certainly an effortless build,
easily qualifying for the classic Tamiya “throw glue and paint in the box, shake
and bake” trend.
For the record: I started by putting together the well appointed cockpit, then
trapped it between the fuselage halves. Basic cockpit color was Hu226 interior
green, with instrument panel, console faces, stick and other levers grips,
various “boxes” and front anti glare area painted black. The nice instrument
decals were affixed onto the instrument panel and succumbed onto it with the use
of decal softener. For the seat belts, I decided to use the decal provided as it
looked quite nice, though the two-dimensional effect will be tad noticeable,
even under my usual “closed canopy” preference. A black wash and some judicious
silver dry brushing at “rubbing” areas concluded cockpit assembly, which indeed
looks very nice out of the box (OOB).
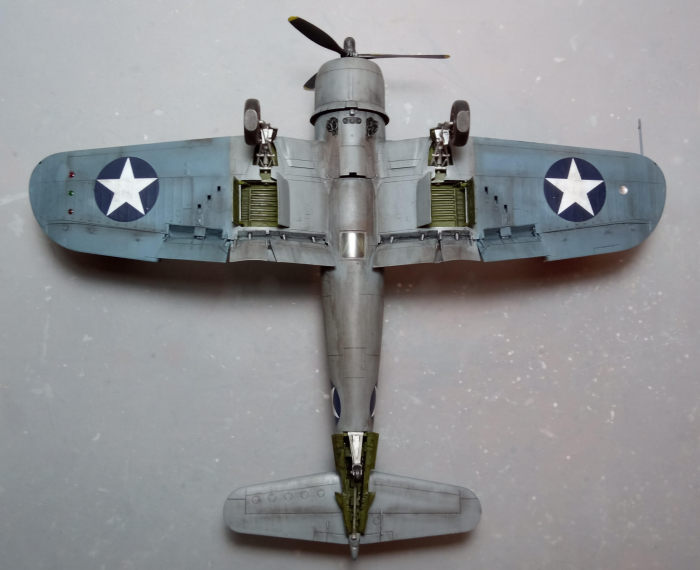
I continued by assembling the central wing section, an 8-piece affair including
the bays’ front walls and oil cooler inlets, then the whole sub assembly was
attached underneath the fuselage. The outer wings were also assembled and
attached at “unfolded” position, followed by the tail planes and the two curved
panels aft of the pilot’s headrest. Fit was excellent all over.
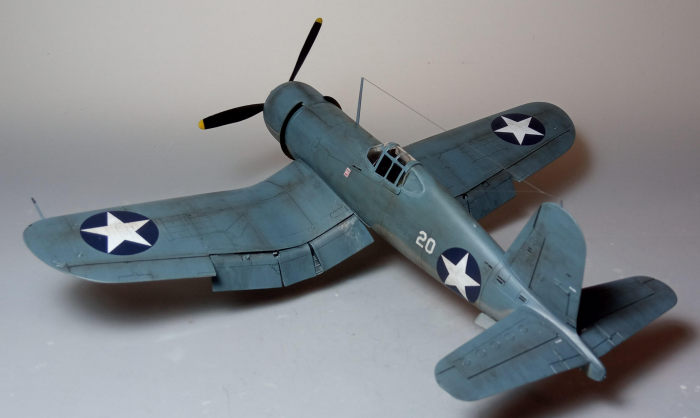 The six
2-piece flaps were assembled but not attached. The kit supplied starboard inner
flap features a small cut-out rectangular area right in the middle of it. Since
this “configuration” was implemented after the war, the cutout was filled by
“securing” a styrene piece of appropriate thickness with liquefied styrene into
the void, filling and sanding smooth.
The six
2-piece flaps were assembled but not attached. The kit supplied starboard inner
flap features a small cut-out rectangular area right in the middle of it. Since
this “configuration” was implemented after the war, the cutout was filled by
“securing” a styrene piece of appropriate thickness with liquefied styrene into
the void, filling and sanding smooth.
Moving onto the nice engine, I glued the two cylinder rows, then attached the
front casing with the poly cap trapped in. I decided to add ignition wires made
from stretched sprue. The rear firewall with the nice molded exhausts had the
cowling flaps ring attached to its back and the engine at its front, followed by
the one-piece cowling. This completed the engine assembly, which presented fine
looks. Cylinders were painted black, then heavily dry brushed with silver. The
crankcase was painted light blue gray, the magnetos, together with the firewall
front face were painted black, whereas all other innard areas were painted Hu226
interior green. The exhausts were painted with Testors Burned Metal. I chose the
open cowling flaps option, as it had been the normal stance, let alone the fact
that the nice molded exhausts are visible.
I then gave the bird a filling round. Only a very small quantity of filler was
used, mainly at the inner/outer wing joints. Had I been more careful, possibly
no filler at all would have been necessary. After a final 1500 grit sanding, I
blanked the cockpit, bays and engine openings with wet tissue and some masking
tape and took the bird to the paint shop!
| COLORS & MARKINGS |
 I first gave
all undersides, including the inner wing flaps and gear doors a coat of a
leftover Molak 1126 that dried to a nice medium gray shade, then masked it off.
Since the camo line at the fuselage and cowling is not hard, I used Tak/Patafix,
whereas for the inner/outer wing underside hard demarcation line I used normal
masking tape. For all topsides and also outer wing undersides, I sprayed a coat
of Hu144 Intermediate Blue. Upon removing the masks, I gave the bird a coat of
Future, in order to prepare it for decaling.
I first gave
all undersides, including the inner wing flaps and gear doors a coat of a
leftover Molak 1126 that dried to a nice medium gray shade, then masked it off.
Since the camo line at the fuselage and cowling is not hard, I used Tak/Patafix,
whereas for the inner/outer wing underside hard demarcation line I used normal
masking tape. For all topsides and also outer wing undersides, I sprayed a coat
of Hu144 Intermediate Blue. Upon removing the masks, I gave the bird a coat of
Future, in order to prepare it for decaling.
I used the kit decals, done by Scalemaster, which behaved very well: they
detached from their backing paper effortlessly and, with the help of decal
softening solution, succumbed onto the surface details. No apparent silvering
was noted. Once again, thumbs-up Scalemaster and Big Thanks to (much missed)
owner Lloyd Jones. A coat of Future sealed the decals.
A side note to decaling: though not stated at the instructions and no pictorial
evidence of the specific bird’s port side was found, since “Poncho“ had been
credited with two kills by that time, I took the initiative and added two
“kills” to the port fuselage side, by cutting the kit-provided “five kill” decal
for Lt.James A. Halford’s 17-F-13 bird.
| FINAL BITS |
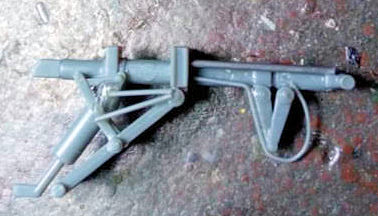 The
landing gear legs were assembled and attached, followed by the wheels and gear
doors. Tamiya neither provides brake lines nor the small rods found at the real
thing. These were all fabricated from stretched sprue. The wheels were filed for
weighted looks, as I figured out that lower tire pressures from the ones used at
carriers were not that uncommon for those Solomon Corsairs operating from the
mainland.
The
landing gear legs were assembled and attached, followed by the wheels and gear
doors. Tamiya neither provides brake lines nor the small rods found at the real
thing. These were all fabricated from stretched sprue. The wheels were filed for
weighted looks, as I figured out that lower tire pressures from the ones used at
carriers were not that uncommon for those Solomon Corsairs operating from the
mainland.
Legs were painted “steel” with silver oleos and black brake lines, wheels had
black tires and steel external rims, whereas their inner drum housings were
painted black and heavily dry brushed with silver. Bays and door innards were
painted with the same Hu226 interior green, a choice not claiming full
credibility, as yellow zinc and even salmon pink are candidates there.
All flaps were attached, adding very interesting looks. The kit provided
exhausts, while not bad, did not seem to resemble the curvy and, to a degree,
uneven looks that I would observe in pics, so I fabricated six tubes from a
plastic hollowed cotton swab stem, by cutting them at an angle and squeezing
them to become oval. They were attached in position with a mix of cyanoacrylate
glue and liquefied styrene and were painted Testors burned metal.
I only selected to attach the smell ordnance hook aft of the engine cowling: you
can either add this or the bomb with its pylon, but NOT the external tank
(though it is stated at the instructions), since the kit provided tank is a late
type, not carried from the Solomon Corsairs (thanks to Tom Cleaver for pointing
this out).
It was then time for some weathering. I started by applying a black wash all
over (to bring out all engraved detail), heftier at places where oil or grease
would accumulate (like the bays and engine). I then went on applying brown and
black dry pastels at all areas where dirt, grim or even engine staining would be
evident. As Tom stated, one can never weather too much a Solomon Corsair, so I
did not restrain myself at all! Some silver was also dry brushed at mainly the
wing roots and inner flaps, where the personnel would frequently step.
 The prop was
painted black with equally black hub and yellow tips. Its leading edges, as well
as the hub, were dry brushed with silver. I could not resist and added the blade
stencils, hoping that my bird had not flown for too long, so they would have
still been in position. An almost matt coat gave the bird its final finish.
The prop was
painted black with equally black hub and yellow tips. Its leading edges, as well
as the hub, were dry brushed with silver. I could not resist and added the blade
stencils, hoping that my bird had not flown for too long, so they would have
still been in position. An almost matt coat gave the bird its final finish.
The gun sight had its base painted black and attached. The excellent
transparencies had their well defined frames hand painted and also attached,
presenting an almost perfect fit. Whereas the belly mounted downward view
transparency, subjected to underside dirt, engine oil and the like, was, in many
cases and from a point onwards, painted over, I elected to leave it unpainted
and just weather it with dry pastels, in order to obtain a dull, dirty look.
The front big mast was attached, as well as the fin located tiny one, the latter
being fabricated from a piece of stretched sprue, as the original molded with
the fin would by no means survive Yours Truly's brutal sanding practices… To
represent the aerial wires, thin stretched sprue was run between these two
masts, as well from the fin one towards a (nicely protruding and off-sided to
the right) point aft of the canopy, .
All lights, including the underside starboard wing mounted identification ones,
were replicated with respective blobs of red, green and amber clear paint. Two
small lights are molded on wing outer top areas, which, at some pics are clearly
visible whereas at some others are not, possibly been faired over. I decided to
replicate them by pinning a silver dot in their middle and filling the
surrounding area with Clearfix. Finally, the port underside landing light had
its innards painted silver and its clear lens attached, before calling
“Poncho’s” bird done!
| CONCLUSIONS |
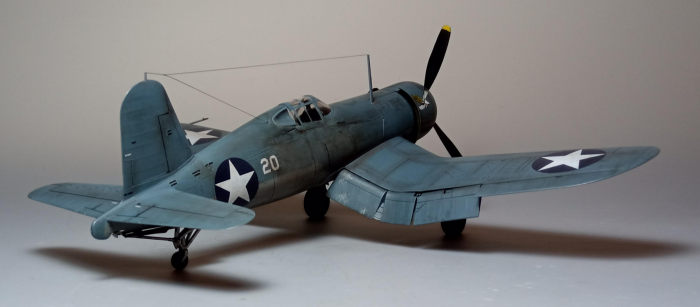
Though nowadays (2023)
a classic, you cannot really go wrong with a Tamiya 1/48 Corsair. General shape
is correct, molding is superb, as are the details provided, instructions are
clear, construction is uncomplex, fit is superb and decals are excellent. Even
out of the box an imposing model will emerge, while ample room is left for the
super detailer wishing to deal with key areas.
Tamiya has to be congratulated for coming up with such a contained kit from as
early as 1996, which, per the company’s very welcome tradition, is reissued from
time to time with exactly the same boxing, parts and decals (only the latter
being freshly printed) and offered at really sensible, if not low prices.
If you own or come across one and fancy building a bird cage Corsair, do not
hesitate to grab and immediately build it: 100% Satisfaction Guaranteed!
Happy modeling!
Spiros
Pendedekas 10 March 2023 Copyright ModelingMadness.com. All rights reserved. No
reproduction in part or in whole without express permission. If you would like your product reviewed fairly and fairly quickly, please
contact
the editor or see other details in the
Note to
Contributors.