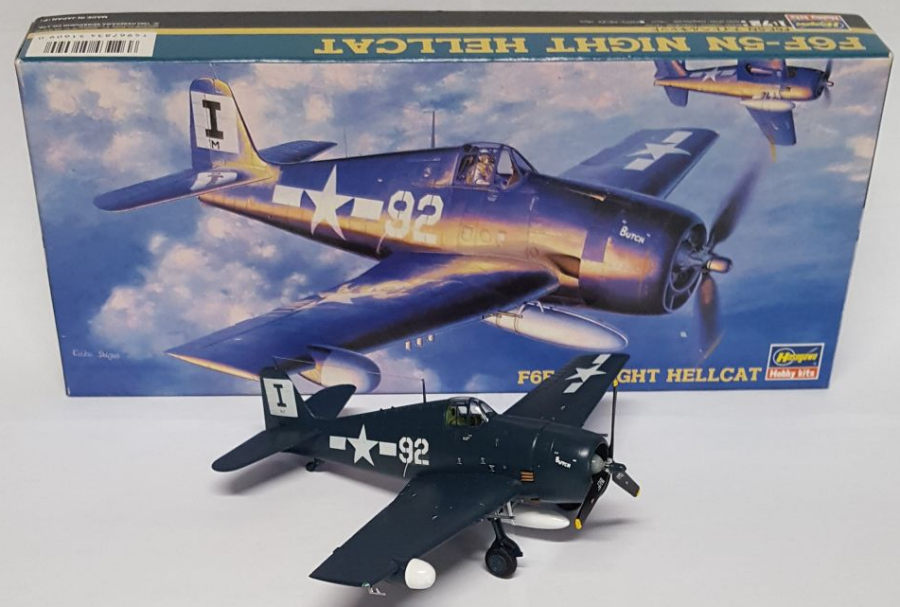
Hasegawa 1/72 F6F-5N Night Hellcat
| KIT #: | 51609 (SP109) |
| PRICE: | ~$10-20.00 'used' |
| DECALS: | Three options |
| REVIEWER: | Chris Mikesh |
| NOTES: | Superscale 72-735 decals |
| HISTORY |
(From the Instruction Sheet): On the Pacific front during World War Two,
Japanese and American forces fought numerous night air battles late in the war.
It was extremely difficult to locate and identify aircraft targets at night from
another aircraft, so the US Navy developed the F6F-3 into the F6F-E/N night
fighters, by adding the AN/APS-4 radar system to a pod on its right wing. 18
 F6F-3E’s
were produced and it was able to detect aircraft at a distance of approximately
6 kilometers (~3.7 Miles). The radar was not very sophisticated or reliable and
after the improved AN/APS-6 became available, 200 F6F-3N Hellcats were produced
using it. Better night fighting instruments, non-reflective canopy glass and
windscreen were also added to the F6F-3N. The F6F-5E/N Hellcats were used by
both the US Navy and Marines, and it was a more powerful opponent, with 2,
20-millimeter cannons and 4, .50 caliber machine guns. The red lighted
instrument panel retained the pilots night vision, and some aircraft had exhaust
flame hiders and 20 millimeter cannon flash suppressors. A total of 1,434
F6F-5/EN’s were produced during May 1944 to 1945. Although the radar pod reduced
top speed a little, it still had a fantastic rate of climb, and the night
fighting Hellcats were assigned to operate from Leyte Island in the Philippines,
replacing the Northrop P-61 Black Widows, stationed there. The early F6F-3/N
Hellcats proved the concept and success of night fighting in the Pacific theater
during the conflict.
F6F-3E’s
were produced and it was able to detect aircraft at a distance of approximately
6 kilometers (~3.7 Miles). The radar was not very sophisticated or reliable and
after the improved AN/APS-6 became available, 200 F6F-3N Hellcats were produced
using it. Better night fighting instruments, non-reflective canopy glass and
windscreen were also added to the F6F-3N. The F6F-5E/N Hellcats were used by
both the US Navy and Marines, and it was a more powerful opponent, with 2,
20-millimeter cannons and 4, .50 caliber machine guns. The red lighted
instrument panel retained the pilots night vision, and some aircraft had exhaust
flame hiders and 20 millimeter cannon flash suppressors. A total of 1,434
F6F-5/EN’s were produced during May 1944 to 1945. Although the radar pod reduced
top speed a little, it still had a fantastic rate of climb, and the night
fighting Hellcats were assigned to operate from Leyte Island in the Philippines,
replacing the Northrop P-61 Black Widows, stationed there. The early F6F-3/N
Hellcats proved the concept and success of night fighting in the Pacific theater
during the conflict.
| THE KIT |
Issued in 1993, this kit
is typical of many Hasegawa offerings, and it is a beauty! The model breaks down
into common components; wing halves, fuselage halves, cockpit, engine, and
landing gear. As this kit is considered a “Special”, it has additional parts and
decals to make the
 unique
version. In this case the radar pod on the wing, 20mm cannons, instrument panel
(with radar) and canopy.
unique
version. In this case the radar pod on the wing, 20mm cannons, instrument panel
(with radar) and canopy.
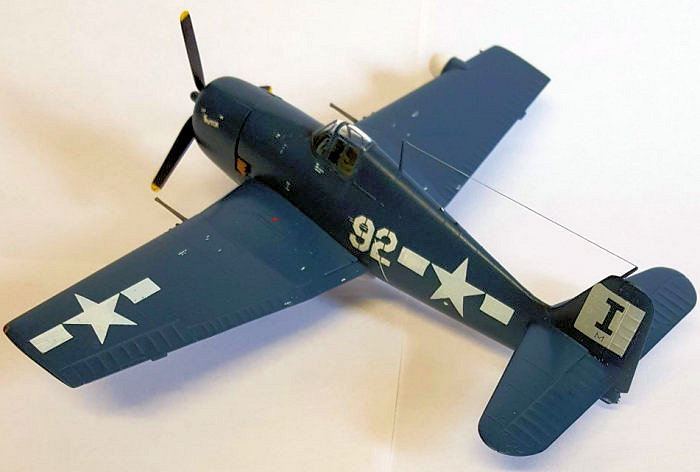
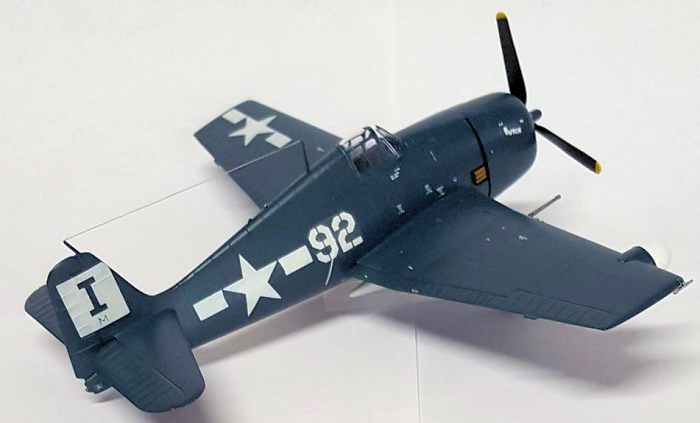
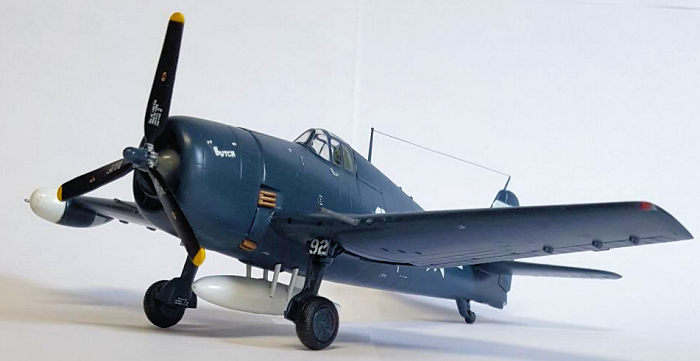
Most panel lines are raised, but very fine that adds to the scale view. In other words, they are not a 2-inch trench by scale. Hasegawa did an excellent job with the amount of detail that does not over power the end result.
The instructions are what we often come to expect from Hasegawa; well-illustrated and broken down into the aforementioned components for a painless build. Painting is well noted using Gunze Sangyo or Mr. Color references. Finally, the decals offer 3 versions. VMF(N)-511 US Marines, VF(N)-41 Navy, and VC-3 (circa 1959) US Navy. The provided decal sheet is crisp with a lot of stenciled details and 2 optional national markings depending on the year or Squadron you depict.
| CONSTRUCTION |
Again, the construction is straight forward. Start with the cockpit and put in all the details you can. Typical of Hasegawa in the early 90’s, the details are provided by decal, but is not a negative distraction. There are many things missing from the cockpit, so if you have an interest in super detailing the interior, I recommend a resin and photo etched interior. In my case, I only added seatbelts.
One complication I experienced were that the decals for the interior were very brittle (30-year-old decals) and thin. When using these tiny decals, it was very easy for them to not stick, and blow away or break. I needed to glue them down with thinned Elmer’s glue (dries mostly clear).
 The fuselage
went together easily, and all the pins lined up perfectly. Once glued, I
discovered that only sanding the seams was necessary. I did not need any putty
to refine the seams. All I needed to pay attention to was re-scribing the panel
lines and taking care not to break off the antennae on the top of the rudder as
well as details on dorsal spine.
The fuselage
went together easily, and all the pins lined up perfectly. Once glued, I
discovered that only sanding the seams was necessary. I did not need any putty
to refine the seams. All I needed to pay attention to was re-scribing the panel
lines and taking care not to break off the antennae on the top of the rudder as
well as details on dorsal spine.
My kit had slightly warped wings but were not a problem. Clamps held everything together as I glued the wings. However, I discovered a huge gap at the wing root to the fuselage. Once the wing was glued to the fuselage and cured, I simply added a piece of sheet stock in the gap, and trimmed once cured. Problem solved.
Most notable on this kit is the AN/APS-6 radar dome on the wing. Scott Van Aken reviewed this model many years ago. He also noted that the radar was not up to Hasegawa standards, being a rough fit and also not round. Prepared for this, I put extra time in the dome before gluing onto the plane. But sadly, it still is an awkward fit.
No other assembly issues were experienced. The momentum kept up all the way to the painting. I knew this was going to be a nice model when completed, so I slowed down to avoid mistakes by rushing this project to completion.
| COLORS & MARKINGS |
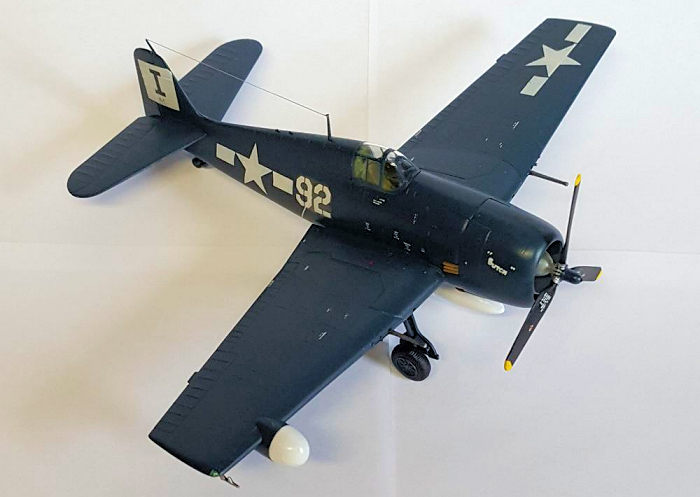
Tamiya AS-8 Spray Navy Blue was the primary paint used on this plane. My confidence in Tamiya paints is not unfounded. It laid down perfectly at every angle, and is very forgiving if you put down too much or are too close. Notable also is the white drop tank. I though it peculiar for a night fighter. Several coats of Tamiya Gloss White were airbrushed on to cover over the gray color of plastic (same with radome).
 Decals were a
nightmare. I’m glad I was not the only one having trouble with those decals.
Scott noted the decals self-destructed on impact with water. After putting on a
decal saver, it barely helped, and a second layer of decal saver did not save
the decals. The one decal I managed to get on the plane was very opaque. Don’t
waste your time on them.
Decals were a
nightmare. I’m glad I was not the only one having trouble with those decals.
Scott noted the decals self-destructed on impact with water. After putting on a
decal saver, it barely helped, and a second layer of decal saver did not save
the decals. The one decal I managed to get on the plane was very opaque. Don’t
waste your time on them.
I paid $5 for the model at an IPMS convention. The Super Scale decals are also discontinued (72-735). I paid more for the decals than the kit, not including $10 shipping from Canada. But, it saved the model from being permanently shelved.
I can hear ‘Marvin the Martian’ muttering “..details, details, details…”. But in this case, the details make the difference. An all blue airplane can be boring, but the stencils, stripes, and markings will give the depth needed to make this plane more presentable. You won’t regret it. A quick coating of future over all, and after it cured, I added a blast of Semi-Gloss spray from Mr. Super Clear aerosol over all.
There isn’t much left except all the “break-off” parts like the antennae, landing gear, doors, and cannons. A quick dip in future for the canopy to make it very clear also makes a big difference. I added the stretched sprue radio wire.
| CONCLUSIONS |
On a scale of 1-10, I’m going to give it a 9 and recommend this model. The only problem I see is the Radome and decals. If you can replace them or find a way to improve them, I’d suggest you consider it. It is an easy model to make, painting is not a problem, and fills a niche in your night fighter collection.
No fingers were detached in the construction of this model.
Constructive comments are always welcome.
June 2023
Copyright ModelingMadness.com. All rights reserved. No reproduction in part or in whole without express permission.
If you would like your product reviewed fairly and fairly quickly, please contact the editor or see other details in the Note to Contributors.