| KIT #: | 70031 |
| PRICE: | €23.53 SRP |
| DECALS: | Six options |
| REVIEWER: | Dan Lee |
| NOTES: | Includes photo etch parts. |
| HISTORY |
Despite being considered obsolete, the US Navy found they needed the Wildcat for escort carrier composite groups because they could take off on the shorter escort carrier flight decks without need for a catapult and had a lower landing speed than the Hellcat.
The FM-1 and FM-2 were
different than the F4F-4s they replaced. Despite being virtually the same as the
F4F-4, the FM-1 had the four gun configuration of the F4F-3 addressing a Navy
complaint about the six gun configuration (both the four gun and six gun wings
had the same amount of ammo so reducing the number of gu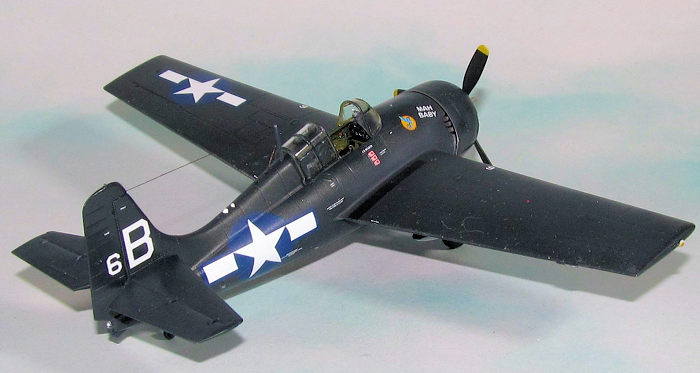 ns increased the total
firing time) and adding the ability to fire rockets. The FM-2 had a more
powerful engine and taller tail to deal with the torque.
ns increased the total
firing time) and adding the ability to fire rockets. The FM-2 had a more
powerful engine and taller tail to deal with the torque.
The Squadron
VC-10 aka Composite Squadron 10 was assigned to the USS Gambier Bay in April 1944. Known as the Mallards, this composite unit of Wildcats and Avengers flew relatively “uneventful” close air support missions and anti-sub patrols for Taffy-3 aka Task Unit 77.4.3, the 3rd squadron of escort carriers assigned to the 7th Fleet till the fateful day known as the Battle Off Samar.
Both their worst and finest hour, Taffy-3 would end up fighting for their lives to protect the troop and cargo ships from the bulk of the Imperial Japanese Navy Battlefleet. The fierce attacks of their escorts and air strikes from their air groups (who didn't have the weapons or training to attack battleships) stopped the IJN from turning Halsey's blunder into total disaster. Among the ships lost was VC-10's home base, the Gambier Bay.
Most of VC-10 were sent home after the sinking of the Gambier Bay while the rest were transferred to other units. The squadron was being rebuilt in California when the war ended. Another VC-10 known as the “The Challengers” was formed in the Cold War and assigned to Guantanamo Bay. This 2nd VC-10 was disestablished in 1993.
| THE KIT |
 Arma Hobbies has been
around only for a few years, but made a name for themselves designing highly
detailed, relatively easy to build 1/72 kits of WW2 fighters with detail
approaching 1/48 scale. The FM-2 expert version of the kit comes on two sprues
of grey plastic and one sprue of clear parts as well as canopy, window and wheel
masks made from Japanese style Kabuki tape and one fret of photoetched parts.
There are decals for the interior bits and for six different planes.
Arma Hobbies has been
around only for a few years, but made a name for themselves designing highly
detailed, relatively easy to build 1/72 kits of WW2 fighters with detail
approaching 1/48 scale. The FM-2 expert version of the kit comes on two sprues
of grey plastic and one sprue of clear parts as well as canopy, window and wheel
masks made from Japanese style Kabuki tape and one fret of photoetched parts.
There are decals for the interior bits and for six different planes.
The plastic parts have pretty good detail and very little flash, however I found that sometimes the parts are too fine and need to be carefully cut off the sprue tree or you will break them.
| CONSTRUCTION |
It all began with the interior parts. The FM-2 Wildcat doesn't have a simple interior that you can slap together. Due to the wheel well/engine compartment and cockpit, you have to do a lot of parts painting first. I added as many of the PE cockpit parts to the interior first including the chain/wheel mechanism for extending and retracting the landing gear.
 The cockpit itself was
painted interior green (Xtracrylix) while the interior wheel well was painted
light grey Tamiya XF-80 (as an approximation of Grumman grey.) Next the fine
detail parts were painted using a fine tipped brush as per instructions.
The cockpit itself was
painted interior green (Xtracrylix) while the interior wheel well was painted
light grey Tamiya XF-80 (as an approximation of Grumman grey.) Next the fine
detail parts were painted using a fine tipped brush as per instructions.
Next up the interior decals had to be added. It was around this time that my close up eyesight started going wonky and had to do this sans glasses so this was not as easy.
The various interior bits were added. One thing to be extremely careful about is positioning the interior parts of the landing gear. Make sure they are in the correct position or you will be having a difficult time adding the landing gear. How do I know? Well, read on to find out.
The rest of the plane went together quickly (external seams glued with CA glue and internal connections glued with Tamiya extra thin.) One thing is follow the sequence laid out in the instructions for the tail. I left off the engine and the cowling to add later. The canopy was masked off and kept separate from the rest of the model.
| COLORS & MARKINGS |
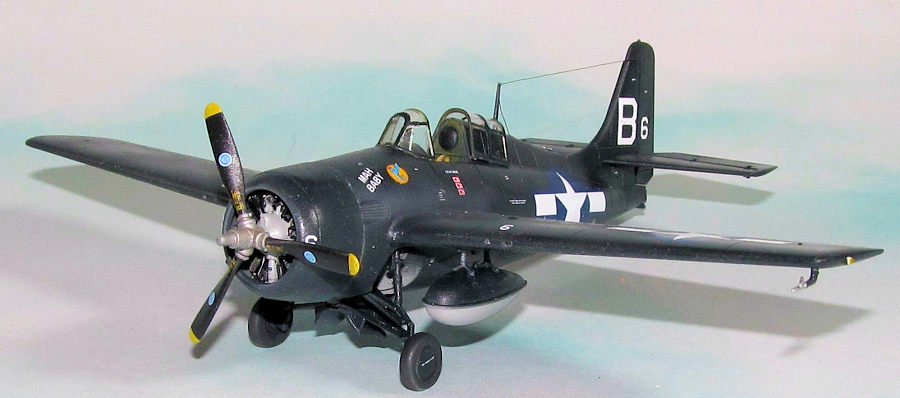
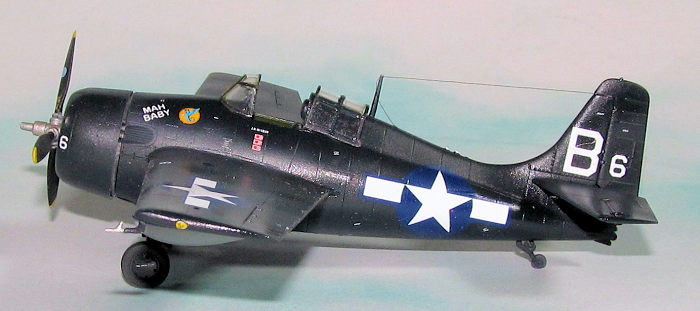
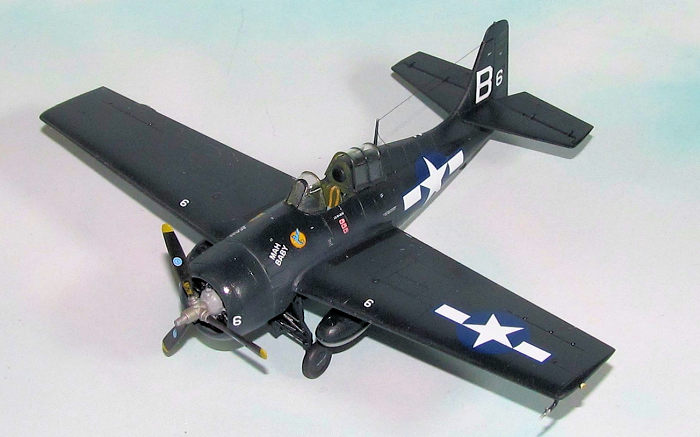
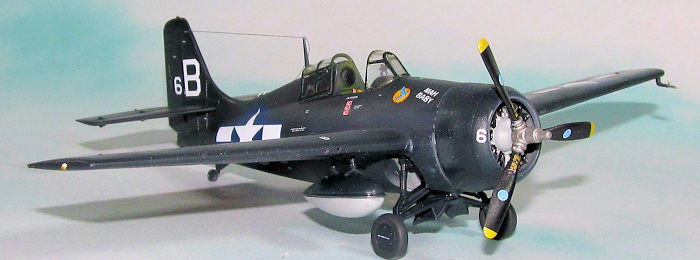
I picked the VC-10 scheme “Mah Baby” because I wanted to build a Glossy Sea Blue Wildcat so this checks off that box on the model building list (if and when Eduard releases their 1/48 scale FM-2, I will probably build a RN version.)
The model was stuffed with cut sponges to fit into the various orifices and painted using Xrtracrlyix GSB. It turns out that Xtracrylix GSB is a pretty easy to use paint. Sprays on nice and reasonably smooth mixed with 10% isopropyl alcohol or their thinner and it stays on without need for primer. I just sprayed it on without any additional prep work. Areas that were a little rough or had overspray were gently polished the next day using various grit of polishing cloths, cleaned up and painted again with a thin coat of paint.
 The canopy was painted
first interior green, then neutral grey and then GSB. If you're wondering why I
sprayed on the neutral grey it allows the canopy to stay relatively the same
shade as the rest of the plane as I have found GSB over interior green gives it
a slight but noticeable difference in color.
The canopy was painted
first interior green, then neutral grey and then GSB. If you're wondering why I
sprayed on the neutral grey it allows the canopy to stay relatively the same
shade as the rest of the plane as I have found GSB over interior green gives it
a slight but noticeable difference in color.
The wheels were masked off and painted. I used Tamiya German Grey XF-63 for the tires. The fuel tanks were painted top half GSB and the bottom half XF-80 as per the painting structions.
Finally the prop was painted Stynylrez black primer. The tips were masked off then sprayed flat white and then flat yellow (XF-3). Next the prop hub was masked off and sprayed Vallejo Metalcolor White Aluminum.
The Arma decal went on without too much trouble. Again, the benefit of mostly white (but very tiny) decals on a dark background (GSB) really helped here.
I sprayed on a thin coat of flat black from the exhausts to show some use. It can be barely seen on the GSB paint, but it is there. I didn't really add anything else as the color doesn't allow for much else. I did wipe the decal solution off before spraying the final coats. I first sprayed on Vallejo Acrylic Gloss. When it was dry I went over the topside areas with a light coat of Vallejo flat to show weathering.
| FINAL CONSTRUCTION |
The cowling and various
painted tiny parts were added without much trouble. Meanwhile the landing
gear was just as fiddly as the Tamiya F4F-4 Wildcat which means it is the
design not so much the model makers. It turns out I didn't glue the interior
landing gear parts enough and they fell out as I was trying to jam the
 rest
of the landing gear in. An hour later, I was still scratching my bald head
trying to figure out how to put the landing gear in without wanting to smash
the rest of the nice model I had built.
rest
of the landing gear in. An hour later, I was still scratching my bald head
trying to figure out how to put the landing gear in without wanting to smash
the rest of the nice model I had built.
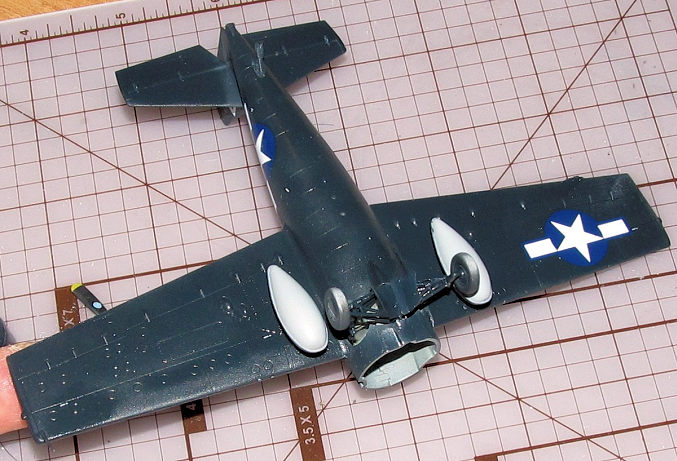
It turns out that you have to align the exterior strut pieces (A11 and A12) so that they touch as mentioned in the instructions (which for some reason I ignored or didn't notice.) Once they touch you can use that to bend A18 into the correct angles. I ended up using small dabs of CA glue to hold everything in place. I also found I had to deepen the groves that the subassembly A11/A12 sit on so they sit according to the instructions.
I then gently slid the landing gear assembly into the grooves and that was it (the attachment points were pre glued with Tamiya extra thin.) The rest tiny details went together easily after that and I was done.
| CONCLUSIONS |
The Arma Hobbies kit hype is real. I enjoyed (minus the landing gear) building this 1/72 kit. They are fun and quite detailed (the cockpit is almost 1/48 scale detail wise.) It was proved to be a much easier build (less than 3 weeks from start to finish) than from what I read about the 1/48 Hobby Boss FM-2 kit with Vektor Upgrade set or the even more difficult limited run Sword kit.
This is a fun kit worth its price.
3 July 2023 Copyright ModelingMadness.com. All rights reserved.
No reproduction in part or in whole without express permission. If you would like your product reviewed fairly and fairly quickly, please
contact
the editor
or see other details in the
Note to
Contributors.