| KIT #: | 03955 |
| PRICE: | $10.00 |
| DECALS: | One option |
| REVIEWER: | Cliff McNutt |
| NOTES: | Stand model |
| HISTORY |
 First
entering service in 1942, the F4U corsair showed its worth almost immediately.
Proving more than capable of knocking down whatever the Japanese threw at it,
taking some hits, and still getting its pilot home in one piece. The type
remained in production until 1952, and earned a formidable reputation as an
excellent ground pounder and night fighter during the Korean war. One corsair
even shot down a Mig-15, the only prop to jet kill of the war.
First
entering service in 1942, the F4U corsair showed its worth almost immediately.
Proving more than capable of knocking down whatever the Japanese threw at it,
taking some hits, and still getting its pilot home in one piece. The type
remained in production until 1952, and earned a formidable reputation as an
excellent ground pounder and night fighter during the Korean war. One corsair
even shot down a Mig-15, the only prop to jet kill of the war.
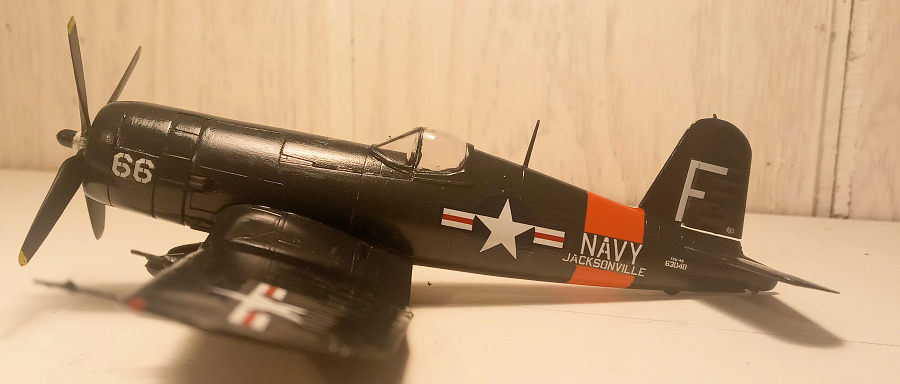
This particular Corsair is of the same variant as the notorious Mig killer, an F4U-4B. This version is significant also in the fact that it replaced the rather dated original armament of previous versions(6 50.cal machine) with a much more modern solution, 4 20mm cannon. Corsairs also served with France in large numbers, and were involved in a shooting war as late as 1969, during the ‘football’ war, when they were flown by Honduras and El Salvador.
| THE KIT |
This is one of Revell’s newer releases,coming out in 2014. Upon removing the kit from the box, one is confronted with a very nice set of instructions and paint guide, all of which are printed in full color. There is also a separate sheet of paper listing all the possible ways that one can die from modeling in every imaginable language, as well as containing the decal sheet in its folds. The decal sheet is unremarkable, but still very nicely done with one option for a Navy reserve plane.
The parts are nicely molded, coming in four sprues of grey plastic and one clear. They have engraved panel lines and good detail. You have the option of either building the kit with the 50. Cal machine guns, or the 20mm cannon. The manual does not list retracted gear as an option, but this does not mean it cannot be done.
| CONSTRUCTION |
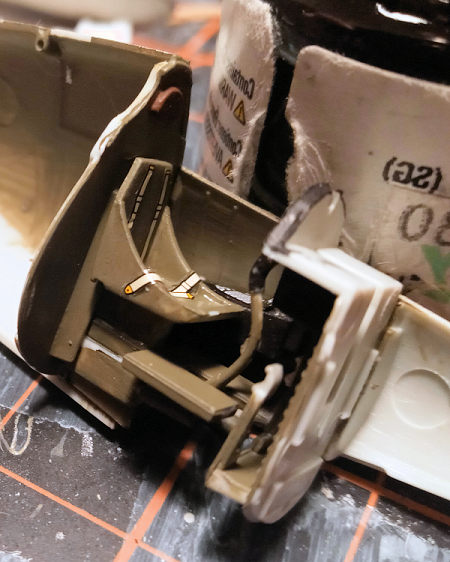
The first part of the kit to go together was (you
guessed it!) the cockpit interior. Detail , including seat belts, was provided
by seven decals. The interior was painted overall ModelMaster olive drab. The
instrument panel and side consoles were painted ModelMaster flat black before
receiving their respective decals, while the headrest received a coat of Vallejo
flat brown, and the rudder pedals a coat of Vallejo silver. All paints used on
this model are acrylics and are applied by brush. All the cockpit pieces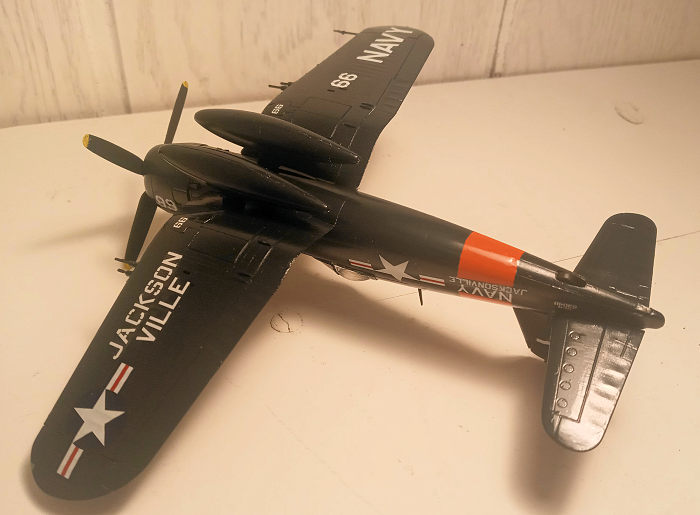 fit together snugly, and were inserted into the right fuselage half without any
difficulty.
fit together snugly, and were inserted into the right fuselage half without any
difficulty.
After this, I cemented the two fuselage halves together. Then I installed the
rear part of the engine cowling, which has the exhaust pipes molded into it.
When first I glued together the fuselage halves, they seemed to point outward in
relation to the rest of the model, but the cowl fixed that by pulling and
holding them together. Then the wings were assembled. This was fairly straight
forward, and the wing halves were clamped to dry using rubber bands and clothes
pins. Once dry, the wing intakes were installed. These will require two or three
rounds of minor sanding and filling on the leading edges, but nothing major. I
also filled the outer cartridge ejector slots, since this kit comes only with
slots for the six 50. Cal machine guns and I was building a plane with four 20mm
cannon. Filler used is Vallejo plastic putty. Cheap, but nontoxic. I also
installed the rudder at this approximate space in time. This was rather easy,
since the rudder simply sits in between the two halves of the vertical
stabilizer. Then came the moment of truth as the wings were mated to the
fuselage. This was a mostly pain free procedure, with the only hiccup being that
the rear part of the wings which forms the lower portion of the fuselage stuck
up a little from the rest of the airframe. Whether it was an error on my part or
an issue with the kit, I am not sure. Either way, the situation was soon
remedied with a little filler and some sanding, although one could probably
press it all the way down and glue it in. After this, all the finishing touches
were added to the wings, which consisted of installing the wing tips, and guns
of your choice. The elevators/horizontal stabilizers were then inserted into
they’re slots
 and left to
dry. Now to that big ol’ P&W radial. The cylinders were painted Vallejo silver
mixed with a little bit of basalt grey of the same manufacture. The gearbox
received a few coats of ModelMaster gunship grey. Assembly was fairly straight
forward, with the crankshaft being sandwiched between the two rows of cylinders.
The gear box then sat on top of this whole asselby. Once the engine was
finished, it was affixed two its respective cowl flaps and attached it to the
airframe. This was then covered by the last pieces of the cowl, all of which fit
together relatively well(no filler). Then the final piece of the fuselage went
on. This part covers the distance between the instrument panel and the rear end
of the engine cowl. Sadly, there is a small gap at the point where it meets up
with the cowling, and will require some filling and sanding.
and left to
dry. Now to that big ol’ P&W radial. The cylinders were painted Vallejo silver
mixed with a little bit of basalt grey of the same manufacture. The gearbox
received a few coats of ModelMaster gunship grey. Assembly was fairly straight
forward, with the crankshaft being sandwiched between the two rows of cylinders.
The gear box then sat on top of this whole asselby. Once the engine was
finished, it was affixed two its respective cowl flaps and attached it to the
airframe. This was then covered by the last pieces of the cowl, all of which fit
together relatively well(no filler). Then the final piece of the fuselage went
on. This part covers the distance between the instrument panel and the rear end
of the engine cowl. Sadly, there is a small gap at the point where it meets up
with the cowling, and will require some filling and sanding.
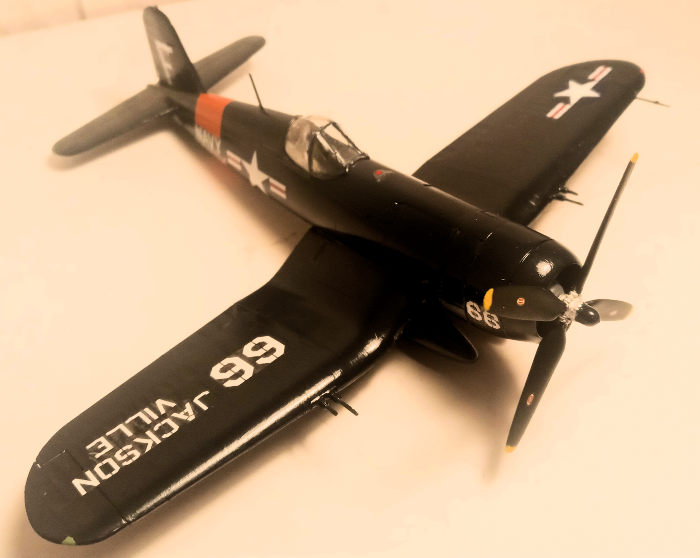
I had originally planned to build this kit ‘wheels down’, but after seeing a photo of a corsair in low level flight on a strafing run, I was overcome by a sudden urge to build this kit with retracted landing gear. Unfortunately, this kit does not include parts to build it ‘wheels up’. However, all the landing gear doors are of the sort where they must be cut before installation in the open position. So all I had to do was trim off the little clasps that hold them open. The main gear doors fit beautifully, and the fit for the tail wheel door wasn’t too shabby either. All doors require a little thinning for a good fit though and some further trimming was required on the tail wheels respective landing gear well on the sides, which the door sits on. However, apparently, all Corsairs models up to the -4B have the rear wheel semi recessed into the fuselage, so in other words it pokes out through a little hole in the rear gear doors. Fixing this problem was not as hard as I thought it would be though. I simply cut most of the strut off, leaving just a little stub of strut sticking out of the wheel. The stub was then cemented inside the doors in such a way that the wheel was still hanging out. The tail hook was simply set in its proper position with some cement to hold it in place. Now it is time for some paint!
| COLORS & MARKINGS |
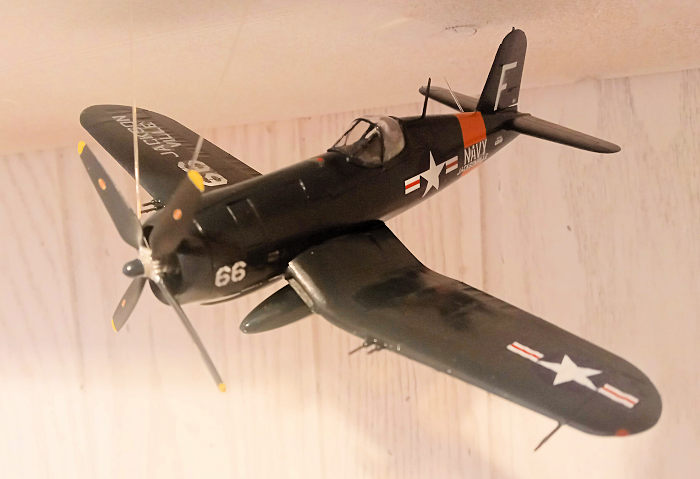 The model
was painted overall ModelMaster dark sea blue. Since I was doing this by hand,
It took four coats and some patience before the model had adequate coverage. I
elected to paint the drop tanks on the sprue, then assemble them, and then clean
them up with the proper paint color. The exhaust and gun barrels were painted
model master gunmetal. After all this was completed, the model went through
final assembly( canopy, prop, drop tanks, etc, all of which went on very
nicely.) and the kit was ready for some markings!
The model
was painted overall ModelMaster dark sea blue. Since I was doing this by hand,
It took four coats and some patience before the model had adequate coverage. I
elected to paint the drop tanks on the sprue, then assemble them, and then clean
them up with the proper paint color. The exhaust and gun barrels were painted
model master gunmetal. After all this was completed, the model went through
final assembly( canopy, prop, drop tanks, etc, all of which went on very
nicely.) and the kit was ready for some markings!
I decided to use the kit decals, since I didn’t have anything more exciting. Admittedly, these markings aren’t exactly what I would call hot stuff. They depict an F4U-4B Corsair of the Naval air reserve training unit based at Jacksonville Florida in 1954. Still, they are colorful and add a nice bit of pizzazz to the kit. The decals went on very nicely and settled down on the model very well.
| CONCLUSIONS |
In closing, I found this kit to be very enjoyable and would definitely recommend it to any of my fellow modelers. I would say the kit warrants Something like a skill level two or three. These newer Revell kits are generally very high quality.
| REFERENCES |
American military aviation: a century of innovation
100 Planes 100 Years: the first century of aviation
20 August 2021
Copyright ModelingMadness.com. All rights reserved. No reproduction in part or in whole without express permission.
If you would like your product reviewed fairly and fairly quickly, please contact the editor or see other details in the Note to Contributors.