| KIT #: | 61031 |
| PRICE: | $15.00 'used' |
| DECALS: | Two options |
| REVIEWER: | Christopher Campbell |
| NOTES: | A good older mold kit that still builds up well |
| HISTORY |
Another visit from the Brewter Buffalo, one of the most maligned and possibly underrated aircraft in history. Loved by thousands hated by millions, this stumpy looking fighter has always held an appeal to me. I have built a “herd” of them, over the years, and will doubtless build more.
This aircraft has been chronicled and debated extensively; even to death one might say. With that in mind, I will keep this historical summary somewhat brief, as I tend to go on at length about the Buffalo, hitting some of the high and low points and the version that I am depicting here.
The Buffalo began life as a submission to U.S. Navy for a specification fielded for a new carrier fighter, one of monoplane design. Grumman submitted what would become the legendary F4F Wildcat, Brewster the XF2A-1, and Seversky a navalized derivative of the P-35, the NF-1. The latter was hopelessly outclassed by the Buffalo and Wildcat, while contracts were eventually let to both Brewster and Grumman for the new fighters.
 The Brewster
would be the first U.S. Navy carrier monoplane fighter. Equipped with a Wright
R-1820-34 Cyclone engine producing 950 horsepower, the aircraft had an excellent
roll rate and a top speed of more than 300 mph. Its armament was to be one .30
and one .50 caliber machine gun in the cowl, with provisions for two .50 caliber
guns in the wings that were almost always fitted.
The Brewster
would be the first U.S. Navy carrier monoplane fighter. Equipped with a Wright
R-1820-34 Cyclone engine producing 950 horsepower, the aircraft had an excellent
roll rate and a top speed of more than 300 mph. Its armament was to be one .30
and one .50 caliber machine gun in the cowl, with provisions for two .50 caliber
guns in the wings that were almost always fitted.
Fifty-four were initially ordered by the Navy in 1936 and all should have been rosy for Brewster company and the Navy. However, the F2A utilized some complicated construction techniques being applied in a rather antiquated facility. Unlike most aircraft plants, the Brewster plant was a multi-story affair with subassemblies being completed on different floors. Complicating things even more, the completed aircraft could not simply be flown away as from most plants, as the factory was located in the middle of Queens, New York, with no runway access.
Finished aircraft had to disassembled and trucked to airports where they would be reassembled and tested. Eventually, they would acquire a facility at the Newark airport for this. Yet, the Buffalo and other Brewster products were hamstrung by this facility and deliveries were slow. This contributed in no small way to the Navy opting to acquire F4F Wildcats from Grumman, who could deliver the aircraft faster and more efficiently.
Worse, problems with the Buffalo began to surface. One of the most significant was an issue with the landing gear, which had a tendency to jam after multiple carrier landings. Repairs to these often weakened the gear, resulting in gear collapses and more extensive damage in later landings.
Improved versions of the aircraft were being developed and export markets were being sought. Aircraft would eventually be ordered by the Netherlands, Belgium, Finland (where it racked up a 26:1 kill ratio on the Eastern Front), and other countries expressed interest. The F2A-2 version featured here saw the most expensive service with the U.S. Navy, including Neutrality Patrols on carriers in the Atlantic.
Brewster continually struggled with slow production and quality control issues. Even after being subcontracted to produce the F4U Corsair this would continue.
With its trouble fraught history, the Navy finally dropped the axe on Brewster, cutting their contract for the Corsair on July 1, 1944. Brewster was effectively dead, with their only standout design being the much-debated Buffalo. The company would close their doors for the final time in 1946.
| THE KIT |
 Initially
released by Tamiya in 1974, this was the first and for many years the only 1/48
kit of the Brewster Buffalo. It was, at the time, cutting edge, with well done
recessed detail, a reasonably detailed cockpit, and parts to build British or
Dutch export variants or the U.S. F2A-2. It went out of production in the late
1970’s, and by the time I acquired my first one when I was in college in the
late 1980’s they were difficult to find, commanding prices of $50 on vendor
tables at model shows, if you could find one. (I bought two during that period.)
Initially
released by Tamiya in 1974, this was the first and for many years the only 1/48
kit of the Brewster Buffalo. It was, at the time, cutting edge, with well done
recessed detail, a reasonably detailed cockpit, and parts to build British or
Dutch export variants or the U.S. F2A-2. It went out of production in the late
1970’s, and by the time I acquired my first one when I was in college in the
late 1980’s they were difficult to find, commanding prices of $50 on vendor
tables at model shows, if you could find one. (I bought two during that period.)
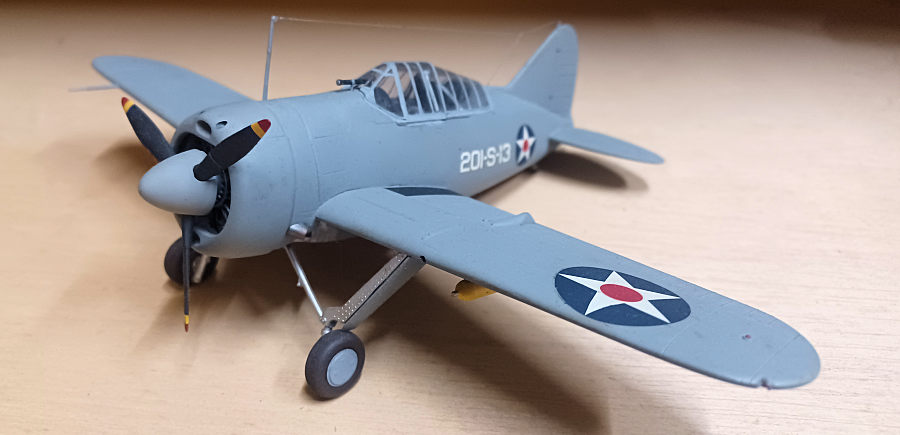
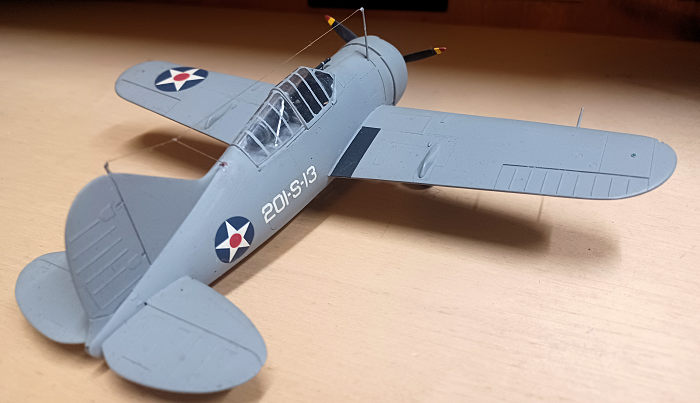
In 1993 it would be released once again by Tamiya, but only as the F2A-2 version with interwar U.S. Navy yellow wings markings, or an overall grey aircraft used during neutrality patrols in the Atlantic. This is the release that was used for this build.
Out of the box, it still makes a very decent representation of the Buffalo. This boxing has a single canopy and prop option, unlike other releases of the Tamiya kit that build multiple versions out of the box. It can be improved with various resin and photo etch and can benefit from a vacuform canopy to allow the cockpit to be displayed, if you are so inclined. It builds easily and well, though. Out of the box, as this one was built, it can easily be finished into a beautiful model.
| CONSTRUCTION |
I started with the interior, spraying everything in Testors silver to represent the natural aluminum seen in the cockpits of these. This was extended to the landing gear bays and inside the engine cowling.
While this was drying, I painted the instrument panel in Tamiya Flat Black, dry brushed the instruments in silvers, and picked out a few details here and there in red or yellow. Once dry, the sidewalls had appropriate panels, boxes, etc., painted in Tamiya Flat Black and dry brushed accordingly. Since the canopy is one piece and would be displayed closed, I simply painted the modeled on seatbelts, the route that I have gone on most of the builds I have done using this kit.
 The cockpit
parts, firewall, fuel tank and other components were all glued in place with CA
glue. The fuselage closed up well with CA glue and required on a small amount of
sanding along the seams.
The cockpit
parts, firewall, fuel tank and other components were all glued in place with CA
glue. The fuselage closed up well with CA glue and required on a small amount of
sanding along the seams.
The wings were then glued together with CA and again only required a little filling of the seams with thin CA and some sanding. This subassembly was then fitted to the fuselage. This is the principal place that fit issues will be encountered on this kit.
The joints on the ventral surfaces almost invariably require some minor filling and sanding. I have usually found some CA glue sufficient and did on this build. The upper joints where the wings meet the fuselage generally require some filling as well.
This was filled with CA glue and did away with the seem well. However, the required enough sanding that I inadvertently obliterated more surface detail around the join that I wished to. On subsequent builds I had used a slightly different approach.
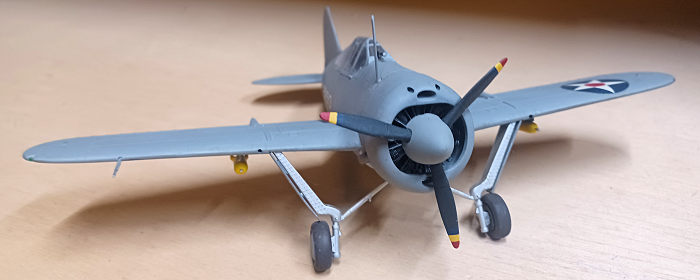
With this completed, the horizontal stabilizers were glued into place. These went on without issue and did not require filling. Following this, engine and cowl were given basic cleanup and preparation for painting, along with the landing gear, propeller, and spinner. Now it was time to paint.
| COLORS & MARKINGS |
The engine, propeller shaft, and landing gear struts were then sprayed with Model Master Anodonic Grey and set aside. As this was drying the propeller was sprayed in Model Master Flat Black. Then this was masked off and the propeller wraning stripes were painted in Testors Flat Yellow, Flat Red, and Model Master Insignia Blue.
I then turned my attention back to the engine and painted the crankcase in Testors Flat Grey. The cylinders were give a black wash and after this was dry the pushrods, knuckles, and ring were accented in Model Master Chrome. The crankcase was accented with dry brushing with Testors Silver and the magneto painted with Tamiya Flat Black.
The completed engine was then fitted, followed by the cowl without any problems. Prior to painting, the exhaust stubs were hollowed out slightly with bit chucked in a pin vice. All the openings were then stuffed with damp paper towels and the final painting began.
 This was
one of the easiest paint jobs that I ever done. The entire aircraft was overall
Neutral Grey, so nothing mask off. In this case, I used Model Master Neutral
Grey, shooting it in two coats.
This was
one of the easiest paint jobs that I ever done. The entire aircraft was overall
Neutral Grey, so nothing mask off. In this case, I used Model Master Neutral
Grey, shooting it in two coats.
While this was drying, the tires were painted in Testors Rubber, with the outer hubs painted in the same Neutral Grey. The brake drums received Testors Rust that was accented by dry brushing with Model Master Burnt Iron and Dark Anodonic Grey.
Finally, the landing gear oleos were painted in Testors silver, as was the tail wheel gear. Then it was assembled and glued in place with CA glue. The entire models was given a coat of Model Master Spray Gloss and set aside to dry so that decaling could begin.
The decals were from the kit. These went on quite easily, applied with Micro Sol. The white on the roundel starts is somewhat translucent, as is a known issue with these decals. However, with the overall grey paint, I did not think that it would be an issue and it was not, at least not noticeably.
After these had set, the exhausts were painted in Model Master Burnt Iron, then accented with some Adononic Grey dry brushing. The entire model was then given a spray of Model Master DullCote.
| FINAL CONSTRUCTION |
Weathering was kept minimal, as these aircraft were kept reasonably clean in their prewar service. At least, so they appear in most photos that I have seen.
 Probably the
most difficult part of this kit is removing rollover support from the sprue in
one piece. This part is very delicately molded and fragile. Whether one uses
nippers or and X-acto blade, and I have tried both over the years and it has
broken on most that I have built. Worse, it is the only part of the kit that
tends to have any flash, making it even more troublesome. This time, luck seemed
to be with me, and I actually got it off, painted and installed without any
damage occurring.
Probably the
most difficult part of this kit is removing rollover support from the sprue in
one piece. This part is very delicately molded and fragile. Whether one uses
nippers or and X-acto blade, and I have tried both over the years and it has
broken on most that I have built. Worse, it is the only part of the kit that
tends to have any flash, making it even more troublesome. This time, luck seemed
to be with me, and I actually got it off, painted and installed without any
damage occurring.
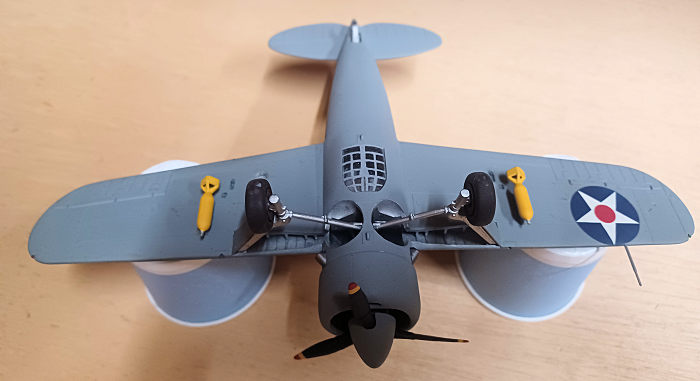
The propeller and spinner were fitted and glued into place. The two small, underwing bombs had previously been assembled and painted in Flat Yellow. These were no glued into place with CA glue.
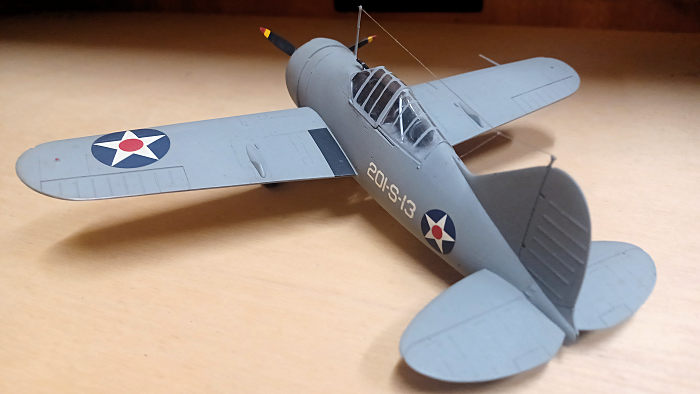
I then turned my attention to painting the canopy framing, the interior being done in the same Testors Silver and the exterior, naturally, in Neutral Grey. This is probably the most tedious part of the kit, as there is simply a lot of framing (the one thing that I hate about building Buffaloes.) When finished it was installed with Elmer’s white glue.
The antenna mast was glued in place and painted. Then aerial rigging was added with stretched sprue tinted with Dark Anodonic Grey. The landing light interior was painted with Testors Silver and the lens glue in place with white glue Finally, running lights were painted with Tamiya Clear Red and Clear Green to finish the build.
| CONCLUSIONS |
The Tamiya Buffalo is a somewhat dated kit now, but it still builds up very well. I have the Classic Airframes kit in my stash, as well as Special Hobby kit, plus two of the Czech Model/Special Hobby 1/32 kits. My next Buffalo will probably be one of the latter. Still, I am certain that this will not be my last Tamiya Buffalo.
This is an easy kit to build and an easy kit to detail out nicely. It could benefit from a vacuform canopy that cold be positioned open and there is some room for improvement in the cockpit if this were to be done. If you wish to go that route, there are detail sets available for it, as well as a number of conversions.
I would recommend this kit to any modeler. It is reasonably easy to obtain and typically not all that expensive these days. Yes, it has been surpassed by some kits, but it is far from a dog. It can still hold its own against many newer releases. Its general ease of assembly also makes it suitable for the relative novice. As always, enjoy the build.
| REFERENCES |
F2A Buffalo in Action by Jim Maas, Squadron Signal Publication, 1987
https://en.wikipedia.org/wiki/Brewster_F2A_Buffalo
22 May 2024
Copyright ModelingMadness.com. All rights reserved. No reproduction in part or in whole without express permission.
If you would like your product reviewed fairly and fairly quickly, please contact the editor or see other details in the Note to Contributors.