Tamiya 1/48 B-339 Buffalo
| KIT #: | 61094 |
| PRICE: | $15.00 'used' |
| DECALS: | Three options |
| REVIEWER: | Christopher Campbell |
| NOTES: | A good older mold kit that builds and converts well |
| HISTORY |
Ah, the Brewster Buffalo, one of the most maligned and misunderstood aircraft in history. To bring it up among aviation or modeling enthusiast will almost inevitably lead to an argument, as its history is unquestionably checkered, tainted, and at times paradoxical and polarizing.
For reasons that I have never really fully understood, I have, since my early modeling years always been intrigued by this tubby looking little fighter. It is hated by many and adored by others. It could be found in almost every theater at one point or another during World War II. Sometimes it seemed little more than a piloted clay pigeon, while at others it was a holy terror to its opponents. I personally assess this by paraphrasing American ace, General Robin Olds, who during the Vietnam War once said of the ostensibly antiquated MiG-17 that in the right hands and in the right combat environment, it was a “Vicious, vicious little beast.”
This aircraft has been chronicled and debated extensively; even to death one might say. With that in mind, I will keep this historical summary somewhat brief, as I tend to go on at length about the Buffalo, hitting some of the high and low points and the version that I am depicting here.
The Buffalo began life as a submission to U.S. Navy for a specification fielded for a new carrier fighter, one of monoplane design. Grumman submitted what would become the legendary F4F Wildcat, Brewster the XF2A-1, and Seversky a navalized derivative of the P-35, the NF-1. The latter was hopelessly outclassed by the Buffalo and Wildcat, while contracts were eventually let to both Brewster and Grumman for the new fighters.
The Brewster would be the first U.S. Navy carrier monoplane fighter. Equipped with a Wright R-1820-34 Cyclone engine producing 950 horsepower, the aircraft had an excellent roll rate and a top speed of more than 300 mph. Its armament was to be one .30 and one .50 caliber machine gun in the cowl, with provisions for two .50 caliber guns in the wings, and more often than not employed.
Fifty-four were initially ordered by the Navy in 1936 and all should have been rosy for Brewster company and the Navy. However, the F2A utilized some complicated construction techniques being applied in a rather antiquated facility. Unlike most aircraft plants, the Brewster plant was a multi-story affair with subassemblies being completed on different floors. Complicating things even more, the completed aircraft could not simply be flown away as from most plants, as the factory was located in the middle of Queens, New York, with no runway access.
Finished aircraft had to disassembled and trucked to airports where they would be reassembled and tested. Eventually, they would acquire a facility at the Newark airport for this. Yet, the Buffalo and other Brewster products were hamstrung by this facility and deliveries were slow. This contributed in no small way to the Navy opting to acquire F4F Wildcats from Grumman, who could deliver the aircraft faster and more efficiently.
Worse, problems with the Buffalo began to surface. One of the most significant was an issue with the landing gear, which had a tendency to jam after multiple carrier landings. Repairs to these often weakened the gear, resulting in gear collapses and more extensive damage in later landings.
Improved versions of the aircraft were being developed and export markets were being sought. By 1939 war was looming in Europe and several nations expressed and interest in the Buffalo. Finland then found themselves embroiled in the Winter War when the Soviet Union invaded. Equipped mostly with antiquated biplanes, Finland leapt at the chance to acquire the B-239 model, purchasing more than fifty of a de-navalized version, though few had arrived before that conflict ceased.
However, their service in the hands of the Finns during W.W.II would be the stuff of legend. More than thirty Finnish pilots reached ace status in the portly-looking Buffalo. With several scoring more than twenty kills in it and thirty-six achieving ace status. It would continue to score aerial victories in Finnish hands up until 1944, long after it had been surpassed by more modern designs being fielded against it. The exact kill ratio is a matter of some debate, though is generally accepted as 26:1 in Finnish hands. (This from the aircraft often derided as the worst fighter as W.W.II) Finland would retire their last Buffalos in 1948.
Belgium also attempted to acquire aircraft in these frenetic days. However, only six were delivered or nearly so. Instead, they wound up being impounded in transit on the French island of Martinique when Belgium and France fell into Nazi hands in 1940. The remainder of the Belgian order was taken over by the British Fleet Air Arm, some of which would eventually find their way to Crete.
More British orders came in for one-hundred Seventy aircraft that would be assigned to British Far East possessions which were mostly equipped with very antiquated aircraft to this point (Vickers Vildebeest, anyone?). There they would see action across Burma, Malaya, and Singapore, often flown by RNZAF pilots. The Netherlands also ordered a similar model, like the British version designated B.339 and fitted the same Wright Cyclone engine producing 1,100 horsepower. More than seventy would be received, assigned to the equally hard-pressed Dutch East Indies forces.
Results were somewhat mixed in this theater. Many of the Japanese aircraft being encountered were initially earlier Japanese types like the fixed gear Ki.27. However, these were being flown by battle hardened, seasoned Army pilots who knew how to fly the agile aircraft in combat to its best effect. The newer Ki.43 Oscar and A6M2 Zero were also being encountered, both of which were more maneuverable and faster, with the A6M2 being more heavily armed. However, Buffalo pilots in this theater learned to maximize the strengths of their aircraft and despite being outnumbered and often out maneuvered, managed a higher kill to loss ratio. Several pilots would become aces and the Buffalos, beset by problems ranging from mediocre production quality, shortages of supplies, and field modifications that often caused more problems than they solved, soldiered on to the bitter end, against all odds.
The U.S. Navy had previously received the improved F2A-2 variant, which had served on carriers in numbers until just before or at the U.S. entry into the War, including neutrality patrols in the Atlantic. This in many ways may have been the definitive U.S. variant, as it was still light and reasonably agile. However, this would be superseded by the F2A-3 variant in 1941.
 With
the additional weight of added armor, the .30 caliber gun being replaced by a
.50 caliber gun, a heavier radio and morfe, the weight had increased over the
previous version by nearly 25%, making it slower and reducing its rate of climb
notably. This variant would see service in anti-sub patrols in the Atlantic and
saw some action in the Pacific in scouting missions flown from the USS Lexington
before being replaced by Wildcats in the early month of 1942.
With
the additional weight of added armor, the .30 caliber gun being replaced by a
.50 caliber gun, a heavier radio and morfe, the weight had increased over the
previous version by nearly 25%, making it slower and reducing its rate of climb
notably. This variant would see service in anti-sub patrols in the Atlantic and
saw some action in the Pacific in scouting missions flown from the USS Lexington
before being replaced by Wildcats in the early month of 1942.
Most infamously, the F2A-3 would be the most numerous fighter type defending Midway, with twenty rising to meet the Japanese attack on the island alongside five F4F’s. The engagement resulted in the loss of thirteen Buffalos, with nine kills scored against the Japanese. Two of these were Zeroes and the remainder Nakajima B5N “Kate” bombers. The Buffalo would be withdrawn from U.S. frontline service immediately thereafter, though would continue to serve as an advanced trainer and later as instructional airframes into 1944.
It is worth noting that many of the Marine Corps pilots who saw action on that fateful day had little or no combat experience and many were fresh from flight training. (One among the defenders was future Marine Corps ace and aviation legend Marion Carl, scoring his first kill that day in a Buffalo.) Those dauntless defenders were facing Japanese naval aviators at the absolute zenith of proficiency, highly trained and most with significant combat experience. Taking that into account and the numeric superiority of the Japanese, it is quite questionable that a different type of aircraft could have made a significant difference in the outcome, whether it had been Wildcats or something else.
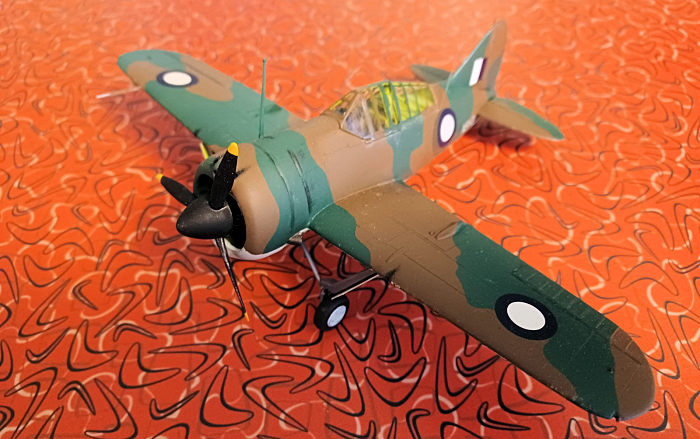
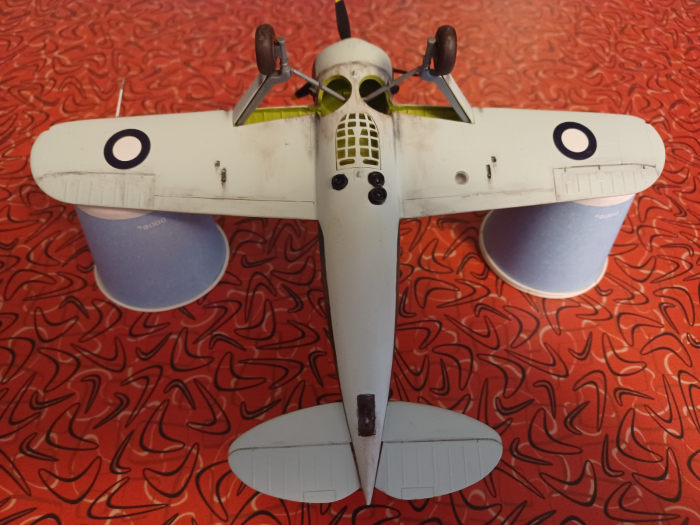
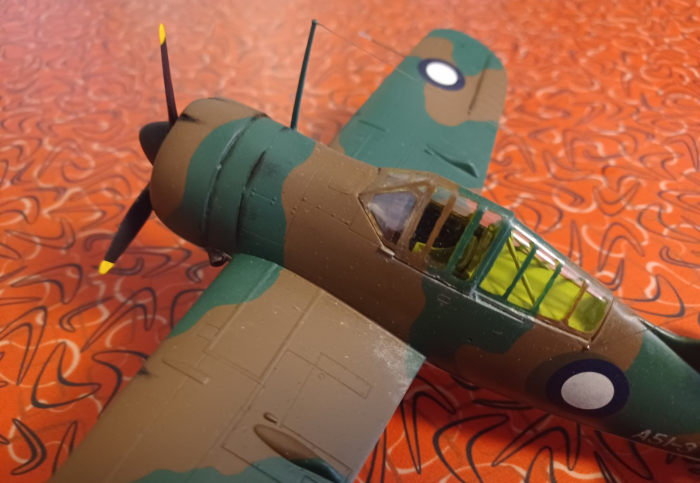
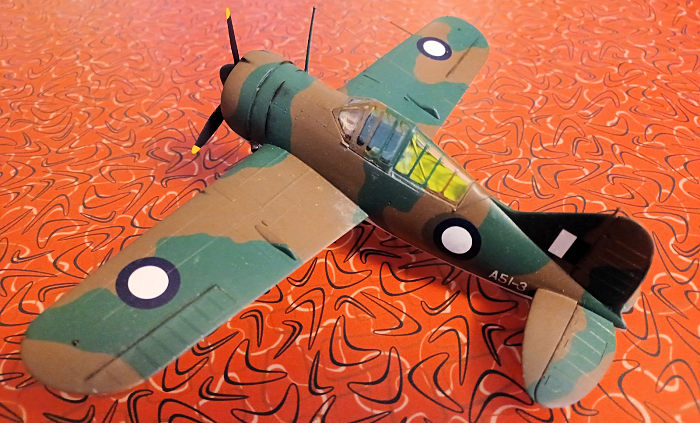
The final Buffalos produced were the Modell 339-23, originally intended for the Dutch East Indies. The Dutch were forced to surrender their last stronghold in Java while these aircraft were in route. Diverted to Australia, these twenty aircraft would see service in the RAAF. Six were initially assigned to a photographic reconnaissance unit and others were subsequently modified to operate in this role. This included the installation of three aerial cameras installed ventrally, with one being offset at an oblique angle. Some additionally had their wing guns removed to decrease weight. None would see actual combat and they were ultimately turned over to the U.S. 5th. Air Force and scrapped in 1944. One of those recon ships is the subject of this model.
Only one complete Buffalo survives, a Finnish aircraft recovered from a lake in 1998 and on display at the Aviation Museum of Central Finland in an unrestored state. The same museum also houses the sole VL Humu built, an indigenously produced Buffalo variation built from wood over a steel frame, intended to augment the Buffalos in service, but found to be somewhat overweight and underpowered, with only this single prototype being produced.
Two replica Buffalos exist. One is in the Cradle of Aviation Museum in New York, completed as an F2A-2 in U.S. Navy markings. Another is housed in the Netherlands Military Aviation Museum in Dutch markings.
Thus ended the tumultuous saga of the Buffalo. It has been argued by some that when flown correctly and in skilled hands, the aircraft was an ace-maker. I tend to agree with this assessment to a point. At other times, it has been said to be at best a manned target and at worst a flying coffin. That, I find to be an overly harsh assessment.
More than a few aircraft have failed to live up to expectations in combat. Hurricanes, P-39’s, and P-40’s hardly fared any better in these chaotic early days of the Pacific war when the Japanese juggernaut was overwhelming almost everything in its path. Wildcats did better, especially when flown the well-trained U.S. Navy carrier pilots and equally trained and seasoned Marine Corps aviators. Given the marginal differences in the turn and roll rate and overall performance of the two aircraft, one can argue that if flown by such pilots and employing similar tactics, the Buffalo might have done just as well, or very near so. This will doubtless continue to be debated for as long as memories and the written history of the Buffalo continues to exist.
As for the Brewster Aviation company, the Buffalo was largely its high point. The company had never been a serious contender in the American aviation industry. Their previous design, the SBA/SBN torpedo bomber had seen a production run of only thirty aircraft. Due to the very inefficient production methods in place, despite the contract being issued in 1936, the first aircraft was not delivered to the Navy until 1940, when its already dated date deign was hopelessly antiquated.
A follow-on design the SB2A Buccaneer sought to compete with Grumman’s TBF Avenger in 1941. It, too, was outdated from the beginning, especially so compared to the Avenger. While over seven hundred were built, some even being sent to the British as Brewster Bermudas, all found it unsuitable for combat. It was relegated to training, target towing, squadron hack duty, and use as an instructional airframe. Two of these survive, one in storage at Pima and another restored and on display at the Museum of Naval Aviation at Pensacola.
While Five-hundred-nine Buffalos were ultimately produced, though their record in U.S. service was decidedly lackluster. Brewster was ultimately given one last chance to make good when the Vought F4U-1 Corsair would be produced under license for the U.S. Navy as the Brewster F3A. Over seven hundred would be produced (one of which survives as an airworthy example based at the National Museum of World War II Aviation in Colorado Springs). However, with endless production problems, including shortfalls caused by poor quality control and labor disputes, the company was doomed.
F3A’s were considered unsuited for combat in U.S. service due to a series of wing failures. Yet, over half of the production went to the British Fleet Air Arm, where they would see extensive combat use.
Their final attempt at an attack plane proposed for the U.S.A.A.F. Designated the XA-32, it looked somewhat like a Curtiss SB2C, with potentially formidable armament of up to eight wing mounted .50 machine guns or quad 37mm cannon. It was also overweight and underpowered, weighing in just shy of a twin-engine A-20. As such, it gained no traction and was rejected. An up-engined version was proposed that would have mounted a Pratt & Whitney 4360 in place of the R-2800, though this never progressed beyond the drawing board.
With a history of slow production and often poor quality production, the Navy finally dropped the axe on Brewster, cutting their contract for the Corsair on July 1, 1944. Brewster was effectively dead, with their only standout design being the much-debated Buffalo. The company would close their doors for the final time in 1946.
| THE KIT |
Initially released by Tamiya in 1974, this was the first and for many years the only 1/48 kit of the Brewster Buffalo. It was, at the time, cutting edge, with well done recessed detail, a reasonably detailed cockpit, and parts to build British or Dutch export variants or the U.S. F2A-2. It went out of production in the late 1970’s, and by the time I acquired my first one when I was in college in the late 1980’s they were difficult to find, commanding prices of $50 on vendor tables at model shows, if you could find one. (I bought two during that period.)
 In 1993 it
would be released once again by Tamiya, but only as the F2A-2 version with
interwar U.S. Navy yellow wings markings. In 2004 the boxing that I used for
this build was released with parts and decals for the B.339 British and Dutch
Versions. Scalemates shows a release in 2020 by Finemolds with Japanese markings
for a capture aircraft, though I have yet to see one of these.
In 1993 it
would be released once again by Tamiya, but only as the F2A-2 version with
interwar U.S. Navy yellow wings markings. In 2004 the boxing that I used for
this build was released with parts and decals for the B.339 British and Dutch
Versions. Scalemates shows a release in 2020 by Finemolds with Japanese markings
for a capture aircraft, though I have yet to see one of these.
Out of the box, it still makes a very decent representation of the Buffalo. There is more than one canopy and prop option, as well as other parts specific to certain versions. Like many kits that build multiple versions, I think that it is safe to say that out of the box it is not truly accurate for any, but can easily be made so with some research and detailing. There are numerous aftermarket parts and conversions for the kit that have been offered by various manufacturers over the years. I have personally built three U.S. Navy versions, this R.A.A.F. version, and Finnish B-239 conversion, and still have a couple of kits in my Buffalo stash to build British and Dutch examples.
While I converted one to an F2A-1, Classic Airframes produced a dedicated kit of this variant as well as the Finnish version. Special Hobby has also produced a Finnish version as well as the F2A-3 in 1/48. However, this remains the most readily available kit of the Brewster Fighter in 1/48, being a more mass production item. It can be improved with various resin and photo etch and can benefit from a vacuform canopy to allow the cockpit to be displayed, if you are so inclined. It builds easily and still build well, though, and can be the start of beautiful model.
| CONSTRUCTION |
With the exception of my scratchbuilt cameras and associated modifications, this kit was built mostly out of the box. I started out by spraying the interior components in a color that I have labeled Alt Chromate Green. This is my own concoction that I use where the color required seems to be a little more yellow than standard Chromate or Interior Green. I usually create it by mixing Model Master Chromate Green and Testors Yellow Zinc Chromate until I feel that I have the right shade. With these colors now endangered species, I shall have to create a new formula.
While this was drying, I painted the instrument panel in Tamiya Flat Black, dry brushed the instruments in silvers, and picked out a few details here and there in red or yellow. Once dry, the sidewalls had appropriate panels, boxes, etc., painted in Tamiya Flat Black and dry brushed accordingly. Since the canopy is one piece and would be displayed closed, I simply painted the modeled on seatbelts, the route that I have gone on most of the builds I have done using this kit.
The cameras were scratchbuilt using a somewhat odd method that I have developed over a number of years. Some time back I became somewhat fixated with recon aircraft, though few are equipped with any representation of cameras, even when kitted as a recon version.
I was building the Airfix 1/48 PR.XVI Mosquito when I decided that I wanted cameras in every location that would house them. So, I knew that I was going to have to roll my own as it were but did not know how as yet. I happened to be in Hobby Lobby one Saturday afternoon when I hit upon the idea.
All of my cameras are made from beading components. I bought a bag of lager square, cube beads, some tapered tubular beads, and some translucent pearlescent round beads. To make the basic representation of the camera body, I use half of one of the cube beads, cut with a razor saw, sanded, and shaped. The tapered tubes are cut to length and shaped as a lens body and glued in place with CA glue. Then the assembly is painted grey or black, as deemed appropriate.
The lens itself made by inserting one of the pearlescent beads into the lens tube, turned so that the threading hole does not show. This is secured in place with a small amount of white glue. Once dry, a drop of Tamiya Transparent Blue over the “lens” creates a very realistic effect. This was how I created the three cameras that would be installed in the Buffalo.
 Installing
them proved a little trickier than most of the recon aircraft models that I have
built in the past. Due to arrangement of the Buffalo cockpit, the cameras were
going to be a tight fit just behind the ventral window and in the neighborhood
of the fuel tank. This required both some careful construction and test fitting.
Ultimately, there were no serious issues here, though.
Installing
them proved a little trickier than most of the recon aircraft models that I have
built in the past. Due to arrangement of the Buffalo cockpit, the cameras were
going to be a tight fit just behind the ventral window and in the neighborhood
of the fuel tank. This required both some careful construction and test fitting.
Ultimately, there were no serious issues here, though.
The camera ports in the ventral after wing/fuselage subsection and fuselage were created by initially drilling a pilot hole with a fine bit. This was then increased with larger bits it until the openings were sufficiently large enough. These were then smoothed out with some minor.
The cockpit parts, firewall and cameras were all glued in place. The cameras proved to be a tight fit, as the internal fuel tank beneath the aft cockpit is directly above them, so there was a fair bit of test fitting, despite my experience with this kit. Still, the fuselage closed up well with CA glue and required on a small amount of sanding along the seams. Since I could find no evidence of these recon ships every carrying ordinance, the slots under the wings for the bomb racks were filled with some thick CA glue and sanded smooth.
The wings were then glued together with CA and again only required a little filling of the seams with thin Ca and some sanding. This subassembly was then fitted to the fuselage. This is the principal place that fit issues will be encountered on this kit.
The joints on the ventral surfaces almost invariably require some minor filling and sanding. I have usually found some CA glue sufficient and did on this build. The upper joints where the wings meet the fuselage generally require some filling as well.
In previous builds I have used Squadron Putty, Tamiya Putty, and CA glue. My general experience has been that if CA glue is used here, then the sanding required often winds up obliterating fuselage detail, and possibly wing detail as well. The best results that I have had were with some Squadron Green or White putty carefully applied and then excess removed with a Q-tip dipped in nail polish remover. This usually completes the fill and requires almost no cleanup. That was the route gone on this build.
With this completed, the horizontal stabilizers were glued into place. These went on without issue and did not require filling. Following this, engine and cowl were given basic cleanup and preparation for painting, along with the landing gear, propeller, and spinner. Now it was time to paint.
| COLORS & MARKINGS |
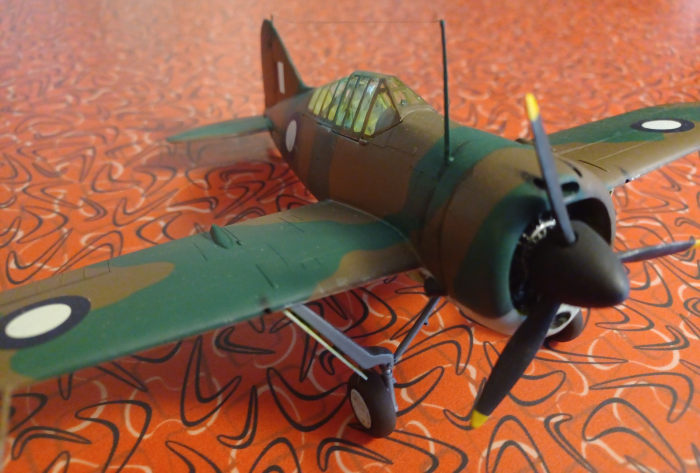
The engine, propeller shaft, and landing gear struts were then sprayed with Model Master Anodonic Grey and set aside. The landing gear bays, firewall area, and cowl interior were then spayed with my previously mentioned Alt. Chromate Green. As this was drying the propeller and cowl were sprayed with Tamiya Flat Black.
I then turned my attention back to the engine and painted the crankcase in Testors Flat Grey. The cylinders were give a black wash and after this was dry the pushrods, knuckles, and ring were accented in Model Master Chrome. The crankcase was accented with dry brushing with Testors Silver and the magneto painted with Tamiya Flat Black. By this time the prop was dry enough to me masked with Tamiya tape and the tips sprayed with Testors Flat Yellow.
The completed engine was then fitted, followed by the cowl without any problems. Prior to painting, the exhaust stubs were hollowed out slightly with bit chucked in a pin vice. All the openings were then stuffed with damp paper towels, the cameras masked off with Tamiya tape, and the painting began.
 The
undersurfaces and landing gear covers were sprayed in Polly Scale R.A.A.F. Sky.
While this dried, I assembled the wheels and sprayed them with Testors Rubber.
The hub covers were painted in the same R.A.A.F. Sky while the brake drums were
painted in Testors Rust, then dry brushed with Model Master Burnt Iron.
The
undersurfaces and landing gear covers were sprayed in Polly Scale R.A.A.F. Sky.
While this dried, I assembled the wheels and sprayed them with Testors Rubber.
The hub covers were painted in the same R.A.A.F. Sky while the brake drums were
painted in Testors Rust, then dry brushed with Model Master Burnt Iron.
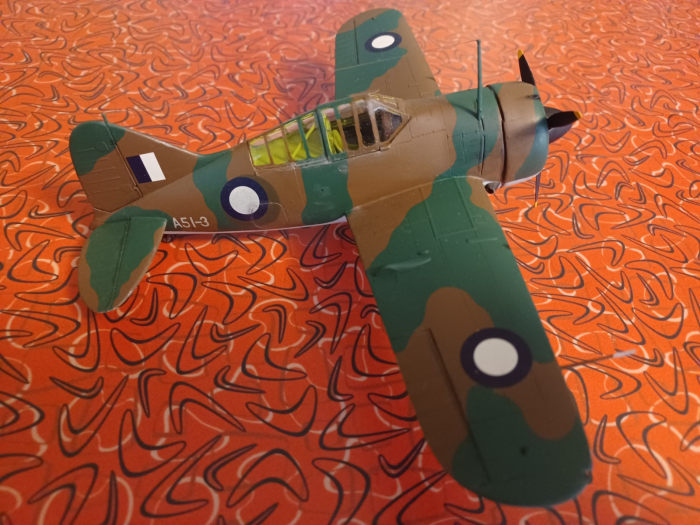
This particular aircraft being modeled had former roundels painted over on the fuselage in a color that looked to be more or less R.A.F. Earth Brown or Olive. I chose the former and after masking off the undersurfaces, I spayed the appropriate area in Model Master R.A.F. Earth Brown. Once dry, an appropriately sized disc of low tack masking tape was applied.
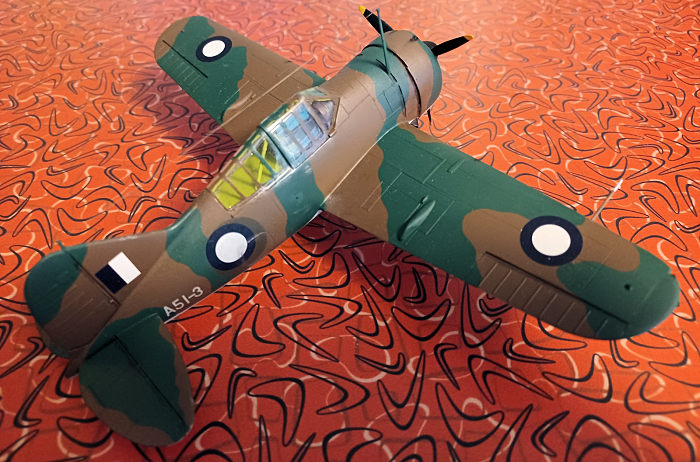
Upper surfaces were then sprayed in Polly Scale R.A.A.F. Foliage Green. When dry, this was then masked of to the appropriate pattern with Tamiya tape and the Polly Scale R.A.A.F. Earth Brown was applied. All of the masking had gone well and only a very minimum of touchup was required when it was removed.
The landing gear oleos were painted in Testors silver, then it was assembled and glued in place with CA glue. The entire models was given a coat of Model Master Spray Gloss and set aside to dry so that decaling could begin.
Decals were taken from Aeromaster Sheet 48-619: Buffaloes Over Southeast Asia. The roundels and fin flash were used and the serial numbers from the sheet, with the exception of the last number that was gleaned from another sheet for the particular aircraft I was modeling. These went on without any trouble and settled down nicely with a small application of Micro-Sol.
After these had set, the exhausts were painted in Model Master Burnt Iron, then accented with some Adononic Grey dry brushing. The Model was then give a spray of Model Master DullCote.
| FINAL CONSTRUCTION |
A dust boot for the tail wheel gear was made from some tissue soaked in Elmer’s Glue and prodded into place with a toothpick. While this was drying, all control surface hinge areas and some panels were accented by dry brushing with Dark Anodonic Grey, followed by a light black wash in some areas.
This was also used in the wheel wells as well as for some general weathering, especially in on the undersurfaces. Some exhaust staining and light gun blast was created by dry brushing with Tamiya Flat Black.
 When the
tail boot had dried, it was painted with Tamiya N.A.T.O. Brown. The propeller
and spinner were given some weathering with Testors Silver being dry brushed as
well as some given to the a few leading edges, the cowl, and boarding area to
give the look of general wear. The propeller and spinner were fitted, followed
by another light spray of Dullcote.
When the
tail boot had dried, it was painted with Tamiya N.A.T.O. Brown. The propeller
and spinner were given some weathering with Testors Silver being dry brushed as
well as some given to the a few leading edges, the cowl, and boarding area to
give the look of general wear. The propeller and spinner were fitted, followed
by another light spray of Dullcote.
Probably the most difficult part of this kit is removing rollover support from the sprue in one piece. This part is very delicately molded and fragile. Whether one uses nippers or and X-acto blade, and I have tried both over the years and it has broken on most that I have built. Worse, it is the only part of the kit that tends to have any flash, making it even more troublesome. This time, luck seemed to be with me, and I actually got it off, painted and installed without any damage occurring.
I then turned my attention to painting the canopy framing, the interior being done in the same Alt. Chromate and the exterior in the appropriate colors and pattern. This is probably the most tedious part of the kit, as there is simply a lot of framing (the one thing that I hate about building Buffaloes.) When finished it was installed with G-S Hypo Watch Crystal Cement.
The antenna mast was glued in place and painted. Then aerial rigging was added Fine E-Z Line. The landing light interior was painted with Testors Silver and the lens glue in place with the same G-S Hype Cement. Finally, running lights were painted with Tamiya Clear Red and Clear Green to finish the build.
| CONCLUSIONS |
 The Tamiya
Buffalo is a somewhat dated kit now, but it still builds up very well. I have
the Classic Airframes kit in my stash, as well as Special Hobby kit, plus two of
the Czech Model/Special Hobby 1/32 kits. My next Buffalo will probably be one of
the latter. Still, I am certain that this will not be my last Tamiya Buffalo.
The Tamiya
Buffalo is a somewhat dated kit now, but it still builds up very well. I have
the Classic Airframes kit in my stash, as well as Special Hobby kit, plus two of
the Czech Model/Special Hobby 1/32 kits. My next Buffalo will probably be one of
the latter. Still, I am certain that this will not be my last Tamiya Buffalo.
This is an easy kit to build and an easy kit to detail out nicely. It could benefit from a vacuform canopy that cold be positioned open and there is some room for improvement in the cockpit if this were to be done. There are, I believe, detail sets available for it.
In one form or another, this kit can be built up with minor modifications to any version of the Buffalo except for the F2A-3. I have a resin conversion to build this version. However, since one of the 1/32 kits is the F2A-3, I doubt that I will use it now.
I would recommend this kit to any modeler. It is reasonably easy to obtain and typically not all that expensive these days. Yes, it has been surpassed by some kits, but it is far from a dog. It can still hold its own against many newer releases. Its general ease of assembly also makes it suitable for the relative novice.
| REFERENCES |
F2A Buffalo in Action by Jim Maas, Squadron Signal Publication, 1987
Brewster F2A Buffalo Aces of World War 2 by Kari Stenman and Andrew Thomas, Osprey Publishing Limited, 2010
https://en.wikipedia.org/wiki/Brewster_F2A_Buffalo
https://www.warbirdforum.com/wright.htm
Christopher Campbell
10 April 2023 Copyright ModelingMadness.com. All rights reserved. No
reproduction in part or in whole without express permission from the editor. If you would like your product reviewed fairly and fairly quickly, please contact the editor or see other details in the
Note to
Contributors.