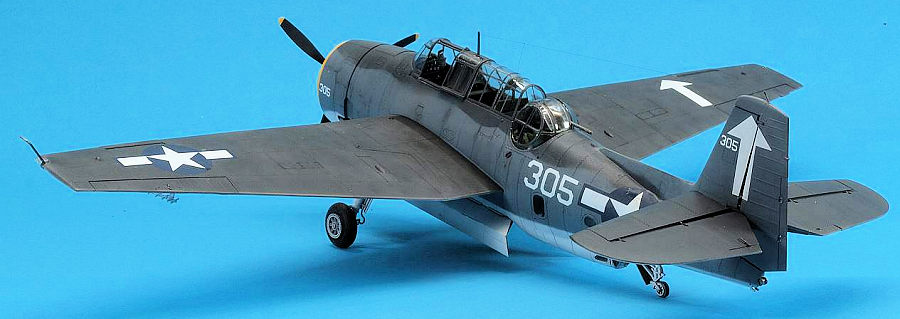
Accurate Miniatures 1/48 TBM-3 Avenger
| KIT #: | AJ3406B |
| PRICE: | £ |
| DECALS: | Two options |
| REVIEWER: | Frank Spahr |
| NOTES: | Eduard p.e & masks. Aeromaster 48-155 decals. |
| HISTORY |
There are many much worthier people that have informed you about this iconic aircraft. I´d recommend this introduction .
| THE KIT |
 Equally, the merits and areas of interest of this kit
have been exhaustively covered when it was issued and people first built it. I´d
recommend
this
preview.
Equally, the merits and areas of interest of this kit
have been exhaustively covered when it was issued and people first built it. I´d
recommend
this
preview.
I got my first Avenger kit at some point around the Millennium, together with the Dauntless and later on their ill-fated Vindicator. All three collected dust, until a second Avenger kit in a rather plain box was donated to me by a modeling friend some years later. This was the later TBM-3 model, and had the wing-mounted radome as an option. It, too, soon collected layers of dust in my basement.
Until at some point in late 2025 I decided to earnestly reduce my (albeit rather puny) stash, by the revolutionary method of building the kits. So I got aftermarket decals, limited PE and paint masks for both Avengers and the Dauntless. After completing some more stashsitters I started this one in the spring of 2026.
| CONSTRUCTION |
I looked through the reviews here on M2 and soon printed out Randy Lutz´ review from 2003, to hopefully make more sense of the instructions and avoid some pitfalls. Despite intense highlighting of the text, and quite some attempts at reading the instructions, I was intimidated, so the project ground to a halt before it had really started.
 A
holiday and some work in and around the house later, I tackled the kit, but took
hardly any photographs during the start of the build phase. In this project I
first used Ammo´s One Shot primer. It had been recommended to me by a friendly
Australian modeler and M2 regular, Stephen Lesley, who had learned about my
problems finding my preferred Badger Stynylrez primer. He claimed that the Ammo
product worked similarly to Badger´s primer, and I was happy to give it a try.
Which worked just as advertised, and made me quite happy. I had also talked to a
very good German modeler who had recommended a degreasing spray to be used
before priming. I got some such product from the local automotive paint shop,
and it seemed to improve paint adherence.
A
holiday and some work in and around the house later, I tackled the kit, but took
hardly any photographs during the start of the build phase. In this project I
first used Ammo´s One Shot primer. It had been recommended to me by a friendly
Australian modeler and M2 regular, Stephen Lesley, who had learned about my
problems finding my preferred Badger Stynylrez primer. He claimed that the Ammo
product worked similarly to Badger´s primer, and I was happy to give it a try.
Which worked just as advertised, and made me quite happy. I had also talked to a
very good German modeler who had recommended a degreasing spray to be used
before priming. I got some such product from the local automotive paint shop,
and it seemed to improve paint adherence.
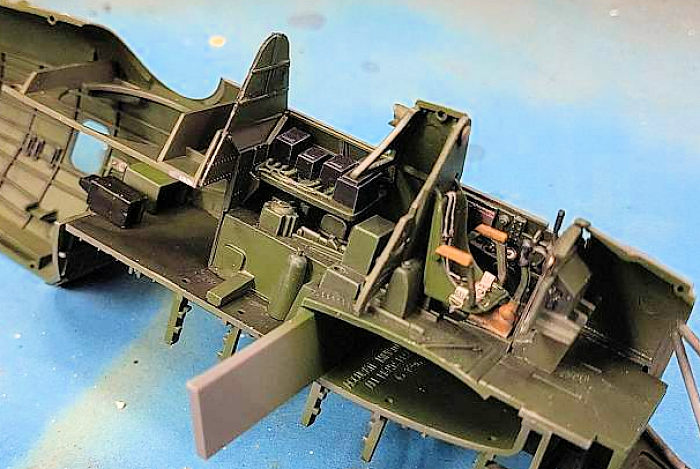
The project started with checking what to change at the kit parts to use the Eduard PE, and then tackle the quite complex cockpit assembly step by step. That wasn´t actually that much more complicated than in previous projects, but the instructions … They were surely well-intended, but caused me to worry unnecessarily and yet did not contain all the warnings I could have used.
 I worked
on other subassemblies as the engine, landing gear and the wings parallel to the
cockpit and fuselage. The engine might have had more positive locators, the
wings fit very well, and I soon found I would be able to prepaint them and
attach them only afterwards. I made paint masks from foam cut to size for the
wheel wells.
I worked
on other subassemblies as the engine, landing gear and the wings parallel to the
cockpit and fuselage. The engine might have had more positive locators, the
wings fit very well, and I soon found I would be able to prepaint them and
attach them only afterwards. I made paint masks from foam cut to size for the
wheel wells.
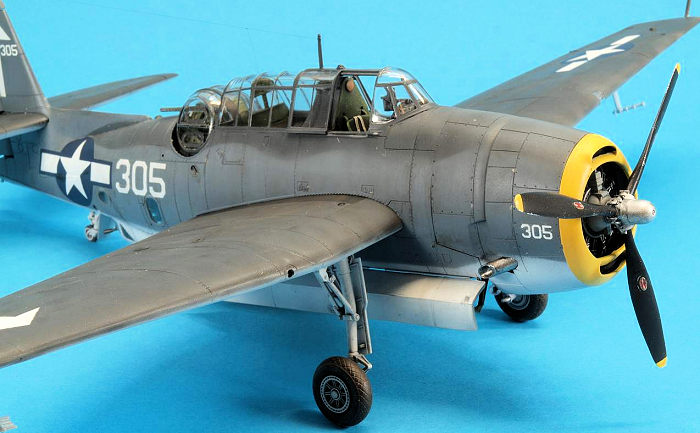
I deviated from the instructions re the ventral machine gun, as I left its fairing detachable and intended to add the gun only at the very end. I was very sure I would damage it during the building process despite the cardboard protector provided. I very soon had to start using the paint masks, which worked well as usual. In fact, I was quite happy with the very lively cockpit including the coloured PE.
I also decided not to insert the tailhook, but only to add it at the end, to ease painting and avoid breakage.
Closing the fuselage worked better than anticipated, and seamwork was comparatively easy. I worked on the turret at this time, too, and found it hard going, but in the end persevered and had a turret that could be mounted.
Here I made quite a whopping mistake: I added the canopies to the model and masked over the turret opening and the sliding canopies, as I found that much easier than otherwise. The bomb bay was also masked off. Rather soon the model was ready for paint.
| COLORS & MARKINGS |
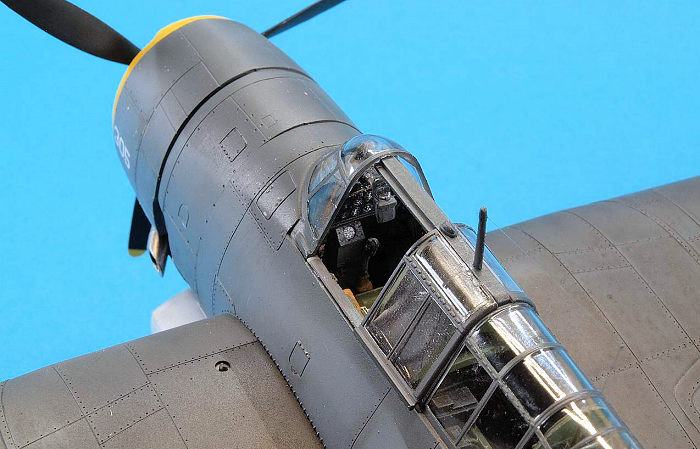 After
priming and correcting flaws, I preshaded fuselage and flying surfaces with
black. The wing walkways were masked instead of using the decals. I sprayed the
entire fuselage Intermediate Blue and then masked off for the white bottom area.
I used pieces of .5 mm solder to keep the edge of the masking tape a bit away
from the model, aiming at a soft demarcation. That worked quite well and was
repeated for the upper Sea Blue areas. I was quite happy with the result. I soon
was able to add the wings and stabilizers, without any need for putty. I then
played around quite happily with thinned black artist´s oils and Q-tips to add
some variation to the painted areas, in addition to the effects of the
preshading. I didn´t want it to be too stark, keeping in mind that the aircraft
in question had been reasonably well tended, but sure would show the effects of
exhaust fumes, smoke, sun and saltwater.
After
priming and correcting flaws, I preshaded fuselage and flying surfaces with
black. The wing walkways were masked instead of using the decals. I sprayed the
entire fuselage Intermediate Blue and then masked off for the white bottom area.
I used pieces of .5 mm solder to keep the edge of the masking tape a bit away
from the model, aiming at a soft demarcation. That worked quite well and was
repeated for the upper Sea Blue areas. I was quite happy with the result. I soon
was able to add the wings and stabilizers, without any need for putty. I then
played around quite happily with thinned black artist´s oils and Q-tips to add
some variation to the painted areas, in addition to the effects of the
preshading. I didn´t want it to be too stark, keeping in mind that the aircraft
in question had been reasonably well tended, but sure would show the effects of
exhaust fumes, smoke, sun and saltwater.
That done, I gave the model a good coat of Future and let that cure overnight before decaling.
I used only the Aeromaster decals which included the prop placards, and basically they worked well. But the Future gave me serious frights when it turned chalky flat and white upon contact with mere water, let along decal setting solutions. I continued with a certain pig-headedness, and after some time and more Future, the scary effect was gone. I did need to use a scalpel and more setting solution due to very localized silvering, but was able to overcome that issue, too.
Another coat of Future and a flat coat blended things in.
| FINAL CONSTRUCTION |
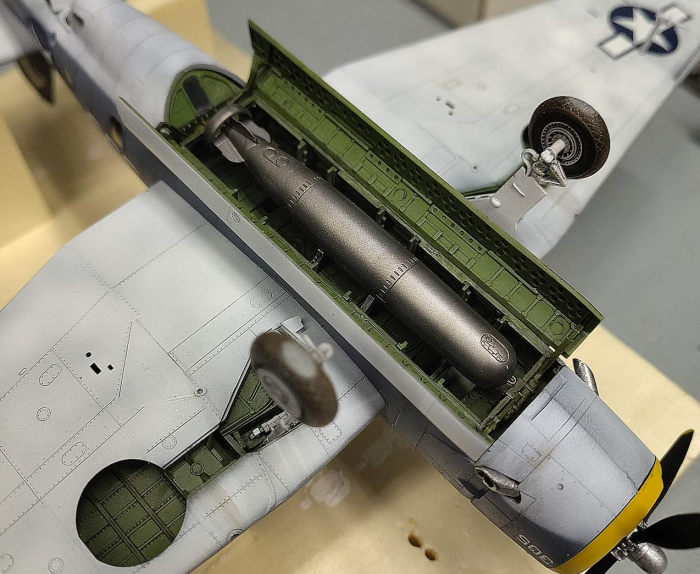 I now
added the things below the fuselage, as in bomb bay doors and landing gear,
working from the center outwards. Most parts fit well. I then tackled the
ventral gun position, removing the cover, and adding the gun. Nort without
having to cut away an internal brace keeping me from getting the gun with its
ammo belt in place. The cover fit well over the gun, I added the tailwheel
afterwards. Of the tailhook, I only used the very end that protruded from the
fuselage. I had taken some care with the wheels, and was happy the tyre was a
separate part from the rims. I had also chosen the treaded tyres simply because
I liked their look better.
I now
added the things below the fuselage, as in bomb bay doors and landing gear,
working from the center outwards. Most parts fit well. I then tackled the
ventral gun position, removing the cover, and adding the gun. Nort without
having to cut away an internal brace keeping me from getting the gun with its
ammo belt in place. The cover fit well over the gun, I added the tailwheel
afterwards. Of the tailhook, I only used the very end that protruded from the
fuselage. I had taken some care with the wheels, and was happy the tyre was a
separate part from the rims. I had also chosen the treaded tyres simply because
I liked their look better.
The torpedo was built as per instructions, very lightly weathered, and then added to the weapons bay.
Having checked that the model sat well on its wheels and having added the landing gear doors, I was able to turn the model around to enter the final phase of the build.
Having unmasked the numerous canopy panes, and having discovered the masks had worked well, I now wanted to add the turret. Ouch. I now realied that would only work before the canopy was added. Lesson learned. Somehow with some trimming, I got the turret into the fuselage, but obviously the additional internal cover would be left over. Well …
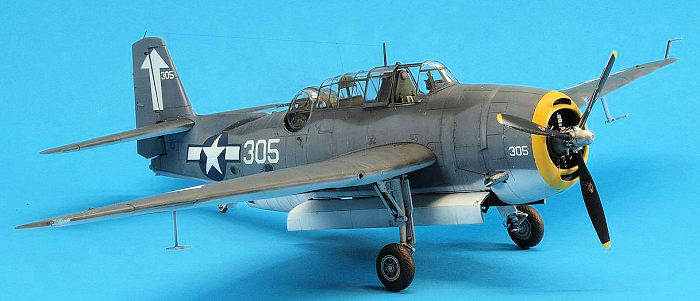
The final steps consisted of adding the prop, and the antenna wire for which I used Caenis monofilament. Some more light weathering with pastel chalks and a pencil followed, until I felt I had reached my best result.
| CONCLUSIONS |
This is still a great kit. It fits well and it looks the part. It´s quite detailed but doesn´t have uber-fiddly parts. The instructions weren´t quite compatible with me, and I overlooked some good advice in the reviews I had read. But here is my Acc Min Avenger, a few decades after it was the hottest kit around. I still believe model kits are made to be build, and not to be collected. So this is what I do. Warts and all.
| REFERENCE |
Scrivner, Charles L. : TBM/TBF Avenger in Action. Carrollton 1987.
3 August 2026 Copyright ModelingMadness.com.
All rights reserved. No reproduction in part or in whole without express
permission. If you would like your product reviewed fairly and
fairly quickly, please
contact
the editor or see other details in the
Note to
Contributors.