| KIT #: | 3411 |
| PRICE: | $ |
| DECALS: | |
| REVIEWER: | Frank Spahr |
| NOTES: |
Eduard PE FE 284 @ 7 €, Eduard Paint masks EX 047 @ 6€, Eduard Brassin #648712 SBD-5 Twin Machine Gun 1:48 @ 8€, Print Scale Decals #48-195 @ 19€ |
| HISTORY |
 The iconic
Douglas Dauntless SBD dive bomber was the backbone of US carrier aviation in the
bombing role, and fought all the pivotal battles of the Pacific War. Possibly
the single most decisive action fought by Dauntlesses was the Battle of Midway,
but they held their own for a very long time. The nickname „Slow But Deadly“ was
a very justified one.
The iconic
Douglas Dauntless SBD dive bomber was the backbone of US carrier aviation in the
bombing role, and fought all the pivotal battles of the Pacific War. Possibly
the single most decisive action fought by Dauntlesses was the Battle of Midway,
but they held their own for a very long time. The nickname „Slow But Deadly“ was
a very justified one.
Read more about the Dauntless at this link.
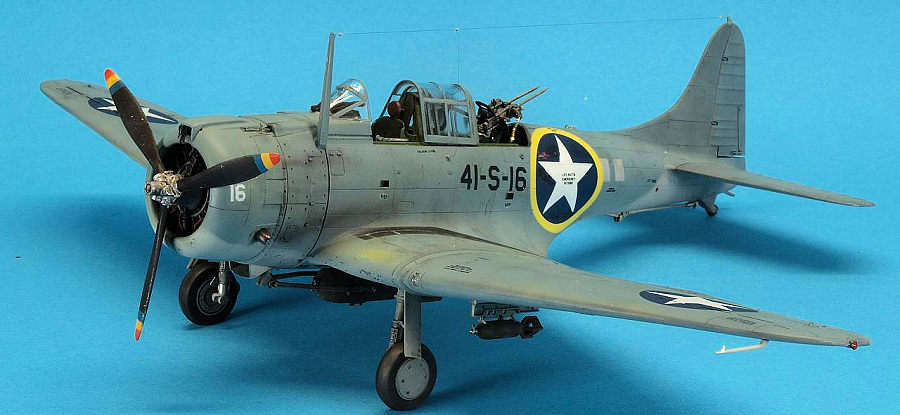
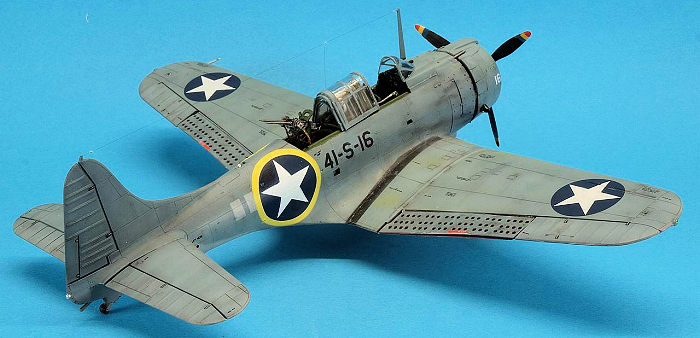
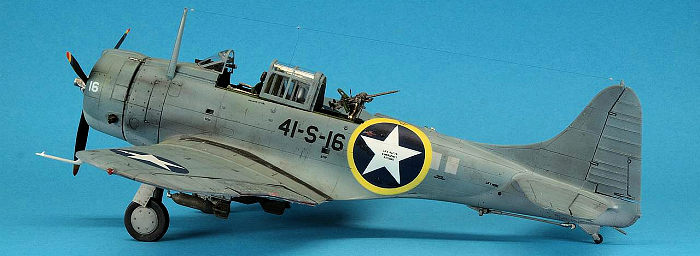
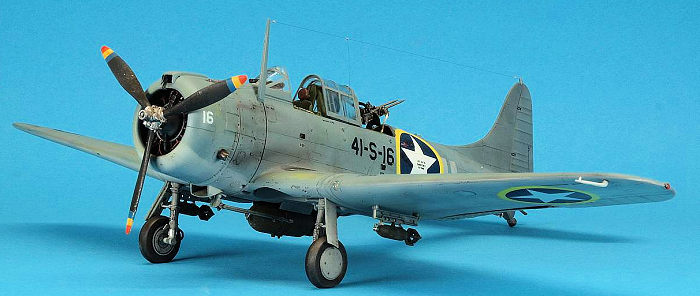
When I dragged my kit from the stash, I soon decided to use a different scheme from the one provided. Looking through decal options that would fit the kit, I decided to use a sheet for an aircraft flown from USS Ranger in November, 1942 during Operation Torch. This was the allied invasion of North Africa, and the immediate opponents were the French. There were still some formidable French warships, and during the fighting, Dauntlesses from USS Ranger sank the battleship Jean Bart in Casablanca harbour.
| THE KIT |
 Much more
capable and eloquent people than me have written about this kit. Visit
this
link.
Much more
capable and eloquent people than me have written about this kit. Visit
this
link.
From my point of view, it is very neatly produced and set standards back when it was first issued. It is quite highly detailed and complete, and in my eyes does not need much aftermarket. Surface detail is all there, yet restrained, and all in all I can well understand why this kit has been rated that highly.
I chose to use Eduard paint masks, very useful with a greenhouse canopy like the Dauntless´. Moroever I bought a recent Eduard PE sheet, with seatbelts and coloured instrument panels and the like. As my kit (the Coral Sea version) only had a single machine gun, I needed a twin machine gun. Again, Eduard had just what I needed – a multimedia kit from their Brassin series.
| CONSTRUCTION |
I started this kit after a less enjoyable project, hoping for a more relaxed build. In this spirit, I soon decided only to use the easiest PE items from the very nice Eduard sheet I had bought. Moreover, I decided to do the boring but probably prudent thing, and stick to the instructions.
Said
instructions to me looked more user-friendly than those of my previous Avenger
build, and I worked my way through the first step without much troubly. Not
having the Detail and Scale volume, a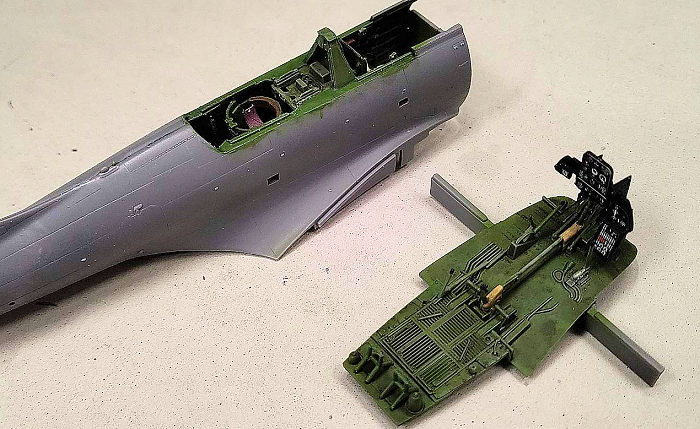 nd
not willing to buy it now, I made the best of the instructions re the colour
callouts, and soon had the fuselage halves ready for a wash and some drybrushing.
I also tackled the instrument panel and glued it to the cockpit floor, letting
it dry thoroughly for once.
nd
not willing to buy it now, I made the best of the instructions re the colour
callouts, and soon had the fuselage halves ready for a wash and some drybrushing.
I also tackled the instrument panel and glued it to the cockpit floor, letting
it dry thoroughly for once.
It´s always more demanding to reconcile kit and PE instructions, but skipping the weirder PE helped. I had originally intended to leave the PE fronts for the radios off, but in the end employed them and like their look. Once I had closed the fuselage, I addressed the cockpit bulkhead, the pilot´s seat and the gun mounting. The PE seatbelts, looking superior to the provided decals, worked reasonably well, even though demanding.
After assembling the gun mounting, I pulled out the Eduard Brassin twin .50 machine gun I had bought, and wa-hey, that little thing is a demanding kit in its own right. Again, I skipped the more ludicrous and molecule-sized parts, and hoped to get away with it. I mounted the gun in the raised position.
Having rechecked to the best of my knowledge, I glued the bulkhead with the pilot´s seat into the fuselage, and again let things cure well. Then followed the cockpit decking and the radio rack. Next came the crucial step of adding the rest of the cockpit assemblage, which went reasonably well. Nonetheless, to attach the bottom part of the wing, I needed to do some trimming at the front for a decent fit. I must have made a mistake with the lower part of the cockpit assembly.
That also firmly attached, I proceeded to the upper wing parts, which fit quite nicely, and let it all cure overnight. I then filled the small remaining gaps with Vallejo Putty. I also assembled the intermediate and the proper cowling, cleaned the parts up and dryfit the intermediate cowling to the fuselage. That necessitated some small corrections until I had a pleasing fit.
I then diverted from the instructions, by adding the paint masks to the canopy parts plus the other clear parts. The rationale was to be able to mask off the interior for painting in a simple and reliable manner. I was planning to use the part for the closed canopy for that, attaching it with Maskol. By the way - I realized that Eduard has switched parts J103 and 104 in their paint mask instructions, and mislabeled J 105 as K 105.
 Having
painted and assembled the engine, I checked the fit of the two cowling levels,
and then decided to only attach them with Maskol first, in order to be able to
paint the demarcations and weather the paintjob without interfering with the
engine. I also sprayed and washed the machine guns. The two forward-firing guns
I decided to add only after painting the cowling.
Having
painted and assembled the engine, I checked the fit of the two cowling levels,
and then decided to only attach them with Maskol first, in order to be able to
paint the demarcations and weather the paintjob without interfering with the
engine. I also sprayed and washed the machine guns. The two forward-firing guns
I decided to add only after painting the cowling.
I then finally started on the fuselage seams, carefully sanding them after masking the adjacent areas. Probably out of excessive worry, I covered the various openings in the bottom of the fuselage with Maskol or pieces of foam, and also glued the bomb fairing. I then assembled and glued the stabilizers, and filled the small remaining upper seams with Vallejo Putty. Whilst all that cured, I addressed the prop. Having seen in Davis Gandees´ SBD review that the prop tips in that timeframe were not yellow, I asked in our friendly forum. I was unsure whether all naval prop tips at that time had the same colour, or whether rank or fleet location or any other category played a role. I was assured that three stripes of four inches width were correct, with Insignia Red , then Yellow and Blue from the prop tip on. So I spent the best part of an afternoon spraying and masking, until I could remove the masks and sigh in relief.
| COLORS & MARKINGS |
Having prepared the fuselage as well as I could, I gave it a unifying coat of grey primer. The dive brakes were sprayed red on the insides and also on the outside, in an effort to get the holes a visible red from the outside later on. I also followed Davis´ review in not spraying the center divebrake red, but leaving it in the underside colour.
After overall preshading, areas I considered prone to wear and tear were sprayed Chromate Yellow. I had to use Lacquer based paint for the first time after almost two decades of using water-based paints only. It was a weird feeling for me, and I must admit I have very much come to enjoy the lack of paint fumes. The undersides were now sprayed Light (Gull) Grey, allowing some variations. After masking the undersides (using thin diameter soldering wire for the „flying mask“ sections, pure Blue Grey was applied, followed by a lighter second coat. I then masked the wing walkways and sprayed them black.
Now came
something special: Ranger´s planes still carried full squadron codes at the time
of Operation Torch. The yellow surrounds to the large National Insignia obscured
them partly. So they were reapplied ahead of the insignia and the old ones
painted over. In this plane, and there is a photo of it in the Squadron booklet,
the overpaint wasn´t done in the topside colour, but in a lighter
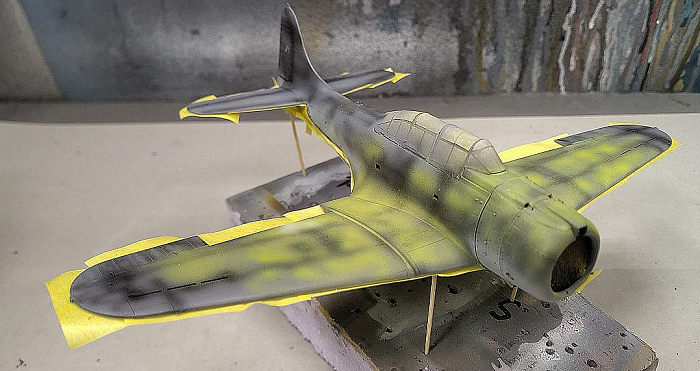 shade. The
author of the Squadron booklet assumes it was the underside colour. I made a
mockup of the insignia, a circle cut from masking tape with 28 mm diameter, to
hopefully judge correctly where the codes would have to got. I wanted to avoid
masking and spraying them after the decals were applied. Masking over decals?
Bad idea. Got the T-shirt. So I did my masking and spraying in a slightly
different light grey now.
shade. The
author of the Squadron booklet assumes it was the underside colour. I made a
mockup of the insignia, a circle cut from masking tape with 28 mm diameter, to
hopefully judge correctly where the codes would have to got. I wanted to avoid
masking and spraying them after the decals were applied. Masking over decals?
Bad idea. Got the T-shirt. So I did my masking and spraying in a slightly
different light grey now.
The next morning, I took the Micromesh cloth I had bought literally decades ago, and carefully rubbed away the topcoat in some places, so that the Chromate Yellow came through. It did work, and I was quite chuffed, to be honest. I then played around with thinned dark brown oil paint a bit to grunge things up, and then applied a good coat of Future.
The next day, I applied the first decal to the underside of the wing. That went well, so I continued. Sadly, the crucial National insignia on the fuselage wrinkled and started tearing. Moreover, the white wasn´t opaque enough. That did not make me happy.
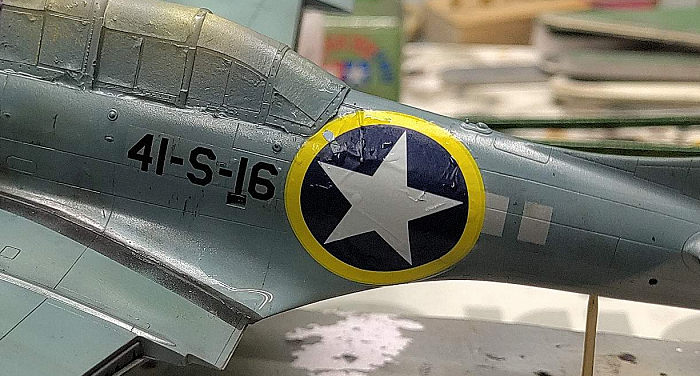 I used a
fresh X-Acto blade and setting solutions to make the decals conform to the
surface as well I could, let it cure overnight and then revisited the model to
decide upon my next step.
I used a
fresh X-Acto blade and setting solutions to make the decals conform to the
surface as well I could, let it cure overnight and then revisited the model to
decide upon my next step.
Things looked better, but not good enough. So I carefully smoothened the surface of the decal with Micromesh, and then applied the two remaining national insignia on top. They had no yellow surrounds, but were of the correct size. That went reasonably well, even though the little blighters where it belonged, applied Micro Set and let things cure. A while later, I applied Micro Sol, after carefully slicing open the still warped bits, and again very carefully used my dedicated decal brush to even things out.
In hindsight, what I should have done was getting proper masks and spray the whole shebang, or at least spray a white circle prior to applying the decals. I (hopefully wisely) decided against removing the decals and starting afresh. That process would have implied a whole flock of fresh problems of all sorts. And with me, those seem to gather compound interest, if you take my meaning.
I had applied the first decals on Tuesday morning. By Thursday afternoon I had most of the wrinkles evened out, and was able to make touchups using White, Chromate Yellow and Insignia Blue. Those improved the look a bit more. On Friday morning, I revisited the model, and made some passes with a Micromesh cloth to blend things in. Then I applied Future generously and let it all cure. Well, those three days surely made things interesting, exciting and, oh yes, challenging. Not that I entered the project for these three flavours.
Next came adding the stencils, of which I did not use all. They were then sealed with Future and later a flat coat was added. That cured, I found some areas with silvering and again used setting solutions, Future and a flat coat. These decals had an aim: Teaching me Virtues like Patience and Humility.
| FINAL CONSTRUCTION |
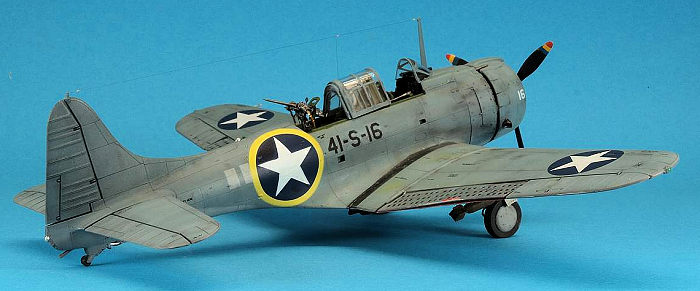 Now I
could disassemble the cowling pieces previously only attached with Maskol. Upon
adding the machine guns, I found they interfered with the PE instrument panel,
so I shortened the guns accordingly. Now they fit, and I attached the first
cowling piece, followed by the engine. Before adding the cowling proper, I
played around with my airbrush adding exhaust staining, which in my eyes went
quite nicely, thank you. Having added the cowling, proceeded with the dive
brakes, adding first the upper and then the lower ones. Having added a bit more
grunge to the undersides, I then added the landing gear and bomb parts.
Now I
could disassemble the cowling pieces previously only attached with Maskol. Upon
adding the machine guns, I found they interfered with the PE instrument panel,
so I shortened the guns accordingly. Now they fit, and I attached the first
cowling piece, followed by the engine. Before adding the cowling proper, I
played around with my airbrush adding exhaust staining, which in my eyes went
quite nicely, thank you. Having added the cowling, proceeded with the dive
brakes, adding first the upper and then the lower ones. Having added a bit more
grunge to the undersides, I then added the landing gear and bomb parts.
Now came the home stretch. The bombsight and the hoisting cable plus the headrest were added to the cockpit. But I left out the map table as that would be only attached by the pilot after entering the aircraft. I then glued the various canopy pieces with PVA, trying to make them fit as well as I could. The twin machine gun was iffy to add, but after a while it held. The final items to be added were the antenna mast and wiring, and the pitot tube. The various navigation and formation lights were painted accordingly, with small drops of PVA added over them. Some more grunging up and I called it quits.
| CONCLUSIONS |
This is a really very neat kit. Well designed and produced, it builds well without much hassle. It depicts a most important (and iconic) aircraft. I enjoyed the process a lot; I especially had fun with my new airbrush, and with exposing the yellow primer using Micromesh cloth.
I had wanted to use the rather more colourful Operation Torch decals, but I was quite unhappy with how they behaved. Obviously, as I had decal trouble several times over the past year, the problem might not be the decals, but the klutz trying to work with them. The jury´s still out on that.
Anyway – I enjoy looking at the completed model and on the whole, it was a great experience.
| REFERENCES |
https://www.pearlharboraviationmuseum.org/blog/douglas-sbd-dauntless-scout-dive-bomber/
https://airandspace.si.edu/collection-objects/douglas-sbd-6-dauntless/nasm_A19610109000
Frank Spahr
30 September 2026
Copyright ModelingMadness.com. All rights reserved. No reproduction in part or in whole without express permission.
If you would like your product reviewed fairly and fairly quickly, please contact the editor or see other details in the Note to Contributors.