Matchbox 1/32 SBD-5 Dauntless
| KIT #: | 04711 |
| PRICE: | €22 in 2007 |
| DECALS: | Three options |
| REVIEWER: | Spiros Pendedekas |
| NOTES: |
| HISTORY |
 "Scout Bomber Douglas" (SBD) Dauntless was the US Navy's main
carrier-based scout/dive bomber from mid-1940 through mid-1944. It was
also flown by the United States Marine Corps, both from land air bases
and aircraft carriers. A land-based variant, having the arresting hook
deleted, was purpose-built for the USAAF, as the A-24 Banshee.
"Scout Bomber Douglas" (SBD) Dauntless was the US Navy's main
carrier-based scout/dive bomber from mid-1940 through mid-1944. It was
also flown by the United States Marine Corps, both from land air bases
and aircraft carriers. A land-based variant, having the arresting hook
deleted, was purpose-built for the USAAF, as the A-24 Banshee.
With its long range, good handling and maneuverability, potent bomb load, great diving characteristics, good defensive armament and general ruggedness, it is of no surprise that the SBD was considered a very good naval scout plane and dive bomber.
Having been designed back in 1935 and consequently considered somehow obsolete at the beginning of WWII, destined to be scrapped, it interestingly persisted and remained in service only because its successor(s) development was problematic! Its most important version was the SBD-5, with 2965 built, featuring a more powerful R-1820 engine, increased ammunition and radar equipment capability.
This fine plane is perhaps best remembered as the bomber that delivered
the fatal blows to the Japanese carriers at the Battle of Midway in June
1942. Its nickname "Slow But Deadly" was earned during this period.
| THE KIT |
Matchbox initially issued this kit in 1977. It was reboxed by AMT in 1981, with its (so far) final reissue performed by Revell in 1999. A copy of this last reissue was discovered in 2007, forgotten on a book shop’s shelf at a small Greek town, carrying an equally “forgotten” price tag of only €22. Yours truly being a hunter of such classic, old, forgotten (and the like) kits, meant that this kit was acquired immediately.
 The kit comes in the typical side opening Revell blue box, with a very
attractive boxart, depicting a couple of VMSB-231 Dauntlesses performing a
dive bombing. Inside the box, you are greeted with 5 light gray big sprues
sealed in a bag. Molding still looks good with not a lot of flash. Panel
lines are a mixture of raised and engraved and are adequately executed (no
Matchbox “trenches” here). Cockpit detail is sparse and very generic, not
very convincing. Two barely acceptable looking pilot figures provided.
The kit comes in the typical side opening Revell blue box, with a very
attractive boxart, depicting a couple of VMSB-231 Dauntlesses performing a
dive bombing. Inside the box, you are greeted with 5 light gray big sprues
sealed in a bag. Molding still looks good with not a lot of flash. Panel
lines are a mixture of raised and engraved and are adequately executed (no
Matchbox “trenches” here). Cockpit detail is sparse and very generic, not
very convincing. Two barely acceptable looking pilot figures provided.
Engine, as well as firewall and aft details (supporting struts, fuel tank etc.) are simplistic looking. Their surrounding panels are destined not to be glued, in order for the latter structure to be visible. Landing gear looks also very simplistic, this being also true for the totally plain bays area. At least, the characteristic dive brakes are separately provided and are nicely perforated, but no internal detail is provided at them whatsoever.
Instructions were redone by Revell at this last reissue and are a definite improvement over the original ones. Three nice scheme options are provided, one of them being a French Aeronautique Navale version. The comprehensive decals are printed by Cartograf, still looking nice after all those years.
All in all, inside the box is what one would expect to find on a decent 1977 era kit. I decided to give this kit a go, build it out of the box (OOB) with pilot and gunner in the cockpit, “just like old times”.
| CONSTRUCTION |
I began by joining the two fuselage halves, with the cockpit floor,
instrument panel and gunner’s aft horizontal plate trapped between them. I
then attached the 2-piece pilot's and single piece gunner’s seats, the
control stick, the pilot-gunner intermediary bulkhead and the rear machine
gun (at “stowed” position-with its two top fuselage doors affixed “closed”
as well). Basic cockpit color was Hu226 Interior Green, with black
instrument panel, consoles and stick grip, “leather” cushions and gunmetal
machine gun. A leftover instrument decal was applied at the instrument
panel. The rest of the raised details were dry brushed with silver, various
red “knobs” were replicated with a 10/0 b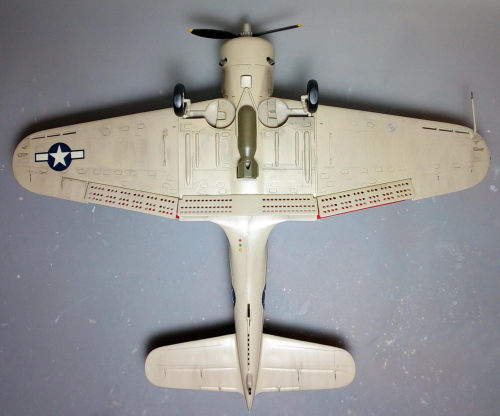 rush and a leftover small gunsight
was added. The finished cockpit looked sparse for 1/32, with the plan being
to insert the two figures provided (after “livening” them up) at later
stages, in order to fill the emptiness.
rush and a leftover small gunsight
was added. The finished cockpit looked sparse for 1/32, with the plan being
to insert the two figures provided (after “livening” them up) at later
stages, in order to fill the emptiness.
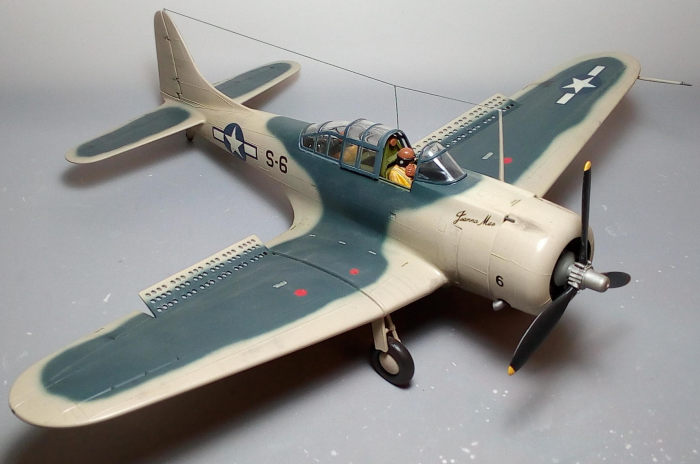
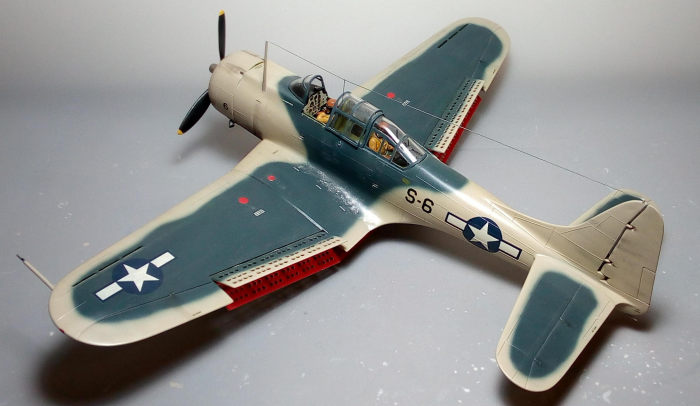
The main wing was a beautiful subassembly, consisting of a central underside part, onto which two upper smaller ones were first attached; then the two outer (2-piece each) wings were attached at a dihedral, with a helpful head-on view provided by the instructions indicating the correct angles. Since the main landing gear legs, doors and bays would be painted underside color, they were installed at that time, as well. I decided not to install the dive brakes, as they would be too fragile at those early stages.
Whereas Revell suggested allowing 5 hours curing time for the assembled wing assy, I went on and immediately attached the fuselage on it. This is kind of a standard practice for me, as I prefer to have all basic components joined all at once (when possible), in order to have some allowance taking care of gaps and joint angles before glue completely cures. The single piece horizontal stabilizers and two piece rudder were also attached. Fit of all the above was good.
After aligning at correct angles, I let the whole assembly to cure and moved on doing some more subassemblies: those included the 4-piece engine with its 7-piece aft support structure, the 2-piece front cowling, the 5-piece prop, the 3-piece main wheels (sans the hubs, in order to make painting easier) and, finally, the 4-piece bomb.
Upon glue curing, I went on and attached the engine supporting assy at the
fuselage front, followed by building up the 3-piece cover around them in
such a way that joint gaps were minimized. The engine was then attached,
followed by the cowling. The firewall front face and cowling innards were
painted green zinc (Hu226) and the engine was painted black, then dry
brushed with silver. The two piece rear wheel was attached at this time, as
well.
The very nicely perforated dive brakes were smooth sanded and had their
innards painted red. After a general filling and sanding session, I attached
the central bomb anchoring device and wing pylons, I blocked the engine with
wet tissue and headed to the paint shop!
| COLORS & MARKINGS |
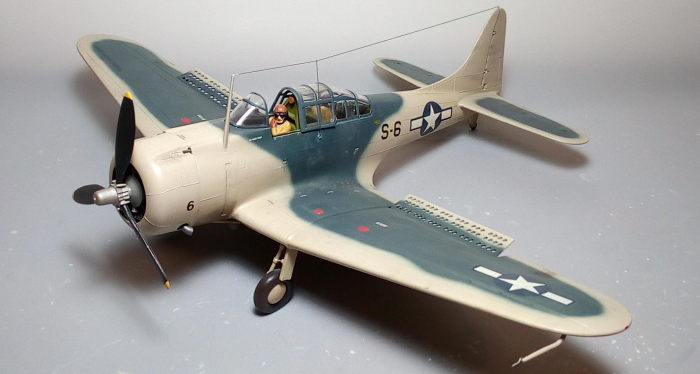
I decided to depict a machine belonging to USMC VMS-3, as it operated from
MCAS Bourne Field, St Thomas, Virgin Islands, sometime in 1944. Instructions
call for a very light gray overall, with sea blue freely applied on top of
the main wings, horizontal stabilizers and central part of the fuselage. I
was 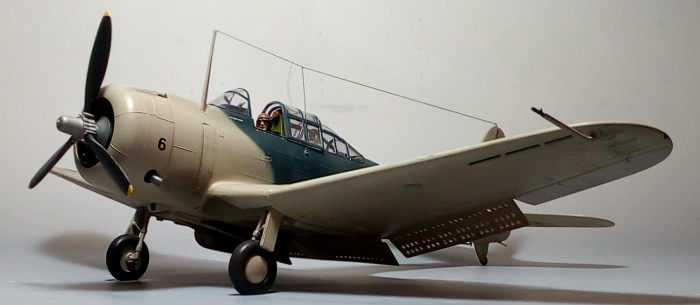 somehow pleasantly surprised with the sea blue color callout, as I
thought it would have been kind of gull (dull!) gray. Upon netting, though,
I found an excellent color pic, depicting MSS-3 Dauntlesses in formation,
flying over Virgin Islands from that time period, clearly indicating that
the top color was not gray, but kind of intermediate blue.
somehow pleasantly surprised with the sea blue color callout, as I
thought it would have been kind of gull (dull!) gray. Upon netting, though,
I found an excellent color pic, depicting MSS-3 Dauntlesses in formation,
flying over Virgin Islands from that time period, clearly indicating that
the top color was not gray, but kind of intermediate blue.
I thus went on and applied to the whole plane a coat of Hu196, which dried at a very light gray, almost off-white shade. The dive brakes’ external surfaces, wheel bays and all landing gear components were painted with the same color. Upon drying, I freehanded the topside blue, for which I used Hu144 Intermediate Blue, which positively matched the pic reference color. After “tightening” the demarcation lines with my airbrush at its finest settings, I applied an overall coat of Future, in order to prepare the model for decaling.
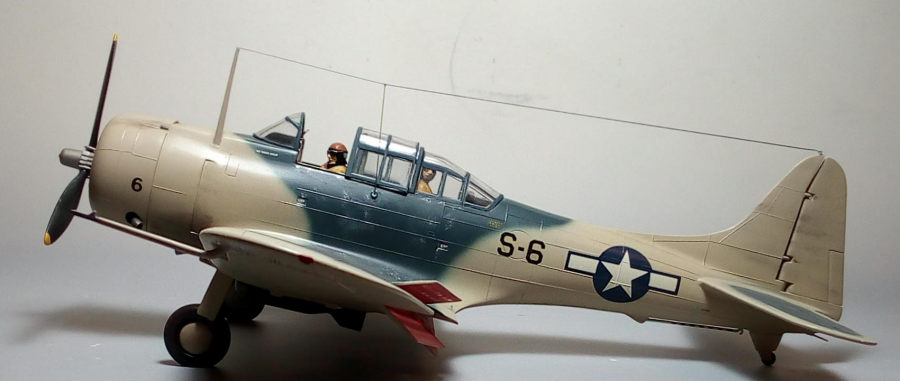
I used the kit decals, in order to represent the “S-6” machine, which carried the name “Joanna Mae'', discreetly written on the starboard side. Though old, the decals behaved flawlessly whatsoever, adding a lot to the model looks. A coat of Future sealed them.
| FINAL CONSTRUCTION |
The main wheels were flattened with a file to look weighted, had their tires
painted black, and installed in position, followed by their hubs (It is true
that the inner rim areas looked totally toyish and, though I was in OOB
build mode, i should have extra detailed that area a tad, oh well...). The
rear wheel had its tire carefully painted black with a 10/0 brush. The
arresting hook was painted fuselage color with black stripes and attached in
position.
The front antenna, pitot tube and simplistic nose guns were also attached. Guns and the pitot tip were painted gunmetal. The bomb was painted olive drab and attached in position, as well.
It was then pilot's and gunner's time! In order to breathe life into them, I repositioned their heads and hands to less stiff posture (yes, I had to brutally cut them…). After receiving khaki flying suits, yellow vests, leather gloves and helmets and black boots, earphones and goggles, they were attached onto their seats, with the end result looking busier and more realistic.
 The prop had steel hub, black blades, yellow tips and was attached, together
with the two exhausts that were previously hollowed by drilling and painted
Testors Burned Metal. All 5 dive brakes were then attached “deployed”, a
position observed many times. I opted for that position (together with
adding cockpit figures and the bomb), as to try “busying/livening up” the
otherwise simplistic looks.
The prop had steel hub, black blades, yellow tips and was attached, together
with the two exhausts that were previously hollowed by drilling and painted
Testors Burned Metal. All 5 dive brakes were then attached “deployed”, a
position observed many times. I opted for that position (together with
adding cockpit figures and the bomb), as to try “busying/livening up” the
otherwise simplistic looks.
Whereas pic evidence shows the VMS-3 flying Dauntlesses in near pristine condition, applying some weathering would not look out of place and would add some extra interest. I thus went on and applied exhaust marks, fuel/oil leakages and general dirtying, especially at the undersides, all done with suitable colors of dry pastels. Some paint chipping (done with “silver” dry brushing) and black wash was judiciously applied as well, with an almost matt coat giving this beautiful bird its final finish.
After hand painting windscreen and canopy frames, I attached them in place using tiny amounts of styrene glue, with white glue filling the gaps afterwards. The wingtip lights were represented with tiny blobs of red and green clear paint.
Stretched sprue, tightened with a hairdryer, was run from the front antenna
mast to the fin, (with a shorter part running from the port cockpit sides
straight up to "meet" the main wire), before calling this beauty done!
| CONCLUSIONS |
The only other 1/32 option of this important plane is the very comprehensive Trumpeter offering. Trumpeter came with a full series of 1/32 Dauntlesses/A-26 Banshees back in 2006. Those seem to be the definitive Dauntlesses kits so far, a pleasure to build, as can be realized in Tom’s reviews here and here; they definitely are the way to go, not only if you want a 1/32 Dauntless, but also the best model of Dauntless in any scale! Though initially coming at a high price (well over $100) back then, they can be found at more reasonable prices nowadays (as of 2021).
 With good general shape, but otherwise sparsity and simplicity
detail-wise, the Revell/Matchbox offering was by all means a decent offering
when it first appeared in 1977. Built out of the box, as in my case here, an
acceptable model might result, especially if tackling the latest Revell
reissue which carries nice decals. Attaching the dive brakes in “open”
position and using the crew members resulted in busier/livelier looks,
something this kit desperately cries for. Of course, you might commence
super detailing key areas, but, with the Trumpeter offerings in existence,
there may be little point in attempting such a big job.
With good general shape, but otherwise sparsity and simplicity
detail-wise, the Revell/Matchbox offering was by all means a decent offering
when it first appeared in 1977. Built out of the box, as in my case here, an
acceptable model might result, especially if tackling the latest Revell
reissue which carries nice decals. Attaching the dive brakes in “open”
position and using the crew members resulted in busier/livelier looks,
something this kit desperately cries for. Of course, you might commence
super detailing key areas, but, with the Trumpeter offerings in existence,
there may be little point in attempting such a big job.
An easy build (in fact it was a joy to put it together), making it an ideal
choice for your first 1/32 project, not re-released since 1999 and extremely
difficult to find nowadays, who knows, Revell, Atlantis, or someone else,
might surprise us and re-issue it at a reasonable price, taking its position
beside the definitive Trumpeter as a cheap, decent, simple build.
If you happen to own one, and have some respectable shelf space available (she is a big girl in 1/32!) by all means go and tackle it: "Good Old" modeling times wll fo sure be revived!
Happy modeling!
21 March 2022
Copyright ModelingMadness.com. All rights reserved. No reproduction in part or in whole without express permission.
If you would like your product reviewed fairly and fairly quickly, please contact the editor or see other details in the Note to Contributors.