Academy 1/72 SB2C-4 Helldiver
| KIT #: | 12545 |
| PRICE: | $42.00 SRP |
| DECALS: | Two options |
| REVIEWER: | Bill Michaels |
| NOTES: | Converted to USCG RESCUE configuration |
| HISTORY |
August 4th, 2022 (Coast Guard Day) marks the service's 232nd anniversary! The US Coast Guard was founded on August 4th, 1790, as the Revenue Marine. As such, it is the USA's oldest continuous sea-going service. (The Continental Navy and Marines were created in 1775, but were disbanded after the Revolutionary War, and not re-established until 1798.) In honor of Coast Guard Day, here is a build of a lesser-known USCG subject....
I won't repeat the story of the long, defect-plagued development of the Helldiver-- Scott covers that well in his 2006 Preview of the original release.
Rescue Helldivers
 Late in the war, the U.S. Navy converted some
battle-weary Helldivers for use as rescue aircraft. The were used primarily in
rear areas- Hawaii and the west coast. There were lots of training and test
flights, as well as ASW patrols being flown in the areas around the major (and
minor) bases. Accidents and engine failures, etc. led to pilots ditching in the
open ocean, sometimes at a great distance from the Air Station.
Late in the war, the U.S. Navy converted some
battle-weary Helldivers for use as rescue aircraft. The were used primarily in
rear areas- Hawaii and the west coast. There were lots of training and test
flights, as well as ASW patrols being flown in the areas around the major (and
minor) bases. Accidents and engine failures, etc. led to pilots ditching in the
open ocean, sometimes at a great distance from the Air Station.
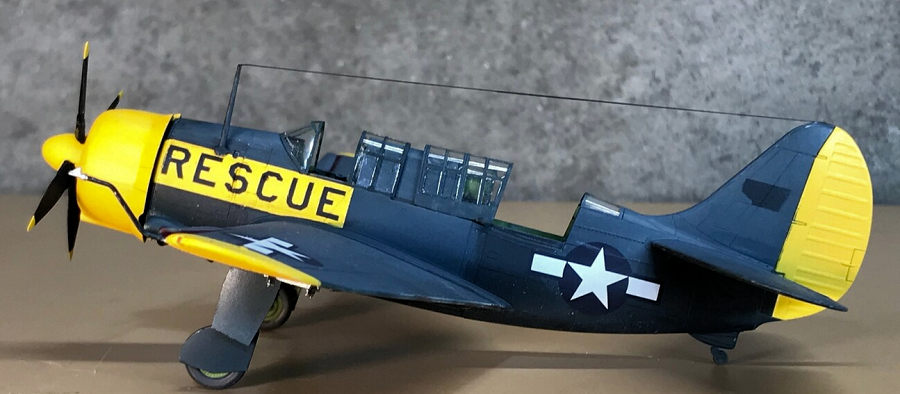
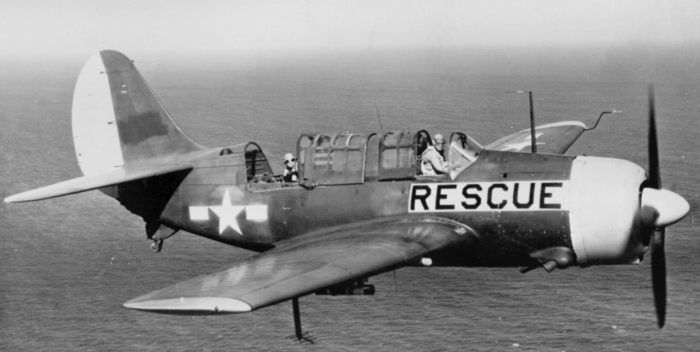
The idea behind using the Helldiver as a SAR platform was that it was twice as fast as any available seaplane or other multi-engine traditional search aircraft. The aircraft were stripped of armament, and instead of bombs they carried a large life raft with food, water, and medical supplies. The planes would be used to quickly find downed aircrew, and deliver the raft and supplies to keep the aircrew alive until a rescue boat or nearby ship could pick them up.
The planes were given distinctive SAR markings. Photos show the aircraft's original Dark Sea Blue paint had weathered and faded extensively. The planes being converted were not completely repainted-- rather, fresh paint was used to cover up the old markings, then new national insignia was applied. (The photos clearly show how much darker the bands of fresh paint were in comparison.) The planes also got standard yellow SAR markings, including the large “RESCUE” on each side of the nose.
US Coast Guard use of the Helldiver
 In July of 1945, Coast Guard Air Station San Diego
obtained three Navy Rescue Helldivers for evaluation as potential SAR aircraft
for use after the war, as they had real potential for use in traditional coastal
rescue situations. (The Coast Guard also later took on ex-Army and Navy
SB-17G/PB-1G aircraft for the long range SAR mission post-war.) They Helldivers
were used for a variety of missions over the waters off southern California, and
were considered successful. But they were still returned to the Navy in January
1946, when the Coast Guard was returned to the Treasury Department to resume
peacetime operations. While successful, the aircraft were deemed to be too
expensive to operate, and that fact, coupled with the pioneering work the Coast
Guard had done during the war with helicopters, marked the end of the use of
single-engine fixed wing aircraft for the USCG Search and Rescue mission in
coastal waters.
In July of 1945, Coast Guard Air Station San Diego
obtained three Navy Rescue Helldivers for evaluation as potential SAR aircraft
for use after the war, as they had real potential for use in traditional coastal
rescue situations. (The Coast Guard also later took on ex-Army and Navy
SB-17G/PB-1G aircraft for the long range SAR mission post-war.) They Helldivers
were used for a variety of missions over the waters off southern California, and
were considered successful. But they were still returned to the Navy in January
1946, when the Coast Guard was returned to the Treasury Department to resume
peacetime operations. While successful, the aircraft were deemed to be too
expensive to operate, and that fact, coupled with the pioneering work the Coast
Guard had done during the war with helicopters, marked the end of the use of
single-engine fixed wing aircraft for the USCG Search and Rescue mission in
coastal waters.
| THE KIT |
 The Academy SB2C-4 kit was well received when first
released in 2005. It was a welcome replacement for the (very) old Airfix and
Matchbox kits that were the only other options in 1/72 before that. Academy
followed the initial 2005 release with a Special Edition in 2006 that included
PE flaps and dive brakes and new markings. (This 2006 release was the only one
to date that has included the “RESCUE” markings.)
The Academy SB2C-4 kit was well received when first
released in 2005. It was a welcome replacement for the (very) old Airfix and
Matchbox kits that were the only other options in 1/72 before that. Academy
followed the initial 2005 release with a Special Edition in 2006 that included
PE flaps and dive brakes and new markings. (This 2006 release was the only one
to date that has included the “RESCUE” markings.)
In 2016, Academy did a Special Release – “Operation Iceberg” (The Okinawa invasion), and then released it again (unchanged) in 2020. This release includes PE flaps and dive brakes that can be positioned open or closed, as well as decals for three aircraft.
| CONSTRUCTION |
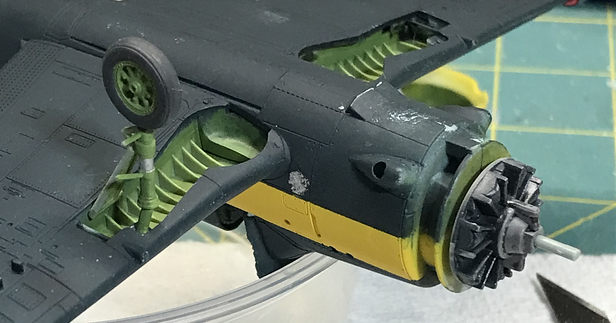
Construction starts with the cockpit. I am not a
cockpit super-detailer, especially in 1/72 scale. In this case, I think the
cockpit is nicely detailed, and I found that the parts required very little
clean-up and all fit well. The floor of the cockpit is also the top of the bomb
bay, with decent detail on both sides. The seat and
 instrument panel both looked
good enough, and the kit's IP decal was sufficient, given that you can't see it
all that well once the model is assembled. The separate sidewalls look nice once painted,and a simple wash and highlights will work wonders.
instrument panel both looked
good enough, and the kit's IP decal was sufficient, given that you can't see it
all that well once the model is assembled. The separate sidewalls look nice once painted,and a simple wash and highlights will work wonders.
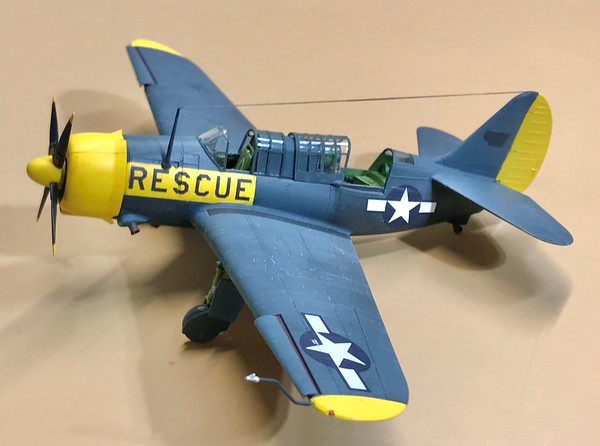
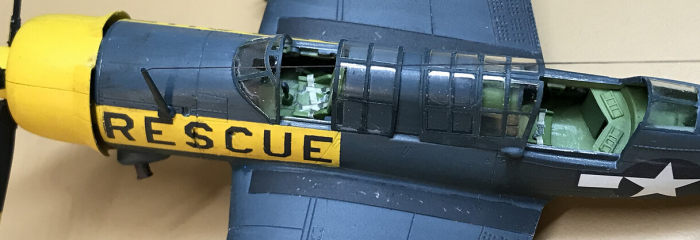
The rear cockpit also fits well and looks good, but with that big canopy it could use a few detail enhancements. The radio rack looks OK with its various black boxes, though I found the kit decals for these to be a bit lacking- I think that just painting and dry brushing the parts gives a better look. Also, you can see the backs of the radios through the canopy, and it looks too empty/plain. I added some wiring harnesses made from thin copper wire, painted black, to “busy up” the back side.
The rescue planes were unarmed, but I went ahead and assembled the rear guns for the sake of the review. (see photo) One detail missing is that at the aft end of the rear cockpit, the rear deck has molded ammo bin tops. There should be large ammo boxes under them, but the kit doesn't include that detail. I didn't care, as I'm not using the guns, but I would probably add them if I was doing a standard Helldiver.
Another detail I did add to the rear cockpit is the crew's life raft. There is a tube that holds this, mounted to the inside of the fixed section of the rear canopy. The kit just gives you an empty container-- so I took a small piece of Tamiya masking tape and folded and rolled it to look like a rolled-up life raft. I gave it a dingy yellow wash and stuffed it into the tube. It was a simple thing to make, but it really improves the look of the rear cockpit!
I have never really liked PE seat belts- I always found them hard to shape properly, and the paint would chip off, etc. For this build, I tried something new-- I used the Kits World 3D printed seat belt decals. I really like the way they worked-- they aren't as flat as PE or regular decals, and were easy to install. The close up photo shows a little pixelation in the printing, but that is exaggerated by the camera somewhat. In person, they look nice to me! (I think they'd be even better in larger scales.)
 The left and right bomb bay doors are molded in the
open position, each is a single piece with the bomb bay sidewalls and hinges all
together. This makes for a sturdy, hassle-free installation if you are doing the
normal kit- but I wasn't. I couldn't find any photos showing what the rescue
payload looked like, so I built my model with the doors closed. To do that, you
need to do some surgery, and cut the door free from the rest of the part.
The left and right bomb bay doors are molded in the
open position, each is a single piece with the bomb bay sidewalls and hinges all
together. This makes for a sturdy, hassle-free installation if you are doing the
normal kit- but I wasn't. I couldn't find any photos showing what the rescue
payload looked like, so I built my model with the doors closed. To do that, you
need to do some surgery, and cut the door free from the rest of the part.
In many kits I have found that landing gear and bomb bay doors meant to be built open don't actually fit the opening very well if you try to assemble them in the closed position. Fortunately, that was NOT the case here-- the doors fit quite well-- I just needed to do a little sanding along the hinge-side edge. (I had cut them a little oversize, as a precaution.)
If you are going to close the doors-it is easier to fit them before closing up the fuselage. Once that was sorted out, I found that the cockpit parts fit perfectly inside the fuselage, and the fuselage closed up nicely. The design of the kit allows you to leave the engine and cowl off until the end-- that made painting easier!
From the start, I had no intention or desire to use the PE dive brakes. The original plastic brakes look fine to me in the closed position-- the only reason I would see using the PE parts is if you waned to show them in the open position. (I'm not a fan of PE parts in general, and do not go out of my way to use them when they aren't really needed.)
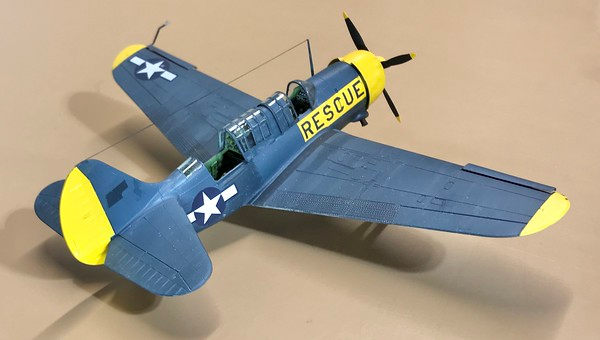
With that decision made, I found the wings went together easily. For the rescue edition, I left the gun barrels out, and cut the end of the barrels off the front of the wing fairing. The wing slats are separate parts—and can be installed deployed or retracted. Every photo I could fine shows them extended on the ground, so that's the way I built them. The mounting points are a bit fragile, so I'd recommend leaving them off to the very end of the build.
| COLORS & MARKINGS |
When I started building the kit, I was planning on
having to come up with my own set of markings for the Rescue version. The kit
decals for the basic US insignia could be used, but I thought I'd have to make
decals for the “RESCUE”. Academy did include the decals for the Rescue version
in the first Special Edition release from 2006, but I couldn't find it anywhere.
Fortunately, Modeling
 Madness regular “chukw” did have a copy of the 2006 kit,
and he sent me a hi-res scan of the both the decal sheet and the relevant
placement instructions. That allowed me to work with my club-mate and friend Pip
Moss to create the appropriately-sized graphics as a .pdf file.
Madness regular “chukw” did have a copy of the 2006 kit,
and he sent me a hi-res scan of the both the decal sheet and the relevant
placement instructions. That allowed me to work with my club-mate and friend Pip
Moss to create the appropriately-sized graphics as a .pdf file.
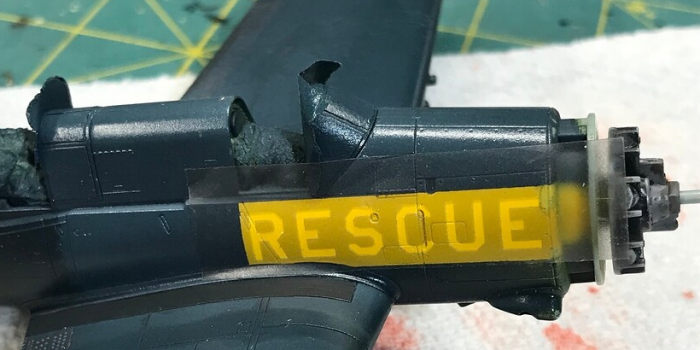
I now had two options for the RESCUE markings: I could print them on clear decal film, or use my Cameo4 cutting machine to make a mask for painting. The decal route can be easy, but I was a little concerned about the amount of clear film that would be between the letters. Knowing that nothing looks more like painted -on markings than actual painted-on markings, I went ahead and cut a mask. The letters are less than a ¼ inch tall (about 6mm), but I was still able to get a cleanly cut mask.
I primed the model with white Stynlrez, then painted the yellow areas with Tamiya XF-3 flat yellow. Once that was fully dry, I then installed the fixed canopy parts and applied the Eduard canopy masks. I then masked the cockpit and all the parts that needed to stay yellow and started in on the blue. The entire model then got a coat of Vallejo Dark Sea Blue, top and bottom.
I wanted to give the model a faded and worn appearance, as all the photos I found seem to show that new, fresh-from-the-factory aircraft were not converted to SAR aircraft-- older aircraft seemed to be the ones converted for this role. So before I went any further with the paint, I did some testing...
I had a copy of the old Airfix Helldiver kit in the stash, so I went ahead put the basic airframe together. I then primed it and painted it top and bottom with the same Dark Sea Blue. I then started experimenting, by adding small amounts of Vallejo white and Intermediate blue to the Dark Sea Blue, and thinned the mix so it was more like a wash. I then airbrushed multiple layers, lightening the paint a little more each time as a went. I focused mostly on the parts of the aircraft that was most exposed to the sun--- the bottom got a few light passes only, so it stayed fairly close to the original dark blue.
 Happy with the results, I then prepared the model for
the same treatment. I masked off the areas that I wanted to stay dark blue to
represent the old markings getting painted out with fresh paint. The model then
got the same treatment that I had used on the paint mule. (I avoided fading the
yellow areas- they were supposed to look like fresh paint.)
Happy with the results, I then prepared the model for
the same treatment. I masked off the areas that I wanted to stay dark blue to
represent the old markings getting painted out with fresh paint. The model then
got the same treatment that I had used on the paint mule. (I avoided fading the
yellow areas- they were supposed to look like fresh paint.)
With the faded paintwork done, it was time to apply the decals. The yellow parts were un-masked, and a gloss clear coat was applied to the model. The Academy decals went down really well, and only needed a little MicroSet/Sol to settle in. The RESCUE masks were then applied-- and the markings airbrushed. After the masks came off I was very pleased-- they came out perfect!
The look I was going for was relatively un-weathered paint on the undersides, but faded/chalky paint with new markings on the top surfaces. Here's how I did that:
Temporarily attach the cowl with a bit of putty.
Coat of semi-gloss clear on the undersides.
Red wash on the dive brakes
Flat coat on the topsides.
Additional well thinned flat clear with a drop of white or light gray, to build up a “chalkiness” effect on the horizontal surfaces. (The undersides of the of the folding parts of the wing got a little of this treatment too, to show the effect of the hot Pacific sun on the planes when parked on the flight deck.)
A very light application of the “dot filter” effect, using white oil paint.
A final flat clear to tie everything together.
Once the model was flat coated, the final details were put into place. The engine, cowl and prop were attached. The pitot tube and radio mast were installed, and a bit of Ezline was installed for the antenna. The moving canopy parts were tacked in place with a couple of dots ow white canopy clue.
| CONCLUSIONS |
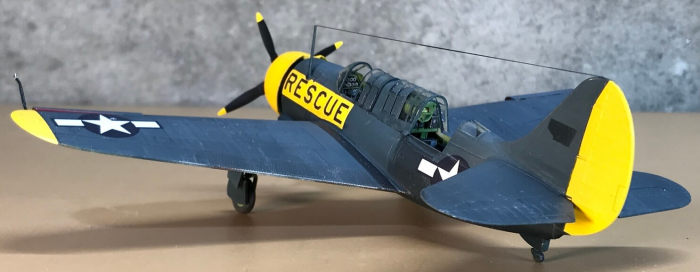 Highly recommended. I was really impressed with the
fit and finish of the kit-- it was an enjoyable build from start to finish! I am
also very happy with how well the home-made masks turned out, and how well my
first attempt at a sun faded finish turned out.
Highly recommended. I was really impressed with the
fit and finish of the kit-- it was an enjoyable build from start to finish! I am
also very happy with how well the home-made masks turned out, and how well my
first attempt at a sun faded finish turned out.
This was one of those rare builds where everything went right!
| REFERENCES |
Book: U. S. Coast Guard Aviation, by Arthur Pearcy
Website: Coast Guard Aviation History https://cgaviationhistory.org
Kit Instructions, Wikipedia, assorted modeling forums.
Special thanks to Pip Moss of the IPMS Patriot Chapter in Bedford, Massachusetts and to Chuck Wojtkiewicz (chukw) for their assistance in getting the “Rescue” markings sorted out!
4 August 2022
Copyright ModelingMadness.com. All rights reserved. No reproduction in part or in whole without express permission.
Review kit courtesy of my wallet.
If you would like your product reviewed fairly and fairly quickly, please contact the editor or see other details in the Note to Contributors.