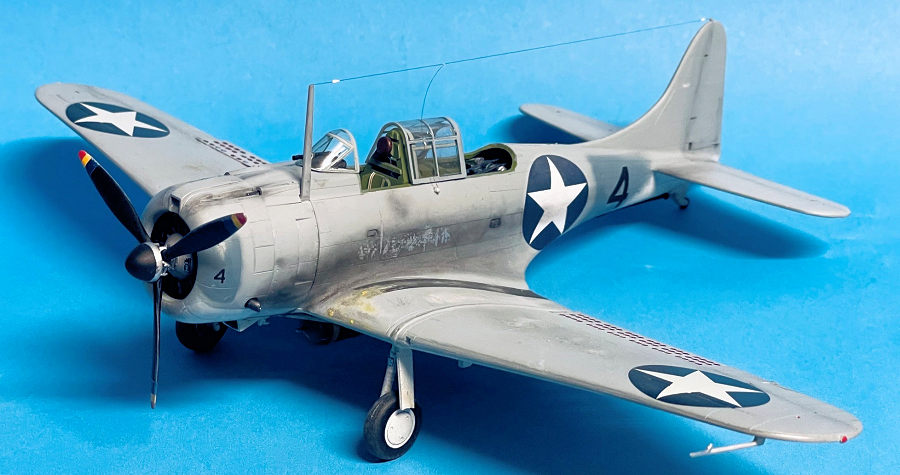
Hasegawa 1/48 SBD-3 Dauntless
| KIT #: | 09119 |
| PRICE: | $25.00 |
| DECALS: | Three options |
| REVIEWER: | H Davis Gandees |
| NOTES: |
| THE KIT |
 Hasegawa
released this kit in 1994. There have been 8 re-releases, the most recent in
2020.
Hasegawa
released this kit in 1994. There have been 8 re-releases, the most recent in
2020.
The kit is accurate in shape and exterior detail, but the kit is overly simplified in the cockpit but more so with the iconic dive flap holes being molded solid! Also, the canopy pieces are too thick and can’t easily be positioned open. There are 7 pages of clear instructions with color callouts and 3 views for 3 aircraft. However, the instructions call for the prop tips to be painted yellow, that is incorrect for the timeframe. Yellow prop tips were not authorized until February 1, 1943.
| CONSTRUCTION |
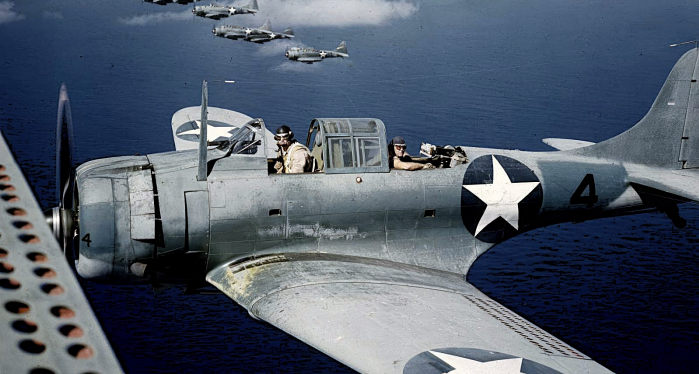
After reading Barrett Tillman’s excellent “The Dauntless Dive Bomber of WWII, I was inspired to build this kit. While researching the SBD, I came across this mesmerizing color photo of a Marine SBD-3 from VMSB-241 just after Midway. The Marines received this one and others from the Navy to replace the ones that were sadly lost at Midway. VMSB-241 flew obsolete SB2U-3 Vindicators and SBD-2 Dauntless dive bombers under heavy fire using low altitude glide bombing rather than vertical dive-bombing suffering heavy losses. I don’t normally do heavy weathering, but I had to try and replicate the photo in 1:48.
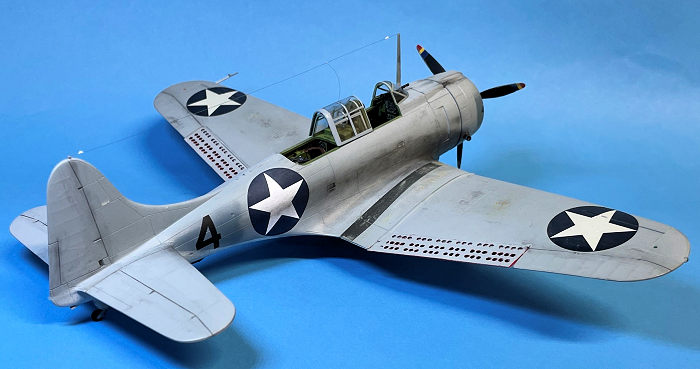
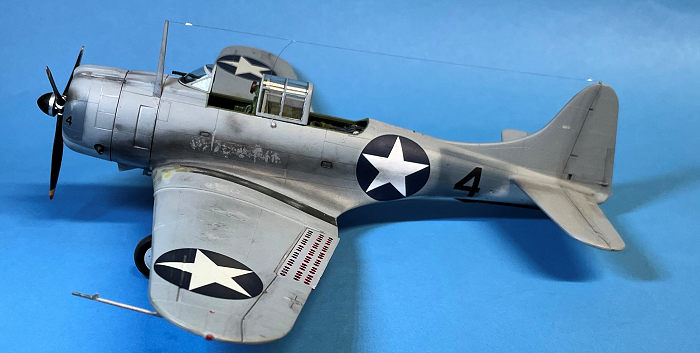
As the dive flaps would be the most challenging part of the build, I dove right in with a new #11 Ex-Acto blade and cut the flaps from the wings. I learned in my research that these flaps were never extended on the deck or ground unless maintenance was being performed so mine had to be closed. The kit I received from a modeling friend included PE flaps from Carrier Deck Accessories. I was not looking forward to this part of the build but they turned out to be quite realistic. I attached 3/32 styrene T where the wing flaps were removed that provided a good mounting surface for the upper and lower flaps.
 I
built the cockpit using what parts were included and added an Eduard seat
belt/harness for the pilot. The gunner’s seat was so small I could not get a PE
seatbelt to fit so, I left it off as it’s not noticeable once the model was
closed up. The kit instrument decals were applied and look convincing. The
cockpit was lightly dry brushed with aluminum.
I
built the cockpit using what parts were included and added an Eduard seat
belt/harness for the pilot. The gunner’s seat was so small I could not get a PE
seatbelt to fit so, I left it off as it’s not noticeable once the model was
closed up. The kit instrument decals were applied and look convincing. The
cockpit was lightly dry brushed with aluminum.
There was a bulkhead (part 3) shown to be mounted between the pilot and gunner positions with 2 windows that I could not find in any references and it did not fit correctly where instructed, so it was left out. I do wish there had been a radio stack to install for the radioman.
The fuselage closed up with no problems. I enhanced the rear gun doors opening so it didn’t look like a bad seam.
Trouble began when I attached the assembled wings to the fuselage, there was a bad wing root gap on both sides. I think it was a result of relieving stress from cutting away the flaps. I installed thin styrene shims and checked the dihedral alignment and blended the root area smooth. I did not forget the vinyl grommet part to later install the 1000 lb. bomb.
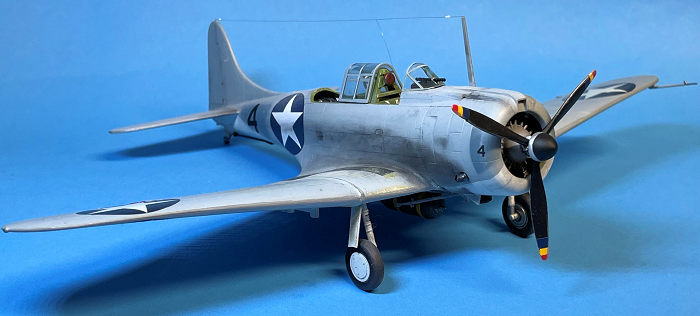 The
kit engine detail was good and the exhaust ring lined up with the 2 exhaust
stack openings in the cowling perfectly later in the build. The cowling pieces
all fit perfectly leaving only realistic seams and the gun barrels were drilled
out painted gun metal and installed after the model was painted.
The
kit engine detail was good and the exhaust ring lined up with the 2 exhaust
stack openings in the cowling perfectly later in the build. The cowling pieces
all fit perfectly leaving only realistic seams and the gun barrels were drilled
out painted gun metal and installed after the model was painted.
The prop was correctly painted semi-gloss black with red-yellow-blue tips and given a final flat coat and some weathering with a Prismcolor silver pencil .
The landing gear struts attached in the gear wells with just enough play to align them with the correct inward position to make the wheels perfectly upright when viewed from the front.
As mentioned, the cockpit parts would not allow displaying the pilot’s sliding section open. I carefully removed enough from the rear fixed section, so it and the sliding section mounted perfectly in the open position. Unfortunately, I could not fit the 2 rear sections, but I read that they were often left off in the hot South Pacific, removing enough weight for an extra box of .30 ammo.
All the small bits were installed with no problems, except I broke the delicate bomb trapeze I had to repair before installing it and the 1000 lb. bomb.
| COLORS & MARKINGS |
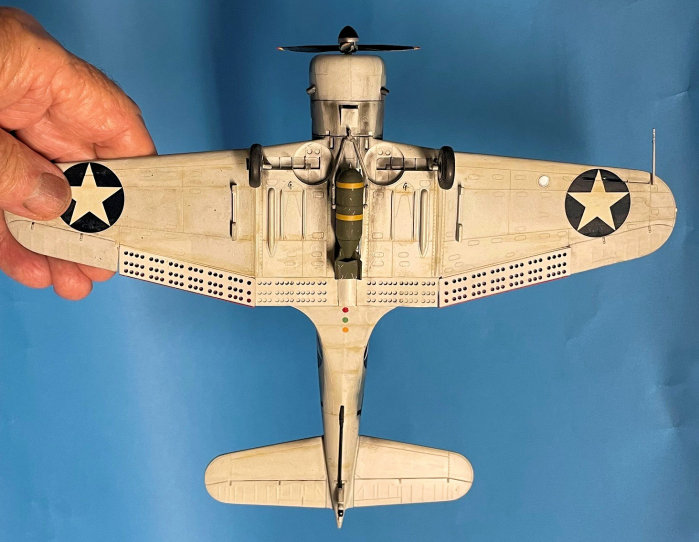
 I learned
in my research the center flap interior was not painted red as most modelers and
full-scale restorers tend to do. It is painted the same light gray as the rest
of the underside.
I learned
in my research the center flap interior was not painted red as most modelers and
full-scale restorers tend to do. It is painted the same light gray as the rest
of the underside.
The model was washed and masked before 3 light coats of a custom mix of 1 part Tamiya XF-18 Medium Blue and 3 parts XF-2 White. I experimented for most of a day to get the color to match the photo.
The SBD in the photo had been in the Pacific for over a year and was extremely faded to an almost gray color. The bottom was sprayed with Vallejo White Gray, and the model was left to dry for 2 days in a plastic bin before weathering.
The work had just begun on this model as replicating the color photo was to be one of my most memorable modeling tasks ever.
I used national insignia decals from my stash. I selected 2 upper wing decals that were slightly lighter than the rest as these 2 received the brunt of months of sun and sea. Using Solvaset the decals settled well into the leading-edge slats and panel lines. When fully dry I burnished them with light blue pastel with a Q-tip. I did the others slightly less using the same process.
The #4 decals from a Scalemaster sheet were applied over the slightly weathered blue-gray areas where the former Navy markings had been painted over. The SBD-3 decals were applied to the tail leaving Navy and BuNo off as they were painted over when received by the Marines.
Rather than attempt to replicate the heavy wear areas by adding hues of color, I decided to do it just as they had occurred. I sprayed a thin base layer of aluminum then a thin layer of yellow chromate and the final faded blue-gray mixture over the whole upper airframe and let it dry overnight.
 To produce
the wear areas on the NATO black painted wing walks and blue-gray heavy wear
areas, I attached a 3/16 inch round piece of 600 grit wet or dry paper onto a
pencil sized dowl that I worked the area over to produce the look in the photo.
I twisted it and scuffed it back and forth lightly like work boots would have
done. I spent most of a day with this process that produced the worn look I
wanted. Using a fine brush, I touched up areas as needed. The right side of the
aircraft was done the same way referencing a photo of a similar squadron mate
for reference. The strange aluminum wear area under the pilot’s position was
stippled with an old skiff Testors brush and Tamiya TS-30 Silver Leaf.
To produce
the wear areas on the NATO black painted wing walks and blue-gray heavy wear
areas, I attached a 3/16 inch round piece of 600 grit wet or dry paper onto a
pencil sized dowl that I worked the area over to produce the look in the photo.
I twisted it and scuffed it back and forth lightly like work boots would have
done. I spent most of a day with this process that produced the worn look I
wanted. Using a fine brush, I touched up areas as needed. The right side of the
aircraft was done the same way referencing a photo of a similar squadron mate
for reference. The strange aluminum wear area under the pilot’s position was
stippled with an old skiff Testors brush and Tamiya TS-30 Silver Leaf.
Other common areas of wear and highlighting were done with a silver Prismacolor pencil. I also applied light weathering on the upper surfaces using a contrasting blue pastel. A contrasting gray pastel was applied to the lower airframe.
The heavy oil and exhaust staining from the notoriously leaky and probably well used R-1820 engine was applied using black-brown pastels with a soft brush in the direction of the airflow. This was also staining on the inner stabilizer leading edge.
I applied data plate decals on the landing gear struts and one on the engine nose case adding additional realism.
A nylon thread antenna wire was stretched between the mounting point on the tail (that I managed not to break off) to the antenna mast. A downlead was attached to the antenna wire and an insulator on the port fuselage side. White insulators were painted on the antenna wire with a sharp toothpick.
| CONCLUSIONS |
I would recommend this kit for a beginner or modeler who wants a simple kit. But for modelers wanting more detail there are several to choose from. Thanks to my great modeling friend Jim who supplied the Hasegawa kit with a PE flaps bonus! I enjoyed building this model in 45 hours with over half of it assembling and installing the PE flaps and weathering. I think I accomplished my goal of replicating the color photo and hope the readers enjoyed the article!
| REFERENCES |
Squadron SBD Dauntless in Action #64 and Barrett Tillman’s excellent book, The Dauntless Dive Bomber of World War Two for inspiration!
11 August 2026 Copyright ModelingMadness.com. All rights reserved. No
reproduction in part or in whole without express permission. If you would like your product reviewed fairly and fairly quickly, please
contact
the editor or see other details in the
Note to
Contributors.