Flyhawk 1/72 SBD-3 Dauntless
| KIT #: | 6001 |
| PRICE: | $24.00 |
| DECALS: | Multiple options |
| REVIEWER: | Joe Essid |
| NOTES: | Outstanding but fiddly. Poor instructions |
| HISTORY |
 I'll cheat
here, referring readers to Tom Cleaver's excellent history of the SBD-3
Dauntless and Dick Best's role in the Battle of Midway in the reference section.
I'll cheat
here, referring readers to Tom Cleaver's excellent history of the SBD-3
Dauntless and Dick Best's role in the Battle of Midway in the reference section.
The Douglas SBD Dauntless struck young-modeler me, in the early 1970s, as a sturdy-looking monoplane with the neatest dive-brakes on earth, and the brakes were painted red! I knew that it contributed more to the turning point of the Pacific war than any other single type. I recall building one in 1/48 back then, probably a blue-box Monogram kit. It likely sat on a nearby shelf as I fought and refought the battle using Avalon Hill's still excellent board game, Midway. Decades later, having seen both films by that name as well as John Ford’s documentary, I wanted to build Best’s SBD.
That naval aviators were reluctant to give up a plane deemed obsolescent in 1941 says much about the Dauntless. The Curtiss Helldiver that began replacing it in 1943, though a newer design, never won over the hearts of those who flew it in quite the same manner as its predecessor. Ironically, both Dauntless and Helldiver marked the end of the line for an entire category of aircraft.
After the war, dive-bombing continued, but dedicated dive-bombers soon vanished as weapons of war. That said, the legend of the SBD has endured. My only personal encounter? I had the pleasure of seeing a Midway-veteran SBD, wrapped in white plastic at the Virginia Military Aviation Museum, heading overseas for a full restoration.
| THE KIT |
 Check out
the
preview for more info on the kit.
Check out
the
preview for more info on the kit.
Bring a sharp pair of sprue nippers; I bought a new, high-quality set just for this model after finding that the plastic is very thin. That feature lends itself well to having nice trailing edges as well as perforated dive-brakes. The downside? Some small cockpit parts, such as the rear guns, can be easily broken, once off the sprues. The sprue-gates are small and mostly sturdy, so most parts will not need much preparation. Even so, I snapped two of the dive-brake actuators and the one end of the bomb trapeze.
One little complaint: given the masks included for the canopy, I expected seat belts, but none are provided. I fabricated some from masking tape for the pilot’s seat.
The two canopies, one a closed set and the other open, are thin and clear. Two versions of the front canopy depict the SBD with and without the bomb-aiming sight. Is Flyhawk planning an SBD-5 version of the Dauntless?
| CONSTRUCTION |
The instructions are poorly done. You get no advice about how to pose the canopy open, nor how to place the hatches that cover the rear guns, if they are positioned ready to fire. I relied on photos for this and other details.
The interior went together first, and I had some difficulty closing up the fuselage. There are small and easily missed marks for mating the flight deck to the nicely detailed sidewalls, so it’s the same as getting to Carnegie Hall: practice, practice, practice. I had to use CA to fill a gap at the top, between the pilot’s and gunner’s position; I sanded down the edges to make sure the canopies would fit later.
 Before gluing
anything, I triple-checked fit as I would with a limited-run kit. Fit was strong
except on the port wing’s root, where I used sprue melted in glue to fill a
fair-sized gap. I read how another builder encountered that exact issue. I also
found that the upper dive-brakes, which need to be posed closed for an SBD on
deck, were too large to fit the openings. They would look fine, posed open as
the kit recommends. I sanded them down but the thin plastic meant I nearly broke
one.
Before gluing
anything, I triple-checked fit as I would with a limited-run kit. Fit was strong
except on the port wing’s root, where I used sprue melted in glue to fill a
fair-sized gap. I read how another builder encountered that exact issue. I also
found that the upper dive-brakes, which need to be posed closed for an SBD on
deck, were too large to fit the openings. They would look fine, posed open as
the kit recommends. I sanded them down but the thin plastic meant I nearly broke
one.
Call that near disaster this modeler’s fault; I quit there. The upper flaps still stand proud of the wing but I did my best to “trick the eye,” as my drawing teacher used to say, with a closed seam and paint. I should have beveled the top edge, but I’ll save that for next time.
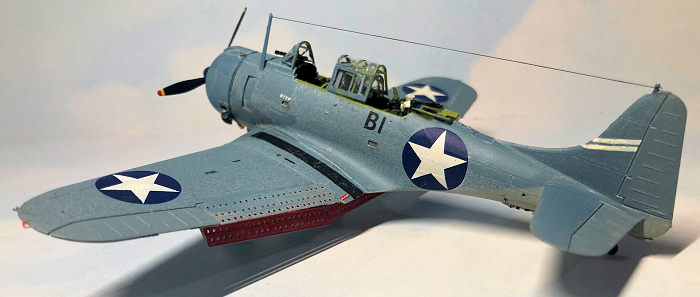
As I finished the build, I read that the bombs included are not correct for a bombing unit. You get two nicely detailed 100-pound and one 500-pound projectile, correct for scouting missions. These weapons will go in the stash for later, as they are well detailed. I scratch-built a 1000-pound bomb with parts from my boneyard. It fit well on the kit’s bomb-release trapeze.
| COLORS & MARKINGS |
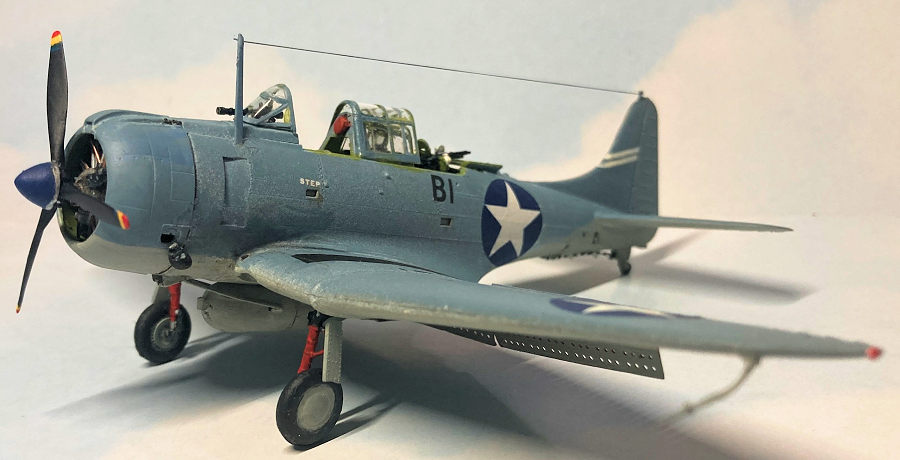
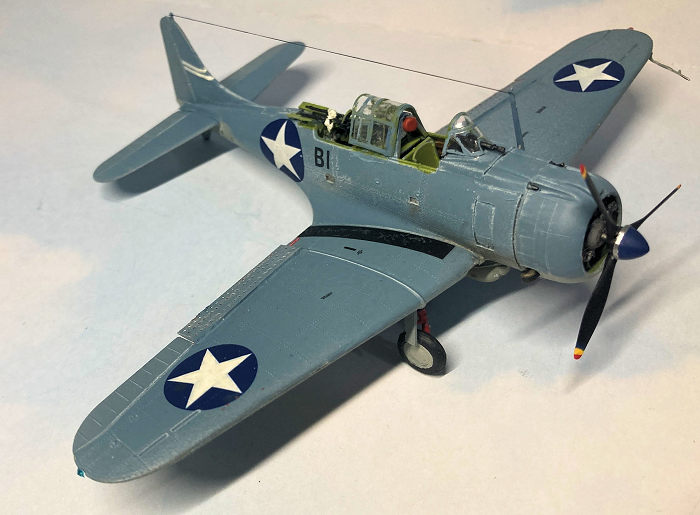
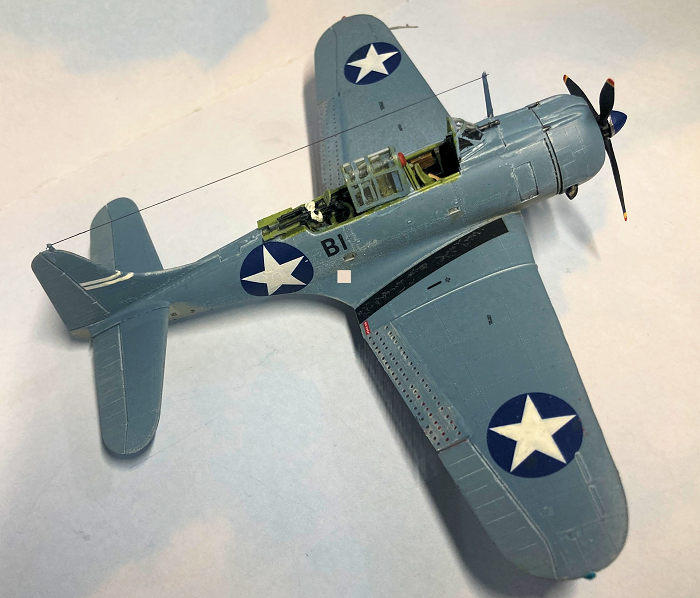
I wanted to build Best’s aircraft, B-1 from Enterprise. The kit provides numbers for any SBD-3 that flew at Midway, apparently in the wrong font but I used them anyhow.
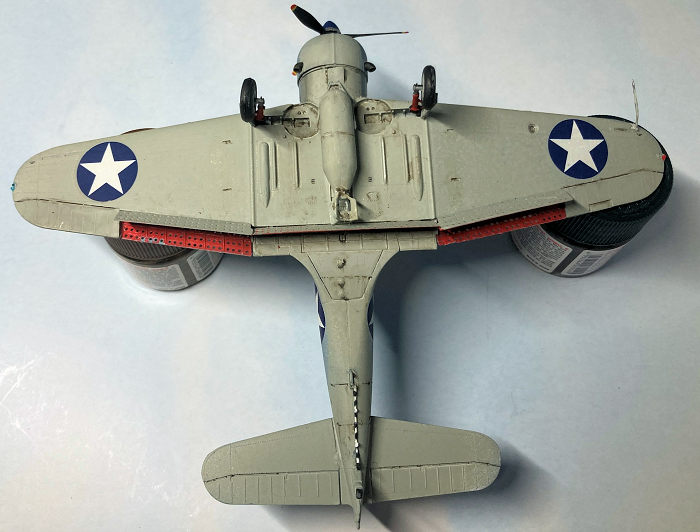
I airbrushed Mission Blue-Gray topsides and when cured, I hit it with Tamiya flat. That dried overnight, and I masked off the top to shoot Mission Light Gull Gray. I had very little overspray, which was wiped off with a damp cotton swab. This method of hitting the paint with flat before applying additional colors saves a lot of heartache on simpler camo schemes.
 Other
reviews describe the decals as too transparent and easily torn, but I found only
the second claim true over the paints I used. I tested one of the wing-walk
stripes and it disintegrated when placed over Micro Set, so for the other wing I
tried floating the decal into place with warm, soapy water. This technique
worked well for me. All decals then went down and all but one (more on that
later) adhered like paint when dry.
Other
reviews describe the decals as too transparent and easily torn, but I found only
the second claim true over the paints I used. I tested one of the wing-walk
stripes and it disintegrated when placed over Micro Set, so for the other wing I
tried floating the decal into place with warm, soapy water. This technique
worked well for me. All decals then went down and all but one (more on that
later) adhered like paint when dry.
I painted the missing wing walk, sealing it and the decals under more Tamiya flat, then added some chipping with a silver Prismacolor pencil, and exhaust from a 9B pencil. I kept the weathering light as the aircraft seemed to have all enjoyed recent paint jobs before Midway. Best told Michael Smith, whose build of this kit guided me, that his Midway SBD was one of the cleanest Navy aircraft he ever flew. I only applied exhaust staining and Flory grime to the undersides lightly.
The landing-legs of Best’s aircraft were also painted red, as research by Smith revealed. All movable dive-brake surfaces were brushed red; the center brake’s upper half remained in gray.
I completed the squadron-leader stripes by hand, as the decals would not match up at the leading edge of the fin.
Just before final assembly and canopies, the model got coated with flat from a can. Somehow during this process the insignia on the upper port wing lost a patch of blue, so that was repainted with Tamiya blue, the same color I used on the plane’s spinner. It matched perfectly. Both stars got touched up with Mission Insignia white, as the white of the decals proved transparent. I’d recommend other decals or pre-painting a white circle where the decal will go.
| FINAL CONSTRUCTION |
 I finished
with the kit’s radio mast and my scratch-built bomb. I lost the kit’s pitot tube
at this point, and just after I had attached a homemade replacement, I found the
kit part. I planned to keep my creation in place. It was a bit thick for scale
but sturdier and I was proud of the tiny point I had weaseled on at the end.
I finished
with the kit’s radio mast and my scratch-built bomb. I lost the kit’s pitot tube
at this point, and just after I had attached a homemade replacement, I found the
kit part. I planned to keep my creation in place. It was a bit thick for scale
but sturdier and I was proud of the tiny point I had weaseled on at the end.
Then it too broke! In this Theater of the Absurd, the kit’s pitot went back in place, as Flyhawk and maybe the Almighty intended. It bent. I skim-coated it with CA and hope it stays put.
Applying the masks to the canopy (the first time I’ve done this) was easy and I brushed interior green, then blue gray. When I removed the masks, I only had a little seepage onto the clear areas. I removed this with a toothpick without hurting the Future in which I’d earlier dipped the parts.
Then, facepalm time. I masked the wrong front canopy piece (without bomb sight) and thus used up its masks, but hand-painting the frames on the correct part with a tiny brush for wargaming figures gave me an acceptable result.
I brushed Mission flat on the framing with the same brush, then attached the canopy with clear-parts cement. A bit of EZ-line made the Dauntless ready for photos. As a final taunt to me, the kit nearly lost its port exhaust, left dangling during photos. It’s back on now that the kit is in the case. Watch the small parts on this one!
| CONCLUSIONS |
Not for the novice or child, so treat it as a limited-run model. You may want to source aftermarket decals.
Despite the flaws noted, I liked building this kit a lot. The interior detail (except the lack of a seat belt) sells the kit. My goal has long been to build one example of every aircraft-type that served in the Midway battle. I also want another Dauntless in the case, but Flyhawk’s SBD is not easily found at the time of writing because of US import tariffs. I may get out my Dremel and drill holes in the dive brakes of a recent issue Airfix SBD for a Cactus Air Force Dauntless.
| REFERENCES |
Smith, M. “1/72 SBD-3 Dauntless – Lt. Richard Best at Midway.” https://putteringinthestudy.com/2025/02/17/1-72-sbd-3-dauntless-lt-richard-best-at-midway/
Tom Cleaver's article: https://modelingmadness.com/review/allies/cleaver/tmcsbd3.htm
6 November 2025
Copyright ModelingMadness.com. All rights reserved. No reproduction in part or in whole without express permission.
If you would like your product reviewed fairly and fairly quickly, please contact the editor or see other details in the Note to Contributors.