Accurate Miniatures 1/48 SBD-1 Dauntless
| KIT #: | 3420 |
| PRICE: | $30.00 |
| DECALS: | One option |
| REVIEWER: | Andrew Erion |
| NOTES: | Significant molding defects |
| HISTORY |
 The
SBD-1 Dauntless was the first variant of the well known dive bombing
workhorse of the US Navy until its replacement by the SB2C Helldiver. An
evolution of the previous BT-1 dive bomber from 1935, the Dauntless had a
unique construction. It had an at-the-time cutting edge semi-monocoque all
metal construction with fabric covered control surfaces (except the enormous
dive brakes and flaps), it didn’t have conventional wing spars, with lead
designer Ed Heinemann instead opting for a collection of “cells” which would
provide better strength for pulling out of the high speed, near vertical
dives.
The
SBD-1 Dauntless was the first variant of the well known dive bombing
workhorse of the US Navy until its replacement by the SB2C Helldiver. An
evolution of the previous BT-1 dive bomber from 1935, the Dauntless had a
unique construction. It had an at-the-time cutting edge semi-monocoque all
metal construction with fabric covered control surfaces (except the enormous
dive brakes and flaps), it didn’t have conventional wing spars, with lead
designer Ed Heinemann instead opting for a collection of “cells” which would
provide better strength for pulling out of the high speed, near vertical
dives.
The SBD-1 saw its combat debut, to be generous, at Pearl Harbor. Many of the SBD-1s of VMB-1, the squadron to which this aircraft belongs, were destroyed on the ground. According to Wikipedia, some SBDs flying from the USS Enterprise engaged in aerial combat that day. I haven’t found anything else to corroborate this. Later models of the SBD in Navy service were also used extensively throughout the war, possibly most famously at Midway, where all the Japanese carrier losses were attributed to the brave actions of various Dauntless crews. The Dauntless was also adopted by the Army as the A-26 Banshee to little success.
| THE KIT |
 Inside
the box are six dark grey plastic sprues molded in a softer plastic than is
standard for AM. The clear parts have excellent clarity, and the single
decal sheet is quite nice, with many interior decals and optional seat
belts. Notably, the pilot’s seatbelt shouldn’t have shoulder belts on a pre
war aircraft, so unless you cut these off of the decal itself, you’ll need
to use some other technique.
Inside
the box are six dark grey plastic sprues molded in a softer plastic than is
standard for AM. The clear parts have excellent clarity, and the single
decal sheet is quite nice, with many interior decals and optional seat
belts. Notably, the pilot’s seatbelt shouldn’t have shoulder belts on a pre
war aircraft, so unless you cut these off of the decal itself, you’ll need
to use some other technique.
Upon inspection of the sprues (and after opening the plastic bags containing them), I noticed a short shot on the port lower dive flap. Not the worst part in the world to have to fabricate. Unfortunately, the problems with this kit didn’t end there. The fuselage, with its integrated vertical stabilizer, was twisted ever so slightly. The molded detailing, as is standard for AM, is truly top notch and rivals current releases from Tamiya and ICM, although there isn’t any domed rivet detail as is iconic on the real plane. This is one many baffling engineering decisions made on this kit, and the first issue I noticed with the design itself.
| CONSTRUCTION |
Construction on this kit begins in the standard place, but in a non-standard way. After attaching some sidewall detailing, the fuselage is closed up--before even putting in the pilot’s seat. The instructions recommend attaching the rear bulkhead here, but I held off as there isn’t much of anything in the way of locating tabs or pins. Then, the floor of the cockpit is assembled. This is a lengthy and tedious step, and requires careful handling. I managed to screw up the instrument panel decal and decided to just leave the dials clear, painting around them in Vallejo black. This is followed by the pilot’s bulkhead, rear bulkhead, radio equipment, and turret. The pilot’s bulkhead requires some surgery for a prewar aircraft, cutting off the armored headrest, and the fabrication of a small, unarmored, headrest piece. Why AM couldn’t just include this as a normal piece is beyond me, and I always hate having to scratchbuild parts that really ought to come with the kit. All parts were painted in subassemblies with Testors spray enamel metallic silver and touched up with brush painted Tamiya XF-16 Flat Aluminum, which is my go-to for a quick and dirty aluminum color when I don’t feel like breaking out my airbrush and using a dollar’s worth of Alclad II. The entire interior is given a very thin black oil pinwash, with some yellow and brown tones on the floor where the pilot and gunner’s boots would land. There’s some debate on exactly when the interiors were painted the iconic zinc chromate. I think that the planes were all delivered with aluminum interiors, and then repainted zinc chromate when the plane went in for major refits. As I’m building the prewar model with the unarmored bulkheads and turret, I figure that this plane hasn’t been in for a refit yet.
After
this, I assembled the turret, which, like the pilot’s bulkhead, required a
little bit of cutting to make the proper prewar version, but thankfully no
scratch-built parts. Seat belts in both the pilot’s and gunner’s seats were made
with masking tape. After this, I dropped in the pilot’s seat, rear bulkhead,and
radio equipment, followed by the cockpit floor. This required some sanding and
squeezing for a decent fit, likely an artifact of the twist in my kit’s fuselage
parts. This also led to some is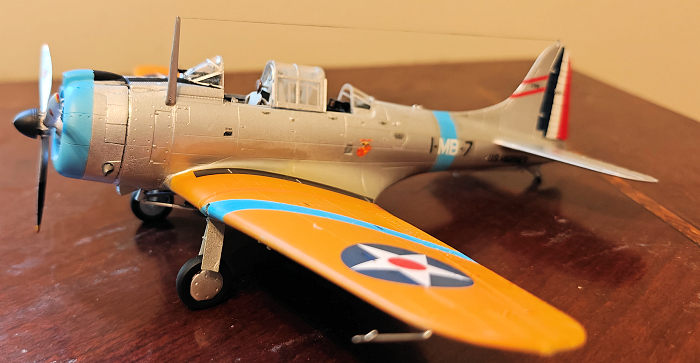 sues
when attaching the lower wing. I glued on the upper wings, starting with the
leading edge at its locating pins, of which there are only two on each wing. To
achieve the proper dihedral, I had to do some minor bending of the bottom wing
until the top wing parts fitted flush with the wing roots molded onto the
fuselage. It appears to me that even on a kit with non-damaged parts, there
would be a small circular gap between the wing roots and the top parts of the
wings, which was easily filled with super glue. For the rest of the filling, I
used a small amount of “sprue goo”, which is old sprues melted into a putty by
combining them with tamiya cement. I find this to be better than putty or
superglue on small gaps, as it welds the plastic together while also filling
gaps. Overall, the wings themselves are quite easy to position and look good,
sitting at what I think is the proper dihedral without much fuss at all.
sues
when attaching the lower wing. I glued on the upper wings, starting with the
leading edge at its locating pins, of which there are only two on each wing. To
achieve the proper dihedral, I had to do some minor bending of the bottom wing
until the top wing parts fitted flush with the wing roots molded onto the
fuselage. It appears to me that even on a kit with non-damaged parts, there
would be a small circular gap between the wing roots and the top parts of the
wings, which was easily filled with super glue. For the rest of the filling, I
used a small amount of “sprue goo”, which is old sprues melted into a putty by
combining them with tamiya cement. I find this to be better than putty or
superglue on small gaps, as it welds the plastic together while also filling
gaps. Overall, the wings themselves are quite easy to position and look good,
sitting at what I think is the proper dihedral without much fuss at all.
Here’s where things get interesting. I had to do something about the short shot on the dive flap, and I decided to do it sooner rather than later, in case I can’t work out a decent solution and have to relegate it to the shelf of doom. I found some plastic card that I had bought some time ago during a conversion of an old MPC SB2C into an XSB2C-1 and traced the profile of the intact dive flap with a sharp xacto blade. After that, I cut it out completely and began sanding down the trailing edge at an extremely shallow angle in order to thin it down somewhat. I used a pin vise with a bit matching the size of the holes on the other dive brakes to drill the holes, as well. The internal bracing was more difficult.
The horizontal stabilizers on the Dauntless are very thin, which means that there isn’t room for locating pins. This isn’t a huge deal, as the attachment tabs are a very tight fit with the fuselage. Unfortunately, this doesn’t mean that there aren’t gaps between them and the fuselage. These were much larger than those on the wings and I used superglue to fill them.
After this, I put on the last of the interior parts: the gunsight, the crane hoist, the radio direction finder antenna, and the cockpit map table. Much has been written on internet forums about part J111. The instructions recommend installing this in step 11 rather than step 2, when the rest of the cockpit is assembled, and I found this extremely difficult, and took quite a lot of delicate sanding and careful application of superglue. However, the alternative would be somehow forcing the table around the pilot’s seat, which sounds downright impossible. After all this I sand down the filler and steps between parts of the airframe using 100, 600, 800, and 1200 grit sanding film and sanding sticks, making sure not to get any flat spots. I then rescribed the panel lines approximately where I remember them being initially with the help of some drawings online and the stencil section of the decal sheet.
The engine has four total
parts and is nothing to write home about, but looks pretty good under the
cowling. There are many other modellers who make much better engines than me and
I’d recommend reading their advice rather than taking mine, as my rendition of
this engine can only be described as passab le.
I suppose I lack the patience for things like scratch built ignition harnesses
and brass pushrods. The cowling is assembled from three parts and the interior
painted Vallejo Sky Gray.
le.
I suppose I lack the patience for things like scratch built ignition harnesses
and brass pushrods. The cowling is assembled from three parts and the interior
painted Vallejo Sky Gray.
I attached the upper dive brakes, which also seem slightly twisted from heat or something. These have extremely long mold gates on them, extending almost the entire length of the part, and it’s very easy to lose lots of small details like hinges when cleaning these up. I attached the dive brake actuating arms and the lower dive brakes in the down position. Frustratingly, there is a significant gap between the ends of the dive brakes and the sides of their slots in the wings and the flaps themselves are quite twisted so that if the inside edge is aligned with the top of the wing, there is a three millimeter gap on the outside of the wing. This wasn’t an issue on the lower flaps in the deployed position, but looks terrible on the upper surface. Putty and a hair dryer to bend them back into position is really the only option here.
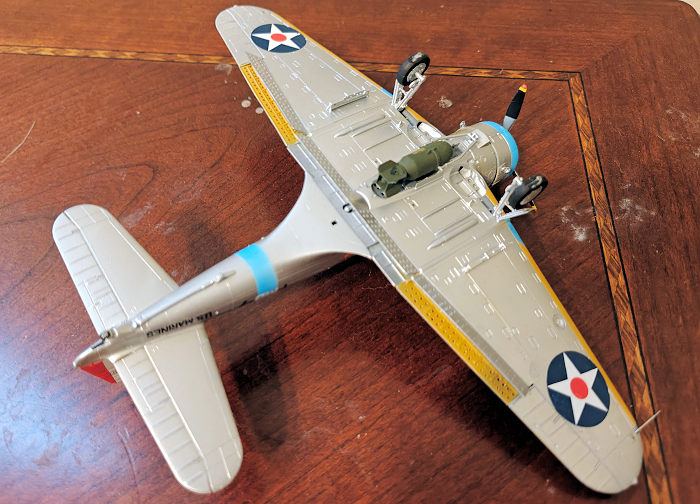
After this, I began work on the armament. The 1,000 pound bomb is constructed from four parts, with a fairly detailed fuse and well rendered fins. There are also two 100 pound bombs made from two parts each, but I left these off and only attached their rails. Landing gear was a huge pain. Yet again, there’s not any sort of locating tabs or pins for the three parts that make up the struts and the doors, which makes it difficult to get the darn thing together, much less to replicate the correct six degree angle as on the real thing. I opted for the flattened wheels, which was a nice inclusion and makes me wonder even more why they didn’t just make a part for the pre war headrest if they’re willing to include two extra parts already.
I decided to leave off the bomb, landing flaps, and other small parts until after painting for ease of access, and I masked and glued the separated canopies in their “closed” position for painting with white glue.
| COLORS & MARKINGS |
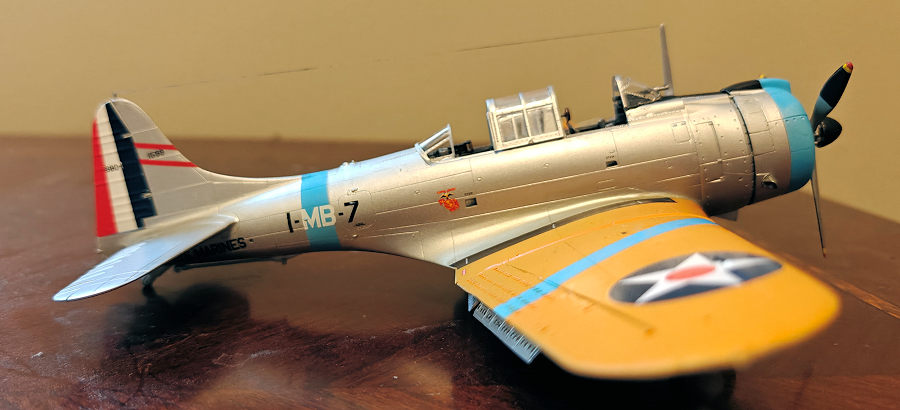
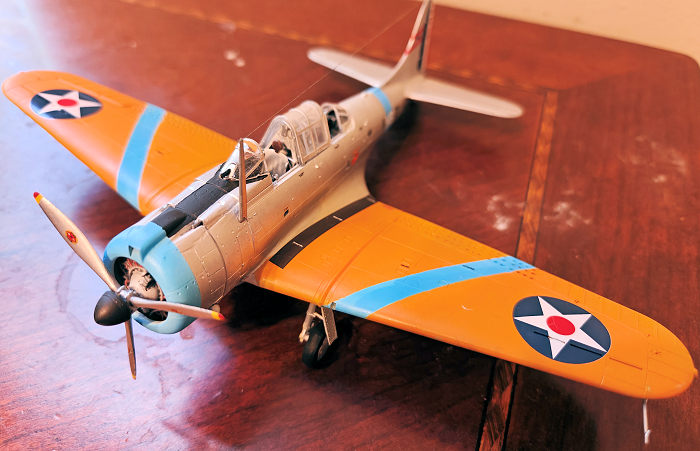
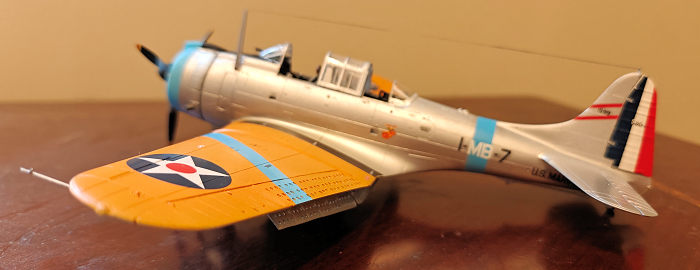
The Dauntless I am building is a US Marine one, of VMB-1. I’m sure aftermarket decals for wartime SBD-1s in their gull grey also exist, I just find this scheme far less interesting than the garish aluminum and yellow with stripes of green, blue, and red, as is seen on the pre war aircraft.
I bought some Eduard masks
for about $10. Ever since building the ICM KI-21-Ib, I haven’t had the patience
for cutting my own masks. Painting was done with Tamiya Acrylics through an
Iwata Neo in my homemade paint booth with a homemade regulator and a Harbor
Freight compressor. You don’t need expensive gear to get good results! I usually
spray between 15 and 20 PSI with paint thinned to the consistency of skim milk.
All paints are diluted one to one with Tamiya X-20A. I laid down a coat of white
Tamiya primer, followed by masking off the sections that would be yellow. Then,
I sprayed Tamiya X-1 as the base coat for the aluminum sections. I used TS-30
Silver Leaf for the aluminum, and then masked the aluminum and sprayed roughly a
5:1 mix of XF-3 Yellow and XF-7 Red over the white primer for the insignia
yellow color on the horizontal surfaces. From here, I masked off the blue
stripes and sprayed that with Vallejo Sky Blue, mixed about 2:3 paint to water,
as Vallejo acrylics
 aren’t
compatible with X-20A. I’m not sure if sky blue is exactly the right color, as
other modelers have used a darker insignia blue, but I think that sky blue is
pretty and I haven’t found any color photos of the blue flight Dauntlesses to
verify it one way or the other. After some touch ups, I sprayed on a gloss coat.
aren’t
compatible with X-20A. I’m not sure if sky blue is exactly the right color, as
other modelers have used a darker insignia blue, but I think that sky blue is
pretty and I haven’t found any color photos of the blue flight Dauntlesses to
verify it one way or the other. After some touch ups, I sprayed on a gloss coat.
Decals are standard fare for an AM kit. They’re very thin, and I honestly should’ve sprayed the areas under them with white to avoid a slight amount of yellow showing through on the upper wings. The rudder stripes were a bit difficult to apply and don’t meet over the edges, so I had to touch those up with insignia white and red. The roundels are also not unusual for a kit of this age, with the blue and white circle and star printed separate from the red central circle, which is a bit frustrating but better than having the colors bleed together on the decal sheet during the printing process. Modern kits generally have these as one decal which is obviously much better. It is possible to create any SBD-1 using the decals provided, just like the AM F3F-2 kit, and I chose to make the flight leader of the blue flight, which has a blue fuselage band, cowling band, and chevrons on the upper wing. Stencils are easy to apply and there aren’t very many of them.
After decals, I attached the deployed landing flaps, radio aerial, pitot tube, and bomb assembly, and used black painted stretched sprue to represent the antenna. I used a very thin dark grey oil wash over the aluminum sections and a dark tan wash on the yellow sections and drybrushed some black behind and on the exhausts to simulate wear. Subtlety is the name of the game here, as these prewar aircraft seem to have been polished frequently and the yellow paint rarely wears very much. If I were to do this again, I’d probably start with the blue, then mask those sections, prime with white, paint the yellow, mask the yellow, and then spray the aluminum, as I had issues with the opacity of the blue and yellow on the wings, but it turned out okay and I’m happy with the plane overall. I wouldn’t mind skipping the washes altogether as they’re barely visible.
| CONCLUSIONS |
This kit has the excellent detail that Accurate Miniatures was known for and has been reboxed by Academy fairly recently. I can’t speak to the quality of the Academy kit, but this AM kit left something to be desired. It could’ve been heat damage from storage in the southern heat that led to the twisting, but the short shot on the flaps was more than I would’ve liked to have dealt with and the way the rear bulkhead attaches with no guides or locating pins is absolutely terrible. The gaps on the flaps were far too large to have been a mistake in installation and I would recommend that anybody trying to build this kit themselves just scratch make some flaps using evergreen sheets and some careful test fitting. However, despite the issues, this is much easier to beat into submission than the archaic Monogram kit and it has much better detail out of the box than the Hasegawa kit. Other AM kits I’ve built have been much better in terms of fit and even the engineering of the kits themselves, with plenty of locating pins that are sorely missed on the SBD. This doesn’t fall together like their Avenger. I’ve heard that this could be due to the original AM in the late 90s scrambling to ship as many kits as possible to avoid bankruptcy, abandoning quality control for volume. Overall, this is a solid kit that requires a moderate amount of modelling skill to turn into a decent looking SBD, and I’d recommend it for anybody with some modelling and scratch-building experience who wants an SBD-1 model in 1:48 scale that is even remotely accurate to the actual aircraft.
Back to the Previews Index Page
Back to the Previews Index Page