
Matchbox 1/32 SBD Dauntless
| KIT #: | PK- |
| PRICE: | $15.00 'used' |
| DECALS: | Three options |
| REVIEWER: | Christopher Campbell |
| NOTES: | Converted to SBD-3. Toylike model with potential. |
| HISTORY |
The SBD was the evolution of prewar Northrop BT-1, which bore a distinct faily resemblance, looking very much like a Dauntless with semi recessed and fared landing gear and a two blade propeller. This was improved upon by legendary Douglas designer Ed Heinemann to produce the SBD-1, entering service in 1939 and rapidly replacing its forbearer as well as the more antiquated Curtiss SBC Helldiver biplane in U.S. Navy carrier air wings as well as Marine Corps dive bomber squadrons.
A unique feature of the Dauntless were the perforated, split dive flaps. These were adapted from the BT-1. Perforations were found to reduce tail buffeting during a dive, which improved bombing accuracy and dive recovery. Armor and self-sealing fuel tanks were added starting with the SBD-3 variant, helping make the Dauntless a superb weapon of war that could give as well as it got and then some. Only the infamous Stuka could rival it for bombing accuracy or ruggedness, though was twenty miles per hour slower than the “slow” top speed of 255mph. boasted by the Dauntless and could not hope to maneuver with the same agility in a dogfight. The infamy Stuka did give rise to another version of the SBD, though.
When the Blitzkrieg began across Europe, the Stuka became the stuff of legend in its dive bombing attacks and a number of nations and air forces sought to acquire their own dive bombers. The U.S. Army Air Force had operated its distant cousin, the Northop A-17 (fixed gear) and A-17A dive bombers (Also bearing a quite noticeable family resemblance, so noticeable in fact that when the United States Air Force Museum’s example was found in a wodded field in the 1990’s that it was initially though by its discoverers to be an SBD) in prewar service, though had abandoned dive bombing tactics. This changed with an order for a landbased variant to be called the A-24 Banshee.
Eventually, nearly over nine hundred Banshees would be produced in three variants and saw action in the New Guinea, the Gilbert and Marshall Islands, and Alaska. In most cases, in stark contrast to its Navy and Marine Corps service, their combat record was less than stellar. This was in part due their use in areas where the Japanese sometimes held air superiority combined with air crews lacking sufficient experience or training. Additionally, bombing accuracy never matched that of Navy crews due to the aircraft rarely being used in true dive-bombing attacks. Banshees were soon relegated to second line roles or trainers, with some continuing on as late as 1950.
 In Navy
hands, the Dauntless was a thing to be feared, proving its worth time and again
in Naval engagements in all theaters of operation. Most famously it was
instrumental in the destruction the Japanese carrier force at the Battle of
Midway in 1942. In the Atlantic it guarded convoys and hunted U-boats. In every
amphibious campaign across the Pacific it performed close air support in the
hands of Navy and Marine Corps aviators and flew strike missions against
Japanese naval and air bases. It saw action in Operation Torch in North Africa
and even in the Normandy campaign in the guise of A-24 Banshees supplied to Free
French forces.
In Navy
hands, the Dauntless was a thing to be feared, proving its worth time and again
in Naval engagements in all theaters of operation. Most famously it was
instrumental in the destruction the Japanese carrier force at the Battle of
Midway in 1942. In the Atlantic it guarded convoys and hunted U-boats. In every
amphibious campaign across the Pacific it performed close air support in the
hands of Navy and Marine Corps aviators and flew strike missions against
Japanese naval and air bases. It saw action in Operation Torch in North Africa
and even in the Normandy campaign in the guise of A-24 Banshees supplied to Free
French forces.
Later versions would even carry Yagi radar in later versions. Through mid-1944, when the Curtiss SB2C Helldiver replaced it in frontline service, the Dauntless sunk six Japanese aircraft carriers as well as fourteen cruisers and numerous smaller vessels. It would continue on in U.S Navy service and Marine Corps service in various secondary roles through then end of W.W.II. Additionally, during this time it racked up a number of air to air kills, being able to engage in a turning dogfight when forced to, much to the chagrin of a number of Japanese pilots. Rear gunners would claim a number of kills as well. Overall, its bombing accuracy and defensive capability combined with its damage resilient design made the SBD one tough customer and the stuff of legends. Its reputation was hard earned and well deserved. Few single-engine, carrier-based aircraft can match its record in its intended role. If it has been placed on pedestal, it earned its place there. Its designers and crews all have ample reason to have been proud of this extraordinary machine and to have had a hand in it.
New Zealand also operated the SBD in combat in the Pacific during the war until they were eventually replaced by Vought F4U-1B Corsairs. In addition to seeing action with French forces during W.W.II, it would see action postwar in Indochina as late as 1949, operating from the aircraft carrier Arromanches. Finally, the Chilean and Mexican air forces would operate A-24 Banshees into the late 1950’s. (Many museum and flying warbird examples of SBD’s are actually former Mexican Air Force A-24 survivors that, in a manner of speaking, returned home.)
| THE KIT |
Matchbox released their SBD-5 kit in 1977. This was their second kit in this scale, after their Spitfire Mk.22/24 that was released a year earlier. This was a prime year in which to release such a kit, just a year after the 1976 Midway had been a fair hit in theaters.
 Typically,
as with most Matchbox kits its is molded in three colors. In this case blue,
black, and white. The major parts themselves are decently molded and configured
for an SBD-5. It features opening cowl panels to display what was, for this era,
a nicely detailed engine. The panel lines are heavy, in typical Matchbox
fashion. However, they actually look reasonably like the lapped panels used on
the real thing.
Typically,
as with most Matchbox kits its is molded in three colors. In this case blue,
black, and white. The major parts themselves are decently molded and configured
for an SBD-5. It features opening cowl panels to display what was, for this era,
a nicely detailed engine. The panel lines are heavy, in typical Matchbox
fashion. However, they actually look reasonably like the lapped panels used on
the real thing.
The cockpit is very lacking in detail and features a pilot’s seat that looks more like a pushback recliner. The instrument panel is not too bad, as are the basic side panels. The gunner’s compartment is sorely lacking in detail though it features a good seat. There is little else in the way of detail there. Additionally, the machine guns provided are not well molded and look very toylike. The same can be said for the bomb armament. Unfortunately, there is also rather inaccurate, very sharply molded bomb shaped recess in the lower wing for this centerline armament. The dive flaps and landing gear are designed to be moveable.
There are decals provided for one U.S. Navy aircraft, one Free French aircraft, and one New Zealand RNZAF aircraft. I have used decals from Matchbox kits with mixed results. Sometimes they have gone on very well, while other times they have cracked and disintegrated. These looked to have originally been well printed though were in bad shape when I obtained the kit.
This kit has been released by AMT and Revell as well as Matchbox. Revell acquired most, if not all Matchbox molds some years ago. I believe it was last released in 1999, and presumably, they still have the molds. So, we may see it again.
| CONSTRUCTION |
I had just recently seen the 2019 film Midway when I happened across this it at a model show. I was struck with the same Dauntless mania that I had after seeing the 1976 movie when I was nine. Back then, I built a half dozen or more Airfix and Hawk 1/72 SBD kits back when you could buy them from Woolworth’s or Woolco for $1.50 and $1.00, respectively. I also built at least two of the Monogram 1/48 kits, that at the time sold for $2.00.
All were in different paint schemes and markings, as even back then I had a decal stash. I built them in markings from Midway, the Battle of the Coral Sea, Army Air Force A-24’s, later versions in three-tone camo, and one in New Zealand livery. If I had known about the Yagi radar equipped models at the time, I would have built one of them as well, if I could have scrounged the antenna from somewhere.
Since then, I have always been a bit SBD crazed. The first kit that I built when I got back into modeling for the second time was 1/48 Monogram SBD built up in flight, detailed and motorized. This also brought me my first modeling award as an adult in 1996.
I never actually saw this kit when it was released and did not see one until I ran across one at a Homewood Toy and Hobby in Birmingham when I was in college. I had a passing interest in it, but never picked one up to build until late 2019. (In 1989, I was more intrigued by their Sea Venom kit, which my late fiancé Frances McDaniel surprised me with a gift of and I later built into an award winning model in Suez markings.) Still, I knew what I was getting into with this kit. It was going to be an ordeal to build in the manner that I wanted to finish it. However, just off of detailing the 21st. Century Toys Stuka to death and finishing up my Williams Bros. P-35, I was spoiling for a fight as it were. I found it an enjoyable and reasonably easy build, though.
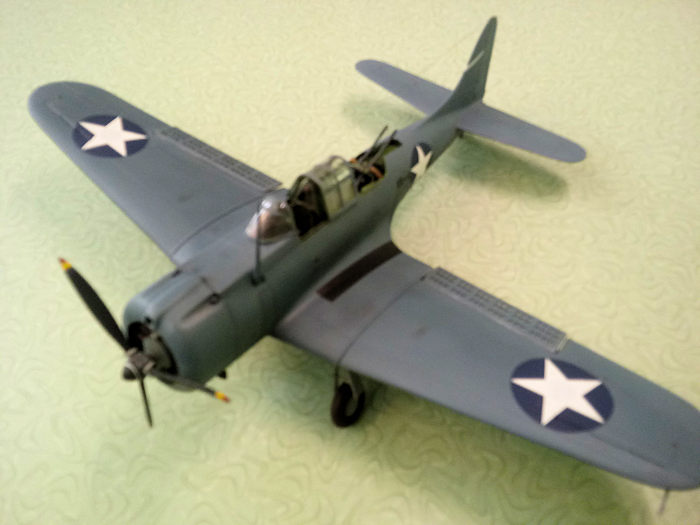
I had long decided that if I wanted to build a really big SBD, but had never committed and pulled the trigger. I also knew that when I did, it would be in Midway markings, specifically as the aircraft flown by either LCDR Wade McClusky, LCDR Max Leslie, or Lt. Dick Best. I was already well familiar with Lt. Best and the exceptional job that he did on that fateful day, especially after having suffered lung damage due to a faulty oxygen system. Having recently seen it dramatized with in the newest Midway film sealed the deal. I would be building Best’s Dauntless.
This would mean additional work, more than just detailing the kit, though that would prove to be something of challenge as well. The cowl and propeller would have to be significantly modified, as they represented a later -5 version. The latter was easy. The former proved a bit more difficult than had been anticipated. Overcoming such a challenge is what makes a build like this fun, though.
I started with the engine on this one. I sued the engine out of the box. It was cleanly molded and I detailed it principally with careful painting and accenting. The cylinders were painted in Model Master Dark Anodonic Grey and the crankcase in Testors Flat Grey. The pushrod tubes were painted in Testors silver and the spark plug wires in Testors Red, and various other details accented in silver or black. Everything was given a light acrylic wash based on Tamiya Flat Black to give it a somewhat used look.
It was not my attention to display it with the cowl panels open. Thus, the engine mounts and parts that would have been visible here were given a basic assembly necessary to allow it to be mounted securely. Now it was time to turn my attention to the cockpit and gunner’s station. This was where the real work would begin.
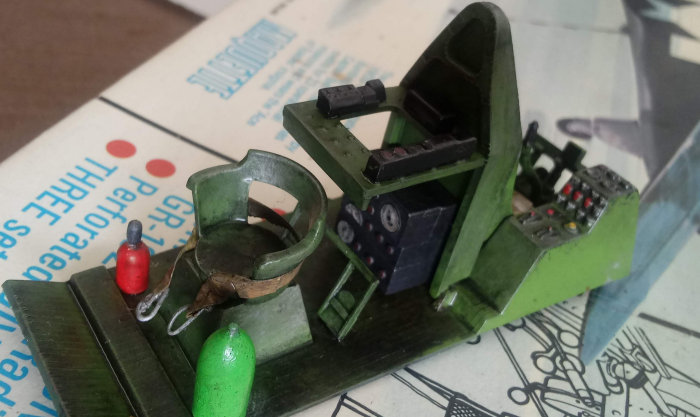 The
god-awful pilot seat was discarded. I did not even put it in the parts box, as I
could not imagine where I would ever need a 1/32 Barcolounger. Instead, one from
a 1/32 Hasegawa Spitfire was used, which looked fairly close to the photos that
I had. The basic interior was painted in Model Master Chromate Green. Various
panels were painted black and then details picked out in red, Tamiya Hull Red,
silver, and yellow. There were several scratchbuilt levers added along with a
trim wheel from the parts box. The somewhat odd oxygen pipe and mouthpiece were
scratchbuilt from something similar in shape found in the spares box as well.
Then everything was drybrushed with Testors silver to accent it and show some
appropriate wear.
The
god-awful pilot seat was discarded. I did not even put it in the parts box, as I
could not imagine where I would ever need a 1/32 Barcolounger. Instead, one from
a 1/32 Hasegawa Spitfire was used, which looked fairly close to the photos that
I had. The basic interior was painted in Model Master Chromate Green. Various
panels were painted black and then details picked out in red, Tamiya Hull Red,
silver, and yellow. There were several scratchbuilt levers added along with a
trim wheel from the parts box. The somewhat odd oxygen pipe and mouthpiece were
scratchbuilt from something similar in shape found in the spares box as well.
Then everything was drybrushed with Testors silver to accent it and show some
appropriate wear.
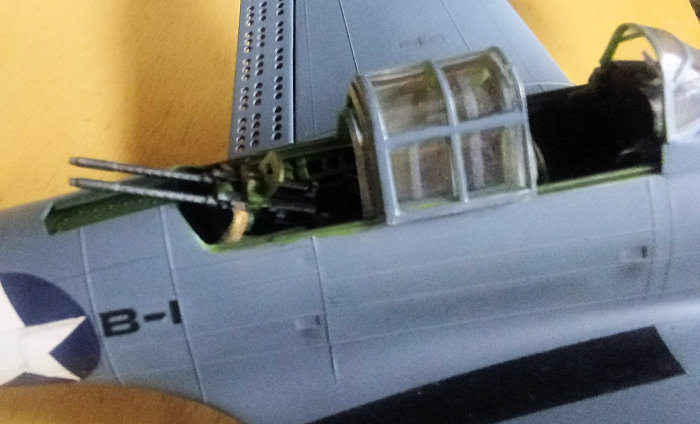
Much more detailing was necessary in the after compartment. Radio components from the parts bins were added. The housings were painted black and the dials white with the tik marks accented by dry brushing in flat black. The auxiliary rudder pedals, a fire bottle, and an oxygen cylinder were also scrounged from the parts bin, modified as needed, and fitted. An auxiliary control stick was also included, but fitted in a stowed position, as this was rarely used. Tape seatbelts were added to both seats along with scratchbuilt buckles. Then everything was given a somewhat heavy wash of the same acrylic mixture used earlier. This gave it a very nice, well-used look.
The instrument panel required some special work. The actual kit panel has blank spaces filling the areas where there should be the receivers and charging handles of a pair of Browning .50’s protruding. This was cut away through scoring with an X-acto blade and the trimmed and sanded. After painting the panel Tamiya Flat black, the instruments were dry brushed with white and silver, with some details picked out with red, yellow, and cream. The gauges were each given a drop of Micro Krystal Clear.
The guns were Frankenstein creations, made from multiple parts from the parts bin. These were painted in Testors Gun Metal and then accented by dry brushing with Anodonic Grey. In retrospect, the dry brushing left them looking a little too silvery, as if most of the bluing or Parkerizing had been worn off. However, I did not realize it until I had glued them in place and decided at this point to leave well enough alone.
With this completed to my satisfaction, I fitted it to the fuselage and glued it together with gap filling CA glue. The fit was good and required only a moderate sanding and minor touchup fills with CA glue. After having previously built their Sea Venom and Spitfire kits, it was definitely the best fit that I have had in any Matchbox kit in this scale.
Assembly on the wings then began. The wing is multipiece affair but presents few problems. However, the instructions would have you fit the landing gear and dive flaps at this point. Expecting to break or at least damage them, I left them off until later, much as I had done on the Monogram SBD that I built some years back.
There is an open space at the inboard section of the wings where the dive flaps are fitted that is not there on the actual aircraft. This was solved with some thin plastic card trimmed to fit and glued in place with CA glue. A little sanding and minor additional filling and this was resolved. Then the outer wing panels were attached. Again, the overall fit was generally good and little filling was needed. The entire subassembly was sanded and soon ready to mate to the fuselage. The horizontal stabilizers were also assembled at this time and went together with no problems.
I initially thought to fill or remove the bomb recess in the lower wing. However, the more that I examined this, and the bomb displacement gear, it looked as though the fit was going to be rather problematic with the kit bomb or anything from my spares box. Ultimately, I sanded it some to reduce it sharp delineating, but left it mostly as it was. This is probably the only part of the final appearance that I am dissatisfied with, though I would not say that it is actually bad looking. It is mainly noticeable if you are actually looking for it.
The fit of the wing to the fuselage was not bad but did require some filling. As usual, I used gap filling CA glue for this. It took two sessions of filling and sanding, though presented no real problems. The stabilizers went on with almost no filling required and I was now ready to deal with the biggest challenge, modifying the cowl to that of an SBD-3 with the air scoop.
My initial thoughts were that I would simply find and air scoop in my “scoop drawer” in my spare parts organizer, glue it on, sand it, and open up a hole in the cowl if needed. That was not to be the case, though. This would prove to be the most complex modification required, though ultimately reasonably easy.
As I examined the various scoops and found several that could be adapted, it was very obvious that this initial solution would not work. True surgery on the cowl and grafting the part in would be required. Once I had finally settled on one (I am uncertain as to what kit this was originally gleaned from.) I marked the centerline of the cowl in pencil and then taped the scoop in place. I then marked it off on either side after which the area where the scoop would be fitted was cut away with an X-acto razor saw.
The air scoop was then glued in place with a substantial amount of gap filling CA glue and several sanding and filling sessions ensued. While tedious and time consuming, the modification came out right the first time. The scoop itself was reshaped slightly and I soon had the proper cowl for an SBD-3.
The propeller blades of the kit are of a much broader paddle style used on the later SBD-5. These were thinned out by sanding until they had the proper, more slender shape of those used on the earlier SBD-3. Once completed, the warning stripes were painted on the tips in blue, red, and yellow, and then masked off. The blades were then painted flat black and fitted to the hub. A small spinner was gleaned from the parts bin to be sanded, and shaped appropriately. It was painted in Tamiya Semi Gloss Black with a thin white ring, as was correct for this aircraft. The completed propeller was then set aside as I prepared to paint the kit.
| COLORS & MARKINGS |
 The interior
of the cowl was first painted in Chromate Green. The exhausts were then drilled
out with a pin-vise. Then the engine and cowl were fitted to the fuselage
without issue and I was ready for a painting session. The cockpit and cowl
opening was stuffed with damp paper towels and the former was partially masked
with 3M blue painters tape. The panel lines were preshaded in Testors Flat Black
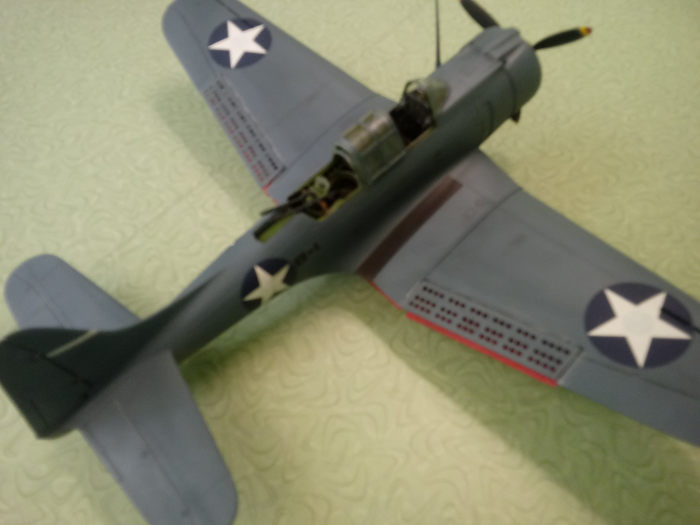
in order to accent them. The underside was then painted in Model Master Neutral
Grey. The upper section was then painted freehand with Model Master Intermediate
Blue.
The interior
of the cowl was first painted in Chromate Green. The exhausts were then drilled
out with a pin-vise. Then the engine and cowl were fitted to the fuselage
without issue and I was ready for a painting session. The cockpit and cowl
opening was stuffed with damp paper towels and the former was partially masked
with 3M blue painters tape. The panel lines were preshaded in Testors Flat Black
in order to accent them. The underside was then painted in Model Master Neutral
Grey. The upper section was then painted freehand with Model Master Intermediate
Blue.
While this was drying, the insides of the dive brakes were painted in Testors Flat Red. Once they had dried, they were set on a strip of painters tape attached to the work bench and painted in the appropriate exterior colors.
While all of this was drying, I turned my attention to the armament. The bomb was less than satisfactory. However, I did not have a suitable substitute on hand. I glued it together and did a great deal of trimming and sanding until it had a shape that I found acceptable. I drilled out a section in the tip with a pin vise and added a detonator that looked about right from a bomb in the my overflowing “bomb bin.”
Finally, generally satisfied with it, I sprayed it in Testors Flat Yellow, more than anything else to see if there were in fill spots that I had missed or goofs in my sanding. After this had dried, I cut two thin strips of Tamiya tape and masked the twin yellow striped and sprayed it in Testors Olive Drab.
Then came the most difficult part of the painting. I needed to paint the two thin white lines on the tail that were squadron markings. I used a thin strip of cut from Tamiya tape, around the same width as had been used on the bomb and masked the center of this at the correct angle. I then masked it on either side with wider Tamiya tape and the area surrounding this in more 3M painter’s tape. This was then sprayed in Tamiya Flat White and came out just right on the first try.
| FINAL CONSTRUCTION |
The exhausts were hand painted in Model Master Burnt Iron and accented by dry brushing Testors Rust. The landing gear was now painted in Neutral Grey with Chrome Silver used for the compression struts and the wheels were assembled and painted in Testors Rubber, with the brakes given the same color treatments as the exhaust and the hub covers painted in Neutral Grey before being glued in place. Some minor cutting on the gear was required to fit the gear in place post wing assembly. This came off easily and the landing gear was secured in place. The tail wheel was painted in the same rubber color and installed. The tail hook was painted white, the stripes masked, and then sprayed in flat black before being installed as well.
The entire model was then given a coat of Testors rattle can Gloss. Once this had dried I began decaling it. The wing and fuselage insignia were taken from Eagle Strike sheet 48162, originally intended for a 1/48 TBD, but appropriately sized for the Dauntless. These went on flawlessly. The numbers were gleaned from another sheet in the decal stash. So few decals were required for this model that it made it for of the quickest decal jobs that I had done in years! (Sort of a relief in a way.)
The three ventral signaling lights were created by drilling three evenly spaced holes a little left of centerline just aft of the ventral dive brake. These were then filled with a drop of Elmer’s white glue applied with a toothpick. Once this had dried, they were tinted in Tamiya Clear Red, Green, and Yellow.
 The canopy
was then masked and painted in the same Intermediate Blue and the interior
framing hand painted in Chromate Green. A gunsight was gleaned from the parts
bin, again, painted and fitted above the instrument panel. I then turned my
attention to the rear guns.
The canopy
was then masked and painted in the same Intermediate Blue and the interior
framing hand painted in Chromate Green. A gunsight was gleaned from the parts
bin, again, painted and fitted above the instrument panel. I then turned my
attention to the rear guns.
Those supplied in the kit absolutely would not do. I happened to have a set that would in my spares bin, though I cannot say what they came from, as I do not recall building anything that these could have been scavenged off of. In any case, they looked just right and with a little work they were fitted to the kit swivel mount. A set of 1/35 ammo .30 ammo link belts were painted and added to this as well, making for a much more realistic gunner’s station. I will note that the armor plate for the gunner, though simple, is nicely done and looks quite accurate, as well as the basic flexible swivel mount.
Some general weathering was done with various hues, some light washes, and light dry brushing with Testors Aluminum. The dive flaps were also given some light weathering and glued in place. This last part proved a little tricky, and I have accidentally broken both of the upper flaps off and had to repair them since then. In retrospect, I might not have attached them in this manner, though I am far from certain if the long-term results would have been any more satisfactory. The entire model was then given a coat of Testors rattle can Dullcote.
The bomb and displacement gear went in place with no problems. The running lights were then hand painted with Tamiya Clear Red, Clear Green, and Clear Blue. Exhaust stains were dry brushed with Model Master Flat Black. The canopy was glued in place with G-S Hypo Watch Crystal Cement. Lastly, the radio mast was fitted and the aerial rigged with E-Z line and the propeller was glued to the shaft. Now I had a 1/32 SBD-3 for my collection.
| CONCLUSIONS |
The Matchbox SBD is a dated kit and is clearly surpassed by the Trumpeter offerings. I enjoy the challenge of trying to make a silk purse out of sow’s ear, though, and I enjoyed building it. In general, I would not recommend it for a serious modeler unless they are up for a great deal of modification and scratchbuilding. Conversely, a beginner wanting to tackle a larger subject could build this out of the box with relative ease and still produce a nice looking model.
That being said, I rather enjoyed this build and was very pleased with the results. Sometimes, I would often rather do a ton of scratchbuilding rather than build some of the newer kits that are sometimes overly complex. Despite all of the additional work, I only spent around thirty hours on this. Based on my experience with other Trumpeter kits, I suspect that I could not have built their SBD-3 in this same time. As for the results, I have seen a few jaws drop when people find out that it is actually the Matchbox model.
I built this model with the intention of making it a show piece just before the Coronavirus outbreak and model shows were put on hold the week after I finished it. Now, I am finally getting the chance to show it off. Whether or not it wins any awards, it was a lot of fun and I am satisfied with my work. (And that is what any real hobbyist should strive for. It’s great to turn heads and win awards, but personal satisfaction and relaxation is really what this hobby is about. We should all keep that in mind.) If I wanted another 1/32 SBD, I might even build another one.
This is by no means a shake and bake kit. If someone wants to build an accurate model, as I noted and detailed, it takes a lot of work and patience. Yet the Trumpeter kits are no easy go either, simply by virtue of their very numerous parts. May each modeler choose their own path and be happy with the course that they have taken and satisfied that they have done right by their own assessment.
In closing, I wish to note, like a number of other modelers that I have seen on this website, I am most displeased with Rustoleum’s decision to kill off the Testors Model Master paint line, along with some of the Testors line as well. This line and Tamiya have been my paints of choice since I got back into modeling for the first time in the 1980’s. Clearly, from this review and others that I have done on this site, Model Master was my go to paint.
They were the most accurate colors readily available to modelers for decades at reasonable prices. Discontinuing them has done a great disservice to the modeling community as a whole, and especially to those entering the hobby who may not have ready access to other paint lines at their local hobby shops. I would implore them, as I suspect many would, to reintroduce this line, even if it was in a somewhat abbreviated form. I, and I suspect many others, would prefer to be able to buy much of my paint as needed from my local hobby shop rather than having to order it and wait days or weeks for it to arrive.
| REFERENCES |
SBD Dauntless in Action (No. 64), by Rob Stern, Squadron/Signal publications, 1984
SBD Dauntless in Action (No. 236), by David Doyle, Squadron/Signal Publications, 2015
Dive Bombers in Action, by Peter C. Smith, Blandford Press, 1988
The Hamlyn Concise Guide to American Aircraft of World War II, by David Mondey, Hamlyn Publishing Group, 1996
https://en.wikipedia.org/wiki/Douglas_SBD_Dauntless
22 May 2022
Copyright ModelingMadness.com. All rights reserved. No reproduction in part or in whole without express permission.
If you would like your product reviewed fairly and fairly quickly, please contact the editor or see other details in the Note to Contributors.