
Pavla 1/72 TBY-2 Seawolf
| KIT #: | 72038 |
| PRICE: | $ |
| DECALS: | Three options |
| REVIEWER: | Carmel J. Attard |
| NOTES: | Short run with resin bits. |
| HISTORY |
The Sea
Wolf was a naval design intended for use as a torpedo bomber to operate from
deck of carriers. It performed its maiden flight as XTBU-1 and was intended as a
development replacement to the Avenger. The origin goes back to 1940 when the
Vought Company received a USN contract for a prototype, three-seat bomber. This
was a mid-wing cantilever monoplane of a graceful shape with tail wheel landing
gear and powered by a Pratt and Whitney R-2800-22 double Wasp radial engine
rated at 2,000hp. It carried a crew of three seated in tandem beneath a long
greenhouse canopy. Weapons were to be carried in a lower-fuselage
 weapons bay or on two under
wing hard points. After successful testing the US Navy arrived to a decision for
production of the type but as Vought Company lacked adequate production space as
it was committed with the production of F4U corsair, it was agreed instead that
the type shall be built by Consolidated.
weapons bay or on two under
wing hard points. After successful testing the US Navy arrived to a decision for
production of the type but as Vought Company lacked adequate production space as
it was committed with the production of F4U corsair, it was agreed instead that
the type shall be built by Consolidated.
A contract for 1,100 aircraft of TBU type was placed with Consolidated in September 1943 and the type soon gained the name Sea Wolf. The TBY2 differed from the TBY1, of which one is known to have been built by having a radar pod mounted under starboard wing. Sea Wolf production was terminated after 180 aircraft had been completed. The Sea Wolf was armed with three 0.5 Browning fixed forward firing machine guns, one 0.5 trainable rearwards firing machine gun in a dorsal turret, one 0.3 rearwards firing machine gun in ventral turret position and 1600 lbs of disposable stores, which could be a 22” torpedo or a corresponding load of bombs in the bomb bay. It also carried an armored protection for the crew and fuel tanks. Two twin gun pods could also be carried under the wing inner pylons. After their equipment in the CASU-22 at the Quonset Pont base, Rhode Island, the series Sea Wolf were included in the VT-154 operational squadron that had to sail for the Pacific theatre with the USS Lyte CV-32, after training end in 1945. At the end of 1947, most of the remaining TBY-2 were withdrawn from service and scraped.
The Sea Wolf had a maximum speed of 312mph at 17,700’ altitude, cruising speed of 156mph and had a range of 1025miles with one torpedo. The TBY-2 had a wingspan of 17.42M, Length of 11.39M and a wing area of 40.88 Sq.M
| THE KIT |
It is the first time that the TBY-2 Sea Wolf has been released as an injection moulded kit form to a scale of 1/72 scale. Earlier release of the kit was by VAC Wings, which was a vacu form type of kit at same scale. The box cover states it is an Octopus kit but it is produced by Pavla Models. The kit is moulded in medium grey plastic that carry engraved detail panel lines on most of the parts and they come sealed in a large polytene bag. Another sealed bag contains resin parts and also included is a long greenhouse type vacform cockpit canopy. The kit can be built in sub assemblies in view of the many detail parts it contains.
| CONSTRUCTION |
 Starting with the cockpit
which contains many resin parts and having a plastic floor and resin side
paneling and bulkhead, a resin pilot seat and a control stick in plastic. This
assembly was painted in interior colours with seat straps added and the
instrument panel fixed in place and ahead of it is a firewall having the lower
part forming the bomb bay front narrow extension. These are all fitted to one
side of the fuselage half. There is another bulkhead behind the cockpit that is
a ‘u’ shaped section and further aft there is the rear gunner’s compartment made
up from five kit components. Before closing the fuselage halves and fix these
together I found it very practical to glue 1/4 “long tabs made from cut plastic
sprue to the inner edge of one side so that the two halves will self align
together in the absence of locating guides. This also applies to the leading
edge of the wings before these are fixed together. I tend to do this with most
short run kits where there is absence of locating guide pins.
Starting with the cockpit
which contains many resin parts and having a plastic floor and resin side
paneling and bulkhead, a resin pilot seat and a control stick in plastic. This
assembly was painted in interior colours with seat straps added and the
instrument panel fixed in place and ahead of it is a firewall having the lower
part forming the bomb bay front narrow extension. These are all fitted to one
side of the fuselage half. There is another bulkhead behind the cockpit that is
a ‘u’ shaped section and further aft there is the rear gunner’s compartment made
up from five kit components. Before closing the fuselage halves and fix these
together I found it very practical to glue 1/4 “long tabs made from cut plastic
sprue to the inner edge of one side so that the two halves will self align
together in the absence of locating guides. This also applies to the leading
edge of the wings before these are fixed together. I tend to do this with most
short run kits where there is absence of locating guide pins.
The kit
also contains three short resin exhaust pipes that are fitted to a port opening
area located ahead of the wing on both fuselage sides. To simplify matters I
glued a small piece of curved plastic card on the inside so that there was no
chance of the small pipes from dropping inside the fuselage when added. After
the fuselage was closed I fitted the upper decking which continue to add detail
to the interior. Moving to the wings these were first glued together, the radar
pod added and the wings are cemented to the fuselage with a butt joint. This was
followed by the tail planes and after that the resin engine bulkhead added.
After painting the engine and fixed in place, the resin front cowling is fixed
using super glue. Allowing the assembly to set, I then added the detailed bomb
racks, which are made in resin. I then added the gun pods to the wings. I
drilled two holes and fitted cut measured pieces of surgical needles to simulate
 hollow gun barrels and fixed
these in place. I then continued to assemble the two wing wheel wells complete
with the undercarriage that comes quite well detailed. I then added the
undercarriage doors. I did not fix the main wheels but painted them and left to
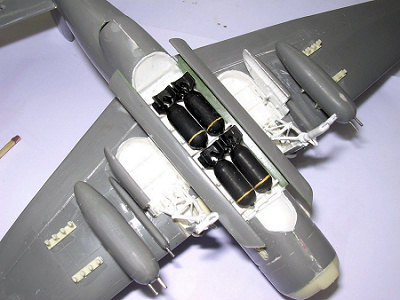
a later stage. The wheel wells were painted semi mat white. The bomb bay was
also painted in same colour. I did manage to find more detail that I could add
to the open bomb bay in fact added extra four bomb backs inte
hollow gun barrels and fixed
these in place. I then continued to assemble the two wing wheel wells complete
with the undercarriage that comes quite well detailed. I then added the
undercarriage doors. I did not fix the main wheels but painted them and left to
a later stage. The wheel wells were painted semi mat white. The bomb bay was
also painted in same colour. I did manage to find more detail that I could add
to the open bomb bay in fact added extra four bomb backs inte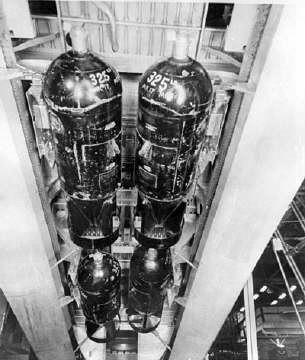 rnally
and four 325 lb bombs thereby filing the somewhat empty spacious bay. These
bombs complete with pylons were mounted on a separate rectangular thin plastic
card which had webbing detail added to it before the whole bomb assembly was
transferred insider the bomb bay and fixed for good. I could have added a
Torpedo instead but preferred to add bombs as I had good reference material.
Tail wheel assembly was then added.
rnally
and four 325 lb bombs thereby filing the somewhat empty spacious bay. These
bombs complete with pylons were mounted on a separate rectangular thin plastic
card which had webbing detail added to it before the whole bomb assembly was
transferred insider the bomb bay and fixed for good. I could have added a
Torpedo instead but preferred to add bombs as I had good reference material.
Tail wheel assembly was then added.
It was now the turn of the transparencies to fit in place. The rear turret transparency was first cut to correct height with a fine saw and a slot for the gun carefully cut vertically using a razor sharp modeling knife. This was lowered on a plastic ring that had a sloping bracket to hold the gun. The turret transparency was thicker at the lower end and needed careful trimming. After painting the turret interior, seat and gunner protection armour and gun, the transparency was then lowered and fixed in place using white glue. The frame was then masked with Tamiya strips of tape, which were cut on a glass flat plate. The turret clear part was then painted in sea blue. The main canopy was then test fitted and gently lowered in place securing with white glue. When these were dried I applied tiny drops of super glue to areas to secure and bond the cockpit parts in place. I used super glue after the cockpit canopies were sealed so that any fumes emitted will not seep to the interior, thus leaving the greenhouse as clear as crystal. The canopy was gently masked and the framing painted in same manner as the turret Perspex. Finally the port and fuselage antennae were added.
| COLORS & MARKINGS |
The leading edge radar pod was painted light grey and masked. The canopy parts and bomb bay and wheel wells were also carefully masked. The kit was given an overall coat of ‘Compucolour’ Sea Blue. This was followed by fine sanding in wet and dry and again given the final coat. After the paint has dried the masking was removed and any touching up applied with a fine brush in the respective colour.
| FINAL CONSTRUCTION |
 Like many limited run kits
the propeller blades were separate from the hub. The resin hub was drilled with
shallow holes and the blade roots fixed in them using a tiny drop of super glue
giving chance and holding each blade in correct angle until it take hold before
moving to the next blade. I think this was the most tedious step that I have
encountered and believe me you need patience to match the right blade angle for
all the three. The blades were now painted black and the hub silver. A shaft
added to simplify fitting it to the resin engine front, which was also drilled
to take the propeller shaft. Prop was fitted in place.
Like many limited run kits
the propeller blades were separate from the hub. The resin hub was drilled with
shallow holes and the blade roots fixed in them using a tiny drop of super glue
giving chance and holding each blade in correct angle until it take hold before
moving to the next blade. I think this was the most tedious step that I have
encountered and believe me you need patience to match the right blade angle for
all the three. The blades were now painted black and the hub silver. A shaft
added to simplify fitting it to the resin engine front, which was also drilled
to take the propeller shaft. Prop was fitted in place.
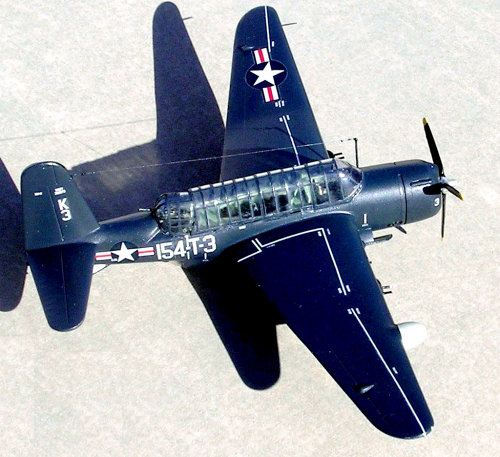
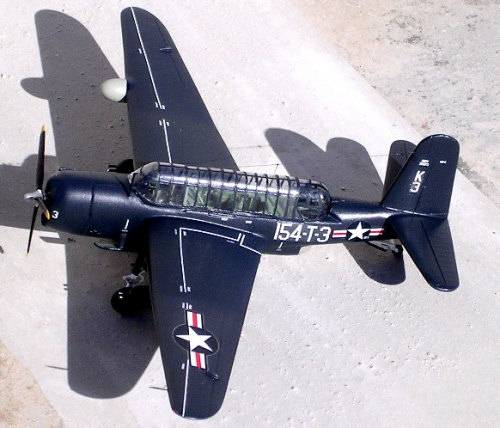
The decals are of good quality, quite thin but the white pigment is opaque. There are war and post war colour scheme options and I opted for a post war machine in which case the separate red insignia bars were added. I finished my Sea Wolf to represent one of 24 machines forming Torpedo Squadron VTY-154/155 that was established on the NAS Quonset Point naval base circa 1947-48. The kit comes with sharp white wing walkway lines and legends. Alternatively one can choose another overall sea blue Sea Wolf that served at the ATTDTU (Torpedo Development Unit) at the NAS Norfolk naval base which is also the last surviving Sea Wolf. The other choice fell on one based at Convair Field factory airfield, August 1944, which was in 3 tone Navy wartime markings. Finally the kit was given a coat of semi matt varnish of Revell brand.
| CONCLUSIONS |
This was another interesting Pavla Models kit that comes with an appreciable amount of detail in resin. Not a kit to go about rushing with it but in the end it results into an interesting addition to the USN collection.
February 2007
Copyright ModelingMadness.com. All rights reserved. No reproduction in any form without express permission from the editor.
If you would like your product reviewed fairly and quickly, please contact the editor or see other details in the Note to Contributors.