| KIT: | Hobby Boss 1/72 P-40E Warhawk |
| KIT #: | 80250 |
| PRICE: | NZ $12.99 |
| DECALS: | Two options |
| REVIEWER: | Zac Yates |
| NOTES: | Semi snap-tite kit |
| HISTORY |
Historically the Curtiss P-40 is a much-maligned aircraft: stripped of its crucial high-altitude performance with the removal of a supercharger early on, the aircraft never really had the chance to prove itself in the role for which it was designed. Several Allied pilots nonetheless blooded themselves in this very attractive aircraft, albeit at much lower altitudes than Curtiss originally intended. Almost every air force during the Second World War operated the P-40 series in most theatres, notably in the African campaign and Pacific. As time went on the P-40 was increasingly retired to a lead-in trainer role, such as in Canada and New Zealand.
The Rolls-Royce
Griffon-powered naval version of the P-40, designated P-40H by Curtiss and
licence-built in the UK by Fairey as the “Kittiwake”, entered service in
mid-1944. 250 production examples were built in two major variants, with all
aircraft serving in the Fleet Air Arm. Essentially a P-40N-1 with a Griffon 75
installed, four 20mm Hispano cannon, clipped and strengthened wings for
increased roll ability and greater external load carrying, folding wings and a
tailwheel, the Kittiwake was very successful in combat. Serving until 1960, the
aircraft saw active service in Korea and Malaya in addition to the Battle of the
Atlantic and over Japan in the dying days of world war. The Royal Australian
Navy operated 16 former FAA examples, only one of which remains extant today.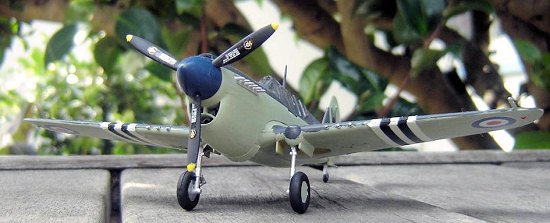
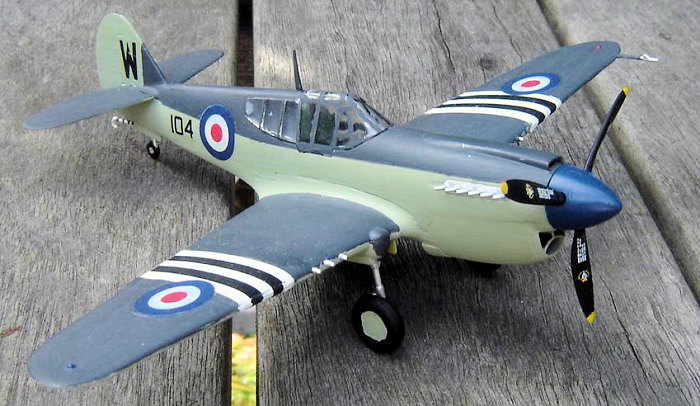
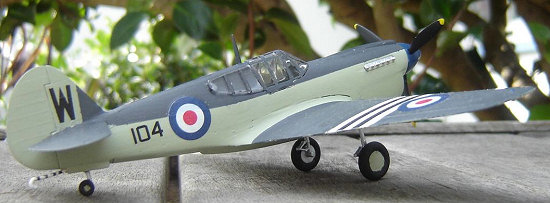
Nine Kittiwakes are in existence today, with only four currently airworthy (although others are either under restoration or slated for this). The aircraft represented by this model is in fact a stock P-40E operated by the Confederate (now Commemorative) Air Force in FAA colours. Registered N440CF, the former RCAF trainer was restored during the 1980s by Archibald Rafael at Montreal, flying again in 1987. She was donated to the First Observation Wing (Washington state) of the CAF in early 1995, and was repainted soon after as Kittiwake FB Mk.2 WA196, serving aboard HMS Wasp in 1952 (this aircraft was later transferred to the RAN and was written off after a landing accident in 1957). She was attached with a dummy tailhook and proved very popular at the CAF’s annual Airsho as well as several other events around the country. After several years on the West Coast airshow circuit, she was transferred to the Gulf Coast Wing (based at Houston, TX) late last year and reappeared as an American Volunteer Group P-40E flown by Lt Col Edward Miller in Burma, 1942. An authentic Kittiwake, FB Mk.1 WA012, is held by the CAF at Pittsburgh, PA for eventual restoration (to be registered N40H).
| THE KIT |
Hobby Boss have recently issued a series of 1:72 World War 2 fighters in a semi-snaptite configuration, with the fuselage being moulded as a single piece and the same with the mainplane. The external detail is lightly engraved, in my opinion similar to that seen on Revell of Germany and Academy kits. Around twenty additional small parts are included on several small sprues, and most can be simply snapped into place. A drop tank and centreline bomb are included, as are their pylons. All gear doors are moulded in place ( a major relief as I hate those tail wheel covers!), as is the radio mast aft of the cockpit. As with any snap-tite kit there are bound to be large gaps, so filler is a must if you want a decent representation of the subject. For a look at what the typical Hobby Boss fighter looks like in the box, check out Scott van Aken’s preview of their Bf.109G-10.
| CONSTRUCTION |
 As with the
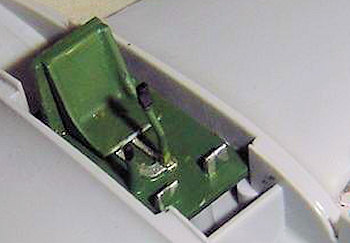
majority of my builds, I started on this P-40 with the cockpit. This consists of
a floor, seat and seat back, and a control column. There is no sidewall detail
at all, nor anything for the control panel, simply a flat area underneath the
forward coaming. The cockpit floor includes a moulded-on flap control and some
raised detail where the control column attaches. The seat is very basic and
would benefit from a seat belt, but with the thickness of the transparency it
really wouldn’t be worth the effort.
As with the
majority of my builds, I started on this P-40 with the cockpit. This consists of
a floor, seat and seat back, and a control column. There is no sidewall detail
at all, nor anything for the control panel, simply a flat area underneath the
forward coaming. The cockpit floor includes a moulded-on flap control and some
raised detail where the control column attaches. The seat is very basic and
would benefit from a seat belt, but with the thickness of the transparency it
really wouldn’t be worth the effort.
The cockpit parts were all painted with two coats of Tamiya Flat Green XF-5, with the raised detail on the floor being drybrushed Chrome Aluminium X-11 and the handles on both control column and flap lever Flat Black XF-1. A separate headrest is included for behind the pilot, this also received some Flat Green and the cushion Flat Brown XF-10. The cockpit interior on the fuselage was painted Flat Green (my standard for Allied fighters), and the blank control panel Flat Black to hide the lack of detail. The areas behind the side transparencies were painted with two coats of German Grey XF-56.
 When the paint
had dried, the cockpit parts were separated from their sprues and cemented in
place. The completed subassembly was then cemented onto the centre section/mainplane
and set aside.
When the paint
had dried, the cockpit parts were separated from their sprues and cemented in
place. The completed subassembly was then cemented onto the centre section/mainplane
and set aside.
At this point I trimmed the fuselage of flash, which was rather noticeable around the engine area. This done, cement was applied to the large location pins and contact areas, and the fuselage attached to the wing. A fair amount of pressure was needed to get the two parts to mate to my satisfaction, as the snap-tite element of the kit reared its ugly, “I-don’t-need-no-stinkin’-glue” head. The horizontal stabilisers were removed from the sprue, trimmed and cemented in place, as were the cowl flaps, and the now externally-complete airframe was set aside to dry.
I turned my attention to the smaller components now left on the sprues, namely the undercarriage and prop. The propeller received two coats of Flat Black and Lemon Yellow X-8 tips, whilst the spinner had four coats of Flat Blue XF-8. The oleos were painted Chrome Aluminium, the tyres Flat Black (of course!) and the wheels Chrome Aluminium and Sky XF-21. The tailwheel oleo was painted Chrome Aluminium also, and the tyre Flat Black. The wheel itself received a dot of Sky. The gunsight had its body painted Flat Black, the glass sight Chrome Aluminium, and the crash pad Flat Brown. The exhaust manifolds were painted with two coats Chrome Aluminium – not strictly authentic, I know, but all I have readily available. I intend on purchasing a better representation on my next trip to the hobby shop.
The airframe was
now set, so I cut the single-piece canopy from its sprue and cemented it in
place. A problem arose here with the distinctive transparencies behind the pilot
– they just wouldn’t stay flush. I tried a clothes peg, I tried Tamiya tape, had
I an elastic band handy I would’ve tried that, but the things just splayed
outward. Aerodynamically highly inefficient, aesthetically highly unpleasing!
Next time I do one of these I may attempt
 a combination of cyanoacrylate and an
elastic band. Always space to learn something new with kit building!
a combination of cyanoacrylate and an
elastic band. Always space to learn something new with kit building!
The rather worrying gap along the fuselage, extending from propeller mount back to tailwheel, had me wringing my hands and chewing my fingernails to bits. How on Earth can I fix this? I was extremely tempted to ignore it and just get on with painting, but my inner modeller said “get the filler! You know you want to! What do you want your fellows to think of your skills if you have that canyon running along the fuselage?”.
Thanks brain! At last, the motivation I needed! Out came the Humbrol model filler, applied with a blunt X-Acto long past its prime, and set aside to set. When this was done, I got into sanding vigorously with some coarse blue paper, then finer grey. Satisfied, I headed to the paint shop.
| COLORS & MARKINGS |
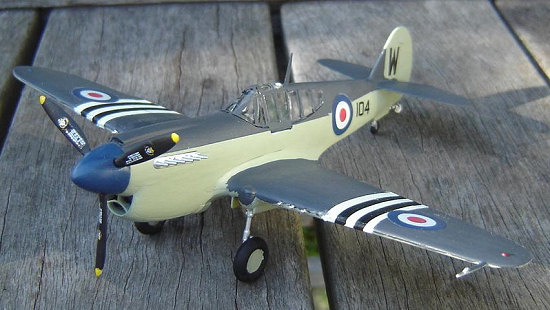
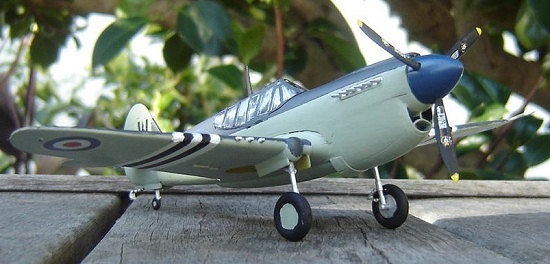
When painted as a Kittiwake N440CF wore the typical Korean-era Fleet Air Arm scheme of Extra Dark Sea Grey uppers and Sky lowers, with black and white invasion stripes on the wings.
For my Kittiwakes (and any other FAA aircraft I happen to build) I use Tamiya’s German Grey in place of EDSG, and their Sky. A decent enough match for my eye, and when compared with images of currently preserved Seafires, Kittiwakes, Sea Furies etc it looks close enough. However, if you know of a closer match for both then please let me know!
 The lowers were
painted first, with the fuselage sides, vertical tail and wing/stabilisers
receiving a good three coats of Sky, with plenty of drying time inbetween. When
fully dry the Sky was masked off with Tamiya tape and the German Grey uppers
applied – again, three coats. With Tamiya acrylics I find three coats to be the
best option. As the Grey dried I applied two coats of Yellow Green XF-4 to the
wheel wells and door interiors. After this any overflow was touched up with Sky.
The radiator intake interior received an afterthought coating of Flat Black,
followed by a touch-up with Sky around the lip.
The lowers were
painted first, with the fuselage sides, vertical tail and wing/stabilisers
receiving a good three coats of Sky, with plenty of drying time inbetween. When
fully dry the Sky was masked off with Tamiya tape and the German Grey uppers
applied – again, three coats. With Tamiya acrylics I find three coats to be the
best option. As the Grey dried I applied two coats of Yellow Green XF-4 to the
wheel wells and door interiors. After this any overflow was touched up with Sky.
The radiator intake interior received an afterthought coating of Flat Black,
followed by a touch-up with Sky around the lip.
The canopy was painted German Grey freehand, as I don’t yet have the courage to tackle a masking job on something so complex as a P-40. A BAe Hawk? Sure! But not the multi-framed glasshouse of Curtiss’ finest!
Being a P-40E this kit came only with US and Russian markings, and not the FAA roundels needed for a Kittiwake. So I headed into my decals box, and unearthed some appropriate roundels from a (I believe) FROG Westland Wyvern, a fuselage code number and tail letter from Italeri’s 1:72 A-4E/F, and invasion stripes from what I think was a P-51D (they were rather thick and had some yellowing, so they may have been early Heller or Matchbox). After applying one set of invasion stripes I found there was a mass of carrier film, so my nippers were used to remove overflow on the leading and trailing edges of the wing, and the three stripe sets left on the sheet were judiciously trimmed by X-Acto. Warm water was used as cold just simply didn’t work out. Unfortunately the roundels proved to be a tad translucent, so (most noticeably on the fuselage) the grey can be seen poking through the white portions.
The invasion stripes caused another headache as they just wouldn’t stick to the leading edge of the wing. The solution? Drastic I know, but I used some Italeri liquid cement (snatched from my ex-girlfriend’s half-completed all-in-one F4U-4 kit) to get the darned things to stay down, let them dry and then filled in the gaps with some Flat Black and White X-2.
| FINAL CONSTRUCTION |
Once the decals
had set, I cemented the exhausts in place and also the tailwheel. The main oleos
were cut from their sprues and so were the tyres, the lot were then cemented tog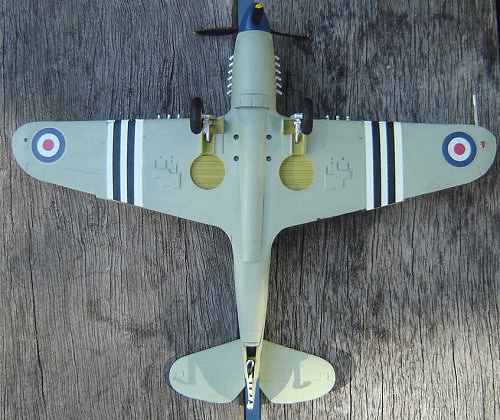 ether.
When dry, they were attached to the wing, and the tyres received a touch up of
Flat Black.
ether.
When dry, they were attached to the wing, and the tyres received a touch up of
Flat Black.
The prop and spinner were also cut from their respective sprues and touched up, and cemented together (like most P-40 kits these days the prop is inserted into the spinner first, followed by a plate to seal it). I found no cement was necessary when I attached the prop assembly to the airframe due to a nice, tight fit. Manufacturer’s marks for the prop were scavenged from my Hobby Boss P-40N and a suitable tailhook found in my spares box and trimmed to fit. Finally the wingtip lights were painted with a dash of Flat Blue and Red X-7, and the machineguns and pitot tube tip some Chrome Aluminium and voila! A pseudo-Kittiwake!
| CONCLUSIONS |
What a fun build! I like this Hobby Boss company! I’m actively seeking a New Zealand stockist of these little gems so I can get my hands on their P-40M. I was a big fan of Mongoram’s Snap-Tite range when I was younger (fond memories of making a B-26 on a two-hour roadtrip!) and it’s good to see them make something of a comeback, albeit as new-tool kits from another manufacturer. Great work! All up this kit took about 24 hours of work, and leaves me immensely satisfied. Thank you Hobby Boss!
Kit courtesy Simon “Mossie” Witty, whatifmodelers.com board member. Built as one of my 12 entries for the “I Love P-40s! Group Build” at What If.
April 2007
| REFERENCES |
Aeroplane Monthly, May 2004 issue (Database: Curtiss-Fairey Kittiwake by Tony Fox)
Classic Wings Downunder magazine, Vol.2 No.3 1995 (Global News)
Classic Wings magazine, Vol.11 No.4 2006 (News)
The Whole Nine Yards: The Story Of An Anzac P-40 – John King, Reed Publishing 2002
Many thanks to John Lamont and the Kittiwake Syndicate at Ardmore Airport, NZ, for allowing me to examine in detail the prototype XP-40H 41-104730/ZK-CKF.
If you would like your product reviewed fairly and quickly by a site that has over 350,000 visitors a month, please contact me or see other details in the Note to Contributors.