| KIT #: | 1338 |
| PRICE: | 66$ |
| DECALS: | Four options |
| REVIEWER: | Francisco Santoro |
| NOTES: | Aerocalcas |
| HISTORY |
This plane was built by Douglas in their Long Beach plant, California, and delivered to the USAAF on September 6th 1942, being given the serial number 4664, being identified in the USAAF as Build Number 41-18539. It began its service career with the USAAF in the 5th Air Force, based in Australia on 9th October 1942 with the registration VHC-CL, and later VHC-FD.
On July 6th 1945 it was moved to Oahu, Hawaii. On December 13th 1946, the plane was sold to an airline. Later, in 1947, it was operated by G. Batchelor with the registration NC68180. In 1948 it was trasnferred and used by Arrow Airlines.
In Janury of 1948 the aircraft was bought by the Aviación Naval
Argentina, and it was given the number DIMA (Dirección de Material de la
Armada) 0296. and assigned to Escuadra Aeronaval 2, with registr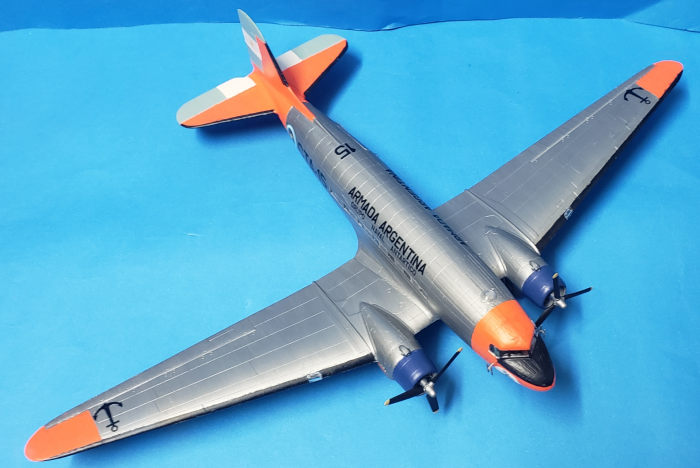 ation
2-GT-12. In 1952, the aircraft was transferred to the Escuadra Aeronaval 4,
being redesignated 3-T-15 while operating for Escuadra Aeronaval 3, and then
4-T-24, when it was returned to Escuadra Aeronaval 4.
ation
2-GT-12. In 1952, the aircraft was transferred to the Escuadra Aeronaval 4,
being redesignated 3-T-15 while operating for Escuadra Aeronaval 3, and then
4-T-24, when it was returned to Escuadra Aeronaval 4.
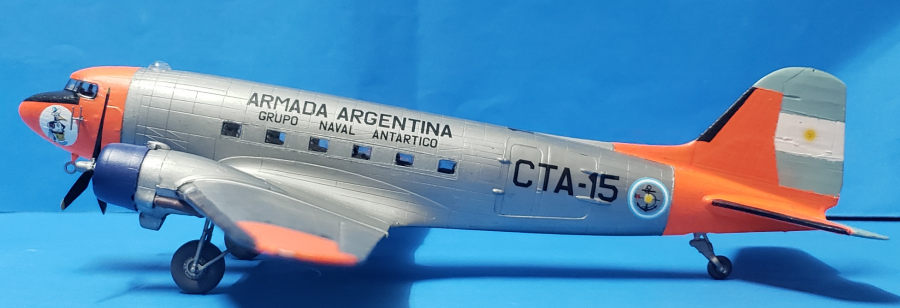
In November 1958, the aircraft was transferred to 2° Escuadrilla Aeronaval de Transporte, part of the Comando de Transporte Aeronaval. The aircraft was by then registered as CTA-15. During 1961, it was modified to carry two Fairchild cameras, and was used for reconnaissance missions.
During the Antarctic Campaign of 1961-62, the Armada joined forces with the Unidad de Tareas 7-8, named "de Exploración y Reconocimiento Aerofotográfico), which depended on Fuerza de Tareas 7. Said unit was tasked with performing the flight to the South Pole with two DC-3s, CTA-12 and CTA-15. The aircraft were modified and painted for Antarctic operations with the addition of extra fuel and oil tanks, communication equipments, a Doppler altimeter, a heating system, and aluminium skis for the landing gear. Upon CTA-15´s return from the Arctic, the aircraft kept flying in transport missions. On December 30th 1963 it was assigned to Escuadrilla de Sostén Logístico Móvil, being re-registered as 5-T-25. It kept operating with this unit until July 30th 1971, when it was discharged from service.
The aircraft was preserved in the square of Base Aeronaval Ezeiza (Buenos Aires) from November 1978 to 1999. The plane was repainted in its Antarctic scheme. Up to 1999, the plane was removed from its resting place, having its wings, engines and rudder removed. The insignias, by then, had been faded by the pass of time. It was at this time that plans to move the plane to Base Aeronaval Comandante Espora (Bahía Blanca, Buenos Aires) were made. The aircraft arrived on December 12 2002 to the base, where it was restored with the skis and the Antarctic colour scheme.
The aircraft is currently preserved on Hangar 1 of the Museo de la Aviación Naval (Comandante Espora, Bahía Blanca, Buenos Aires).
| THE KIT |
 The kit comes inside a top opening box, with all the parts being
inside a single bag, except for the clear bits, which came inside their own
bag. The plastic is molded in grey, and is somewhat hard, with the panel
lines being recessed. An interior is provided for the cockpit and for the
passenger cabin. Clear parts are good and clear, but almost nothing can be
seen through them once the fuselage halves are closed, so you don't need to
superdetail everything.
The kit comes inside a top opening box, with all the parts being
inside a single bag, except for the clear bits, which came inside their own
bag. The plastic is molded in grey, and is somewhat hard, with the panel
lines being recessed. An interior is provided for the cockpit and for the
passenger cabin. Clear parts are good and clear, but almost nothing can be
seen through them once the fuselage halves are closed, so you don't need to
superdetail everything.
Instructions are of the foldable style with black and white images of what goes where. A sprue diagram is provided on the first page. Italeri also provides paint callouts for their own range in the second page, just before starting the kit.
Decals look very good, glossy and with minimal carrier film. I bet they were printed by Cartograf. Four options are provided: One RAF (D-Day, decals are provided for the stripes), one American (UK based in 1945), one French (based in Indochina), and the last one for an Italian machine (Latina, 1963). Colours are Olive Drab and Neutral Grey for the RAF version, Olive Drab, Dark Green clouds and Neutral Grey for the American one, Aluminium and Black for the French option, and White with Aluminium for the Italian machine.
| CONSTRUCTION |
I began by gluing the cabin windows to the fuselage halves. These
were glued carefully with Revell Contacta cement on the unions between the
windows. After that, I began checking which parts needed to be painted
Interior Green (Italeri calls for the interior to be painted in Olive Drab),
and subsequently painted the cabin floor, seats, cockpit and bulkheads with
Revell 48 Sea Green. The instrument panel was painted black. Once the green
was dry, I opened up holes as indicated in the instructions for the
different bulkheads. After a while I thought to myself that these parts
wouldn't b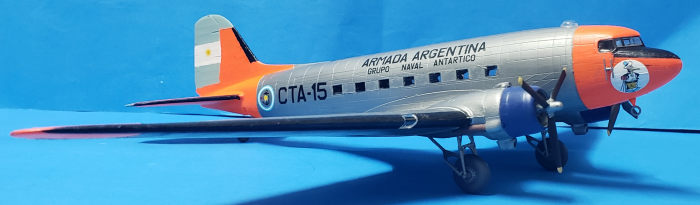 e seen so I left some of them off the model, gluing only the
bulkheads, because they would help me to align the cabin floor. Speaking of
the cabin, Italeri only provides two guide pins for the location of the
floor, so I glued it, using the bulkheads as structural integrity parts. I
then closed the fuselage halves, together with the cockpit and cargo hold
doors. I was told the latter didn't have many contact points, but I didn't
experience that issue with my model.
e seen so I left some of them off the model, gluing only the
bulkheads, because they would help me to align the cabin floor. Speaking of
the cabin, Italeri only provides two guide pins for the location of the
floor, so I glued it, using the bulkheads as structural integrity parts. I
then closed the fuselage halves, together with the cockpit and cargo hold
doors. I was told the latter didn't have many contact points, but I didn't
experience that issue with my model.
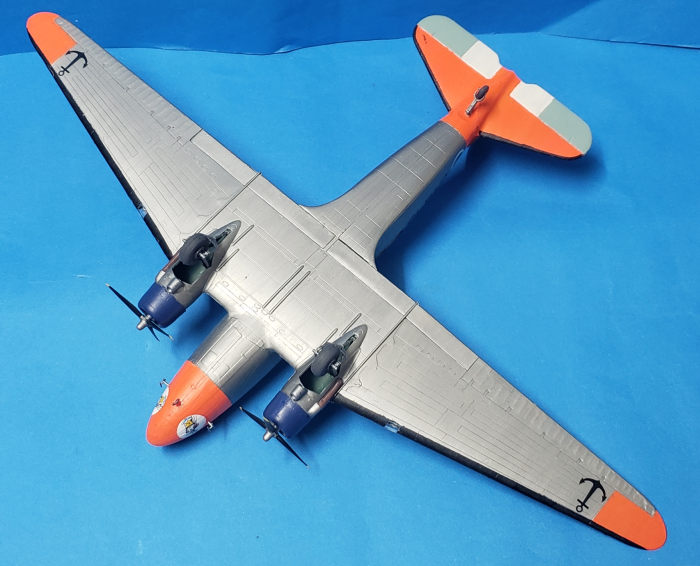
After closing the fuselage halves, I tackled the wings. I was warned by Mr. van Aken and Spyridon Pendedekas about the gaps that would be present when joining the fuselage to the wings. Thanks guys! I glued the wings together, with the flaps (which are separate, but the flap wells don't have any detail) being glued in the closed position. After letting the whole assembly to dry, I did a test fit. The gaps weren't that bad, but they were too visible, even to my standards (did I mention I don't fill anything?). So out came the superglue for them. Once the seams were sanded, I installed the engines, which come with separate shafts for the propellers to spin. After letting the engines cure for a bit, I added the cowlings. The last items to be added before starting the painting stage were the horizontal stabilizers.
| COLORS & MARKINGS |
This was the part I was expecting the most, since I had bought an
Orange Matt colour from Revell just for this project (I may do it in 1:48,
since I too have decals for that). I first painted the Argentinian flag on
the rudder and elevators. After that, I masked those areas and added strips
of masking tape to cover the windows, and then primed the entire model with
Revell 76 Light Grey. After that, I
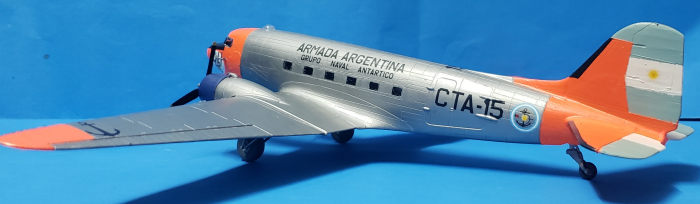 free handed the orange, which needed
lots of coats for it to cover properly. Once I was done with the orange, I
masked those areas and painted the aluminium surfaces with Revell 91 Steel.
When I unmasked everything I was quite pleased to see no paint had gone
under the tape. I can't say the same for the black de-icing and anti-glare
areas, which did run under the tape in some areas. Since the orange would
have needed lots of coats to cover properly, I decided to leave those areas
as is. The model was the gloss coated for the decals.
free handed the orange, which needed
lots of coats for it to cover properly. Once I was done with the orange, I
masked those areas and painted the aluminium surfaces with Revell 91 Steel.
When I unmasked everything I was quite pleased to see no paint had gone
under the tape. I can't say the same for the black de-icing and anti-glare
areas, which did run under the tape in some areas. Since the orange would
have needed lots of coats to cover properly, I decided to leave those areas
as is. The model was the gloss coated for the decals.
Regarding the decals, these came from an Aerocalcas sheet, which seems to be out of production for the moment, since I can't see them on the manufacturer's website. They´re thin and need plenty of water to be placed on the desired areas. Microsol wasn't needed for them, but I brushed some just to be sure. After leaving the decals cure overnight, I matt coated the entire model.
It was then that I unmasked the cabin windows and painted any areas that I hadn't reached before.
The landing gear was painted in Steel 91 from Revell, the wheels's tyres were painted with Revell 78 Tank Grey, while the hubs were painted the same colour of the gear legs. Propellers were painted black with yellow tips. The engine cowlings were painted with Revell 56 Matt Blue. I then glued all those parts into their respective areas. Clear parts were glued with white glue.
| CONCLUSIONS |
A fun kit to build that has been largely shadowed by the new Airfix kit. But, if you can get this one on the cheap side, give it a go. Mind the gaps though.
| REFERENCE |
http://arqueologiaaeronautica.blogspot.com/2014/06/douglas-c-47-dl-skytrain-matr-cta-15.html
August
2022
Copyright ModelingMadness.com. All rights reserved. No
reproduction in part or in whole without express permission.
If you would like your product reviewed fairly and fairly quickly, please
contact the editor or see other details in the
Note to
Contributors.