Airfix 1/72 C-47 Skytrain
| KIT #: | A05031 |
| PRICE: | €20 in 2005 |
| DECALS: | Two options |
| REVIEWER: | Spiros Pendedekas |
| NOTES: | Reboxed Italeri kit |
| HISTORY |
After the end of the war,
many C-47s continued to offer their services to the USAF, with their
contribution to war operations being enormous, as the typical examples of the
aerial resupply of Berlin during the Soviet blockade in 1947 and overall
participation in the Korean War clearly indicated. The RAF C-47s were given the
name "Dakota", a name by which the aircraft became known throughout the world.
 From 1947
onwards the Royal Hellenic Air Force (Ελληνική Βασιλική Αεροπορία - EBA) began
to receive surplus examples from both the USAF and the RAF, the grand total
clocking 88, initially equipping the 355 and 356 Tactical Transport Squadrons in
Elefsis Air Base. The type was used in the Greek Civil War (aditionally as a
bomber, featuring improvized bomb release systems) and also in the Korean War
(where, with the efforts of their crews, it excelled). The venerable bird
provided crucial transport services to the Hellenic Air Force throughout its
operational life, with the last few examples retiring in 2008.
From 1947
onwards the Royal Hellenic Air Force (Ελληνική Βασιλική Αεροπορία - EBA) began
to receive surplus examples from both the USAF and the RAF, the grand total
clocking 88, initially equipping the 355 and 356 Tactical Transport Squadrons in
Elefsis Air Base. The type was used in the Greek Civil War (aditionally as a
bomber, featuring improvized bomb release systems) and also in the Korean War
(where, with the efforts of their crews, it excelled). The venerable bird
provided crucial transport services to the Hellenic Air Force throughout its
operational life, with the last few examples retiring in 2008.
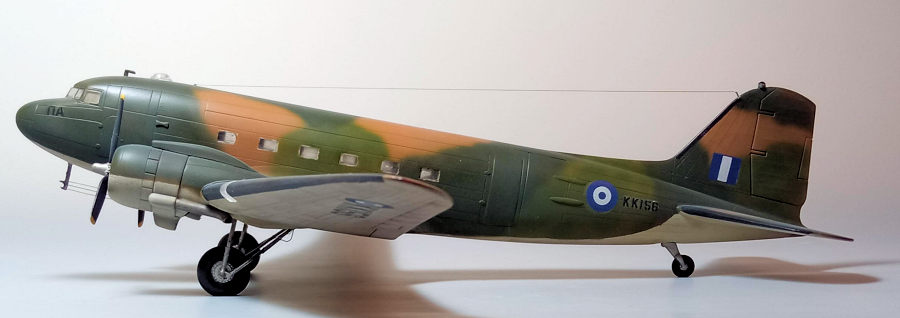
KK156 started its life as USAAF's 43-49479 bird, delivered to the RAF in
September 1949 and transferred to Greece soon after. It was withdrawn from
service in early 2005 and is currently (as of 2022) residing at Tanagra air base
as a static display aircraft, with its still acceptable condition deeming it
suitable for a possible future restoration in flying status (hope is what drives
this world).
| THE KIT |
Before launching its very
nice 2014 new tool C-47, Airfix reboxed the venerable (and, actually, quite
good) 1979 Italeri mold twice, in 2001 as DC-3 and in 2013 as C-47.
My copy was the 2001 DC-3 version, coming wrapped in a small and flimsy top
opening box, featuring a nice box art of a RCAF Rescue bird. Upon opening the
box, I was greeted with two sprues molded in white styrene and a small clear
fret, all loosely floating within the box, without any protective bagging,
meaning potential scratches to deal with. The styrene parts exhibit correct
general shapes and are quite crisply molded with not too much flash, featuring
engraved panel lines (just a tad on the heavy side but only too great for a 1979
mold).
Cockpit detail is basic, including a plain instrument panel, control yokes,
seats and two mummy pilots, but, frankly, almost nothing can be seen through the
small windscreen. Cargo/pa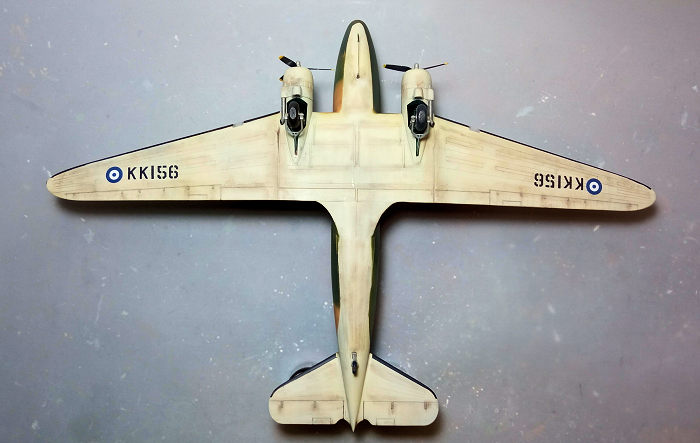 ssenger
interior is practically non-existent , just a floor with molded-on “boxes”.
Again, unless you decide to pose the cargo door open, everything is practically
invisible through the small windows.
ssenger
interior is practically non-existent , just a floor with molded-on “boxes”.
Again, unless you decide to pose the cargo door open, everything is practically
invisible through the small windows.
Engines look quite good, this being also true for the cowlings and the exhausts
(the latter would benefit a lot from hollowing their tube exits by some micro
drilling). Props and landing gear look sufficient, as well.
Transparencies are nicely molded and clear. Instructions come to the form of a
b/w 10-page A4 booklet. They are consistent, featuring a short history of the
type, with the construction spread in 13 simple and followable steps. Color
callouts are suitably provided where applicable. An added bonus is that all
parts to cover the different versions are included, even if they are not
mentioned at the instructions, allowing the modeler to build practically any
standard version of the C-47/DC-3 family.
Two schemes are provided, for an RCAF and a British European Airways bird.
Decals, though still usable, were off-registered, something not too uncommon for
the older Airfix/Heller decals (a problem that has been fixed with the “new
Airfix” offerings, which feature superb decals). Colors are given only in
Humbrol codes, meaning having your conversion charts handy.
Instructions want you to first assemble the sparse interior and trap it between
the fuselage halves, then attach the central lower wing half and rear
stabilizers. The correct for your version cargo door is then to be attached,
followed by assembly and installation of the main wings, together with the main
landing gear. Engines and props come next, followed by the transparencies
attachment. The various antennas and some other bits that are optional to either
versions are finally to be attached, ending an apparently uncomplex build.
| CONSTRUCTION |
 I started by
affixing all side windows from the inside of the fuselage, followed by attaching
the correct (for my version) cargo door. The latter did not fit too positively
onto the fuselage and its joint strengthened by applying liquefied styrene from
the insides. The minimalist interior was then assembled and trapped between the
fuselage halves. Basic cockpit color was Hu226 interior green with black
instrument panel and yokes. Since practically nothing is visible inside upon
attaching the windscreen, I did not bother putting more effort in detailing the
cockpit and, for the same reason, I left the cargo area totally unpainted.
I started by
affixing all side windows from the inside of the fuselage, followed by attaching
the correct (for my version) cargo door. The latter did not fit too positively
onto the fuselage and its joint strengthened by applying liquefied styrene from
the insides. The minimalist interior was then assembled and trapped between the
fuselage halves. Basic cockpit color was Hu226 interior green with black
instrument panel and yokes. Since practically nothing is visible inside upon
attaching the windscreen, I did not bother putting more effort in detailing the
cockpit and, for the same reason, I left the cargo area totally unpainted.
The main wing was next: after removing all locating pins from all part, I first
attached the central lower wing half, followed by the port and starboard top
halves, which twere first glued onto the fuselage, ensuring gap free roots, then
allowed to “rest” onto the lower central half and glued by using the capillary
action effect of extra thin glue. I then glued the lower wing halves “roots''
onto the lower wing half (again, ensuring gap free lateral joints), then also
allowed them to “rest” onto the upper wing halves, with the capillary action of
extra thin glue securing them. This progressive “buildup” of the wings reassured
gap-free joints all over and catered for overcoming the only complex part of the
build. The horizontal stabilizers were also assembled and attached at this time,
together with the tail extension that was correct for the version I was
building.
 Engines were
next: each consisted of two 7-cylinder rows that were glued together, painted
black, then heavily dry brushed with silver. The engine firewalls were attached
to the wing openings, followed by installation of the engines themselves. The
2-piece cowlings were assembled next and, after having their innards painted
Hu226, were attached in position. Fit was all over nice, with the inevitable
seams at the vertically split cowlings easily attended. The kit provides faces
for the distinctive oil filters at the cowling bottoms that I forgot to add, so
I replicated them with white glue applied to the holes that dried to a
membrane-style and painted gunmetal. Small pieces of mesh were attached to the
empty cooler exits, also painted gunmetal.
Engines were
next: each consisted of two 7-cylinder rows that were glued together, painted
black, then heavily dry brushed with silver. The engine firewalls were attached
to the wing openings, followed by installation of the engines themselves. The
2-piece cowlings were assembled next and, after having their innards painted
Hu226, were attached in position. Fit was all over nice, with the inevitable
seams at the vertically split cowlings easily attended. The kit provides faces
for the distinctive oil filters at the cowling bottoms that I forgot to add, so
I replicated them with white glue applied to the holes that dried to a
membrane-style and painted gunmetal. Small pieces of mesh were attached to the
empty cooler exits, also painted gunmetal.
As a side note, the kit caters for rotating props, but they are so designed that
they must be attached to the engines, with the cowlings then built up beside
them, deeming the whole construction and painting tad complicated. If you want
rotating props that can be affixed at final stages, a solution would be to trap
axles of suitable diameter to the engines upon building them, with the existing
axles attached to the props having to be cut-off and the aft-hub area hollowed,
so the props can be attached to the “new” axles at end stages.
After some filling and sanding (not that much really, as fit was generally
good), I masked all windows with Maskol liquid mask, blanked the cockpit opening
with wet tissue and took the Dakota to the paint shop!
| COLORS & MARKINGS |
Hellenic Dakotas are a modeler’s playground regarding camos, as they not only
sported NMF/silver, NATO, and “Vietnam'' schemes, together with a good number of
special ones (including civilianized birds), but also the individual schemes
themselves were not strictly standardized, so one could spot notable differences
between supposedly identically camoed birds. A modeler’s heaven indeed!
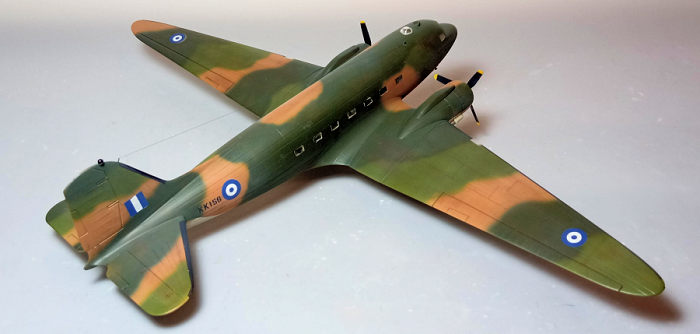
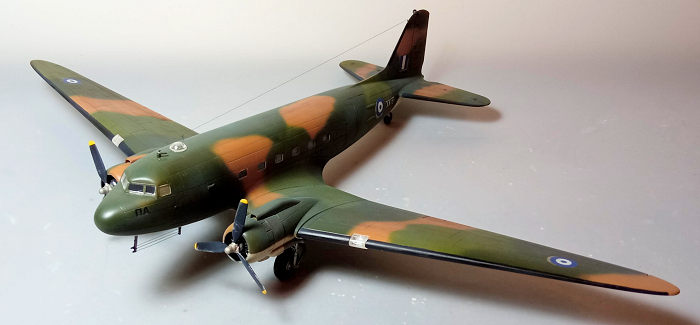
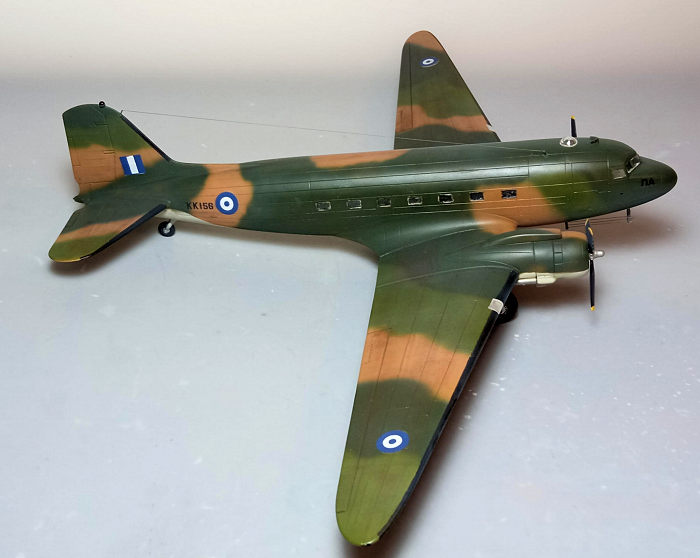 For the KK156
I decided to go for the “Vietnam” style camo (the last one worn by operational
Greek C-47s). For this, I started by applying a coat of Hu28 Camouflage Gray at
all undersides, then masked it off, followed by freehanding the top pattern
using Hu116, 117 and 118 for the two shades of green and tan respectively.
Continuing with painting, I masked and hand-painted black all deicer boots, with
a coat of Future preparing the bird for decals.
For the KK156
I decided to go for the “Vietnam” style camo (the last one worn by operational
Greek C-47s). For this, I started by applying a coat of Hu28 Camouflage Gray at
all undersides, then masked it off, followed by freehanding the top pattern
using Hu116, 117 and 118 for the two shades of green and tan respectively.
Continuing with painting, I masked and hand-painted black all deicer boots, with
a coat of Future preparing the bird for decals.
I invaded my decal dungeon and used generic insignia and codes, in order to more
or less represent the bird’s looks sometime during the late 70's or even early
80’s (a stated above, Greek Dakotas’ looks presented accountable variations in
shades, patterns, insignias and so on, with the search for specific camo of the
specific bird at the specific time being the go-to process for accuracy,
something I did not go for, opting for a more or less generalized approach). A
coat of Future sealed the decals.
As a side note Hellenic “Vietnam camoed” Dakotas featured (at least in a good
number of cases and certainly in their later years) black anti-glare front
panels and wing root walk areas. To add some interest, I assumed that at its
early “Vietnam camo” years, KK156 had these areas painted with the topside camo
pattern, something not uncommon in non-NMF C-47s during WWII.
| FINAL CONSTRUCTION |
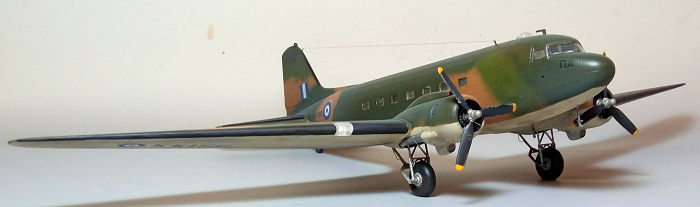
All landing gear parts were attached,
with the Dakota then resting on her feet. Brake lines were added from stretched
sprue. The main wheels (and tad the tailwheel) were filed to look weighted. All
parts, including wheel rims, were painted steel, brake lines and tires were
black and oleos were silver-highlighted with my fine tip silver pen. To add some
interest, the main wheel bays received a coat of bronze green, as it was
witnessed at some derelict examples, where the “standard '' green zinc chromate
would peel off and reveal the bronze green underneath!
I attached the distinctive chin mounted dual pitot, followed by the rear mast
where the three equally distinctive ADF sense wires end, the latter fabricated
from stretched sprue. The props were painted black with steel hubs and yellow
tips and attached in position, followed by the exhausts, which were painted
testors burned metal.
 It was then
time for some weathering, which included an allover black wash (heftier at all
undersides), followed by dark brown/black dry pastels to simulate engine
staining and general dirtying (also too evident at the undersides). A
satin-towards-matt coat gave the bird its final finish.
It was then
time for some weathering, which included an allover black wash (heftier at all
undersides), followed by dark brown/black dry pastels to simulate engine
staining and general dirtying (also too evident at the undersides). A
satin-towards-matt coat gave the bird its final finish.
The tiny windscreen had its frames hand painted and attached in position with
Clearfix, followed by the astrodome and leading edge landing light covers (the
latters’ innards having beforehand been painted silver). Two small masts were
fabricated from thicker stretched sprue and affixed on fin top and fuselage
front respectively (the exact positions determined from net available pictures).
A wire antenna was fabricated from stretched sprue and ran from one mast to the
other, with a V-shape antenna finally attached fore of the astrodome.
The wing tip lights and fin top beacon were replicated by blobs of red and green
clear paint, before calling the Hellenic Dakota done!
| CONCLUSIONS |
Airfix itself came in 2014 with a very nice new tool C-47 (our Editor’s preview here), which is the way to go if you want the latest and greatest 1/72 Dakota. However, the classic Italeri kit has been by no means deemed obsolete, as it is a solid kit with correct general shape and good fit, offering most of the various versions options (like the cargo door type, the astrodome and various antennas). The interior is sparse but not really visible (unless you decide to open the cargo door) and detailing at the key areas of engine and landing gear are not really bad. Add to that the relative easiness of construction and we have a worthy kit that still endures time well.
Should you decide to go
aftermarket, you will not be disappointed, as a lot seems to exist addressing
various kit aspects (corrections,improved looks, different versions etc), with
the choice of either spending the extra money on them or going for the more
expensive but more comprehensive new tool Airfix left to you. If you have one of
these classic kits, or find one at an interesting price and feel like going for
a solid, trouble free build of an iconic plane, by all means give it a go!
Happy modeling!
9 January 2023
Copyright ModelingMadness.com. All rights reserved. No reproduction in part or in whole without express permission.
If you would like your product reviewed fairly and fairly quickly, please contact the editor or see other details in the Note to Contributors.