Maquette 1/72 Boeing C-75
| KIT #: | MQ 7212 |
| PRICE: | €20 when new |
| DECALS: | Three options |
| REVIEWER: | Spiros Pendedekas |
| NOTES: | Frog B-17 kit with “new” fuselage parts |
| HISTORY |
The Boeing C-75 was a
modified Boeing 307 long-range transport aircraft, introduced to military
service in February 1942 and used by the USAAF's Air Transport Command until
July 1944.
The
famous 307 Stratoliner, from which the C-75 emerged, was itself an ingenious
Boeing 1935 design, combining the wings, tail, rudder, landing gear and engines
of the B-17C, with a new circular cross-section fuselage of 138 in diameter,
designed to allow pressurization, so the then spacious airliner could fly in
comfort above the weather.
Only
ten 307s were built. Apart from the first, ill-fated NX 19901, that crashed on
March 18, 1939, while being demonstrated to representatives of KLM, three were
delivered to Pan-Am, five to TWA and one to Howard Hughes. TWA's Stratoliners
flew 3-stop flights between Los Angeles and New York, while Pan Am's flew from
Miami to Latin America. When the United States entered WWII, the five TWA
Stratoliners were converted and pressed into military service as C-75s.
 Conversion
of the 307 to the C-75 included removal of the pressurization equipment to save
weight, removal of the forward four (or five) of the nine reclining seats along
the port side and alteration of the two forward Pullman-like compartments (in
order to provide space for crew requirements on extremely long flights). Extra
fuel tanks were added and the landing gear was strengthened, with the maximum
takeoff weight increasing from 45,000 to 56,000 lb. All five C-75s received the
classic olive drab over neutral gray camo.
Conversion
of the 307 to the C-75 included removal of the pressurization equipment to save
weight, removal of the forward four (or five) of the nine reclining seats along
the port side and alteration of the two forward Pullman-like compartments (in
order to provide space for crew requirements on extremely long flights). Extra
fuel tanks were added and the landing gear was strengthened, with the maximum
takeoff weight increasing from 45,000 to 56,000 lb. All five C-75s received the
classic olive drab over neutral gray camo.
The
C-75 fleet was operated under contract from TWA's Intercontinental Division.
Tilil the arrival of the Douglas C-54 Skymaster, they were the only U.S. built
commercial aircraft able to cross the Atlantic with a payload. Upon their return
to their private owners, those five C-75s completed some 3,000 ocean crossings
and logged more than 45,000 hours flying to every corner of the world!
Once returned to TWA,
they were restored by Boeing to SA-307B-1 civilian status, with new B-17G wings
and engines and B-29 electronics. From 1951 and onwards, they were gradually
passed to and operated by Air Laos, where they ended their flying careers by
1975. Understandably, the fact that Laos was operating five heavy transports
with trans-oceanic range by that time stirred rumors about “Secret Wars”…
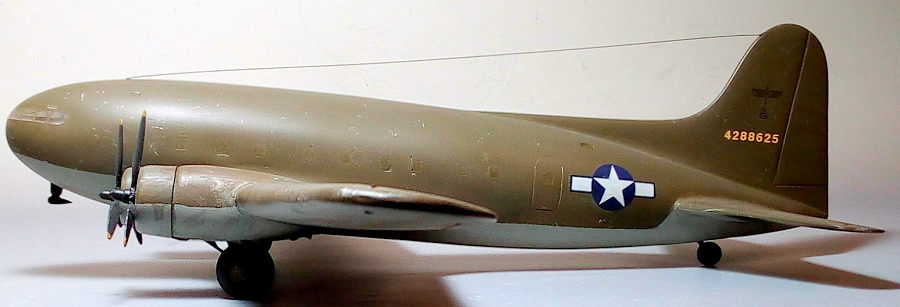
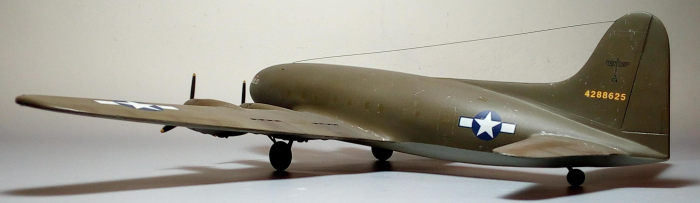
 C-75
#42-88625, started its life as TWA’s N-19907, named “Zuni”. Upon returning to
TWA after the war, it was sold together with the rest four to the French airline
Aigle Azur. Registered F-BELX, it was used on scheduled flights from France to
North and Central Africa, and later to French Indo-China. It was later
transferred to Aigle Azur's Vietnamese subsidiary (Aigle Azur Extrême-Orient)
and used in South East Asia, with the exact history of the specific aircraft
becoming quite complex. It crashed on 27 June 1974, flown by Cambodia Air
Commercial, when a forced landing had to be made in a rice field upon engines
no.1, 2 and 3 failing in succession, just 3 minutes after takeoff. The right
wing struck a tree and separated just before touchdown. The aircraft slid and
caught fire, with 19 of the 39 occupants perishing.
C-75
#42-88625, started its life as TWA’s N-19907, named “Zuni”. Upon returning to
TWA after the war, it was sold together with the rest four to the French airline
Aigle Azur. Registered F-BELX, it was used on scheduled flights from France to
North and Central Africa, and later to French Indo-China. It was later
transferred to Aigle Azur's Vietnamese subsidiary (Aigle Azur Extrême-Orient)
and used in South East Asia, with the exact history of the specific aircraft
becoming quite complex. It crashed on 27 June 1974, flown by Cambodia Air
Commercial, when a forced landing had to be made in a rice field upon engines
no.1, 2 and 3 failing in succession, just 3 minutes after takeoff. The right
wing struck a tree and separated just before touchdown. The aircraft slid and
caught fire, with 19 of the 39 occupants perishing.
Only
one 307 survives today at the Smithsonian Museum's Steven F. Udvar-Hazy Center
in Washington DC, USA. It is the famous Pan Am’s N-19903 "Clipper Flying Cloud",
meticulously restored and preserved in flying condition, despite the fact that
it was ditched in Elliot Bay near Seattle in 2002!
| THE KIT |
This
kit was introduced by Maquette in 1998, featuring newly molded Stratoliner
fuselage parts, whereas all the rest of the parts came from the ancient 1975
Frog B-17E molds.
Upon
opening the flimsy-ish top opening box (with the attractive TWA’s Stratoliner
box art), I was greeted with two white styrene fuselage halves, while the rest
of the parts were sprue sections of the Frog B-17, molded in either blue or
black styrene. The white fuselage halves were very thick, crudely molded, with
lots of flash, pebbly surface and signs of rust coming from the molds. The Frog
parts were definitely on the simplistic side as one would probably expect from a
70s era kit.
 Neither
cockpit nor any means of interior are provided. The engine faces are one piece
with the cowlings and look passable. Landing gear is plain with no wheel bays
whatsoever. Regarding the Frog parts molding, not only respectable amounts of
flash were evident, but also the plastic did not look like styrene, raising
suspicions on its weldability with normal styrene glue. Finally, the Frog parts
surface detail is raised, whereas the Maquette fuselage detail is engraved.
Neither
cockpit nor any means of interior are provided. The engine faces are one piece
with the cowlings and look passable. Landing gear is plain with no wheel bays
whatsoever. Regarding the Frog parts molding, not only respectable amounts of
flash were evident, but also the plastic did not look like styrene, raising
suspicions on its weldability with normal styrene glue. Finally, the Frog parts
surface detail is raised, whereas the Maquette fuselage detail is engraved.
An
equally crude clear fret is provided, being ultra-thick and foggy, ensuring that
internal emptiness would be absolutely un-noticeable. Instructions come as a
double sided folded A3 sheet, with an informative history of the type at the
front page and the seemingly simple construction spread in three basic steps.
Three schemes are provided, for a silver TWA, a gray Pan American and an olive
drab over gray C-75 bird. Irritatingly, only the port side view is provided at
the camo drawings, leaving the modeler to speculate. The Net to save the day
once again! Decals look thin and very well printed.
Having a strange
affection for non-mainstream kits, dealing with less modeled subjects, I could
not resist buying this kit when I saw a last copy of it collecting dust on a
shelf of an Athens hobby shop, back in 2005. Upon realizing that a C-75 scheme
was offered (admittedly not as eye catching as its civilian cousins, but
nevertheless interesting, even more rarely modeled and, most of all, more
forgiving than the NMF or even overall gray…), I figured out it would be
gripping to take that less traveled road and give this kit a go.
| CONSTRUCTION |
I started by first removing all the
heavy flash from the fuselage window openings, then attached the 20 side windows
from the inside of the fuselage. Upon attempting to join the two thick fuselage
halves, I realized that they just wouldn’t fit. So I went on and rubbed both
halves join surfaces against 220grit sandpaper which was secured on a flat
surface, as if they were vac formed! Upon feeling that the joining surfaces were
smooth and level, I successfully joined the two fuselage halves, followed by
attachment of the ultra-crude front windscreen.
 Fit of all
transparencies left a lot to be desired, with huge gaps, general mismatching and
foggy appearance. Attempting to even things, I brutally sanded everything down
with 320 grit paper, then filled all gaps with putty, followed by progressively
thinner grade sanding. Finally, all transparencies were polished with cotton
buds, using Plexiglass polish. The above process resulted in some cracks
appearing, while clarity was still not good. At least, the transparencies
blended reasonably to the fuselage.
Fit of all
transparencies left a lot to be desired, with huge gaps, general mismatching and
foggy appearance. Attempting to even things, I brutally sanded everything down
with 320 grit paper, then filled all gaps with putty, followed by progressively
thinner grade sanding. Finally, all transparencies were polished with cotton
buds, using Plexiglass polish. The above process resulted in some cracks
appearing, while clarity was still not good. At least, the transparencies
blended reasonably to the fuselage.
I
proceeded by assembling the 2-piece wings and tail planes. My suspicions
regarding the “Frog” parts plastic proved true, as styrene glue had no effect on
them, having to resort to cyanoacrylate. The engine nacelles were then attached
in place, as well. Fit of all the above was average. Upon glue curing, all
flying surfaces were filled and sanded and then attached to the fuselage: as
expected, fit also left a lot to be desired there.
After
a generous filling and sanding session, I attached the sensitive underwing
hinges. Then, by looking at net seasonal pics, it became pretty evident that
most (if not all) C-75s had (at least at some point) their port “passenger”
windows painted over, whereas, regarding the starboard ones, things were not
that clear, with chances being that the last two pairs were left unpainted. In
order to replicate that “painted over” look, I decided to mask all
transparencies and hand paint the “painted over” ones at later stages,after the
basic painting, with a side bonus being the lower number of visible "bad
looking" transparencies. It was then time to take this beautiful plane to the
paint shop!
| COLORS & MARKINGS |
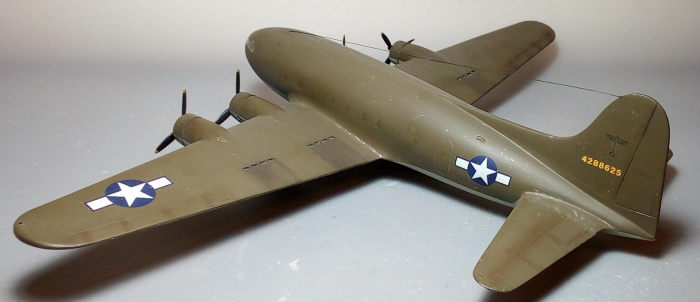
I started by applying Hu140 gray at
all undersides, then masked it off, followed by application of Hu155 olive drab
at topsides. A coat of Future prepared this bird for decals. I used the kit
decals, in order to depict aircraft #288625, as it stood in 1943. Some pics show
C-75s with deicing boots, others not, so I decided not to apply any. Painting
and decaling was the easiest part of this demanding build!
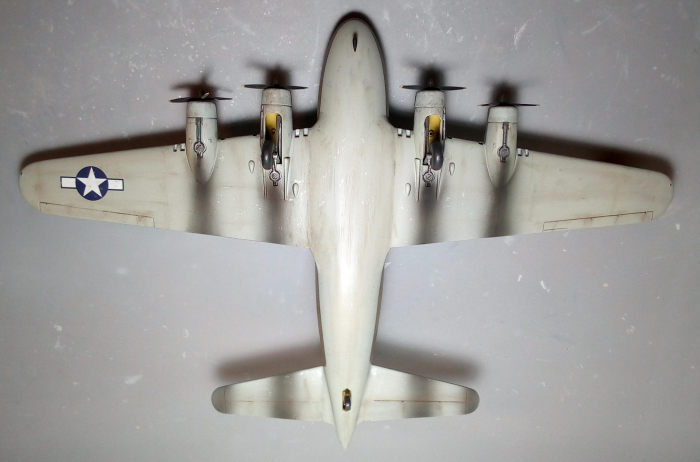
 I attached
the main landing gear legs, followed by the two piece main wheels and the rear
wheel/strut. Landing gear components were painted steel, with the wheels
receiving OD covers with black tires. The ungainly looking bays area was painted
zinc chromate, as I thought it would have been such painted upon MLG
reinforcing, while converted to C-75 status. The engine faces were painted black
and heavily dry brushed with silver, with steel cowling innards. The good
looking props were also painted black with yellow tips and were subsequently
attached. The turbochargers and exhausts were painted burned metal and affixed
into place, followed by the DF antenna at the front, which was painted black.
I attached
the main landing gear legs, followed by the two piece main wheels and the rear
wheel/strut. Landing gear components were painted steel, with the wheels
receiving OD covers with black tires. The ungainly looking bays area was painted
zinc chromate, as I thought it would have been such painted upon MLG
reinforcing, while converted to C-75 status. The engine faces were painted black
and heavily dry brushed with silver, with steel cowling innards. The good
looking props were also painted black with yellow tips and were subsequently
attached. The turbochargers and exhausts were painted burned metal and affixed
into place, followed by the DF antenna at the front, which was painted black.
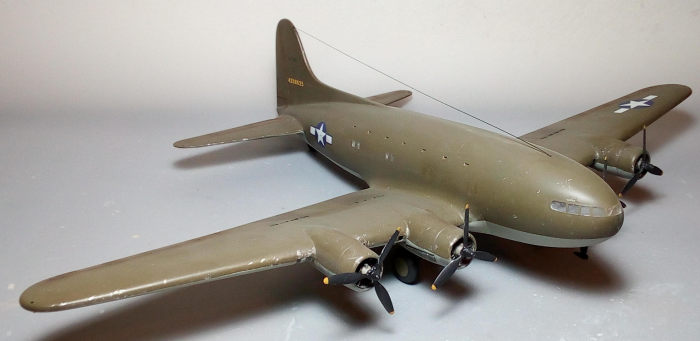
Since this plane would
have been a real workhorse, constantly operating around the globe I decided to
airbrush some generous exhaust gasses staining at the undersides at an "airflow"
pattern. General dirtying (especially at the undersides) with dry pastels and
paint chipping by silver dry brushing at places where paint would have chances
to peel off (like blades leading edges) were also applied. I could not restrain
myself and also added some (very slight) gas staining aft of the upper wing
cooling air exit louvers (it is just exiting cooling air, but it might have had
chances to lightly stain the areas...).
A
matt coat gave this rare bird its final shade. Upon drying and masks removal, I
carefully hand-painted all side windows with the top camo color, sans the last
two starboard pairs. Stretched sprue was run from the front to the fin top, in
order to represent the aerial wire, whereas blobs of red and green clear paint
were applied to represent the wing tip lights, before calling this “militarized”
Stratoliner done!
| CONCLUSIONS |
 Despite the
fact that only 10 were built, it is beyond doubt that the Stratoliner is an
iconic plane. That said, it is interesting that it was only in the 2020s that a
detailed 1/72 Stratoliner became available, when Bat Project decided to issue a
full series of 1/72 all-styrene modern tool Stratoliners (the C-75 being the
last of them, recently, as of 2022, hitting the shelves). By viewing net pics,
these kits look really great, well researched and with very good detail. They
are expected to require some extra effort from the potential builder, but look
absolutely promising to provide a superb result. If you want an accurate 1/72
Stratoliner, this is the definitive way to go.
Despite the
fact that only 10 were built, it is beyond doubt that the Stratoliner is an
iconic plane. That said, it is interesting that it was only in the 2020s that a
detailed 1/72 Stratoliner became available, when Bat Project decided to issue a
full series of 1/72 all-styrene modern tool Stratoliners (the C-75 being the
last of them, recently, as of 2022, hitting the shelves). By viewing net pics,
these kits look really great, well researched and with very good detail. They
are expected to require some extra effort from the potential builder, but look
absolutely promising to provide a superb result. If you want an accurate 1/72
Stratoliner, this is the definitive way to go.
The
Maquette kit essentially is the old Frog kit with conversion parts. While
overall shape looks acceptable, general detailing and clear parts rendition
leave a lot to be desired. A side effect of the thick and foggy clear parts is
that the lack of cockpit and rest of internal detail are of only theoretical
interest, since nothing is visible through!
Definitely not a “shake and bake” kit, requiring a lot of extra effort,
regarding not only the crudely molded fuselage parts and transparencies, but
also the fact that the rest of the parts required cyanoacrylate glue in order to
be attached, as if they were resin. Instructions were more or less followable
and decals were very good.
This kit was issued
only once, back in 1998 and I doubt it will ever be reissued, being extremely
hard to find nowadays. If you are an experienced modeler and by chance run into
one, thinking of tackling it, for sure a lot of work will be ahead of you, but
the result will be a definite eye-catcher in your showcase.
Happy modeling!
Spiros Pendedekas Copyright ModelingMadness.com. All rights reserved. No
reproduction in part or in whole without express permission. If you would like your product reviewed fairly and
fairly quickly, please
contact
the editor
or see other details in the
Note to
Contributors.