| KIT #: | A08015A |
| PRICE: | $37.00 |
| DECALS: | Two options |
| REVIEWER: | Lee Kolosna |
| NOTES: | Basic kit build |
| HISTORY |
The Douglas C-47 is one of the most storied airplanes in all of aviation history. A militarized variant of the iconic DC-3 airliner, the C-47 served in every theater of operations during World War II and continued serving with Air Forces around the world for another half century. Robust, plentiful (over 10,000 were built), and reliable, the aircraft could be configured for cargo hauling, paratrooper deployment, troop transport, gunship duty, medical evacuation, weather reporting, search and rescue, and a myriad of other tasks. The Royal Air Force operated the aircraft as the Dakota in variants from the Mark I to IV. The Mark III was equivalent to the cargo-carrying C-47A with a reinforced floor and folding seats for soldiers or paratroopers.
 The
aircraft was slow with a 170 MPH cruising speed, had docile handling
characteristics, and could carry 6,000 pounds of cargo. Wide doors on the
fuselage side allowed the handling of bulky items. Three crewmen (pilot,
co-pilot, radio operator) were standard, allowing up to twenty-seven passengers
in the main cargo compartment.
The
aircraft was slow with a 170 MPH cruising speed, had docile handling
characteristics, and could carry 6,000 pounds of cargo. Wide doors on the
fuselage side allowed the handling of bulky items. Three crewmen (pilot,
co-pilot, radio operator) were standard, allowing up to twenty-seven passengers
in the main cargo compartment.
General Dwight Eisenhower is attributed to this quote: when asked what items contributed most to the Allied victory of World War II he supposedly said, “The bazooka, the Jeep, the atom bomb, and the C-47”. Another variation of this quote was, “the bulldozer, the Jeep, the 2.5-ton truck, and the C-47 transport plane.” My guess is that both of these quotes are probably not quite accurate, but for a military man with an affinity for logistics and understanding the importance of moving material to the front for use by fighting forces, there is little doubt that he was pleased with a fleet of transports that could be relied upon.
The C-47 was the right tool available for the time. It’s a testament to the overall design that eighty years later there are still dozens flying regularly, hauling cargo and passengers in the pursuit of commerce.
| THE KIT |
Airfix released the first variant of this kit (as a USAAF C-47) in 2013 as part of their renewed line of model kits. A Dakota variant with RAF decals followed two years later. The kit has 142 parts and features recessed panel lines, rudimentary Pratt & Whitney R-1830 radial engines, modest cockpit detail with a decal provided for the instrument panel, a choice of propellers, troop transport seats, two pilot figures, and decals beautifully printed by Cartograf. There is a pair of skis provided for aircraft equipped for artic operations.
The kit has just a few issues. This is by no means a definitive list, just the ones that I noted during my build:
 · The real C-47 featured overlapped aluminum panels and raised
rivets galore. The kit has recessed panel lines with no representation
whatsoever of any rivets. The panel lines are on the slightly heavy side.
· The real C-47 featured overlapped aluminum panels and raised
rivets galore. The kit has recessed panel lines with no representation
whatsoever of any rivets. The panel lines are on the slightly heavy side.
· The fuselage cargo doors do not fit the opening very well if one chooses the depict them closed. They are slightly too small. There is no detail on the inside of the doors.
· There is no cooling jacket detail on any of the engine cylinders. Airfix molded them perfectly smooth which is obviously incorrect.
· The engine exhaust ports are molded as solid pieces. The modeler will need to drill out the ends to give the illusion of a pipe.
So, we have a newly-tooled model kit that replaces the ancient 1960 kit that reflects Airfix’s current kit design philosophy: recessed panel lines which modelers tend to prefer but aren’t exactly true to the aircraft, with a promise of an easy-to-build model with good fit, decent detail, accurate dimensions, excellent decals, and a very reasonable list price.
| CONSTRUCTION |
The interior of the C-47 was – wait for it – actually painted with Interior Green! I used Vallejo Model Air US Light Green FS34151 for the all the internal fuselage walls. The cargo compartment floor was unpainted aluminum with black pallet tracks. I added some seat harnesses for the pilot and copilot made from strips of paper and painted Medium Gray. There is a decal for the instrument panel, but very little can be seen inside when the model is assembled. The seats for paratroopers can be depicted as open or folded up. I went with the former and painted the canvas cushions Olive Drab.
 The
fuselage halves were glued together with CA glue to prevent the appearance of
ghost seams later on and the seams sanded smooth. As stated above the cargo
door is a three-piece affair and doesn’t quite fill the opening so prominent
gaps are present. I glued the front and rear cargo doors in, filled the gaps
with CA glue, and then re-scribed the outline of the doors to restore definition
of this feature. The cabin door retracted inside the airplane, so I simply left
it off.
The
fuselage halves were glued together with CA glue to prevent the appearance of
ghost seams later on and the seams sanded smooth. As stated above the cargo
door is a three-piece affair and doesn’t quite fill the opening so prominent
gaps are present. I glued the front and rear cargo doors in, filled the gaps
with CA glue, and then re-scribed the outline of the doors to restore definition
of this feature. The cabin door retracted inside the airplane, so I simply left
it off.
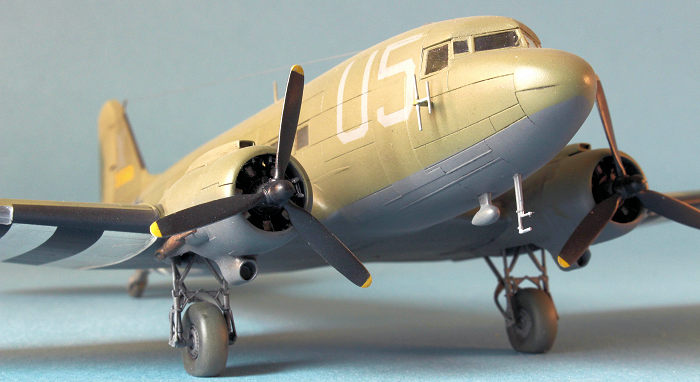
I painted the engines with Alclad Dark Aluminum with Vallejo Gunship Gray crankcases. The interior of the cowlings were painted with Alclad Aluminum. The wings went together as a five-piece assembly, with the landing light clear pieces faired into the surrounding surface and the seams filled. Two more pieces for the fillets were added as the wing assembly was attached to the fuselage. I glued in the horizontal stabilizers and filled the resultant wing root and stabilizer seams. The rudder and elevator are separate pieces (but curiously not the ailerons) that were glued in with a neutral position as evidenced by photos of C-47s at rest.
I had read in other reviews that adding the clear windshield was tricky, but I didn’t have any issues with that, although the clear astrodome required some sanding to settle down into the opening in the top of the fuselage. The fuselage windows glue in from the outside.
I re-scribed panel lines lost in the seam-filling process, and washed the model with warm soapy water to remove any residual sanding dust.
| COLORS & MARKINGS |
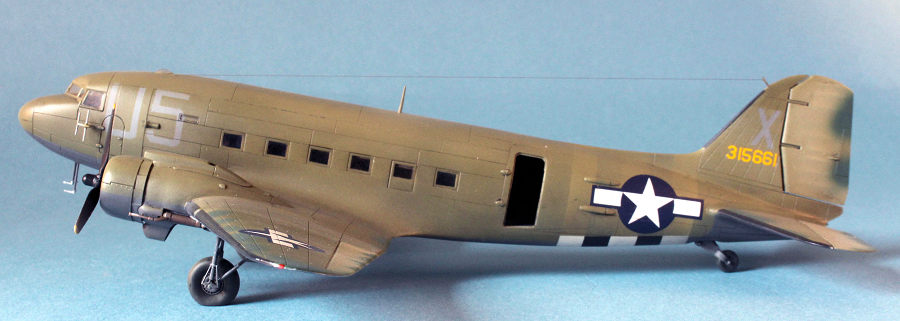
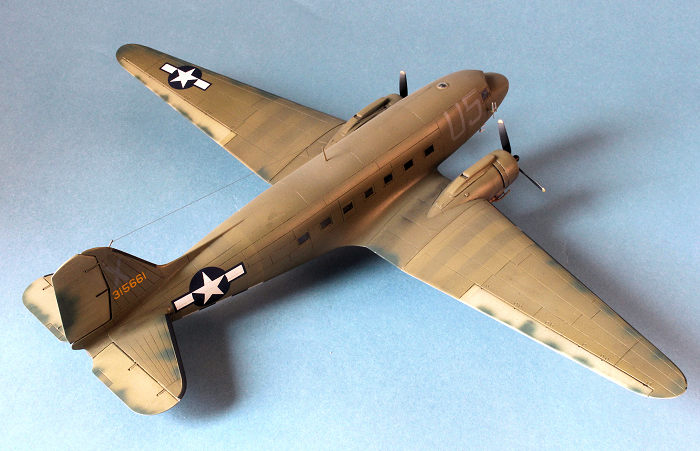
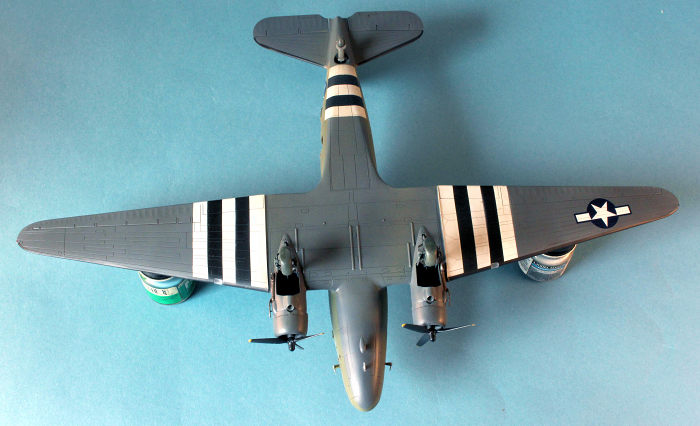
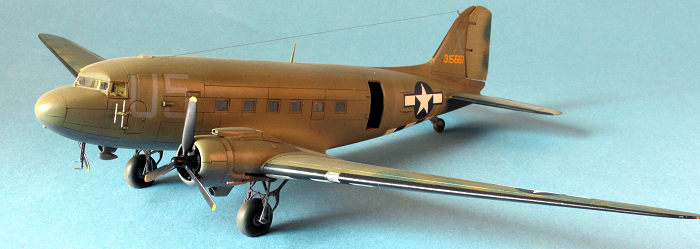
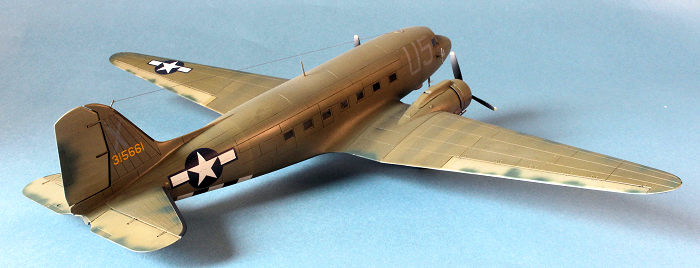
Despite the fact that this is a model kit of a Dakota Mk. III, I wanted to finish my model as a USAAF C-47A. Through research I found a photo of a very generic-looking aircraft, serial number 43-15661, which served with the 436th Troop Carrier Group, Ninth Air Force. It had an Olive Drab over Neutral Gray finish with Medium Green counter-shading on the leading and trailing edges of the wings and tail surfaces. D-Day stripes were applied on June 4 or 5, 1944 and the photo shows the upper stripes were painted over with fresh Olive Drab paint after the orders were issued to do so by the end of August 1944.
After masking all the windows with Tamiya tape, I primed the model with Vallejo Grey Surface Primer, followed by a custom mix of two parts Vallejo Neutral Gray and one part flat black on the underside. The wheel wells, landing struts, and wheels were also painted with this Neutral Gray mix. I masked off the camouflage demarcation line and sprayed another custom mix of ten parts Olive Drab, two parts flat white, and one part Neutral Gray to give the look of a well-used and weathered airplane. When dry, I sprayed the fabric control surfaces with an even lighter Olive Drab, adding six parts flat white to ten of the green. The counter-shading along the leading and trailing edges of the wings, horizontal stabilizers, and rudder was done Vallejo USAF Green FS34092.
 I masked off the D-Day
stripes for both top and bottom surfaces, using Testors Acryl Flat White and
Vallejo Flat Black, then went back over the stripes on the top of the wings and
the fuselage with lightened Olive Drab sprayed thinly enough to let some of the
underlying stripe definition to show through.
I masked off the D-Day
stripes for both top and bottom surfaces, using Testors Acryl Flat White and
Vallejo Flat Black, then went back over the stripes on the top of the wings and
the fuselage with lightened Olive Drab sprayed thinly enough to let some of the
underlying stripe definition to show through.
I sprayed the model with Quick Shine Multipurpose Floor Finish in preparation for decal application. National Insignia were used from a twenty-five-year-old Aeromaster sheet, and the yellow serial numbers taken from an equally old Eagle Strike sheet. The aircraft identification letters U5 and X were masked and painted with Testors Acryl Medium Gray. In retrospect, I probably should have used a lighter gray, but Medium Gray is the correct color according to painting specs.
I applied a pre-mixed dark wash made by MIG Productions on the panel lines and in the wheel wells. Exhaust stains were added to the top of the wings with dark gray pastel chalk.
The propellers were painted with Vallejo Black Surface Primer on the blades and hubs, with Vallejo Yellow used for the tips (four inches, which is 1.5 mm in 1/72 scale!). I sprayed Alclad Aluminum on the rear surfaces of the props to depict the sand-blasted abrasion seen on aircraft operating from crude forward air bases, with a silver pencil used to show paint chipping on the leading edges of the props.
A coat of Testors Acryl Flat Clear was sprayed to seal in the paint and weathering. The tires were painted with Vallejo Tire Black and got a thin spray of Polly Scale Mud around their circumference.
| FINAL CONSTRUCTION |
 Things went
quickly as I added a post on the front edge of the tail fin with brass wire
and attached an aerial wire made from nylon “invisible” thread. The wheels
went onto their respective struts, the pitot tubes were added under the
nose, and the propellers mounted on their shafts. A tiny drop of red paint
went on the left wing and a tiny drop of blue went on the right wing to
depict the small navigation lights. I painted the exhausts with Alclad Jet
Exhaust and dry-drybrushed them with Polly Scale Rust. The YAGI antennae on
either side of the nose were painted with Floquil Old Silver and glued in
position. With that, I was done.
Things went
quickly as I added a post on the front edge of the tail fin with brass wire
and attached an aerial wire made from nylon “invisible” thread. The wheels
went onto their respective struts, the pitot tubes were added under the
nose, and the propellers mounted on their shafts. A tiny drop of red paint
went on the left wing and a tiny drop of blue went on the right wing to
depict the small navigation lights. I painted the exhausts with Alclad Jet
Exhaust and dry-drybrushed them with Polly Scale Rust. The YAGI antennae on
either side of the nose were painted with Floquil Old Silver and glued in
position. With that, I was done.
| CONCLUSIONS |
This is another delightful model from Airfix. I can’t tell you how pleased I’ve been while working through their refreshed 1/72 scale catalog of multi-engine World War II subjects. This one was the easiest to build of the Airfix kits I’ve completed so far. Other than the slightly too-small cargo doors which required some filler to close the gap, this was one nearly perfect build experience. The C-47 is such an important aircraft and I am really pleased to have one in my collection.
14 May 2026
Copyright ModelingMadness.com. All rights reserved. No reproduction in part or in whole without express permission.
If you would like your product reviewed fairly and quickly, please contact the editor or see other details in the Note to Contributors.