| KIT #: | 2652 |
| PRICE: | 21 Euros |
| DECALS: | Five options |
| REVIEWER: | Denis Vercaeren |
| NOTES: | Microscale decal set 48-301 |
| HISTORY |
(adapted from Wikipedia)
The North American Aviation
T-6 Texan is an American single-engined advanced trainer aircraft used to train
pilots of the United States Army Air Forces (USAAF), United States Navy, Royal
Air Force, and other air forces of the British Commonwealth during World War II
and with many other air forces into the 1970s. Designed by North American
Aviation, the T-6 is known by a variety of designations depending on the
 model and
operating air force. The United States Army Air Corps (USAAC) and USAAF
designated it as the AT-6, the United States Navy the SNJ, and British
Commonwealth air forces the Harvard, the name by which it is best known outside
the US. Starting in 1948, the new United States Air Force (USAF) designated it
the T-6, with the USN following in 1962. It remains a popular warbird aircraft
used for airshow demonstrations and static displays. It has also been used many
times to simulate various Japanese and German aircraft, including the Mitsubishi
A6M Zero, in movies depicting World War II in the Pacific. A total of 15,495
T-6s of all variants were built.
model and
operating air force. The United States Army Air Corps (USAAC) and USAAF
designated it as the AT-6, the United States Navy the SNJ, and British
Commonwealth air forces the Harvard, the name by which it is best known outside
the US. Starting in 1948, the new United States Air Force (USAF) designated it
the T-6, with the USN following in 1962. It remains a popular warbird aircraft
used for airshow demonstrations and static displays. It has also been used many
times to simulate various Japanese and German aircraft, including the Mitsubishi
A6M Zero, in movies depicting World War II in the Pacific. A total of 15,495
T-6s of all variants were built.
The first Harvards arrived in South Africa in October 1942 for use by the Joint Air Training Scheme schools. By July 1944, 633 Harvard Mk IIA and III aircraft had been shipped to South Africa, with 555 surviving in October 1945 (379 MkIIAs and 176 Mk IIIs).
As the Harvards had been supplied on lend-lease by the US, 300 were shipped back to the UK from 1946, with the remainder being purchased by South Africa.
The Harvard was officially retired from SAAF service in 1995 and some remain airworthy with private owners.
| THE KIT |
 This kit was
produced ca 1998 by Occidental from Portugal and has been reissued several times
by Italeri and Modelcraft. It is an improvement over the venerable T-6 kit from
Monogram, which dates back to 1979, in that it has engraved panel lines on the
fuselage and wing parts. The detailing on some of the other parts can only be
described as “fair” and some areas lack the finesse that we nowadays take for
granted.
This kit was
produced ca 1998 by Occidental from Portugal and has been reissued several times
by Italeri and Modelcraft. It is an improvement over the venerable T-6 kit from
Monogram, which dates back to 1979, in that it has engraved panel lines on the
fuselage and wing parts. The detailing on some of the other parts can only be
described as “fair” and some areas lack the finesse that we nowadays take for
granted.
Great care should be taken on removing the parts from the sprues, since the attachment points are quite thick and crude in some places (for instance, the wing tips are attached via the wing tip lights and make for a thick blob of plastic).
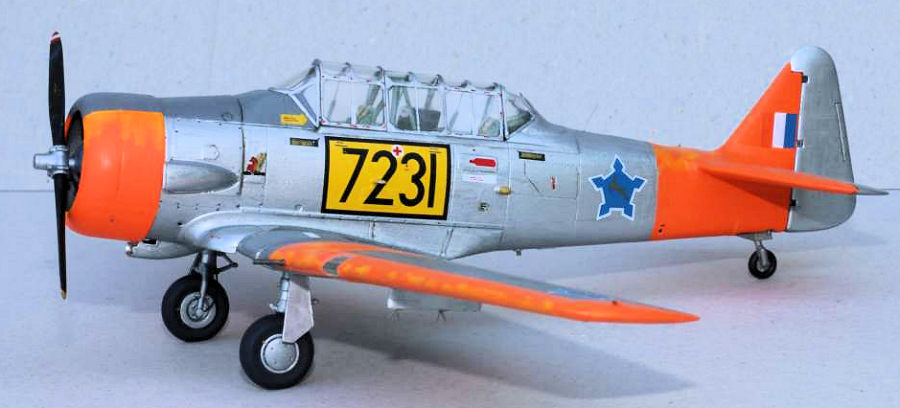
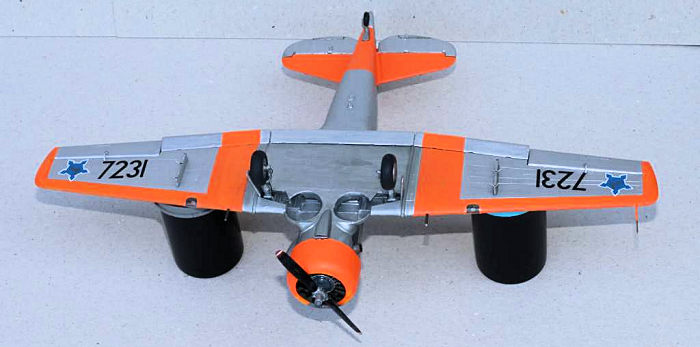
Decals are provided for 5 airframes (Two French, one Italian, one German and a USAF plane). The decals seem to be in good register .
| CONSTRUCTION |
I started with the cockpit : I thinned down the sides of the seats since they were quite clumsy. I added seat belts from masking tape. I then painted the cockpit parts with Humbrol 78 enamel and painted the instrument panels.
I cut off the plastic tabs that are supposed to represent the rudder pedals and replaced them with rudder pedals made from plastic card and copper wire.
I had to do a lot of test fitting in order to get the correct position of part 10b since there are no positive locating tabs.
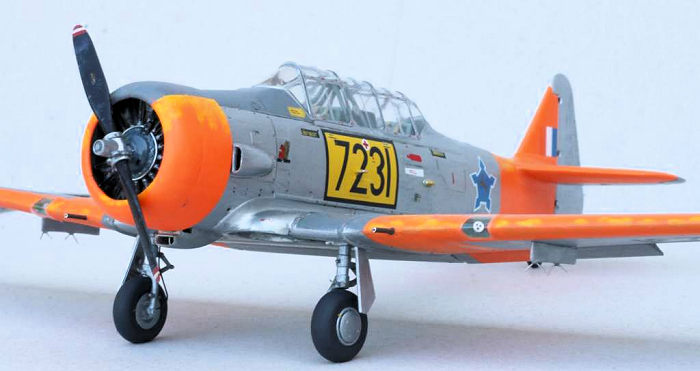
In parallel with the
cockpit, I painted the engine and added the ignition wiring from fine copper
wire. The distributor ring is made from 1 mm steel wire. If assembled as per the
instructions, the engine will sit a bit too much forward. In order to rectify
this, I omitted part 20a. The air intakes for the oil cooler and carburettor
lack a part in the front, leaving a large gap. This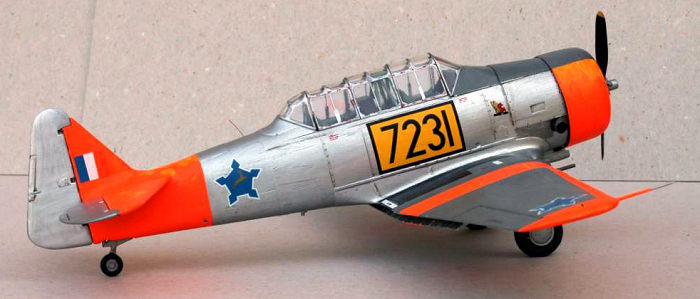 was remedied by adding small strips of plastic card to only leave the front side
open. The propeller was thinned down and parts 24a and b were replaced by
thinner slices of styrene rod.
was remedied by adding small strips of plastic card to only leave the front side
open. The propeller was thinned down and parts 24a and b were replaced by
thinner slices of styrene rod.
I found that Italeri’s engine cowling was too straight (horizontal) on the top. The top of Harvard/T-6 cowlings sloped slightly downwards to allow the pilot better vision. I shaved a couple of slivers off the top and sanded it smooth. Not really noticeable unless you look for it, but I found it looked better.
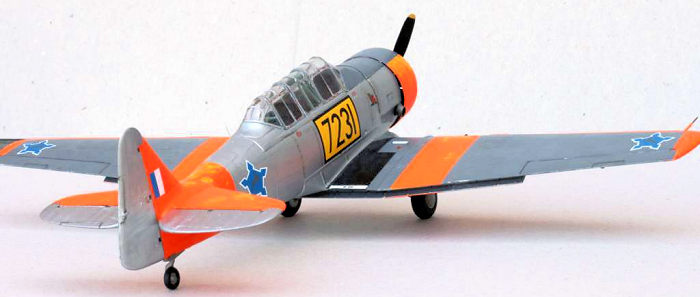
Then it was time to glue the wings to the fuselage, which went very well, needing only a very small amount of Mr Surfacer 500 on the left wing wheel bay bulge. The tailplanes were next and needed a bit of filler and sanding to get a flush fit to the fuselage. The rudder is a bit too tall for the model, so I cut a slice off where it touches the top of the fin. I removed the molded-on position lights from the wingtips and made new ones on the top of the wings.
The cockpit glazing is clear and quite thin, but only a vac canopy will allow for the cockpit sections to be shown a realistic fully open position. I painted all framing on the transparencies using masking tape.
The detail on the kit landing gear legs are a bit on the heavy side, I removed some lugs and replaced them with thin plasticard items. I also added brake lines from metal wire. The last item before painting was to dig out the tailwheel recess a bit, since I found there is not enough depth to it.
| COLORS & MARKINGS |
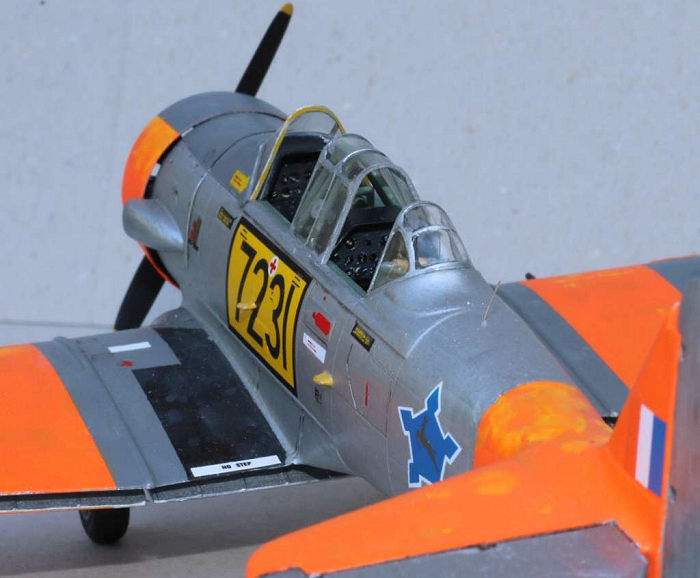 After a coat
of primer, I started out by painting the orange areas yellow, and when dry, I
applied a coat of Revell 25 orange, making sure that a bit of the yellow could
be seen through in some places. I then masked the orange and painted the grey
areas Humbrol 156 Dark Camouflage Grey. After some more masking, I painted the
silver colour using Humbrol 11 .
After a coat
of primer, I started out by painting the orange areas yellow, and when dry, I
applied a coat of Revell 25 orange, making sure that a bit of the yellow could
be seen through in some places. I then masked the orange and painted the grey
areas Humbrol 156 Dark Camouflage Grey. After some more masking, I painted the
silver colour using Humbrol 11 .
I used light amounts of yellow to show the aging of the orange paint, and different shades of grey to show the aging of the grey and metal surfaces, but without exaggerating since I was representing the plane in the 1960s, with less weathering than at the end of their service life.
I used Microscale’s decal set no 48-301 for South African Air Force aircraft, which I originally bought for the Mirage III markings (and which I used on Heller’s Mirage IIIB many years ago). Although more than 30 years old, the Microscale decals behaved very well with the setting solution of the same company. Microscale’s fin flashes contain an error though : the red should actually be orange for a South African plane. Using Humbrol and Revell enamels, I mixed an orange that would resemble the required colour. I added various stencilling from the decal dungeon.
One word of caution : when doing this South Aftrican scheme, you’ll need to remove the front pilot’s step from the fuselage side, apply the large yellow buzz number decal, and replace the step after sealing ! After touch-ups, the paint and the decals were sealed with two coats of Humbrol Satin Cote.
| FINAL CONSTRUCTION |
 After
painting and decaling, on went the engine, cowling and propeller, followed by
the canopies which I attached with white glue. I used round pieces of sprue for
the landing lights and used transparent tape to represent the landing light
covers (Italeri’s covers are of really bad quality).
After
painting and decaling, on went the engine, cowling and propeller, followed by
the canopies which I attached with white glue. I used round pieces of sprue for
the landing lights and used transparent tape to represent the landing light
covers (Italeri’s covers are of really bad quality).
I posed the flaps in the down position since I found that posing them closed would thicken the trailing edges too much. Weapons pylons were made of plastic card and copper wire. The machine guns were represented with Albion aluminium tubing.
Finally, the gear went on and a new pitot tube was made with a steel needle. The whip antenna was made from 0.2mm steel wire from Albion.
| CONCLUSIONS |
An enjoyable build which allowed me to test a new technique (for me anyway) : making landing light covers with transparent tape. Although some will say the kit has its inaccuracies, those inaccuracies are minor in my opinion, and I like the finished model which has become one of the most colourful items in my collection. A kit that is within the capabilities both of beginners and more experienced builders ; recommended !
| REFERENCES |
“North American T-6 et Dérivés” by Patrick Marchand & Junko Takamori (ailes de gloire no 15) ISBN-13 : 978-2914403214
http://www.saairforce.co.za/the-airforce/aircraft/38/harvard-1-iia-iii-na-88
https://en.wikipedia.org/wiki/North_American_T-6_Texan
Denis Vercaeren
1 September 2020
Copyright ModelingMadness.com
If you would like your product reviewed fairly and fairly quickly, please contact the editor or see other details in the Note to Contributors.
Back to the Main Page Back to the Review Index Page Back to the Previews Index Page